What did you do to your GMT today? [Part II]

northcreek

Member
Jan 15, 2012
3,378
WNY
Yeah right ? a 6.0 would be :2thumbsup:
 
Last edited:

Blckshdw

Moderator
Nov 20, 2011
10,771
Tampa Bay Area, FL
Not in the least bit exciting, but put the charger on it. Hadn't gone anywhere since last week, have plans to run some errands the next few days, figured I'd check the charge and saw this... :eek:

Screenshot_20210420-182121_Battery Monitor.jpg

So I'll let that charge up overnight, and should be good to go for my lunch break tomorrow. Definitely a great investment to get ahead of any surprises. :yes:
 

northcreek

Member
Jan 15, 2012
3,378
WNY
400sb? Surprised you didnt opt for the 6.0LS upgrade.
lol...yeah that would have been worth the pain. It is a 5.7 and they put in a Jasper rebuilt. I thought being a Chevy dealer I could get a GM crate engine but, they said my engine was no longer available ? (I still see them at GM performance).
Closer to home I would have had a lot of options but, I was at their mercy being stuck in NM.
I will say though, with that Jasper engine we went back on Int.40 and pounded it 70 mph back to NY with one oil change in a Walmart parking lot, still running strong 4 yrs. later.
 

Mike534x

Member
Apr 9, 2012
1,019
Got to work on the rear brakes, after Amazon delayed shipment of the new bushings and pins. Pulled the caliper off, and yep....the old bushings lost their spring and sat flush against the bracket. Took about an hour to do both sides, but I cleaned up the brackets and clips as best as I could, and greased them and took her for a test drive. A good noticeable improvement, the rear feels like it has braking power again. Fronts were still fine, so I'll leave the new bushings/pins off to the side for another time. I'm just going to roll the current pads, and then change them out later. The rear Bendix pads were a little too big, it says it fits the truck (according to their website) but wouldn't sit correctly once installed. With the cold, and the sleet starting I didn't wanna mess with making it work.


Also had a mini heart attack this morning, got in and started her up and got the "low oil pressure" message on the DIC. The gauge took a fraction of a second longer then it usually does to hit the 40 mark, but it seemed fine afterwards. Oil was a little low, but not enough to cause problems. Going to dig out the mechanical gauge this weekend for a reading, and also pull the AFM screen to make sure its clear. Otherwise, pressure was fine leaving work and sounds exactly as it always does. The sensor could be acting flakey too I'm thinking.
 

Matt

Member
Dec 2, 2011
4,039
Didn't do a bloody thing for mine. If anything, made it worse :frown: . Already ordered a pair of seals.

I'm not dancing yet but I'll have an update later this week.

You're right. Didn't do a damn thing. I'm just sending it now.

BTW, anyone have any interest in 2 pristine silver rear doors originally from an SS?
 
  • Sad
Reactions: Mooseman

Mooseman

Original poster
Moderator
Dec 4, 2011
26,120
Ottawa, ON
BTW, anyone have any interest in 2 pristine silver rear doors originally from an SS?
Sure, if it'll make go faster :biggrin:

Still driving the Av around to burn off gas to eventually swap the tank.
 

Mooseman

Original poster
Moderator
Dec 4, 2011
26,120
Ottawa, ON
Took the Av to the tire shop for two slow leaks. One leaked at the bead, the other at the valve stem. Was losing about 10psi/week each. Should be all good now.
 

Dadwagon

Member
May 21, 2020
141
West coast
Reading here about the rusty frame problems, decided to get mine done with NH oil undercoating. Went down to the shop and spoke with them, they also have a 'rust conversion' process. Decided to do that, too. They also clean and coat the inside of the frame.
Expensive, wish me luck.
What's the ballpark cost of rust proofing one of these SUV frames?
 

Reprise

Lifetime VIP Donor
Supporting Donor
Member
Jul 22, 2015
2,724
(on edit: This describes a DIY method... )

Funny you'd ask. I just ordered up enough materials from the POR-15 people to do the rest of the frame on my Sierra.
A gallon of the prep solution (like an etcher); more than I'll need, but cheaper than 2qts, and 2 x 1qt cans of the actual paint. Less than $150 USD shipped (use 10Y21 for 10% off); orders over $125 (?) ship free. 2 days from NY > IL.

There are cheaper methods, I'm sure. I got their sample kit last year and it's held up well. They'll ship that out free, too. Details on that are in my build thread, and I'll be adding to it when I apply this new shipment, too.
 

xavierny25

Member
Mar 16, 2014
6,372
Staten Island, N.Y
Wash and tire shine.20210424_143720.jpg
Told my wife to smile since she'd kinda be in the pic but she decided to do a lil more and show u guys what a 4 carat diamond ring set looks like on her hand. SHM &LOL
 

Sparky

Member
Dec 4, 2011
12,927
Noted I need to lube something in the front suspension. I heard something on the driver side creak like a jalopy through the drive thru yesterday.
 

Mooseman

Original poster
Moderator
Dec 4, 2011
26,120
Ottawa, ON
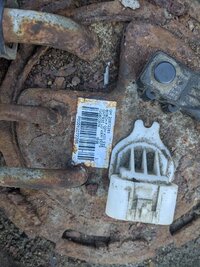
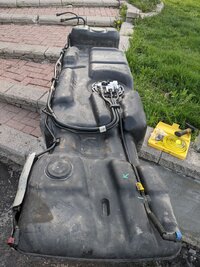
Tackled the gas tank. Some successes, one major issue. Right off the bat, both J-bolts holding the straps broke, just spinning. Well, the rear strap just broke from rust, the front one I had to cut off. Dropped the tank and disconnected the lines and wires without issues. Man they give a lot of free wire for the pump so I could drop it a lot to access the connectors.

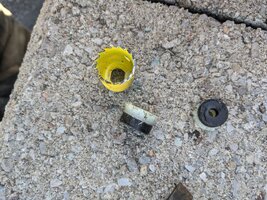
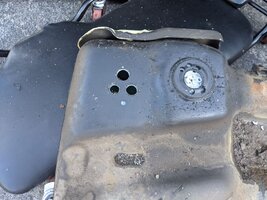
Pumped the 10L or so left in the tank using the pump and a hose hooked up to it. Then tackled the hole at the bottom of the replacement tank that the yard drilled in it to drain it. Used a slightly larger hole saw to make a plug from the old tank. A little grinding and filing, made it fit tight. Then used the soldering gun with a smoothing tip to melt the plastic around the hole. Drilled some holes with a normal drill on the old tank to make some shavings to use as filler on my welding job. Turned out pretty good. I'll test the welds by putting some gas in it and seeing if it seeps before hoisting it back into place. Installed the new fuel pump along with a new locking ring. Man it was difficult with my large meat hooks to go into the tank with the pump in place to grab the two vapour lines to install on the inside of the pump.

Interesting info, the pump was replaced in 2014 with a Bosch and I'm replacing it also with a Bosch. It lasted slightly longer than the original.

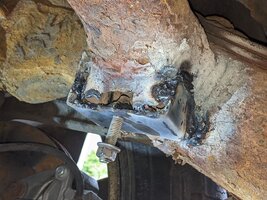
Finished off by getting the strap bolts out. The front one I was able to cut with the grinder. The rear one I started to cut and when I went to snap off the bolt head, the whole mount broke off, rusted out! So that means I will have to do some welding to replace it.

Looking at some other stuff under the truck, I notice that the left lower rear diff arm looks weird. Dammit, it's been replaced and a homemade one welded in. I'm really starting to regret buying the thing :frown:

PXL_20210502_210924657_resized1956166526781842697.jpgPXL_20210502_210929802_resized2988541322056684507.jpgPXL_20210502_214201835_resized8616195001815771907.jpgPXL_20210502_214523227_resized4430910484472432153.jpgPXL_20210502_221113164_resized4359833394082918648.jpgPXL_20210502_232134797_resized4083014675536473671.jpgPXL_20210502_235445674_resized2943029504988893881.jpg
 

coolride

Member
Aug 23, 2019
636
Adirondacks
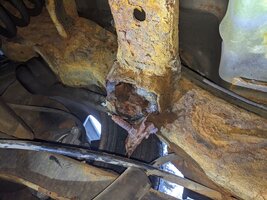
I can see why this bolt didn't want to turn.
fuelpump14.jpg

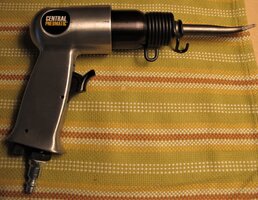
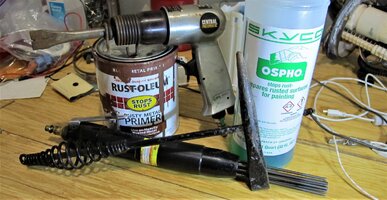
With the tank out of the way, now would be a good time to get after all that rust scale. An air chisel, a needle scaler, or even just a slag hammer would make that rust disappear.
tb142.JPG


Ask me how I know. The reasoning is that if I'm under there again, I won't take such a big rust bath.
fuelpump15.jpg
 
Last edited:
  • Like
Reactions: xavierny25 and Matt

Mooseman

Original poster
Moderator
Dec 4, 2011
26,120
Ottawa, ON
I already cleaned that up quite a bit. Will also hit it with a wire wheel before welding some steel plates. Also planning welding nuts on it and the other one so no more J-nuts. Today and most of the week will be a gather parts time since it will be raining.

I can't believe the amount of rust on this thing.
 

coolride

Member
Aug 23, 2019
636
Adirondacks
Are these called J-nuts? The one on the right was starting to rust apart (damage is visible in image.) These were treated with Ospho and given maybe 1,000 coats of paint. Should last awhile longer.
fuelpump16.JPG
 
Last edited:
  • Like
Reactions: xavierny25 and Matt

Mooseman

Original poster
Moderator
Dec 4, 2011
26,120
Ottawa, ON
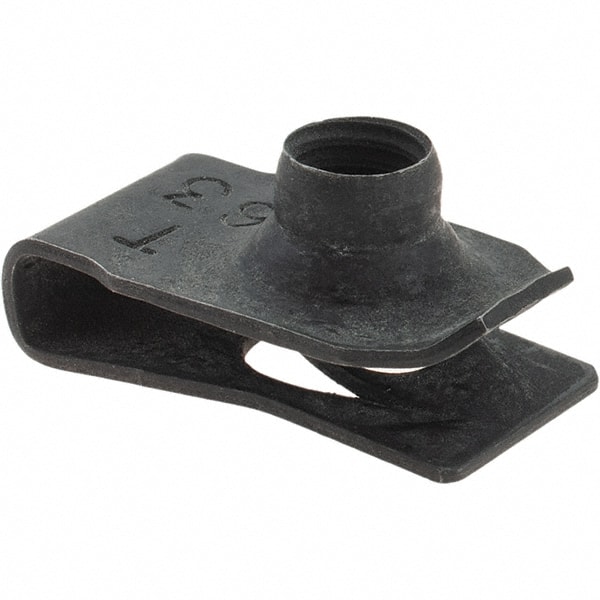
Slight difference between J-nuts and U-nuts. Those are J-nuts. U-nuts are more like these:

6156189-24.jpg

Ordered the straps at my local GM dealer. It was the same price as my local parts house which was Spectra, which are not coated at all for rust protection. Amazon would have been cheaper with either Spectra or Dorman but their delivery times have been garbage lately, taking 5 days for pretty much everything, even on Prime. Also ordered 1/8" flat bar stock and welding rods.
 
  • Like
Reactions: Matt and coolride

Sparky

Member
Dec 4, 2011
12,927
I never replaced my tank straps yet. The way things are headed I don't think I ever will.
 
  • Like
Reactions: Mooseman and Matt

Mooseman

Original poster
Moderator
Dec 4, 2011
26,120
Ottawa, ON
Yesterday, wrapped up on the tank job after getting all the parts and stuff. For the rusted out frame piece, used 2" bar stock. They were damn ugly welds using the old stick welder but they're solid. Welded some leftover exhaust manifold studs in both instead of the J-nuts ans bolts. Should be plenty solid. Sprayed the works with some Tremclad paint.

PXL_20210504_185625588_resized572684420276581934.jpgPXL_20210504_192944705_resized2643577333605728214.jpgPXL_20210504_192958878_resized6324290076437402638.jpg

On the tank itself, I was playing a game of whack-a-mole with the hole patch. Put a little gas in it and it had an oh-so-slight seep. So I'd heat it up with the soldering iron, add some more plastic and smooth it only to have it seep somewhere else. Lather rinse, repeat. Did this 5 or 6 times and eventually, the last time, it had a very, very small seep. Heated up just that spot down, added a bit of plastic and done!

Rest went pretty normal. Jack the tank into place, reconnect the plugs and hoses, front strap went in easily, rear one not so much. Read reviews of some of the aftermarket ones and all had issues with being slightly too short. I think it's by design. I had to bend the strap at the end and had to jack the tank tight as well as ensure it was shoved to the right as far as possible. Sprayed some paint on the bolts to protect them from rust and hopefully will never have to do this again.

Put 20L of gas and it made barely a dent in the fuel level. Started it up and got the CEL :mad: . Scan gave codes for a FPCM MIL request and tank pressure sensor voltage, probably from disconnecting the fuel pump and having the sensor unplugged and running it dry to remove system pressure. Cleared them and all was good.

Drive to Costco for my first normal fill. Already on the light by the time I got there. If you remember, this is what I used to get:

Now:

She took 103L! That is a huge tank. Perfect for towing.

And yes, the overfill/rollover valve was missing from the old tank. It was actually moving around in the tank. I'll do a quick writeup on this issue since there isn't much info on this particular problem.
 

Mooseman

Original poster
Moderator
Dec 4, 2011
26,120
Ottawa, ON
It costs $99CAD per vehicle but I also get a $10 discount through CAA.
 

Blckshdw

Moderator
Nov 20, 2011
10,771
Tampa Bay Area, FL
Took it to Lowes, and loaded up with gutter goodies for phase 1. Having the EXT allowed me to fit 10' lengths in and shut the lift gate, without sticking stuff out the window. Gotta love that! :biggrin: Couldn't have anyone riding shotgun though :rolleyes:

20210506_124927.jpg
 

Mooseman

Original poster
Moderator
Dec 4, 2011
26,120
Ottawa, ON
Drove the Av to Princess Auto to pick up a couple of 2 ton bottle jacks and DMM test leads that were on sale and ordered online for curbside pickup, which is all we can do during the current lockdown. I'm starting to like this if I can wait a day. Just sit in your car and they bring it out to you. Another benefit is you don't buy anything on impulse. Good for me, bad for them though. Then took it for an automated wash.
 

NJTB

Member
Aug 27, 2012
612
Flemington, NJ
TB frame was getting a bit rusty, so I had the rust conversion and NH oil undercoating done. They needlescale the frame and get the loose rust off. I check the rust frequently, and didn't see any rust through and wasn't too worried about it.
Shop got into it, and don't you know, there was rust through by the catalitic converter and the fuel tank. Not bad, no Swiss cheese, but a 3/4 inch hole.
I told them to fix it and they cut about 6 inches on either side of the hole and welded a new piece in. Frame work is REAL expensive.
So, now the frame looks real good, and I'm a bit poorer.
There's picture the shop took and sent me a link, but I can't get it to work on the computer, it's on my phone. Here it is. https://2un.me/75mikiaa
Maybe on of you guys can get it to work here.
 

Mooseman

Original poster
Moderator
Dec 4, 2011
26,120
Ottawa, ON
I'd be afraid of getting this done on mine out of fear I wouldn't have a frame left!
 

TollKeeper

Supporting Donor
Member
Dec 3, 2011
8,267
Brighton, CO
I'd be afraid of getting this done on mine out of fear I wouldn't have a frame left!
Frame? Where we are going, we dont need frames!
 

xavierny25

Member
Mar 16, 2014
6,372
Staten Island, N.Y
Used it to haul the ductless mini-split home early this morning.20210507_113710.jpg20210507_113738.jpg
Tomorrow I'll be using it to pick up the copper line sets the supply house didn't have in stock till late today. Told them to set what I need aside and that I'll be back in the morning.
 

Matt

Member
Dec 2, 2011
4,039
Don't know if it belongs here or the What did you do today? thread, but I went and got my pristine rear doors from my mechanic last night and am taking them to a body shop today to have them painted. My rear doors are done with the drivers rear completely rusted through. And even though I hope to get rid of the truck this year, I can't leave it like that even though I know I won't get any more $$ for it.
 

NJTB

Member
Aug 27, 2012
612
Flemington, NJ
Taking the TB on a real long trip mid June, so I decided to check the spare and make sure the lift mechanism worked. First time since 07, when I bought it.
It was evening, so I lifted the rear seat, pulled out the rods that lower the tire, couldn't even get them to fit on the square to lower it. Came in and watched some You Tube videos on the procedure.
Was losing the light, so today I'll fight with it some more. I'm sure It's going to need a new lift mechanism.
 

TollKeeper

Supporting Donor
Member
Dec 3, 2011
8,267
Brighton, CO
Taking the TB on a real long trip mid June, so I decided to check the spare and make sure the lift mechanism worked. First time since 07, when I bought it.
It was evening, so I lifted the rear seat, pulled out the rods that lower the tire, couldn't even get them to fit on the square to lower it. Came in and watched some You Tube videos on the procedure.
Was losing the light, so today I'll fight with it some more. I'm sure It's going to need a new lift mechanism.
I thought the same thing last year when I had a flat. I put the wrong end into the tube. Flipped it over, and it worked perfectly. But then again, you are in one of the worst rust states in the USA.
 

Mooseman

Original poster
Moderator
Dec 4, 2011
26,120
Ottawa, ON
Just got it out from the dealer for an airbag recall.
 

NJTB

Member
Aug 27, 2012
612
Flemington, NJ
It gets worse.
Yesterday I made the second attempt at lowering the spare. This time the rod fit. As I suspected, the tire dropped about 2-3 inches and stopped, so I need to fix the clip thing on the cable.
Not a huge deal, saw a you tube video where a guy put a ratchet strap to hold the tire up, then cranked down the tire lift thing. Easy enough. Except the guy that did the NH oil undercoating coated the rim of the spare !!!
What a mess. What I noticed about this stuff is that it's oily, to the point it drips from the frame. Looks like dried undercoat, but wipe it with your finger and there's oil on it.
All this because I wanted to air up the spare.
Now the plan is to ride around with a can of fix a flat.
 

Mooseman

Original poster
Moderator
Dec 4, 2011
26,120
Ottawa, ON
Likely it's just the secondary lock that's stuck. You might be able to get it to drop by putting a pry bar into where the secondary lock is and prying or hitting it. We also have a whole section in the FAQ about it:

 
  • Like
Reactions: Matt

Forum Statistics

Threads
23,725
Posts
642,675
Members
19,260
Latest member
rezha

Staff Online

Members Online