What did you do to your GMT today?

Status
Not open for further replies.

littleblazer

Member
Jul 6, 2014
9,267
Checked the bolt torque on the intake on the escalade. That's it. Dropping it off at my aunts for a new windshield later. The original made it 260k but it is sandblasted to hell and headlights blur you out in the rain so it's time. Got a reasonable price for it so...
 
  • Like
Reactions: Matt

Mooseman

Moderator
Dec 4, 2011
26,119
Ottawa, ON
Finished installing the Silvy towing mirrors. Looks pretty good. Only thing wrong is that they ate lower than what they would be in a Silvy so, as tall as I am, I have them adjusted as high as possible. I'll do a.small write up when I have the time. IMG_20181226_144243.jpgIMG_20181226_144303.jpgIMG_20181226_144327.jpg
 

Attachments

  • IMG_20181226_144328.jpg
    IMG_20181226_144328.jpg
    556.2 KB · Views: 20

Mooseman

Moderator
Dec 4, 2011
26,119
Ottawa, ON
6'2"
 

Mooseman

Moderator
Dec 4, 2011
26,119
Ottawa, ON
You can't have a sunroof because my hair would touch the headliner and bother me in the old '02 and the Saab with the sunroof. Love the extra headroom in my LS.
 

EPfiffner

Member
Jun 11, 2018
52
Canton, Ohio
Changed the t-case fluid with the nice blue GM stuff. 99,865 miles so right on schedule. Well, if the PO had ever done it at 50k. It didn't look like it.

Pulled the plugs and did a piston soak with 50/50 acetone ATF. (Oil burner).

Filled the pan with diesel/atf/acetone to soak the pickup (low oil press).

Temporarily installed a manual pressure gauge, yep, it's low at idle.

This coming weekend: Trans fluid & filter.
 
  • Like
Reactions: Matt

Sparky

Member
Dec 4, 2011
12,927
Got minorly annoyed at it. There's a clunk in the front end I have to track down. Something I didn't tighten properly a month ago when I had things apart, or some joint has decided to go bad on me.
 
  • Like
Reactions: Matt

littleblazer

Member
Jul 6, 2014
9,267
Fog lamps
 
  • Like
Reactions: Matt and Mooseman

wstuckey1

Member
Apr 11, 2018
457
Fenton MI
Installed new bump stops under the oem in the rear so I had to test them out.
962F539A-1087-4ECB-9CA8-CA0DEBE9B094.jpeg
They helped a little but my tires still rubbed the fenders on flex. Upon closer inspection it looked like the hole in the oem bumpstop swallowed up the new one.
 

BrianF

Member
Jul 24, 2013
1,264
West central Sask.
Blew another tire today. Out on the highway with the kids when a small vibration started up on the rear. Then it blew out, completely blowing out the sidewall.
 

Blckshdw

Moderator
Nov 20, 2011
10,771
Tampa Bay Area, FL
Time for the rest of my winter maintenance. :cool:

Had picked up a couple cases of oil from Napa when it went on sale a few months ago, as well a some brake quiet. Since I had the front wheels off, I accessed the oil filter from the side. I definitely like this approach better, so I can crack it loose and let it drain without having hot oil dripping down my arm. :yes:

Since this was my first time using brake quiet, I checked the interwebz to get an idea of how much to use. Everyone kept referencing it as a type of glue, and from the on-bottle instructions saying to apply it liberally then let it setup for 10 minutes before reinstall, I got the idea in my head that it would behave similar to RTV. :uhno:

So I globbed a bunch on there, let the pads sit for 10 minutes while I put the oil filter on and poured in my 7 quarts. Put the backing plates on the pads and had multiple uh-oh moments. I assumed this stuff would firm up some and hold in place, but instead it squeezed out everywhere. Cleaned up the messes, and made sure not to get any on the pad surface, then installed back in the calipers. Could see more squeezed out, from the outer pads, but I just left it.

Went for a little drive to go drop off the old oil, low speed stops with light braking was quiet. True test will come later when I get into some stop and go traffic.

20181228_104259.jpg
 

Mounce

Member
Mar 29, 2014
13,667
Tuscaloosa, AL
Had some clunking in the front of the Silverado for a while, bumps, all turns that include a bump or increasing load... Figured my new steering components were falling apart already after a year, sounds just like a steering joint popping from slop but no.. Twas the gearbox which also has play, and has had play for a while, I tried to adjust it last week but didn't adjust it enough or so I think, still loose but seems a little better. Will probably mess with it again around tax time and expect to replace it... It's starting to puke fluid anyways. Whatever.

Gotta do the same inspection on the TB soon, also getting some similar noises and it's at 140k so it's time... Already done upper ball joints and control arms about 40k ago but question the ball joints still, advance house brand, leaking grease from boots (my fault).
 

EPfiffner

Member
Jun 11, 2018
52
Canton, Ohio
Changed the trans fluid and filter, just shy of 100k so right on schedule.

I couldn't tell if the PO had done it prior or not. I saw a few "witness marks" in the aluminum case where the filter seal goes in, which in my experience is impossible to replace without leaving a few marks.

I have never done this before, but I reused the filter seal. It looked great, and with my other power train issues I figured I'll chance it.

Looked pretty normal inside to me, just the usual "never seez" debris around the magnet. No chunks of metal or anything.

I used an ATP filter kit which comes with what they call a "3rd hand" gasket. It allows you to thread a couple bolts in to hold the gasket, therefore eliminating the need for adhesive.

I put a pint of Trans-X in with it, I have always done this but it's not necessary, snake oil you know.
 

Attachments

  • IMG_20181228_130840232.jpg
    IMG_20181228_130840232.jpg
    308.9 KB · Views: 6
  • IMG_20181228_091046821.jpg
    IMG_20181228_091046821.jpg
    667.8 KB · Views: 6
  • IMG_20181228_100646707.jpg
    IMG_20181228_100646707.jpg
    308.3 KB · Views: 6
  • IMG_20181228_090634494.jpg
    IMG_20181228_090634494.jpg
    504.1 KB · Views: 5

Mounce

Member
Mar 29, 2014
13,667
Tuscaloosa, AL
Checked the front end on the TB. Ball joints. All of them need replaced. Both lowers have slack and one upper has slack thusly the other will get replaced too. Tie rods were surprisingly tight. One hub is barely making noise, no slack or anything concerning yet.

Looking at the "heavy duty" ttx line of ball joints, made by mevotech and sold online and at Napa. Top of the line from what I see and just a couple bucks more than moog. I don't feel like doing this job again LOL.
 

Mooseman

Moderator
Dec 4, 2011
26,119
Ottawa, ON
Drove it to North Bay and back with my 2 place enclosed aluminum sled trailer loaded with sleds. About 2500lbs total. About 700km. Didn't miss a beat. Nice riding up there.
 

Blckshdw

Moderator
Nov 20, 2011
10,771
Tampa Bay Area, FL
Didn't sleep well, so got up to tinker with the camera setup in the EXT. The trailer hitch camera was acting up, so did a little testing. Disconnected the power to the roof camera, and it started working properly again. So my conclusion was, using the amp turn-on signal to activate the amp, and power 2 cameras simultaneously, wasn't providing enough current. OK, lemme throw a relay in there, pull power from the 4 gauge 12V line, and use the amp turn on circuit to activate it. Easy right?

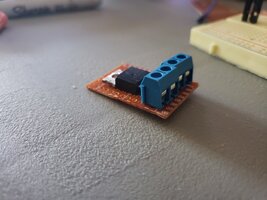
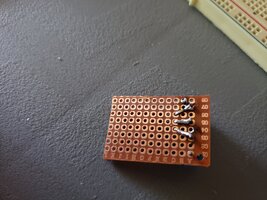
Well I didn't have a spare relay lying around. :undecided: Rooted through the random parts drawers, and came up with an idea. Cut up a small piece of perf board, an NPN transistor, and a couple of screw down wire terminals, to make a solid state relay circuit. :2thumbsup:
20181231_102857.jpg20181231_110829.jpg20181231_110840.jpg

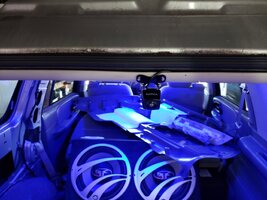
Pulled the lift gate trim, and tried fishing the camera wires through the boot. No dice, the plugs were just too big, so slit the boots, and fished them through that way. Was going to fit some split loom on there, but can't find it. So I'll revisit that later. Drilled a couple small holes and fitted the camera close to the glass. I may need to put some foam under the base, because when I checked the image while the bass was hitting, the camera was nodding with the beat :cool: Shot with the glass open, and the lift gate open.
20181231_131758.jpg20181231_132313.jpg

Ran my wires through the headliner and down the D pillar, taped some of them, and taped the relay circuit to a wire bundle. Did a couple of quick tests, and now both cameras were working nice and clear through the HU.

20181231_134111.jpg20181231_134121.jpg

Buttoned everything up and went for a drive, after a few minutes, the old camera started getting fuzzy again, and eventually stopped giving me a signal. I dunno WTH is going on with it :hissyfit:
 

m.mcmillen

Member
Apr 29, 2016
556
Wisconsin
Changed the spark plugs in my Acadia today. It had been getting about 15 mpg on the highway and it has 120,000 miles on it. It turns out the previous owner had put Autolite double platinums in it. I put OEM plugs back in it so I think that will help a lot.
 
  • Like
Reactions: Matt and Mooseman

Mounce

Member
Mar 29, 2014
13,667
Tuscaloosa, AL
Finally got around to replacing the motor mounts on the trailblazer. I've only had the mounts since February 2018... :eek::eek:

Not sure how everyone else does them, remove fan for extra lift room and squeezing them in and out or what but I chose the strut pull - bottom bracket drop approach. Started with the drivers side first since it's the harder of the two and it took me about 5 hours... Passenger side took 1 hour.

I'm 100% beat :stars: definitely the deepest I've been into the TB, but was quite an accomplished feeling remembering how smooth the old gal was capable of running. It's incredible.
 

Blckshdw

Moderator
Nov 20, 2011
10,771
Tampa Bay Area, FL
@Mounce Do you think it would have saved you time (on the driver's side at least) to remove the fan instead of the strut? I've got one split, but have been procrastinating on changing mine out. :ugh:
 

Mounce

Member
Mar 29, 2014
13,667
Tuscaloosa, AL
@Mounce Do you think it would have saved you time (on the driver's side at least) to remove the fan instead of the strut? I've got one split, but have been procrastinating on changing mine out. :ugh:

I'm gonna say that's subjective. Until yesterday I'd never pulled the struts on the TB. I wasted an hour or more trying to free the bottom mount from the control arm post, I THOUGHT it would be easier than breaking the pinch joint loose and sliding it out of the joint. Boy was I wrong, the pinch joint still fought a little but I picked up momentum after changing my approach. I even mutilated my pitman arm puller on the bench grinder to make it fit the yoke and gave up with it in fear of damaging the threaded shaft.

Also, I have never pulled the fan clutch on it but that's a trivial thing most of the time especially if you leave it in place if that's even possible. But then you run the risk of running out of jacking room, I've heard most people have to trim the top motor mount post and even then it barely fits.

I would personally recommend pulling the struts especially if you've pulled them before and are familiar with them. That gives you access to a nice frame window for accessing the mounts (you can't do much through it but you can at least see what you're messing with then) and simplifies removal by giving more access to the bracket. Which the bracket isn't the easiest thing to get out either as it sits on some conical studs on the frame and requires a fair bit of engine lift by itself (I bottomed the fan against the top shroud and then went a little further past that. But once you get enough room to lift the bracket off it's seat it falls right out.

Honorable mention to using a hole saw on the bracket below the pcm right next to the fuel lines for top nut access.

Tldr, I say pull the struts. But that's just my opinion. And others as it's actually the way AllData specifies.
 

Capote

Supporting Donor
Member
Jul 14, 2014
24,227
Atlanta, GA
Showed it off a bit to some co-workers. I've gotten nothing, but compliments everyday. They said they've never seen a Trailblazer done up like mine before. I'll tell you what, they sure can't get enough of hearing it rev up lol. I almost forgot how freaking loud it is.
 

xavierny25

Member
Mar 16, 2014
6,372
Staten Island, N.Y
Not to it but for it. Disassembled the spare front and rear calipers to be powder coated. On disassemble Noticed 2 of the front pistons are in pretty bad shape.20190104_104109.jpg20190104_112752.jpg20190104_120240.jpg
Off to chemical stripper they go...
 

djthumper

Administrator
Nov 20, 2011
14,956
North Las Vegas
Cleaned the throttle body to get rid of the P0506 and other codes it tripped.
 

BrianF

Member
Jul 24, 2013
1,264
West central Sask.
Well my Tb is parked until I get new tires on it, which who knows when now. So I have been putting some miles on the GMT400. Thankfully gas is down to 80.9 a liter in these parts so I don't feel so bad that she drinks it like the rubbie's on cheap wine.
 
  • Like
Reactions: Matt and Mooseman

Reprise

Lifetime VIP Donor
Supporting Donor
Member
Jul 22, 2015
2,724
Got one of the side steps installed on the blue Sierra (the 'important side', which allows me to get into the truck w/o a stepladder.) Easy enough job, once I figured out which mounts went on each side, and then the correct bolts for the correct locations.

Depending on how 'celebratory' I am after the Bears game, I'll do the other one after the game (the truck sits high enough I don't have to jack it up to do this job). But at least I can climb in, now!


For those of you who may do this on a GMT800 one day... the torque for the cab body mount bolts (where the side steps will mount to) is 55 ft/lb (all models / series)

I examined the mounts, and they still looked good on the D/S, at least. Was glad I didn't just spend the $ for the mounts. I'll check on them as I do other maintenance.

The old Sierra could definitely use them, but that'll be the next owner's project...LMAO

(just FYI - the rad body mounts are spec'd at 52 ft/lb, if you're ever replacing them)

Supposedly (per the instructions that came with the bars,) GM uses thread sealant on the bolts, and you're warned not to use an impact on them - but I found it easy as pie to loosen them with a breaker bar / 18mm socket. And I sure didn't see any sealant on them.


Oh - and while I'm on the subject... this being my first 'southern truck'... I can't believe how much nicer it is to work under this one, vs. the tan Sierra (which spent its whole life accumulating WI road salt -- and it's really not even that bad, as the frame is still solid.) But the new one is SO nice, in this regard. :2thumbsup:
 

Mounce

Member
Mar 29, 2014
13,667
Tuscaloosa, AL
As with most of my posts lately, actually done this yesterday BUT..

Valve cover gaskets on the Silverado. Knocking out one leak at a time. Pretty clean inside despite how rough it looked on the outside from the leak lol.

Screenshot_2019-01-07-11-25-34-1.png

Also done some planning on my drl/park lights mod that should be happening next weekend. Modified the keying on one housing to accept the new three wire socket in place of the two wire just to make sure I could. Will sure beat gutting the sockets and modifying the innards like the write up I read said to.
 

Techguy77

Member
Nov 6, 2018
7
Nebraska
I re-installed my Sony Head Unit for the 3rd time with the Axxess GMOS-014 and ASWC-1 only to be told by Axxess support that the ASWC-1 might be bad. This third tech seemed to know his stuff and confirmed everything was working except for the communication from the ASWC-1 to the Sony Head Unit. So hopefully a replacement unit fixes it. What stupid engineer designed this dash! 3rd Trailblazer so I can do this is my sleep!
 

Mooseman

Moderator
Dec 4, 2011
26,119
Ottawa, ON
I've had nothing but bad luck with Axxess/Metra units myself. I use PAC for Bose units. I've also had good luck in my LS with a Scosche although they're supposed to be junk.
 

HARDTRAILZ

Moderator
Nov 18, 2011
49,665
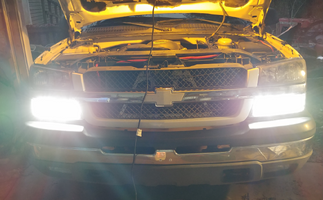
Since ditching the projector headlights and using stock replacements with Sylvania Xtra bulbs i have been unimpressed with the light color and output. Too many years of HID/LED I think and it annoys me now, so looking into some of the LED bulbs that do ok without projectors. Might just be the ticket for my needs.
 

littleblazer

Member
Jul 6, 2014
9,267
Took her to work. Have to say, floor polish for a clear coat substitute is decent.
20190108_150021.jpg
 

Sparky

Member
Dec 4, 2011
12,927
Got rear ended tonight. Silverado 1 Avenger 0. Need my tail pipe fixed, bumper fixed/replaced, and that corner of the box straightened a bit so I can open the tailgate again. The guy's hood, fender headlight, core support are all screwed and I wouldn't be surprised if his radiator is bent (not leaking) and if there's other damage.

Darn phone is uploading upside down...

20190109_203356.jpg
20190109_211912.jpg
 

littleblazer

Member
Jul 6, 2014
9,267
Red truck gets... are you ready for this... 11.1 mpg highway. #Becauseracetruck. Taking her to the plant today.
 

xavierny25

Member
Mar 16, 2014
6,372
Staten Island, N.Y
Did some work on my led swap.20190111_145025.jpg
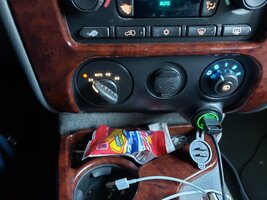
I have to change out the led on the fog light button. It was suppose to be yellow/amber but looks like crap. I tried a different brand of LEDs because the brand I am using didn't have the yellow/amber in stock any where online. lesson learned wait for the good stuff.20190111_145017.jpg
Next up is the auto hvac. I'm also going to order a new USB charging port it looks off and out off place being green.
 
Last edited:

littleblazer

Member
Jul 6, 2014
9,267
Hopefully a new windshield.
 
  • Like
Reactions: Matt and Mooseman

xavierny25

Member
Mar 16, 2014
6,372
Staten Island, N.Y
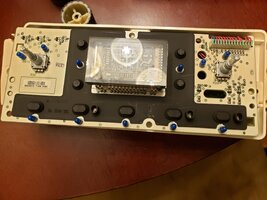
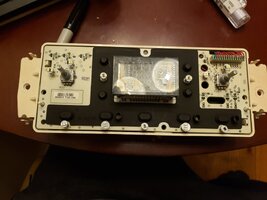
Got to swapping in the LEDs on the auto hvac.20190112_174516.jpg Before20190112_201035.jpg
After

I also did some work with the button repair kit on it.
Before20190111_145017.jpg
After20190112_201046.jpg
And final install20190112_202407.jpg
The repair kit didn't work out the way I wished and the LEDs being as bright as they are didn't help. It will do for now till I figure something else out to fix all the bleeding white light.
Final shot for you guys.20190112_202718.jpg
Next up is the cluster but I have to put in an order for the stepper motors. If anyone knows the part # for them for my 08 Voy please let m e know, Thanks
@Blckshdw I saw that you switched your needle for blue ones any chance you can tell me where you got them?
 

Blckshdw

Moderator
Nov 20, 2011
10,771
Tampa Bay Area, FL
@Blckshdw I saw that you switched your needle for blue ones any chance you can tell me where you got them?

I got them off Ebay, that was forever ago. I searched for GM instrument cluster needles, and there were a ton of packages out there. Most had 2 big needles, and 6 smaller ones, so in our case there were leftovers. Just have to find the hub color, and needle color combo you want, and you're good to go.
 

Blckshdw

Moderator
Nov 20, 2011
10,771
Tampa Bay Area, FL
Have had an odd rough idle issue when the engine is cold, for a while now. Meant to clean the throttle body last month when I did my winter maintenance but forgot, so got up early this morning to remedy that. In removing the TB from the intake, I figured out what the issue (most likely) was being caused by, and it wasn't gonna be a dirty throttle plate. :ugh:

Looking at the back of the plate, you can see it's pretty clean, and the edges weren't bad either. Gave them a quick spray, wiped them down, and called it good.

20190113_092010.jpg

The uh-oh moment was when I was taking off the bottom bolt closest to the firewall. It had backed out some, so the TB wasn't sealed properly to the intake. I could see sand/grit inside the intake once it was removed. Looks like the top 2 bolts were letting stuff get to the gasket as well. Who knows how much stuff has gotten sucked through the engine, guess we'll find out just how bulletproof mine is! :eek:

20190113_092031.jpg

Got that cleaned out as best I could and wiped down the gasket area, so we'll see how the truck behaves moving forward. Morning commutes don't have the issue, since I've always driven far enough without stopping for more than a stop sign, to reach operating temp before hitting heavy traffic. Evening commutes are where I notice it the most.
 

Mounce

Member
Mar 29, 2014
13,667
Tuscaloosa, AL
DRL/Turn signal mod on the Silverado using two pair of switchbacks. DRL is ran from ign-on power source, DRL sockets have been removed and replaced by new 3-wire sockets that are soldered piggy back into the factory turn sockets wiring for ground and turn signal. Housing had one key notch modified by a couple millimeters to allow the 3-wire socket to interface with the DRL housing.

Screenshot_2019-01-13-20-26-49-1.png

Got another set of switchbacks ordered as one has decided to flash white on the off beat when DRL is on. Bulb does it in any socket and other bulbs still act normal in its socket. So yeah video of normal action.

 
Status
Not open for further replies.

Forum Statistics

Threads
23,724
Posts
642,673
Members
19,260
Latest member
rezha

Members Online