Cranks but won't start

budwich

Member
Jun 16, 2013
2,173
kanata
This morning I put the TB on jack stands (Craftsman,) and dropped the crossbar. I expected to see a fuel filter and a harness connector, but instead I saw none of that.

It's a bad picture, I must have been moving. I always put plywood between the frame and jack stands. Metal on metal gives me a bad vibe.
View attachment 95473
I assume this is your way of asking where the fuel filter is.... :smile:
 
  • Like
Reactions: coolride

coolride

Member
Aug 23, 2019
635
Adirondacks
I would really like to know where the fuel filter is.

Also, do I have to reach above the front of the fuel tank and blindly uncouple the fuel lines with only my finger tips??
 

mrrsm

Lifetime VIP Donor
Supporting Donor
Member
Oct 22, 2015
8,192
Tampa Bay Area
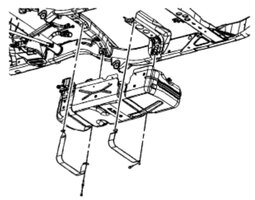
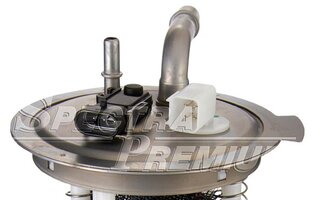
These images show the general layout of the Trailblazer-Envoy Fuel Tanks, with specific closeups of the Harness Connectors of the 2006 TB Return-less Fuel Pump and where you should carefully "reach in and out" to remove them ...without damaging them. Most of the time...the Fuel Tank needs to be LOWERED first to accommodate access to these areas.

Unlike the "Cheaper" After-Market Brands, the ACDeclo, Delphi and Bosch Replacement Fuel Pumps ordinarily Do NOT come with Extended Harness-Pigtail Connectors. Look closely at how badly the Mild Steel Pressure Fuel Line has RUSTED and consider the condition of the underside of your SUV if Heavy Rust Scale is present.

There are only Two Kinds of Fuel Pumps for those of us living in the Rust Belt or the GWN regarding Winter Snow, Brown Road Slush Impacted Vehicle Under-Bodies and the Effects of using Road Salt for these conditions on ALL Unprotected Mild Steel Components:

(1) Those that have already Failed and Rusted Through leaking Fuel.
(2) Those that are GOING to eventually Rust Through and Leak Fuel.

2006TRAILBLAZERFUELTANKDIAGRAM.jpgTRAILBLAZERFUELTANKLAYOUT.jpg2006TBFUELPUMPLAYOUT1.jpg2006TBFUELPUMPLAYOUT.jpg
 
  • Like
Reactions: coolride

coolride

Member
Aug 23, 2019
635
Adirondacks
I have the straps ready to remove. My tank setup does not look exactly like the one above. Here are a few pictures.

This looks like an EVAP canister that's mounted over the spare tire.
tb136.JPG


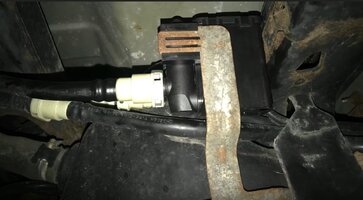
At the back of the tank, I see an electrical connector (right side hanging off that bracket.)
tb137.JPG

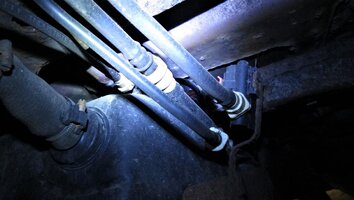
In front of the tank, just above the transfer case. It's obvious how the left line disconnects, but how does the right one work?
tb138.JPG
 

mrrsm

Lifetime VIP Donor
Supporting Donor
Member
Oct 22, 2015
8,192
Tampa Bay Area
Your question is a bit ambiguous right now regarding "disconnecting lines". Are you intent upon Dropping the Fuel Tank to perform an OEM Fuel Pump R&R? The component your image shows at a distance that has a light colored Vent line connector and an Electrical Connector and Harness is the Evap Purge Solenoid hidden from view and so the Harness connections involved here will not be helpful to you for Testing the Electrical Paths to and from the Fuel Pump. This Image shows a Mechanic reaching over the top of the EPV Solenoid on a 2006 Trailblazer to disconnect it for another unrelated EVAP Code issue via an R&R of this particular component:

2006TBEVAPSOLENOID.jpg2006TBEVAPSOLENOID1.jpg


I'm not trying to "Spend Another Man's Money" here... But if I had to go to all of the trouble of Lowering and Raising the Fuel Tank on my TB just to check the Wiring and Continuity of the Pump... I'd seriously consider 'Going Yard" and just perform the complete OEM Fuel Pump of Choice R&R on a vehicle showing as much Rust Scale as your SUV exhibits.

There is little doubt that in order to gain enough direct access to remove the Fuel Pump Electrical Connectors, lowering the Fuel Tank becomes necessary. So if you decide to follow on with doing this job, here is a Video involving a 2007 Trailblazer on how to do everything. The scenes herein will provide you with some better looks at all of the the Wiring Harness, Connectors and Evap and Fuel Line Piping you will encounter when performing this laborious task that will require disconnection just to be able to drop the Fuel Tank:

 
Last edited:
  • Like
Reactions: coolride

coolride

Member
Aug 23, 2019
635
Adirondacks
I'm planning to replace the fuel pump. Everything is very rusty so the top of the pump must be in bad shape. The back of the tank, with the evap solenoids, looks easy to deal with. But the lines at the front of the tank have me confused. Are the lines disconnected at the tank, or forward of the tank at the spot above the transfer case?
 

mrrsm

Lifetime VIP Donor
Supporting Donor
Member
Oct 22, 2015
8,192
Tampa Bay Area
I'm a "Slow Learner" ...and I've always done much better by learning Visually... so my routines for 'getting under the skin' of Big Repairs like this is to FIRST,,, Download and refer often (...by Chapter and Verse) to the Specific OEM GM Service Manual(s) so many of us Thank @Mooseman for providing in his Signature Line.

Then I seek out and view as many YouTube Videos involving the efforts and wisdom of others who've performed these complicated tasks ....and then save them all in a useful "Mechanic's Media Library'.

Then I watch the Videos as often as necessary; sometimes at 1/2 or 1/4 Speed and I make some Work Preparation Notes (...and LOTS of FREEZE-FRAME SCREEN PRINTS) well in advance of doing anything.

In this manner, I've been able to seriously improve my chances of having success with Complex Repairs, without suffering from any Failures of Imagination, Unsafe Surprises or by being Blind-Sided with a raft of issues I might have otherwise Failed to Plan for by rushing headlong, Ad Hoc out into the Garage or onto my Driveway... Way Unprepared.

If you follow this idea to its natural conclusion with your Fuel Tank Project ...You WILL be able to "see" everything and "learn" everything you need to know well in advance and experience the "Doing" part of these tasks in your head, before you even attach that 15mm Socket to your Ratchet Handle...and begin to unbolt the Safety Cross Member at the very start of doing this job. :>)
 
Last edited:
  • Like
Reactions: coolride

coolride

Member
Aug 23, 2019
635
Adirondacks
It's funny because I just finished watching a repair video (Airtex) at 50% speed.

Those manual downloads don't include 2006 4.2L fuel system. I'm just lucky that way.

I'm wondering, what's the best fuel pump value for the money?
 
Last edited:

mrrsm

Lifetime VIP Donor
Supporting Donor
Member
Oct 22, 2015
8,192
Tampa Bay Area
NOT an “Airtek”… Unless you want to have to go through this all over again in 8 Weeks instead of once every 5-10 Years… Stick with the OEM Brands and Bite The Bullet on the COST:

The ACDelco OEM Version:
https://www.amazon.com/dp/B001S30GZW/?tag=gmtnation-20

The Delphi OEM Version:
https://www.amazon.com/dp/B001QUD6R2/?tag=gmtnation-20

You’ll need a New One of These:
https://www.amazon.com/dp/B000C9VVU2/?tag=gmtnation-20

...and perhaps you should also get a couple of THESE in case the Old Ones Crumble like Graham Crackers:
https://www.amazon.com/dp/B004133BQC/?tag=gmtnation-20
 
Last edited:
  • Like
Reactions: coolride

Mooseman

Moderator
Dec 4, 2011
25,996
Ottawa, ON
The manual for another year should be able to cover this.
 
  • Like
Reactions: mrrsm

coolride

Member
Aug 23, 2019
635
Adirondacks
Pulled the relay and listened for noise from the tank, then installed the relay and listened again (I figured, why not.)

The pump goes Hmmmmmm-chercher. Like it comes to a grinding stop. I knew that as soon as I got the thing up on jack stands, the pump would start working again.
 
Last edited:

mrrsm

Lifetime VIP Donor
Supporting Donor
Member
Oct 22, 2015
8,192
Tampa Bay Area
A few years back, @MAY03LT favored using the Bosch Fuel Pump for his Early Model 2003 Trailblazer R&R and IIANM... @Mooseman has also mentioned that it too is a High Quality OEM Fuel Pump.

The only reason that I "shined it on" from being on my Personal Choice List was because during the linked video attached below, @MAY03LT ran into a problem with the later design of the GREEN "O" Ring Fuel Seal. Since he was unable to achieve a Perfect Seal... he resorted to re-using his Original Black "O" Ring.

His corrective actions had very little if anything to do with whether or not the Bosch Fuel Pump can stand 'Shoulder to Shoulder' with its ACDelco and Delphi Brethren.

If you look those up on Amazon...the 2002-2003 TB-Envoy Black "O" Ring is still available ...but it does not Pass Muster with Amazon's Vehicle Confirmation Check. IIWM... I'd get BOTH... just in case you run into the very same problem:


Just so you know... in the scenario you just described... the sound of the pump "Grinding to a halt" is normal, as the priming action to bring up the fuel line pressure is usually complete after 5-10 seconds and then the PCM signals the pumping action to stop.

The excess vibration you heard could be caused by a failing Fuel Pump Electric Motor Commutator(s) and so it MIGHT be an indicator of impending failure. However, as mentioned above, the Definitive Test is to use the Hantek Oscilloscope, a Low Amp Clamp and a Windows Laptop with FREE Hantek Software to Nail Down The Problem:

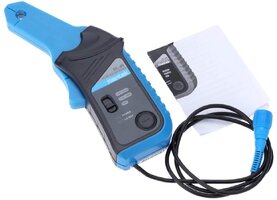
HANTEKOSCILLOSCOPE1.jpgHANTEKLOWAMPROBE3.jpgHANTEKHIGHAMPROBE.jpgHANTEKLEADS.jpgRCAWINDOWSTABLET.jpg

If the Fuel Pump is completely inoperative, you cannot use an Oscilloscope to diagnose its behavior. Here are two Demonstration Videos using a MUCH more expensive PICO Scope... but the $93.00 Hantek Scope Kit with its add-on $60.00 Amp Clamp and $20.00 20:1 Attenuator will work EXACTLY like the PICO version. ALL of the Electric Fuel Pumps in ALL of the Vehicles in the World follow these exact Principles:


Last edited:
  • Like
Reactions: coolride

coolride

Member
Aug 23, 2019
635
Adirondacks
I've watched at least 6 or 7 fuel pump videos and I haven't seen one person use a real fuel line connector tool for pulling apart those fuel line connectors.

Wait a minute. So you just push in on the top of those clips, and then pull the lines apart?
 
Last edited:

TJBaker57

Lifetime VIP Donor
Member
Aug 16, 2015
3,167
Colorado
I've watched at least 6 or 7 fuel pump videos and I haven't seen one person use a real fuel line connector tool for pulling apart those fuel line connectors

I tried using the tool(s) on a 1998 Sierra. The tool was like 3/4" long and the space to use it was maybe 1/4". Brilliant design!
 

mrrsm

Lifetime VIP Donor
Supporting Donor
Member
Oct 22, 2015
8,192
Tampa Bay Area
Due to the Extreme Danger posed by the risk of Fuel Line Separation around 600 Degree HOT Catalytic Converters, Electrical-Sparking Short Circuits and other careless exposure to incendiaries, such as casually discarded Burning Cigarettes by Idiots, ALL of these Connections must be made with Double and even Triple Redundancy of their Locking Fixtures to ensure they remain attached AND LEAK PROOF.

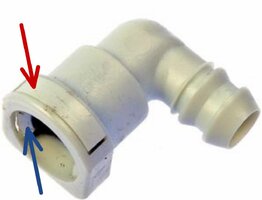
If you look at this GM Fuel Line Connector... You can see that Mechanic is Forced to follow at LEAST THREE STEPS in order to remove the Fuel Lines at or connected to the Fuel Tank:

(1) The Locking Tab Clips (Red Arrow) MUST be manipulated loose with a Pick and THIS requires The Use of TWO HANDS.

(2) The Retention Clip is designed to Prevent the Squeeze Locking Barbs (Blue Arrow) on Both Sides of the Connector from accidentally depressing and allowing the Fuel Line to retract from inside the mating Port. THIS demands that once they become unlocked using a Pick Tool ...the Mechanic MUST pull the Clip completely Loose.

(3) Only AFTER the First Two Steps have been done will the Mechanic be able to Squeeze the Sides of the Connector Fitting.loosening the Fuel Line Barbs...and allowing for the separation of the Line(s) from the Fuel Tank Connector.

GMFUELINECONNECTOR1.jpgGLOBALFUELINERETAINER1.jpg

Making things this DIFFICULT is INTENTIONAL... BY DESIGN in order to Reduce the chances for Accidents that could happen if the Fuel Lines easily got Snagged, Bumped or Brushed Up against anything as interference and cause the lines to accidentally come loose, igniting a Fully Involved SUV or Truck Fire.

Ergo... Mere convenience for the sake of Easier Repairs must NEVER enter into this kind of Safety Engineerin
g Design:

BURNINGSUV.jpg
 
Last edited:

TJBaker57

Lifetime VIP Donor
Member
Aug 16, 2015
3,167
Colorado
Making things this DIFFICULT is by INTENTIONAL DESIGN

Making it difficult is totally reasonable given the risk. In the case I had it was made not possible. Here I have positioned the metal clip in the position it is when assembled. I have the fitting that the clip resides inside removed for the picture. One can see that the tool can in no way fit tight to the plastic line from the pump in such a way that it can slide inside the fitting to release the 4 metal locking tabs! The plastic 'bulkhead' makes it impossible.

IMG_20190918_153443.jpg
 
  • Like
Reactions: mrrsm

Mooseman

Moderator
Dec 4, 2011
25,996
Ottawa, ON
  • Like
Reactions: mrrsm

coolride

Member
Aug 23, 2019
635
Adirondacks
I still don't understand how those retaining clips work. There's a hook on the inside and a barb on the outside. I got lucky with a couple and one, I broke to pieces.

MRRSM, I just don't understand how those retaining clips are released. I read over your explanation a few times and I still don't get it.
 
Last edited:

budwich

Member
Jun 16, 2013
2,173
kanata
I think that because there is no notch in the receiver (near the red arrow) where potential a pick or thin flat head screw driver can be placed which makes it somewhat difficult. Having not done one (and hope I never have to), it would appear the a pick is slid down each end side forcing the top barbs bypass their holder position. This will also cause the arc of the retainer to bow up which now should allow a "slight pry" action happen. Further, if needed, the side picks can be manipulated to aid with the release of the bottom barbs during the upward pry action. My guess based on the picture. You could confirm the release technique a bit by looking at the ones that you successfully got off placing the locking retainer back in an open connector (ie. not attached to the male line / connector) so that you can see the internal action.
 
  • Like
Reactions: coolride

mrrsm

Lifetime VIP Donor
Supporting Donor
Member
Oct 22, 2015
8,192
Tampa Bay Area
Okay... THIS may solve the Mystery with an even SIMPLER Technique...observe the VOP at 00:00:44 into this EXCELLENT Instructional... he refers to this GM Style of Connector as "The Push Style". Unfortunately...I've been wrangling with these damned things more times than I can count ...Me and @MAY03LT...and neither of us recognized this Alternative Method that you'll see will ease your mind and at least a few of your Fuel Tank R&R Efforts from hereon out:


Here is another supporting Video "On The Vehicle" for describing these R&R Problems and How The Connector Fittings Work:


Please ...Forgive me the Original Instructions. I Stand CORRECTED here and yield to the idea that there is ALWAYS something New to Learn.
 
Last edited:
  • Like
Reactions: coolride

TJBaker57

Lifetime VIP Donor
Member
Aug 16, 2015
3,167
Colorado
Okay... THIS may solve the Mystery with an even SIMPLER Technique...observe the VOP at 00:00:44 into this EXCELLENT Instructional... he refers to this GM Style of Connector as "The Push Style". Unfortunately...I've been wrangling with these damned things more times than I can count ...Me and @MAY03LT...and neither of us recognized this Alternative Method that you'll see will ease your mind and at least a few of your Fuel Tank R&R Efforts from hereon out:

The type I spoke of is seen in the first video at 2:27. Looks easy enough except that in my case there was plastic reinforcements that prevented any removal tool from having enough room to insert.
 
  • Like
Reactions: coolride and mrrsm

coolride

Member
Aug 23, 2019
635
Adirondacks
MRRSM, I think the jury is still out on the case of the stubborn clip. I'll take a much closer look now that the tank is on the floor.

Finally on the floor. Don't believe that guy on youtube, it's not easy.
tb139.JPG

Is this rusty and dirty enough? I vacuumed up as much as possible and now it's soaking in PB Blaster. It's removed counter clockwise?
tb140.JPG

Had to snip off the filler tube hose. Anyone know a part number?
tb141.JPG
 
  • Wow
Reactions: mrrsm

Mooseman

Moderator
Dec 4, 2011
25,996
Ottawa, ON
I had the same issue with the clip and fitting on the Saab when the line from the pump rusted through. Clip got destroyed and also destroyed the plastic spacer inside. I had to McGyver a spacer from a bronze bushing.
 
  • Like
Reactions: mrrsm

gmcman

Member
Dec 12, 2011
4,660
Had to snip off the filler tube hose. Anyone know a part number?

I just replaced mine when I had my tank down last week. The hose is very stubborn when trying to get past the ridge so be careful and don't force it. You are at the point now to use a utility knife anyway.

Looks like a SWB tank, same as mine, part # 15131046.

20200720_131608.jpg

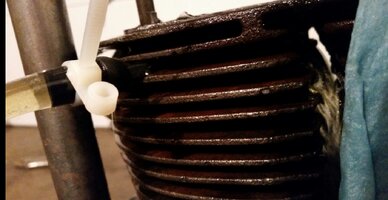
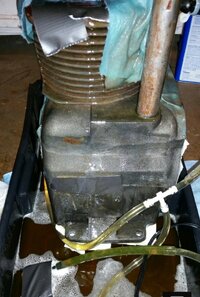
If you have a few days, I would keep the top soaked with Evaporust if possible. I used a drain pan and a small submersible fish tank pump to keep it flowing over the rusted area. Not a fuel tank but an old Kohler K motor.

The ring will be a PITA, just keep tapping on each "ear" as you go around.

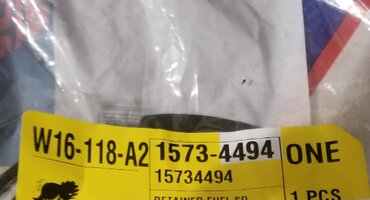
If you need the ring, part # 15734494.

20200720_132630.jpg

I may be mistaken, but if you bust the tabs, then you may need another tank. The dealer didn't show a part number for the neck of the tank, just the tank. At least for my 2002.
 
Last edited:
  • Like
Reactions: mrrsm

gmcman

Member
Dec 12, 2011
4,660
Slightly off-topic but pertains to the job at hand. To demonstrate how effective the Evaporust is, this was the crusted Kohler motor I used, the results were dramatic.

Screenshot_20200720-133802_Chrome.jpg

Screenshot_20200720-133847_Chrome.jpg

Screenshot_20200720-133913_Chrome.jpg

Screenshot_20200720-133944_Chrome.jpg

That's not grey paint, but the bare iron block. The stuff is near-magic.
 

coolride

Member
Aug 23, 2019
635
Adirondacks
Today I ordered a Bosch Fuel pump assembly, an ACDelco lock ring, and new Dorman tank straps. (On closer inspection, the original straps are not bad. I knocked off the loose paint and rust and I think they are still good.)

I could use a new fuel filler pipe. The whole thing (complete steel tube and all rubber hoses) from the cap all the way to the tank. 2006 trailblazer SWB 4.2l. Any ideas?

The commonly available assemblies don't include that short rubber hose that connects the steel pipe to the tank.
 
Last edited:

gmcman

Member
Dec 12, 2011
4,660
I could use a new fuel filler pipe. The whole thing (complete steel tube and all rubber hoses) from the cap all the way to the tank. 2006 trailblazer SWB 4.2l. Any ideas?

The commonly available assemblies don't include that short rubber hose that connects the steel pipe to the tank.

I picked my filler neck up from O'Reilly's, no it doesn't come with the hose to the tank.

The filler neck looked identical, but the angle to the hose from the tank was slightly off, maybe that's just how it is. Either way, the new Dorman filler neck and GM hose worked perfect.
 
  • Like
Reactions: mrrsm

coolride

Member
Aug 23, 2019
635
Adirondacks
  • Like
Reactions: mrrsm

christo829

Member
Dec 7, 2011
513
Fairfax, Virginia
Weird...when I ordered the fuel filler neck for my 04 off of RA (a few years ago now), it came
with the tank connection hose as well, but all the ones I'm looking at now don't. So apologies for only looking at the number for the whole filler assembly for your 06 and not the shorter hose part number!

Chris
 

mrrsm

Lifetime VIP Donor
Supporting Donor
Member
Oct 22, 2015
8,192
Tampa Bay Area
@Mooseman 's Link pops back to a video I added in his Thread that I'll post here because it covers a chance to see Eric "O" from South Main Auto actually removing one of those White Fuel Line Connectors... (Oooops...WRONG Style) AND he covers all of the information so well described by Tom.. @TJBaker57 about the difficulties in removing those Damned Steel Fuel Line Connectors:

 
Last edited:

Mooseman

Moderator
Dec 4, 2011
25,996
Ottawa, ON
If there are gas fumes, the motor in the Shop Vac might ignite them,
 
  • Like
Reactions: mrrsm and TJBaker57

coolride

Member
Aug 23, 2019
635
Adirondacks
The lock ring is still rusted on tight. This tool kit I borrowed from Auto Zone is beyond useless.
tb143.JPG

This air chisel is $9.99 at HF, and I used a 20% coupon. For $7.99, this is alot of fun. But the chisel jumps off the ring, and that makes it hard to use. So the ring is still stuck.
tb142.JPG
 
Last edited:

mrrsm

Lifetime VIP Donor
Supporting Donor
Member
Oct 22, 2015
8,192
Tampa Bay Area
It's too bad they don't make some Brass "Non-Sparking" Air Tools-Chisels for this very purpose... Can't hurt to work on the Damned Thing away from the House and the SUV and keep an ABC Fire Extinguisher at the ready...
 

Forum Statistics

Threads
23,664
Posts
641,765
Members
19,091
Latest member
marcinkit

Members Online