You are using an out of date browser. It may not display this or other websites correctly.
You should upgrade or use an alternative browser.
You should upgrade or use an alternative browser.
What did you do to your GMT today?
- Thread starter MAY03LT
- Start date
- Status
- Not open for further replies.
TollKeeper said:Burned a 10.4 nav disc for my Saab Nav system in my Envoy, and it didn't like it. Pulled the DVD out, and it looked like someone had poured acid on the backing.
Back to my computer for another 36 minute wait to burn another disc. Put it in, Worked perfectly!
 Do you need a burner upgrade, how much data on this disk?
- Joined
- Nov 18, 2011
- Posts
- 49,665
TollKeeper said:Burned a 10.4 nav disc for my Saab Nav system in my Envoy, and it didn't like it. Pulled the DVD out, and it looked like someone had poured acid on the backing.
Back to my computer for another 36 minute wait to burn another disc. Put it in, Worked perfectly!
Since most of the roads around my house were built in the last 5 years, I was lost, OFTEN!
Need to see if I put these on the market here, if anyone would buy them now.
Hmmm...
Kdizzydawg
Member
- Joined
- Apr 14, 2013
- Posts
- 49
Kdizzydawg
Member
- Joined
- Apr 14, 2013
- Posts
- 49
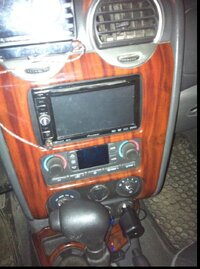
Kdizzydawg said:Got my pioneer avic d3 installed!! Nice to have hands free calling againwas a successful install, just have steering wheel controls to program. Toughest part was getting all the wires in to make room for deck, but I managed to stuff it all in
!
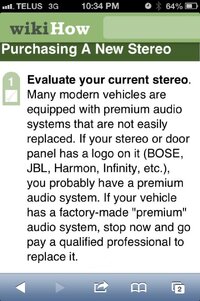
I forgot to mention, I came across this while looking for proper install and had a good laugh.. It was like, "challenge accepted!!" LoL!

Attachments
HARDTRAILZ said:Hmmm...
It was Nav disc 3.0, so about 10 years old.
Blckshdw said:
8.2 gigs, on a dual layer, with a specific type of burn (Booklet in DVD-ROM mode) so that the GM Nav system will recognize it.
You may or may not need a burner upgrade. It all depends if your current burner can recognize a DVD+R(RW)DL. The one in my laptop wouldn't. The ones in both of my desktops would, but were not able to change booklet type. I finally found the correct burner at Micro-Center, installed it, and away I went.

ConeKilrAutoX
Member
- Joined
- Dec 8, 2011
- Posts
- 1,179
05tbowner said:Bought these for it 2 days ago. Still need to get better tires, though.
nice!
Sparky
Member
- Joined
- Dec 4, 2011
- Posts
- 12,927
DDonnie said:Screw you gm, and screw your stupid battery cover. Anybody have any idea why they made it such a pita to remove that thing? Three screws seems like over kill.
Anyway, I installed the relay harness for my hid's today.
Heh. And why they made it you have to disconnect both battery terminals before removing is also annoying... And is why I cut my cover so I can pop it off without disconnecting the battery
mubai
Member
- Joined
- Jan 5, 2012
- Posts
- 321
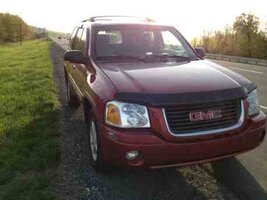
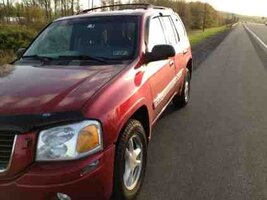
Hit 200,000 miles!!! What, what!!!View attachment 27670
Pictures look pretty crappy using Tapatalk for the first time uploading. :-(
Pictures look pretty crappy using Tapatalk for the first time uploading. :-(
Attachments


ConeKilrAutoX
Member
- Joined
- Dec 8, 2011
- Posts
- 1,179
mubai said:Hit 200,000 miles!!! What, what!!
congrats on the milestone ! my cousins old buick parkave. hit 200,000 today also
Boricua SS
Member
Just received my last two items from AudioControl. Now I can begin my sub install, hopefully on Wednesday!
View attachment 27672
View attachment 27672
Attachments
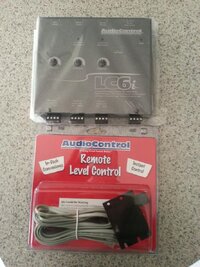
dmanns67 said:Just received my last two items from AudioControl. Now I can begin my sub install, hopefully on Wednesday!
View attachment 13953
Let me know if you need any help with wiring and whatnot, that's kind of why I bought this truck lol
In my truck I didn't feel like mounting it (when I was using a bass knob for my sub amp) so I wedged it between the driver seat and the center console. In the past usually most people want it mounted onto the panel right below the steering wheel where your knee sits while driving.
I actually had the idea to take the empty pod on my dash (where the 4x4 switch goes, mine is empty because it's rwd) and fiberglassing it into there but I don't use the knob anymore.
I actually had the idea to take the empty pod on my dash (where the 4x4 switch goes, mine is empty because it's rwd) and fiberglassing it into there but I don't use the knob anymore.
If you want it to be out in the open, but look very clean what you could do is find out where you want to mount it (say on the dash bezel) and from the backside find somewhere nice to screw it into. You would have to pull the knob off of the controller, and drill a small hole (just for the size of the shaft from the controller to the knob) on the face of the bezel. Then put the shaft through from the back side, mount it to the rear, and then push the knob back into the shaft. All you would see sticking out of the bezel is the knob itself and not the whole square unit.
It really depends on how much you are willing for it to stand out lol. I like for it to be easily accessible, if you get pulled over for your music being too loud you can just turn it down quickly without having to reach into the glove box, center console, etc.
It really depends on how much you are willing for it to stand out lol. I like for it to be easily accessible, if you get pulled over for your music being too loud you can just turn it down quickly without having to reach into the glove box, center console, etc.
WarGawd
Member
- Joined
- Sep 2, 2012
- Posts
- 471
WarGawd said:Picked up my ball joints, tie rod ends, sway bar end links and sway bar bushings in NY today. Moog all the way around except for ACDelco bushings.
Doing those first thing in the morning.
I got that job done as planned - just thought people would get a kick out of the story...
When I picked up the parts, I also had a couple pairs of shoes waiting at my shipping spot (can't get them in Canada), so when I crossed the border, I declared those like a good boy. I didn't mind paying a couple bucks in taxes, because I saved so much on the shoes, and I thought it justified my short trip over...but the border patrol thought this would be a great time to search my vehicle while I was in the office making the payment. The car parts that I hadn't declared were out in plain sight, but I guess since I'd made no effort to conceal them, they just ignored them....whew
Saved enough on the parts thru RockAuto to more than pay the labor bill...I might have been able to tackle it on my own, but time and tool conssiderations also factor in.
Got to the shop, main mechanic (shop owner) and another guy dismantle everything...main mehanic needs the torch to remove driver side ball joint. No problem. He goes to look in on an apprentice, leaves other guy to take off passenger side BJ. Second guy is timid with the torch, use way too little oxygen, takes forever heating things up. I watch, kinda halfway hoping he burns the other rubber bushing (strut mount or LCA??) and has to replace it at their cost. Remaining grease in BJ catches fire, BJ not in horrible condition, so the ball seals against the socket, until the continued heat expansion causes the ball stud to explode from the socket and make a pretty serious dent in the hoist, ricochet off a couple walls and land 30' away.
View attachment 27674
Scared the crap out of everyone in earshot, including a guy at a welding shop 1/2 way down the block.
So main mechanic is slightly embarrassed, takes over from #2 and gets the remaining bits out. He tries to work a little faster I guess to make up for it, and installs the passenger side tie rod upside down:
View attachment 27675
I snap that pic and tell him I'm gonna post it on Facebook just to razz him a bit.

So after a brief misstep where the tie rods were installed with way too much toe angle requiring a second adjustment before I could drive it over for an alignment, the job gets done. Main mechanic decides now is a good time to use the hoist and my roof rack to crush his overhead bay door and dislodge it from the tracks. White paint smudge on the roof rack easily scrapes off with a thumbnail, no other marks. Vehicle trapped in shop till bay door is fully diamantled from it's hinges and reinstalled. Sorry no pics here...I was laughing too hard
And he knocked another 25% off the labor so hey, I'm happy.
MAJOR improvement. I now have a functioning sway bar that makes a noticeable difference in handling on curves, and rock solid front end. The alignment perfected the tracking and wheel centering. Loving it
")
BTW, is this the proper wear pattern for the front pads? Seems odd to me, shop guys weren't sure if it was normal on this vehicle or if selling dealer fk'd up with too small rotors when installed prior to my purchase:
View attachment 27677
Attachments


fr34kout said:If you want it to be out in the open, but look very clean what you could do is find out where you want to mount it (say on the dash bezel) and from the backside find somewhere nice to screw it into. You would have to pull the knob off of the controller, and drill a small hole (just for the size of the shaft from the controller to the knob) on the face of the bezel. Then put the shaft through from the back side, mount it to the rear, and then push the knob back into the shaft. All you would see sticking out of the bezel is the knob itself and not the whole square unit.
It really depends on how much you are willing for it to stand out lol. I like for it to be easily accessible, if you get pulled over for your music being too loud you can just turn it down quickly without having to reach into the glove box, center console, etc.
I was actually thinking about that option. I would like to have the just the knob showing somewhere on the dash instead of having the entire controller mounted. More time consuming, but will look 100 times better. Yeah getting pulled over and fumbling around the glove box or center console would not look good lol.

Conner299
Member
- Joined
- Jan 16, 2013
- Posts
- 279
WarGawd said:BTW, is this the proper wear pattern for the front pads? Seems odd to me, shop guys weren't sure if it was normal on this vehicle or if selling dealer fk'd up with too small rotors when installed prior to my purchase:
View attachment 13959 View attachment 13960
Since your vehicle profile states you have an XL, I would say the last person to do the brake job put rotors from a SWB 360 on. I have replaced a lot of pad & rotor combos, and have never had pads hang over, where they would make that kind of wear pattern.
DDonnie
Member
- Joined
- Mar 26, 2012
- Posts
- 2,631
dmanns67 said:I was actually thinking about that option. I would like to have the just the knob showing somewhere on the dash instead of having the entire controller mounted. More time consuming, but will look 100 times better. Yeah getting pulled over and fumbling around the glove box or center console would not look good lol.
If it's a matter of being pulled over, have you thought about a kill switch for the subs? Check out the second video i posted above, shows where i mounted mine.
Conner299 said:Since your vehicle profile states you have an XL, I would say the last person to do the brake job put rotors from a SWB 360 on. I have replaced a lot of pad & rotor combos, and have never had pads hang over, where they would make that kind of wear pattern.
 Time for some new, and proper sized, rotors.
 DDonnie
Member
- Joined
- Mar 26, 2012
- Posts
- 2,631
But i thought these might come in handy (particularly the pump) for some spring fluid changes.
View attachment 27678
These are harbor freight
View attachment 27678
These are harbor freight
Attachments

- Joined
- Nov 18, 2011
- Posts
- 49,665
DDonnie said:But i thought these might come in handy (particularly the pump) for some spring fluid changes.
View attachment 13961
These are harbor freight
That pump kinda works, but with thick fluid the pressure will pop the hose off and make a mess of you and the driveway...I know

The tri-ball hitch might work, but our recievers are kinda high, so you may need a drop depending on what trailer you would pull.
DDonnie
Member
- Joined
- Mar 26, 2012
- Posts
- 2,631
HARDTRAILZ said:That pump kinda works, but with thick fluid the pressure will pop the hose off and make a mess of you and the driveway...I know
What if you heat up the fluid first by soaking the bottle in hot water? Also, what fluid did you have the issue with? (so i know, im planning on doing both diffs and the transfer case soon)
Conner299
Member
- Joined
- Jan 16, 2013
- Posts
- 279
DDonnie said:What if you heat up the fluid first by soaking the bottle in hot water? Also, what fluid did you have the issue with? (so i know, im planning on doing both diffs and the transfer case soon)
Powerbuilt Suction Gun | Product Details | Pep Boys
This is by far the best thing Ive used for filling both diffs, and my transfer case. Good tip, on it, from MAYO3LT, in his "how to" videos. Front diff, and transfer have drain plugs, and used his method for the rear diff drain. No prblems at all. Disregard the one bad review on the PEP Boys web-site. Mine works fine.
WarGawd
Member
- Joined
- Sep 2, 2012
- Posts
- 471
Conner299 said:Since your vehicle profile states you have an XL, I would say the last person to do the brake job put rotors from a SWB 360 on. I have replaced a lot of pad & rotor combos, and have never had pads hang over, where they would make that kind of wear pattern.
Blckshdw said:
Suspected as much, thanx guys
Kdizzydawg
Member
- Joined
- Apr 14, 2013
- Posts
- 49
HARDTRAILZ said:That pump kinda works, but with thick fluid the pressure will pop the hose off and make a mess of you and the driveway...I know
How about getting two small hose clamps to hold the hoses on?

Sparky
Member
- Joined
- Dec 4, 2011
- Posts
- 12,927
Kdizzydawg said:How about getting two small hose clamps to hold the hoses on?
Problem is the hoses press fit into rubber. There is nothing rigid to clamp against.
- Joined
- Nov 18, 2011
- Posts
- 49,665
For the diffs and TC I only use a piece of hose now. No pump needed. Hold the bottle up high as possible and squeeze.
If you do the rear and do not have a drain plug, please at least take the cover off and inspect your gears. No reason not to and you can clean off the magnet then.
If you do the rear and do not have a drain plug, please at least take the cover off and inspect your gears. No reason not to and you can clean off the magnet then.
Kdizzydawg
Member
- Joined
- Apr 14, 2013
- Posts
- 49
Sparky said:Problem is the hoses press fit into rubber. There is nothing rigid to clamp against.
So you don't think putting a hose clamp around the black would reduce opening making it harder to pop out? Just looks like it is as good as what you are paying for which is not much!! I've seen better built transfer pumps than this one.. Personally i would just pay the extra money for better quality!!
HARDTRAILZ said:For the diffs and TC I only use a piece of hose now. No pump needed. Hold the bottle up high as possible and squeeze.
If you do the rear and do not have a drain plug, please at least take the cover off and inspect your gears. No reason not to and you can clean off the magnet then.
I can see this being easy for lifted vehicles, but not so easy for dropped vehicles. My pumpkin nearly sits on the cross member above it when on the ground, and even when I had the frame up on jackstands and the axle hanging down, I didn't have enough room to fit my bottle of diff fluid upside down comfortably lol.
Speaking of which, do you even need to jack up your truck to access the rear diff, or are you high enough up that you can crawl underneath just because of the height?

mubai
Member
- Joined
- Jan 5, 2012
- Posts
- 321
 Yeah, that's clearly a fail. You definitely lost stopping power. New brakes and rotors are in order.
Also, your story is hilarious, it sounds like a 3 Stooges episode!
BTW, is this the proper wear pattern for the front pads? Seems odd to me, shop guys weren't sure if it was normal on this vehicle or if selling dealer fk'd up with too small rotors when installed prior to my purchase:
View attachment 13959 View attachment 13960[/QUOTE]
- Status
- Not open for further replies.