Transmission removal inspection repair install

mrrsm

Lifetime VIP Donor
Supporting Donor
Member
Oct 22, 2015
7,737
Tampa Bay Area
Normally... Transmission Shops and AT Repair Specialists use a Wide Table Top with a Sturdy Base sporting an Aluminum covering to avoid absorbing all of the Spilled ATF... and they employ the use of Transmission Holding Fixtures like THESE:


TRANSMISSIONVICE1.jpgTRANSMISSIONVICE2.jpgTRANSMISSIONVICE3.jpgTRANSMISSIONVICE5.jpg

As an alternative, if you have any spare 2" X 4" sections laying around, perhaps you could be creative and design & build a Screwed-Together Base Support to be steady enough to do the Job after bolting the Case Flange up to it.

Mind you... if you do build such an apparatus, it can't be too tall and it must also be wide enough NOT to move around or tip over during this work.
 

Uncleenvoy

Original poster
Member
Feb 12, 2020
545
Ny
I have a pretty sturdy work area setup..i just need something or someone to get it up off the ground.
 

mrrsm

Lifetime VIP Donor
Supporting Donor
Member
Oct 22, 2015
7,737
Tampa Bay Area
If you have an Engine Hoist in the Garage... by using some well placed, well wrapped and tied Harbor Freight Woven Nylon Straps or say... a few light lengths of Steel Chain to attach in a balanced manner with the right strong fasteners (Extra Nuts Bolts & Washers) this would allow you to maneuver it up off the deck and around the garage.
 

gmcman

Member
Dec 12, 2011
4,656
Meant to post this last night, but this is an excellent, comprehensive video on the 4L60E.

20200825_170506.jpg
 
  • Like
Reactions: mrrsm

mrrsm

Lifetime VIP Donor
Supporting Donor
Member
Oct 22, 2015
7,737
Tampa Bay Area
If you were to "Scale Down " this Guy's "Crazy Gantry Design" and use a $25.00 "Come-A-Long" ...you could Build, Use and then Disassemble THIS clever apparatus once the work is done:


And THIS Design might just be exactly what you need. It is simpler, requires much less Wood and Hardware and will definitely give you the Mechanical Advantage you'll need to take the fully assembled Transmission from the Deck and swivel it around and over the top of your Bench Area:

 
Last edited:

Uncleenvoy

Original poster
Member
Feb 12, 2020
545
Ny
Oh god no..my tools are strictly limited for auto repair..i would have to go buy a saw,drill bits ,wood uggh..i saw a hoist on offer up for 150 not too far from where i gotta go pick up the t59..asked for the brand and model # as there wasnt much of a description.. gonna offer 100 see where i land
 
  • Like
Reactions: mrrsm

Uncleenvoy

Original poster
Member
Feb 12, 2020
545
Ny
So pissed right now..
 

Attachments

  • 20200826_103932.jpg
    20200826_103932.jpg
    474.8 KB · Views: 23
  • 20200826_103956.jpg
    20200826_103956.jpg
    619.4 KB · Views: 25

Uncleenvoy

Original poster
Member
Feb 12, 2020
545
Ny
Anyone got any welding xperience..im not trying to spend 4 hours and 12 drill bits teying to get this thing out..thinking of going to harbor and get that 120.00 welder and weld a nut on there..ive never welded b4
 

mrrsm

Lifetime VIP Donor
Supporting Donor
Member
Oct 22, 2015
7,737
Tampa Bay Area
Whoa... Slow Down just a Wee "Bit"....

Am I correct in assuming that there is a Chunk of a Broken Off TP-50 Bit...Stuck Down inside the Screw Hole...?

JAMMEDUP4L60EFASTENER.jpg

If so... Just know that the Steel that Tool is Made of is HARDER THAN CHINESE CHECKERS... and will require a few Carbide Tipped Drill Bits to drill into if this is the case... Tell us what happened EXACTLY leading up to this point... and don't spare any of the Gory Details.
 
Last edited:

Uncleenvoy

Original poster
Member
Feb 12, 2020
545
Ny
Pretty simple..got the tp50 3/8 drive on 6 inch extension with breaker bar..the first bolt i tried was the ine immediately below the stripped one..some resistance as expected but started to move slowly..i made sure i was looking at it and saw it moving..i had to straddle the trans to prevent itfrom moving and ti keep it at a straight angle..repeated the steps on the second bolt but ratchet was turning but bolt was not so i stopped...did all the others no fuss..went back to that second bolt made sure tp50 was fully seated and as soon as i applied pressure it move way too easy and i saw all the metal chewed up in there...straddled it where as i would be facing camera
 

Attachments

  • 20200826_121757.jpg
    20200826_121757.jpg
    647.2 KB · Views: 11
  • 20200826_121742.jpg
    20200826_121742.jpg
    735.4 KB · Views: 11

mrrsm

Lifetime VIP Donor
Supporting Donor
Member
Oct 22, 2015
7,737
Tampa Bay Area
Watch from around 6:25 into THIS Video for finer aspects of the Drill Out Method the VOP (Video Original Poster) uses to extract a completely stripped out Bell Housing Fastener from his 4L60E Transmission:

Mind what he mentions about "Using SLOW SPEED..." on the Drill Out Efforts...


As an alternative approach, in this Video... The Mechanic is using a MAPP Gas Torch (NOT an OXY-ACETYLENE COMBO RIG) and shows how to very judiciously apply HEAT to the Aluminum Outer case bulge points containing the in-dwelling, over-tightened Bell Housing Bolt Shanks and immediately and VERY SLOWLY starts to unwind those BH Bolts.

CAUTION:

The Melting Point of Aluminum is just over 1,220 Degrees Fahrenheit ... So NOT allowing the MAPP gas Flame to Concentrate Heat on any one location for too long will avoid Destroying the 4L60E Case.


Last edited:

gmcman

Member
Dec 12, 2011
4,656
Uggh, that sucks, @Uncleenvoy maybe look for a diesel tuning shop in your area. I'm sure there are numerous other shops that could weld a nut to that torx head, but those tuner shops deal with exhaust manifolds and turbo swaps and very likely have to deal with broken exhaust bolts.
 

Uncleenvoy

Original poster
Member
Feb 12, 2020
545
Ny
Drill 1/8 bit starter hole 5/16 but to finish..chisel to wack the outer perimeter then stuck a screwdriver in there and pryed the head off..after waistng all morning setting up this welding stuff..weld wouldnt hold the nut on..live and learn..took maybe 10 minits with the drill
 

Attachments

  • 20200826_145132.jpg
    20200826_145132.jpg
    542.2 KB · Views: 16
  • 20200826_152828.jpg
    20200826_152828.jpg
    546.1 KB · Views: 16
  • 20200826_152836.jpg
    20200826_152836.jpg
    702.4 KB · Views: 16
  • 20200826_152937.jpg
    20200826_152937.jpg
    535.9 KB · Views: 16
  • 20200826_153155.jpg
    20200826_153155.jpg
    483.6 KB · Views: 16
  • Like
Reactions: mrrsm

Uncleenvoy

Original poster
Member
Feb 12, 2020
545
Ny
Snap ring was in there real tight..i used the sledge and a cloth to give it a few taps.got the ring off but tis thing wont move..used channel locks and vice grips but no movement..gonna mive on tho the front and come back to it later
 

Attachments

  • 20200826_165318.jpg
    20200826_165318.jpg
    378.7 KB · Views: 11
  • 20200826_165414.jpg
    20200826_165414.jpg
    432.8 KB · Views: 11
  • 20200826_170456.jpg
    20200826_170456.jpg
    369.8 KB · Views: 10

mrrsm

Lifetime VIP Donor
Supporting Donor
Member
Oct 22, 2015
7,737
Tampa Bay Area
Take a Break and watch this "Instructional Video" from about 1:20 onward... You'll get the Idea...


Sledge Hammers and Transmissions.... Make for Bad Bed Fellows... Just Sayin'...
 
  • Like
Reactions: gmcman

Uncleenvoy

Original poster
Member
Feb 12, 2020
545
Ny
4got pics
 

Attachments

  • 20200826_182148.jpg
    20200826_182148.jpg
    483.6 KB · Views: 13
  • 20200826_182155.jpg
    20200826_182155.jpg
    420.6 KB · Views: 14
  • 20200826_182200.jpg
    20200826_182200.jpg
    280.3 KB · Views: 14

mrrsm

Lifetime VIP Donor
Supporting Donor
Member
Oct 22, 2015
7,737
Tampa Bay Area
Assorted Sizes in Zip-Lok Baggies and a Black Magic Marker on hand to ID and then safely separate and store these Fasteners and Parts... Just in case it RAINS?

Sorry....Didn't see them anywhere on the table... My Bad...
 

gmcman

Member
Dec 12, 2011
4,656
Pull both of the shift solenoids and see if there is any gunk inside of them.

The 2/4 apply piston cover has an O ring that keeps the cover from coming off which is likely why it was stubborn.

You'll have to search around for pricing but this is about what I paid for mine.

 
  • Love
Reactions: mrrsm

Uncleenvoy

Original poster
Member
Feb 12, 2020
545
Ny
Done for today its dark and ive run out of bug spray so all the mosquitoess that were waiting in line think the buffet is open..should be all done with the breakdown tmrw since i wont be running around for hours looking for any tools...only thing is that special tool to compress some part with a spring so i can get out the snap ring..i dont have no scraps of metal lying around to make one gonna see if anybody rents it.oh and that last metal ball wont budge.. i picked up the other 6 no problem and even when i took out that plate and tried to push it out fron the other side it still wont come out..that might be whats causing the problem in the first place..ill check the books to see what gear that ball is responsible for
 

Attachments

  • 20200826_193247.jpg
    20200826_193247.jpg
    332.2 KB · Views: 17
  • 20200826_201050.jpg
    20200826_201050.jpg
    308.6 KB · Views: 15

coolasice

Member
Oct 27, 2013
1,019
Northern Maine
Done for today its dark and ive run out of bug spray so all the mosquitoess that were waiting in line think the buffet is open..should be all done with the breakdown tmrw since i wont be running around for hours looking for any tools...only thing is that special tool to compress some part with a spring so i can get out the snap ring..i dont have no scraps of metal lying around to make one gonna see if anybody rents it.oh and that last metal ball wont budge.. i picked up the other 6 no problem and even when i took out that plate and tried to push it out fron the other side it still wont come out..that might be whats causing the problem in the first place..ill check the books to see what gear that ball is responsible for
looks like the 2nd apply ball, i guess it's know to take a beating. separator plate is probably toast.

don't have a rebuilders manual, but this seemed pretty intense in explaining how the 4l60e works....
 
  • Love
Reactions: mrrsm

gmcman

Member
Dec 12, 2011
4,656
Many issues with these transmissions is the check balls hammer the plate and eventually can push through or in your case get stuck. Ford uses Torlon check balls and generally don't have too many problems.

I'd say that's a very likely culprit. IMO, 150K is a good point to replace these seperator plates.
 

gmcman

Member
Dec 12, 2011
4,656
A few of the special tools you could improvise, but I recommend picking up the seal installer/resizer for the 4 shaft seals.

Possible upgrades if you elect could be a 5-planet output instead of the 4, wider carbon 2-4 band, GM hardened sunshell, Z-pack clutches, Sonnax HD overrun clutch, as well as the vette servo and the super hold 4th apply piston.
 

Uncleenvoy

Original poster
Member
Feb 12, 2020
545
Ny
@gmcman thanx
.i think this truck has 126k iirc..im gonna go look at some rebuild kits now see whats available as far as upgrades..if its cost effective i.ll do it..im selling this thing so trying to keep the expenses down.after doing the transmission lines and buying all that fluid to flush it plus what ive spent so far i gotta go do the numbers to see where im at..actually i think on the breakdown do far ive really only spent the 10 dollars for the tp50..the welder and trans jack are gonna be returned so maybe i can afford an upgrade
 
  • Like
Reactions: xavierny25

Uncleenvoy

Original poster
Member
Feb 12, 2020
545
Ny
This thing wont come out either..looks like its not seated evenly
 

Attachments

  • 20200827_113419.jpg
    20200827_113419.jpg
    368.2 KB · Views: 10
  • 20200827_113431.jpg
    20200827_113431.jpg
    297 KB · Views: 10

mrrsm

Lifetime VIP Donor
Supporting Donor
Member
Oct 22, 2015
7,737
Tampa Bay Area
A STRONG Neodymium Magnet ...Like THIS One will "coax" out that Plug:


MECHANICSMAGNET1.jpgMECHANICSMAGNET.jpg

You'll need some Assembly Lube later on...


4L60EGOOP.jpg

Easier to use than to make...


4L60ECOMPRESSOR.jpg

The correct tool for Springs Clips, etc...


TRANSMISSIONPLIERS.jpgTRANSMISSIONPLIERS1.jpg
 

Uncleenvoy

Original poster
Member
Feb 12, 2020
545
Ny
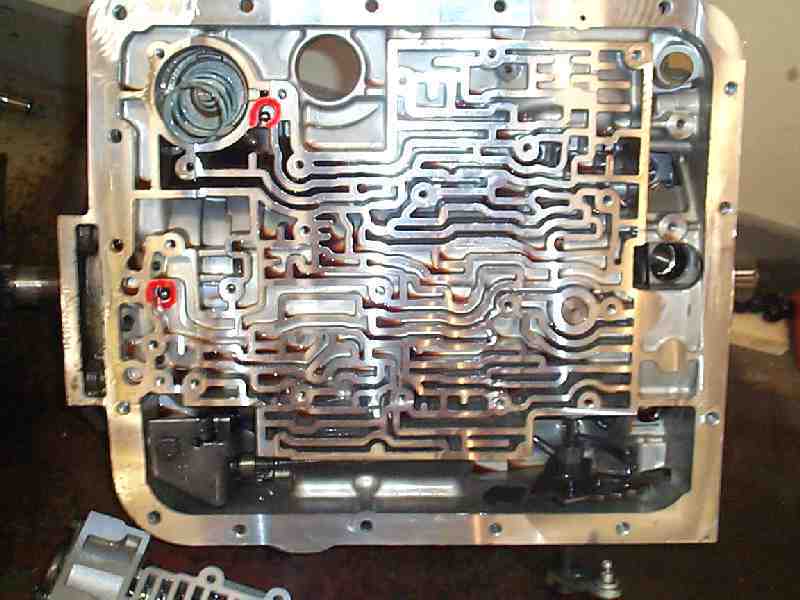
I dont think this is supposed to look like that
 

Attachments

  • 15985453953166156222141563601517.jpg
    15985453953166156222141563601517.jpg
    234.2 KB · Views: 16
  • 20200827_122457.jpg
    20200827_122457.jpg
    456.4 KB · Views: 16

Mooseman

Moderator
Dec 4, 2011
25,347
Ottawa, ON
Found this picture online. Although yours isn't pretty, the opening seems to be correct.

4L60EValveBodyUpperBallLg.jpg
 

Uncleenvoy

Original poster
Member
Feb 12, 2020
545
Ny
Gonna take those things back to harbor and start taking apart the insides when i get back..also alot if nips and chips in the main body part channels
 

Attachments

  • 20200827_124859.jpg
    20200827_124859.jpg
    237.5 KB · Views: 7
  • 20200827_124502.jpg
    20200827_124502.jpg
    144.6 KB · Views: 6
  • 20200827_124531.jpg
    20200827_124531.jpg
    245.1 KB · Views: 6
  • 20200827_124549.jpg
    20200827_124549.jpg
    262.2 KB · Views: 6
  • 20200827_124622.jpg
    20200827_124622.jpg
    141.7 KB · Views: 7
  • 20200827_124627.jpg
    20200827_124627.jpg
    208.5 KB · Views: 6
  • 20200827_124643.jpg
    20200827_124643.jpg
    224.8 KB · Views: 7

Uncleenvoy

Original poster
Member
Feb 12, 2020
545
Ny
@Mooseman yes the opening look like it supposed to be there but look at the edges of mine it looks broken and jagged..ill take a better pic when i get back..maybe when im done disassembly ill take it to a shop give them a few bux to inspect and get thier opinion
 
  • Like
Reactions: Mooseman

Uncleenvoy

Original poster
Member
Feb 12, 2020
545
Ny
Now im stuck..cant take out the guts without removing this thing and the cover wont budge..just broke a piece of the lip trying to pry it out...dont do that
 

Attachments

  • 20200827_163214.jpg
    20200827_163214.jpg
    367.3 KB · Views: 11

Uncleenvoy

Original poster
Member
Feb 12, 2020
545
Ny
Cut down the middle of that center piece used ratchet extension and hammer to lossen it... now its spinning freely with minimum force with channel locks
 

Attachments

  • 20200827_170727.jpg
    20200827_170727.jpg
    328.3 KB · Views: 8
  • 20200827_170732.jpg
    20200827_170732.jpg
    391.2 KB · Views: 7
  • 20200827_170838.jpg
    20200827_170838.jpg
    331.7 KB · Views: 8

Uncleenvoy

Original poster
Member
Feb 12, 2020
545
Ny
@gmcman i couldnt see the seal the cover was pressed in..u have to pull it out to see the seal then remove the seal to get the cover off..now that i see the blue seal gonna go for it
 

Attachments

  • 15985628754726880239318656916344.jpg
    15985628754726880239318656916344.jpg
    365.2 KB · Views: 8

Forum Statistics

Threads
23,332
Posts
638,005
Members
18,537
Latest member
moscoreli

Members Online