Hello everyone - I am a brand new member on this site and am thankful that it exists. This is my second try at posting this thread (although similar to many already posted). I lost all my previous typed text due to veering away from this site momentarily. It was actually a quite lengthy text explaining in detail what had happened to my wife's 04 TB out of nowhere. So this will be a more condensed version. We've owned this TB for roughly 4 years now and never had any real problems with it other than a bad ignition coil and a failed secondary air injection pump and water pump. Three days ago, my wife drove it to work just fine but it would not crank over when she went to leave. Both RPM and Speedometer gauges were jumping erratically about mid point of gauges with the key in the run position. Pushing the key to start did nothing but start the erratic gauge reading cycle over. The shift button on the shifter could not be depressed with key in run and foot on brake pedal and the shifter could not be moved out of the park position. When I checked it out, I noted that the interior lights looked dimmer than normal so I boosted the battery with my jumper cables which allowed me to depress the shift button and move the shift lever through all the gears. I went to crank it and it started and my wife drove it home with me following in my truck. Once home, shut it off, I would not restart and gauges erratic as before. Change the ignition switch which cured the erratic gauge condition as well as the locked shifter condition but still no crank. All the fuses are good, no blown ones found. I watched "MAY03LT's" video on "no crank testing and information". Thank you for posting! When I performed the test where MAY03LT connected the test light to the POS terminal of the battery with the test probe in socket 85 of the starter relay socket, had the key turned to crank and the test light illuminated, it failed that test. My test light did not illuminate when cranking. I did have power on sockets 87 and 86. I do not get voltage at the starter solenoid (purple trigger wire) when cranking. Battery has a full charge. Boosting/jumping the battery no longer helps. I can jump and start the truck by jumping across sockets 87 and 30 of the starter relay sockets and the truck will run. I checked the ground from socket 85 to vehicle chasis and the resistance is zero. Now I am leaning towards the neutral safety switch or the wire to and through it as being the culprit. Any thoughts, experience, suggestions, or advice on the next move I should make will definitely be greatly appreciated. I've been chasing this problem for 3 days now and it's becoming a PITA. Thank you for taking the time to read this!
You are using an out of date browser. It may not display this or other websites correctly.
You should upgrade or use an alternative browser.
You should upgrade or use an alternative browser.
SOLVED!-04 Trailblazer LT 4.2 L no crank - no start
- Thread starter Rad
- Start date
Rad... Sorry about the No Start problems and all the Panic Buttons that situation always causes...but Welcome to GMT Nation. Now... let's see if I can get the ball rolling at 02:56 AM. It would be helpful to know the following somewhere in your response posts:
Did you try to Start the Engine with the Shift Lever in the Neutral Position?
Mileage of the Vehicle?
Was the Battery Tested for any Dead Cells?
Did you Test for Continuity of Power to the Thin Wire (+) to the Solenoid?
Did you Test for Continuity of Power to the Thick Wire (+) to the Starter?
Did you have the Alternator Tested for throwing 13-15 Volts DC to charge the battery?
Are you prepared to replace the Starter as your 1st Point of Attack? I'm guessing this is it!
These Three Videos will provide some other Basic Electrical System Tests to Perform:
No Start Related to the Battery and Starter Circuit
How To Test 3,4,5 Pin Automotive Relays (Very Easy to Follow with Good Diagrams)
No Start Condition Starter Problem No Crank Diagnostics (Eric the Car Guy)
Two Videos that best describe the Electrical and Mechanical Actions of The Starter
Last edited:
Mooseman
Moderator
Did you try swapping the relay? IIRC, the one for the horn is the same. This is a good thread to read up which goes from testing everything up to ultimately being a dead starter.
http://gmtnation.com/forums/threads/crank-no-start-fixed.14693/
http://gmtnation.com/forums/threads/crank-no-start-fixed.14693/
roughtony
Member
Thank you to all who responded to this problem. I wasn't sure of which response to reply to so I responded to the most recent at the bottom. I have ran numerous tests with multi-meter and test light. The "road-block" I believe is where the starter relay is not being energized between pin 87 and pin 85 when turning the key to the start position. It fails that piece of the test as demonstrated in MAY03LT's video. Here are some answers to questions and the things I have done so far:
- vehicle mileage 125,000
- replaced ignition switch (new from dealer)
- replaced starter relay (new from dealer)
- confirmed battery is good (swapped out with known good from my truck to confirm)
- confirmed good battery connection (replaced terminal bolts with new from dealer)
- checked for corrosion (none evident)
- checked all fuses (none blown)
- checked continuity of always hot positive cable to starter (good)
- did NOT check continuity of purple signal wire to starter solenoid (assuming that it's good based on being able to start the truck by jumping across starter relay sockets 86-30..
- tried starting truck in both park and neutral with key (no go)
- did not have the alternator tested per-se but it shows around 14+ volts when truck is running
- I am ASSUMING the starter is good since I can jump the relay in the fuse block to energize the starter and start the truck
I should add that when I turn the key to crank, several components under the hood are being energized. Not sure how to name the components until I find out what they are. I am sure that I'm leaving something out that I have checked in addition the above.
Thank you, All!
Were you able to "Wiggle Check" The Negative Ground Connection at the Engine Block for signs of corrosion or a fractured Contact Tang? The Grounding Cable is one of the few things the engineers cannot dispense with from being made of Pure Copper Wire... subject to flex work hardening and, as the cable(s) bounce and move out of sync with the dynamic vibrations and motions of the Engine riding on top of the motor mounts. In time, the Ground Wire fastening point can become the weakest point at that tang where the metal tang will fatigue and fail...and even occasionally work correctly after that, if the cable and the block happen to touch.
In some instances, traces of sulfuric acid can migrate... yes...even from totally sealed batteries that have been tightened and then loosened hard enough and often enough to break the factory acid seal around the (+) and (-) lead posts...then flowing a small drop at a time all the way down the length of the cable insulation and settle on the metal contact tang and cause dissimilar corrosion between the plated steel or copper tang and the Aluminum in the block and behave exactly like a battery in its own right.
This condition prevails until the oxide by-products caused during this exchange of ions reaches a critical point when the Ground Connection finally loses enough (-) secure contact to be reliable any more. After that, it might behave unreliably depending upon engine compartment and ambient temperature and humidity, etc.
So, this last place that might not be a bad place to check for good contact, If you are aware of OTHER Bonding Straps...looking them over and checking for the same problems couldn't hurt. Somehow these problems almost always turn out to be simple once they are discovered.
Last edited:
Thank you for the reply MRRSM! No, I have not tried to wiggle the negative cable at the engine block but will do so in the morning. What has me puzzled is why I am not getting continuity at starter relay pin socket 85 when performing MAY03LT's test example. Something electrically is preventing this from occurring. Can you or anyone elaborate on that based on the description of what is occurring with the vehicle?
I am still thinking that it is possible that my neutral safety switch or the wire to it could be faulty since I believe that current has to flow through it first.
I have two tests I would like to perform for which I would really appreciate guidance from you experienced troubleshooters out there.
1. How do I perform a continuity test on the wire to and thru the neutral safety switch starting and ending at which specific test points? And, if the wire tests good, how do I test the switch itself?
2. I want to perform a continuity test on the purple trigger wire to the starter solenoid. Where do I find the other end of the trigger wire so I can check for an open?
I will report back after checking on the negative cable on the engine block. I do believe that there is just one electrical obstacle I need to overcome for the truck to return to normal and start with the key.
Thank you!
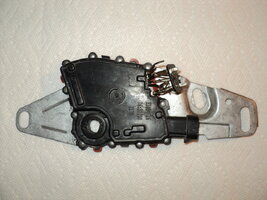
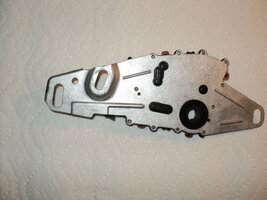
I'm going to assume that your vehicle is equipped with the usual 4L60E Automatic Transmission and ask you to ADD one other mechanical adjustment test before we delve any further into any other electrical diagnostics. The reason you should start here is nicely described in a brief but instructive video from Monster Transmission. The video explains that the Park Neutral Safety Switch is designed with the very purpose in mind of PREVENTING ANY ELECTRICAL CIRCUIT FROM THE IGNITION SWITCH TO THE STARTER SOLENOID/STARTER MOTOR TO INTENTIONALLY STOP THE VEHICLE FROM BEING STARTED WHEN THE TRANSMISSION IS IN GEAR.
So... if the ADJUSTMENT on the Park Neutral Safety Switch somehow has become misaligned because the two 13MM Hold Down Bolts in the Bracket have become loose and it moved from the exact, safe alignment necessary to allow a START condition to prevail... The Purple Wire will NEVER receive the necessary 12 Volts to activate the internal switch inside the solenoid that allows 12 Volts DC to pass into the fat (+) Wire that makes the Starter Motor RUN. Lets start here and see what you think:
If in the end, replacing the Park Neutral Safety Switch becomes necessary, this video is a fairly comprehensive HOW-TO... Never mind that the vehicle is NOT a Trailblazer as the 4L60E Transmission and the supporting use of an identical Park Neutral Safety Switch are ubiquitous and fundamentally the same and so you would follow identical procedures for R&R.
This is an Important Place to Pause...
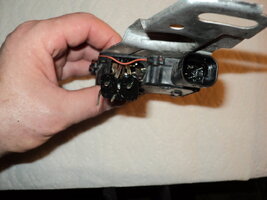
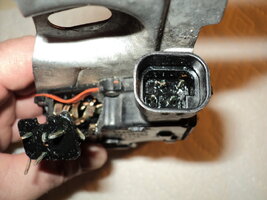
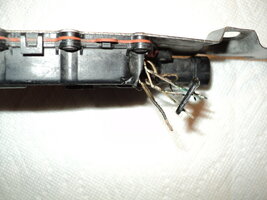
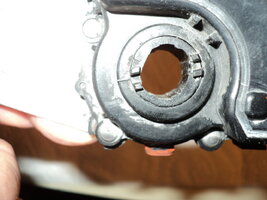
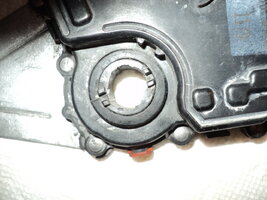
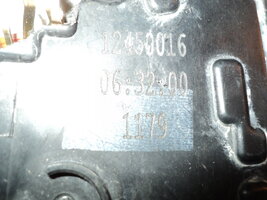
If you must replace the Park Neutral Safety Switch, you will have to destroy the body of the switch in order to safely extract the two weather-pack electrical harnesses because they are Gorilla Hot-Glued in by the factory to minimize complaints of the harness coming loose and having excessive numbers of customer complaints and unnecessary repairs. If you do not, you will run the risk of damaging the wiring. Don't worry about making a mess out of the switch as you will need to spend about $35.00 for a new one and repairing the wiring harnesses would be a much more difficult problem to solve. Just take your time with a pair of needle-nose pliers and use small screwdrivers to gently get the two plugs out of the switch receptacles unharmed:
One other remote possibility is that the Dual Wiring MetrePac Weather Connectors or their wires may have been cut or damaged by road debris and inspecting that area once they are extricated from the switch is important. Check the connectors and adjacent wires carefully with light tugging and a good visual inspection using a very bright light source. This type of problem is rare but it does happen, from time to time.
Attachments
Last edited:
IF your testing is correct, and you are seeing voltage at two places at the relay socket (relay removed, key in run), then you DO NOT have a switch issue. You need to focus on the "other side of things" at the relay.
It is more likely that you have a ground issue either in terms of the PCM not providing the ground OR the ground not making it to the relay.
Further, your initial "test" reported that you had some form of ground "somewhere"... was that during "start attempt" or all the time??? IF it is there all the time, you have a "finger problem" as to how you are testing / measuring things. That needs to be reviewed to ensure correct procedure and / or equipment.
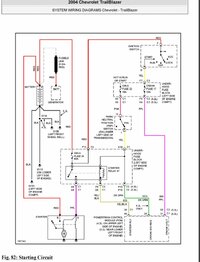
Thank you for all your input and effort trying to assist me with solving this problem. I have definitely ruled out the neutral safety switch as being a problem in the mix. With the key in the run position, I have power (12V) at two points of the starter relay (87 and 86) with the shifter in park or neutral. When I place the shifter in gear, I do not have 12V at starter relay pin socket 86 which tells me that the neutral safety switch is doing what it is supposed to. Looking at the starting circuit diagram, the yellow wire coming from the neutral safety switch to the starter relay is energized when in park or neutral with the key in run or start. Should the dark green wire (crank signal request) coming from the PCM also be hot at this point (with key in Run position) or only when pushing the key to the start position which sends crank voltage through the purple wire to the PCM? I understand that the yellow/black wire (ground) coming from the PCM closes the loop on the starter relay coil which in turn closes the contacts between 86 and 30 of the starter relay and sends voltage to the starter solenoid in turn energizing the starter (I hope I have this right). Clearly, what is supposed to happen is not happening. The starter relay is not being energized (no click) when pushing the key to start. I know that I need to check for voltage from point A to point B of the purple wire from the crank fuse to the PCM. I also know that I need to check for voltage from point A to point B of the dark green wire from the PCM to the starter relay. Again, looking at the starting circuit diagram, specifically at the the PCM at the bottom right, does "crank volt", "crank signal request", and "start relay" relate to the three large connectors at the PCM in the order that they are shown on the diagram, meaning does each wire represent it residing in a different connector? In order to check each one of those three wires for continuity or a break, how do I go about it? I noted that the right connector looking at the PCM from the driver side (darker blue) has three purple wire leading into it. Which one would I have to check for crank voltage? I am a bit confused. Also, how would I check the other two wires (dark green for voltage) and (yellow/black stripe) for ground? I believe I am on the right track...just need guidance on how to!
Thank you ALL!
Thank you ALL!
Eliminate the Impossible and What Remains Is Truth
"Eliminate all other factors, and the one which remains must be the truth."
Sherlock Holmes Quote
-=The Sign of Four=-
There is always the possibility that the PCM itself is the nexus of this problem. @Mooseman recently advised us in another similar thread that the PCM can be diagnosed by means of a High Quality Scanner/Code Analyzer and if it is failing... it will reveal itself.
http://sherlockholmesquotes.com/Sherlock-Holmes-on-Deduction-and-Deductive-Reasoning.html
good analysis... so checking for "continuity" is somewhat moot... although in general terms it is what you want to do. BUT you are going to be more successful checking for "specific values" such as looking for a voltage or ground at a specific point as oppose to see if a wire is "continuous". 
Anyways, you should likely focus your attention in and around the fuse block and probably around the "sense" wires (dark grn) since if I read your "analysis" correctly, the starter relay NEVER gets pulled up (because of lack of ground).
Thus use a "pin probe' (sharp pin thru the insulation) and check the voltage is leaving the fuse block on the dark green. My guess is it is not (first guess) and second guess, the ground isn't making it into the block (again pin probe it). Further check all your grounds going towards the pcm.
FWIW ... This site might seem a bit arcane in relation to doping out your specific problem wiring issues, but this free information on Vehicle Specific Wiring for Remote Starting of Vehicles might prove helpful. The site has a whole array of vehicles listed on the right hand margin might give some additional unique insight and/or provide you with another avenue to look at in order be able to get the vehicle to remotely start and then test the electrical components dynamically:
http://www.modifiedlife.com/2004-chevrolet-trailblazer-remote-starter-wireing-diagram/
http://www.modifiedlife.com/2004-chevrolet-trailblazer-remote-starter-wireing-diagram/
So...am I to understand that I should go below the fuse block by removing the three or four visible bolts on top of the fuse block to check and probe the wires underneath? Isn't that a bit risky? I guess that would be the only way to gain access to the wires the need to be checked. Looking at the diagram, the dark green wire is powered by fuse 22 (as is starter relay socket 86) and should be "hot" with the key in the run position feeding into the PCM. I am not clear whether the entry point of the three wires (yellow/green/purple) going to the PCM represent the three large connectors to the PCM (crank volt, crank signal request, starter relay). Knowing this information would help (I think). Thank you for the reply!
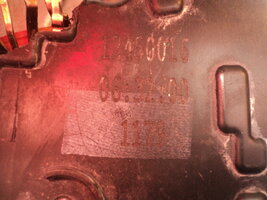
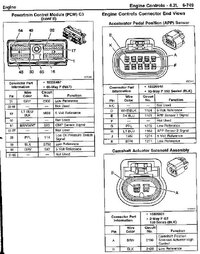
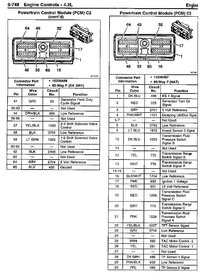
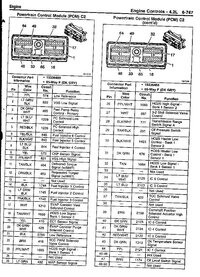
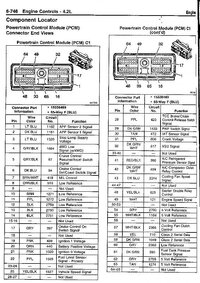
I snagged some PCM Diagrams to see if they help. The plug color on the documents are abbreviated... C1 (BLU) = Blue... C2 (GRY) = Gray... C3 (NAT) = Natural
Attachments
Not sure if you are looking at the same diagram I am. Would like to attach but don't know how. I have it saved to my hard drive as a JPG image but to attach an image it asks for a URL.
Not sure if you are looking at the same diagram I am. Would like to attach but don't know how. I have it saved to my hard drive as a JPG image but to attach an image it asks for a URL.
I am not perusing any wiring diagrams right but if you do a screen print of whatever you are viewing and post it via an edit here.... then I will try to get on the same page with you. I thought these might assist you with any focus you do on the PCM while troubleshooting. They are just JPG Screen Prints from the Trailblazer Factory Carline Series Shop Manuals. If nothing else...they give a good indication of Wire Colors/Combinations and the Features or Components they interact with.
Last edited:
Thank you for the PCM Diagrams, MRRSM! I am sure they will be a big help for pinning out the wires.
Not sure if you are looking at the same diagram I am. Would like to attach but don't know how. I have it saved to my hard drive as a JPG image but to attach an image it asks for a URL.
If you mean you want to add them HERE, just click the "Edit" link on the bottom Left hand corner of any post section and then select the brown "Advanced" button then select "Upload a File" button then just navigate to your Wiring Diagram, select it and upload it...be patient though ...as the server may have to re-size the image on the fly... and normally you cannot bulk load the images.
Personally, normally I wouldn't go near the PCM... however, in your case, I would certainly clean and reseat those cables / connections. With the other symptoms of "gage craziness", that might be an indication of poor cabling there. If it doesn't pan out, I would go back to the fuse block and as suggested check the dark green BUT also check the PPL leaving.
Yes playing with the fuse block might be encouraging trouble but it is a potential area for connectivity issues.
Having said all that and above, I would just meter (resistance) towards the PCM (with key in run / start depending on the fuse position you are at WITH FUSE REMOVED)..... NOTE: before you measure for resistance on any circuit that you don't much about... you should check the point with a voltage measurement to ensure that there ISN"T some form of voltage already present cause depending on that outcome, you might be compromising your meter for resistance measuring if you are "unlucky".
djthumper
Administrator
You want to upload a file. The image would be from another site.Not sure if you are looking at the same diagram I am. Would like to attach but don't know how. I have it saved to my hard drive as a JPG image but to attach an image it asks for a URL.
Okay... I need to leave in a little while for a holiday meeting with family... However THIS site may just prove to be a Gift from Santa Claus because it is Paul "Scannerdanner" Danner's Youtube Free Automotive College Classroom Training and he has plenty of No Crank NO START training videos that might just point you toward the EXACT problem area. His Play Lists are HUGE... so if you are patient and look around for things ...even generic information things about other vehicles... I feel fairly certain he can help you sooner than most other techs can.
You should use an add-on in your browser like VideoDownloadHelper to grab the most relevant training videos from him and watch them and freeze frame or replay them as often as necessary to jot down what you need. He is very down-to-earth and a highly competent and entertaining as an instructor: Good Luck and Good Hunting!
https://www.youtube.com/channel/UCrf6f8hn5oy4alB2WXJCIqA?spfreload=10
Last edited:
My brother, who is an excellent "wire chaser" will stop over tomorrow and help me out with this. For some of these checks, two people are necessary especially when checking the crank circuit. I do not give up easy and the absolute last thing I want to do is take it to a shop for them to mess with. I've had some totally dissatisfying experiences in the past and vowed to never ever let a shop touch any of my vehicles again. I want express my total appreciation for all the responses from you guys so far. Even if it turns out to be (worse case scenario) a failing/faulty PCM (I hope not), I will do my best to avoid allowing a shop touching anything on the vehicle. Based on my findings up to this point, I should not be too far from pinpointing the problem. As mentioned by budwich, I will check for power from the fuse block at the dark green wire and really go over all the grounds thoroughly. We know that the yellow/black wire is not delivering ground to the starter relay which is preventing the relay to energize and send voltage to the starter solenoid via the purple trigger wire. The key is to find out why and correct this condition. Rest assured, I will report back. Thank you to all of you!
FWIW...A small observation from one who is often very detailed during posts...ergo.. mostly wordy out of necessity: I have learned to take pity on my audience by dropping in paragraph inserts or breaks... only because so much text in one large block at a time looks like 'A Wall of Words'; so much so at times that reading and isolating sections often becomes impossible in a dense reading environment. So I force myself to follow a loose Rule of Thumb: If the dialogue is around 1.5 to 2 two inches deep... I cut in an obligatory "Break Line" so the reader can take a breath in between and not get Lost in the Weeds of my "Verdant Verbiage'. ;>)
If you want to call attention to somone either helping you or making reference to something he has touched upon ..you can put that fellow members' name in this format---> @Mooseman ...and he will get a message that you have quoted him or found something useful enough to prompt giving him a well-deserved Honorable Mention ...so to speak.This is the diagram I have been referring to (thanks to mooseman for making them available)
And for those of us who MUST have "The Nine Gates of The Kingdom of Shadows" version of the complete GM Factory Shop Manuals":
http://www.ebay.com/itm/2004-CHEVRO...ash=item58d2ddb8ea:g:q3gAAOSwPe1T0nqd&vxp=mtr
http://www.ebay.com/itm/2004-CHEVRO...ash=item58d2ddb8ea:g:q3gAAOSwPe1T0nqd&vxp=mtr
Reporting back after pinning out the blue connector to the PCM - thank you for the PCM connector diagrams @MRRSM! Every pin on the blue connector (C1) corresponding to the starting system wiring diagram checked out good. I could not check the negative ground signal leaving the PCM back to the starter relay which energizes the starter relay with the key in the crank position. The signal did not reach the relay to activate it and I don't know where it comes out of the PCM back to the relay (which connector). According to the starting system wiring diagram, this occurs through the yellow/black wire at starter relay pin 85 as demonstrated by @MAY03LT in his posted video.
I did not go under the fuse box to tear into it and check for the connection there. We did check the externally routed yellow/black wire the runs through the large connector mounted on the inboard side of the fuse box and the readings behaved correctly at that point as demonstrated in the video but could not get the test light to illuminate at PIN 85 of the starter relay. We may have been checking the same wire leading to the PCM as we did when we checked the PCM connector end (not sure). What we all already know is the it is the PCM that sends the negative signal to PIN 85.
I am now leaning towards the PCM as being the problem. If anyone can suggest how the signal to PIN 85 travels from the PCM to its destination, please advise! Thank you very much and Happy Holidays!
In Combat Shooting Instruction... I used to inform my students... "If you cannot group your shot pattern in the Center of Mass on your targets... Then Don't Mess Around Micro Moving your sights....MOVE YOUR SIGHTS BOLDLY... and bring your kill pattern on target!"
The same philosophy drops over a problem like this in mechanics like a Damp Rag smothers all those tiny brush fires that micro-managing hard to find problems always seems to create.
Since the PCM units are plentiful and you can pick and choose from amongst the best of what is out there... just get the one that matches your GM PCM specific Part Number...and plug it in and see what happens. At an average price of only A Bean ($100)... I recommend that you do as my instructions suggest and don't be surprised if you'll kill all of your enemies with a single shot!
http://www.ebay.com/sch/items/?_nkw...12&_fpos=&_fspt=1&_sadis=&LH_CAds=&rmvSB=true
Last edited:
Mooseman
Moderator
You can grab a PCM from any same year and engine truck, install it and do the security relearn. If after the security relearn it still won't start, then the PCM is sensing something that's inhibiting it from starting. If it does start, then the PCM was the culprit. All you'll need is a CASE relearn to get rid of the CEL.
If you have a pick-a-part nearby, you could find one even cheaper.
If you have a pick-a-part nearby, you could find one even cheaper.
Thank you Mooseman! I ordered a PCM from the site suggested by MRRSM. They will program it with my VIN. It is being shipped on Monday (Holiday delay). As I understand it, at a minimum the truck should crank with a good replacement PCM if my PCM was in fact faulty (please elaborate). We'll see what happens. I will report back once installed and tried.
Merry Christmas!
Merry Christmas!
Mooseman
Moderator
Reporting back...replacement PCM arrived today. Before removing my existing PCM from the vehicle, I connected my code reader (which I did not have available during my previous troubleshooting steps - it was in one of my other cars parked at my second home 3 hours away) and the code reader was able to communicate with the PCM - no codes found. I installed the replacement PCM and the exact same issue - no crank/no start. The security light did flash with the replacement PCM installed (which I expected). I connected my test light to the positive terminal to test starter replay socket 85 while my wife turned the key to start. No light just like before with the original PCM installed.
I removed the replacement and reinstalled the original since I believe that the problem is not the PCM and to avoid the relearn procedure along with some of the other requirements with a PCM replacement.
When I pinned out the Blue PCM connector earlier, all pins checked out and corresponded to the starting system wiring diagram. The negative (yellow/black wire) signal is not making it to starter relay pin 85. I suspect an open in that wire from the PCM to the relay. I may be forced to take it to a reputable shop. Any suggestions from you guys before I bite the bullet? Thanks!
If the same condition prevails with the replacement PCM... Since you noticed you had "Lock" LED on the Dash Panel, perhaps the problem is that the PCMs (either one or both ) are interpreting the Ignition Start Sequence as a violation of the Passcode sequence and therefore interpreting the action as an attempt to Steal the Vehicle. If you cannot hear the Fuel Pump running after you turn the key just before the RUN position, that might reveal if something Security wise is triggering the No Start No Crank condition. It might be a good idea to go through each and every Fuse and Relay connection and see if all the relays are grounding properly. Unfortunately... I don't have any PCM Fuel System and Security Electrical Diagrams to refer to...
Last edited:
What about giving this Passlock Reset Procedure a try?
http://www.cargurus.com/Cars/Discussion-t1859_ds552476
All of what is here seems like "Deja Vu... All Over Again..." But the suggestions still might be helpful:
http://www.greatautohelp.com/forums/viewtopic.php?t=4866
http://www.cargurus.com/Cars/Discussion-t1859_ds552476
All of what is here seems like "Deja Vu... All Over Again..." But the suggestions still might be helpful:
http://www.greatautohelp.com/forums/viewtopic.php?t=4866
Last edited:
Thanks MRRSM! The security light is off with my original PCM installed. It was only blinking with the replacement PCM installed (which I expected). I also expected a crank but no start with the replacement PCM installed. No dice!
I just checked for the fuel pump running with the key in the on position and it runs momentarily as it should.
The wire sending the ground signal from the PCM to the starter relay is my #1 suspect at this point. I just don't know how to go about locating it accurately.
I would really like to focus on that to either confirm or to rule it out.
Hopefully someone can guide me through that without ripping the fuse block apart. I know it's the yellow/black wire. I just don't know it's path from the PCM to the relay and through which branch of the harness it runs.
Thanks!

