My new to me 2006 9-7x 5.3 rebuild

TollKeeper

Original poster
Supporting Donor
Member
Dec 3, 2011
8,056
Brighton, CO
I put my truck up on ramps, and took a look...
I also watched a lot of YouTube videos, and nary a single one deals with a v8... I found one, but the video stops early in disassembly, and he never finishes it. Every other video deals with the I6. Which as we all know is a completely different animal.

So shifting the engine over, like they do on the I6, wont work, as the exhaust manifolds are already nearly pressed against the strut towers. You should be able to tilt the engine, take the 3 motor mount bolts off under the strut on the passenger side, and use a jack to jack up only the passenger side. Pretty sure you have to take the intake manifold off to do this thou. Not sure how this will, or wont help.
 

Reprise

Lifetime VIP Donor
Supporting Donor
Member
Jul 22, 2015
2,724
Ok - so here's an update. And I'm going to start a new thread and link to it, for easier searching.

<placeholder for new thread>

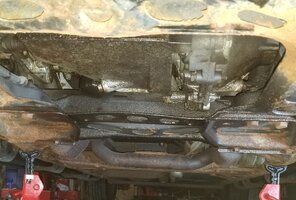
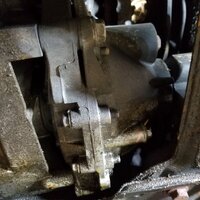
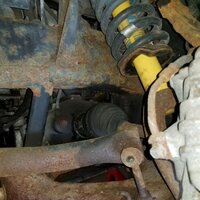
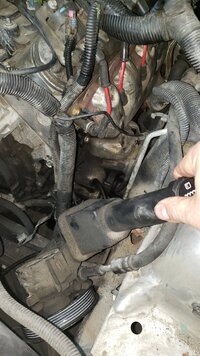
First, some pics. At this point, nothing has been removed but the wheels...
Main_View_01.jpg

Diff_01.jpg

Diff_Left_Wheelwell_View_02.jpg

And one of the disconnect, as we'll have to futz with that, too....
Disconnect_01.jpg

So... what do we see, so far...

- At first glance, removing the diff looks deceptively easy (I know I'll regret saying this...) :dunce:
Unfortunately, while the crossmember and LCAs can be removed, providing more room, it has the frame right underneath. So you won't gain a lot of room by doing so.

- The driver's side wheelwell view shows that the sway bar is going to have to be moved. Less visible is the amount of room between top / bottom of frame section. I'll try to get another pic with a tape measure showing the room, later. But I doubt it can be removed from the side.

- I did get my cherry picker dug out and moved, so that I can bring it in, if needed. For now, I'm optimistic (and hopeful) that I won't need to pull the engine. We'll see.

- There's a wee bit of room in the area of the diff, so for now, we'll hold open the hope that we can manipulate it to work on the seals, in place.

- Yes, it's very wet under there. Reprise has a lot of leakage to track down, and not all of it is from the diff. So he may be pulling the engine to track it down (hopefully just valve covers, etc. We'll see. But I won't put that stuff in this (or the new) thread. If I have to unbolt the motor mounts, I'm going to put new ones in, while I'm there.

Feel free to add comments here, etc. I'll update here with 'major' news, but for now, I'm going to try and build this out in a separate thread. Once it's started, I'll edit this post and link to it, above.

Have to stop here and take care of some personal business, but I expect to start on this again about 4pm CT, with an update a couple of hours after that. Until then, feel free to comment / make suggestions. Time spent so far (actually working and evaluating, not counting pics, posting, etc.): About 40 minutes (guesstimating).
 

TollKeeper

Original poster
Supporting Donor
Member
Dec 3, 2011
8,056
Brighton, CO
So I read a post about removing the power steering pump, and bracket, and possibly gaining enough space to pull it out the the top, but the post never said whether he did it that way or not, or even tried.

And its not wet, its just a bit of self applied anti-corrosive.
 
  • Like
Reactions: Matt

Reprise

Lifetime VIP Donor
Supporting Donor
Member
Jul 22, 2015
2,724
Afternoon update:

- Working on getting the P/S axle out.

Disco'd the ball joint stud from the UCA (remember to disconnect the ABS sensor wire), and let the knuckle swing down.
Buggered up one of the sway bar link studs (so I'll have to break out the sawzall or the death wheel.
Wanted to drop the sway bar for more room to hammer out the axle tripot.

Decided to disconnect the encoder (or TCCM) - whatever the flat-sided connector that connects to the axle disconnect with 8mm (?) bolts. That'll give me more room to hammer on the tripot without damaging the encoder, and potentially leave the sway bar in place.

Work continues. I'll update once I've got both axles out (going to try and leave the intermediate shaft in place, but I'll probably have to remove it to get the diff out.) The disconnect will be next after the axles. It's not dry in that area, so my fingers are crossed that a couple of love taps will loosen it axially, before I start prying it off.

Gonna make a bite to eat and get back out there.
 
  • Like
Reactions: Matt

Mooseman

Moderator
Dec 4, 2011
25,347
Ottawa, ON
And one of the disconnect, as we'll have to futz with that, too....
Disconnect_01.jpg


So... what do we see, so far...
I see an orange can of death. I have lost all respect for you. (Warming up the ban hammer :biggrin: )
 
  • Haha
Reactions: xavierny25 and Matt

TollKeeper

Original poster
Supporting Donor
Member
Dec 3, 2011
8,056
Brighton, CO
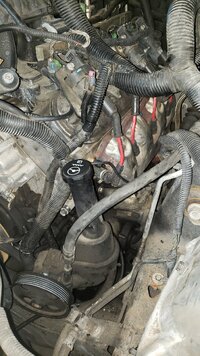
This is where I am at....
Battery out
Battery tray out
PCM/TCM out
PCM/TCM tray out
Alternator out
Alternator bracket out
Power steering pump loose
Driver's side of the engine harness folded out of the way
Wheels off
Body ran out of juice.........

20220525_203605.jpg20220525_203635.jpg
 

Reprise

Lifetime VIP Donor
Supporting Donor
Member
Jul 22, 2015
2,724
Continuing on from the bottom end... this will be my last update for tonight...

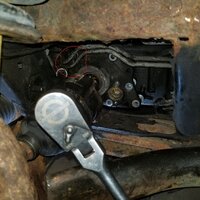
Summary: P/S axle is almost (!) out. As is the actuator, and the disconnect is ready to go. Here's a pic...

PS_Axle_Illustrated.jpg
The circled area in red shows the worst of the axle disconnect bolts to reach, especially if you have an earlier model truck (later, GM reconfigured the trans cooler lines so that they were more out of the way).

There's a clip right behind that area that holds the lines in place. You need to get at least one of the lines out of the clip, so that it can move freely. Also, using a 3/8" drive here should be easier (the 1/2" drive you see here is just a bit 'thick'.

In this pic you can also see that the inner axle end is hanging loose, and the disconnect itself is 'free' (it may not look like it, but it is).

As for why the axle isn't 'out' already... try as I might, I could not clear the tail end out of the end of the disconnect housing, even though I eventually removed / disconnected:
- the brake caliper and rotor
- the tie rod end
- the sway bar link
None of those let the knuckle drop any farther (so just leave them in place, like I originally did). It's possible to remove the knuckle, of course (and there's not much holding it on now, except the 24mm bolt at the bottom). But I left the knuckle connected.

1A Auto showed their tech pulling out the P/S axle as pretty as you please, with the disconnect (and actuator) intact. They're better techs than I am, I suppose </sarcasm>

Another video I found showed the guy having the same trouble I did (and he had a bad CV axle, as well). It's at:


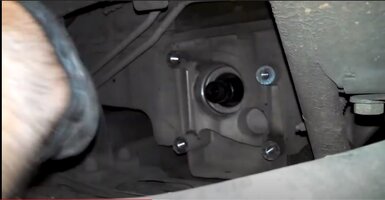
if you want to see it. I'll also post a screencap from it here, as it shows a nice rust-free pic of the area (you can also see that as this is an '05, the trans cooler lines are a bit more out of the way):
Axle_Disconnect_Removed.jpg

So... I'm stopping here for the evening. It appears that Tollkeeper has decided to attack from the top end. As such, this is the last post I'll pic here, as I don't want to make the thread confusing.

Time to get to this point... +3hrs (estimated)
Total time: ~ 4hrs.

More tomorrow. I expect to be able to get the D/S axle out easier (shorter, plus it's a straight shot to the diff). The intermediate shaft will likely need to be driven out, although I'll try and leave it intact.
From there, I'll replace the D/S seal as well, as it'll be easier to drive in while the diff is still connected to the truck. Then I'll remove the bolts and see if we can flip it / do the other seal, without pulling the entire diff.

Or, maybe Tollkeeper will have his all the way out from the top end. Whatever. I'm not racing.
 

TollKeeper

Original poster
Supporting Donor
Member
Dec 3, 2011
8,056
Brighton, CO
I'm not either. I can only put in an hour today, and maybe an hour tomorrow (back, kids and wife). I can put in a couple hours Saturday.

Got a second quote tonight from a shop my boss recommended.. he said 1500, and they would rebuild the differential.
 
  • Like
Reactions: littleblazer

TollKeeper

Original poster
Supporting Donor
Member
Dec 3, 2011
8,056
Brighton, CO
  • Like
Reactions: Matt

TollKeeper

Original poster
Supporting Donor
Member
Dec 3, 2011
8,056
Brighton, CO
Last edited:
  • Like
Reactions: littleblazer

TollKeeper

Original poster
Supporting Donor
Member
Dec 3, 2011
8,056
Brighton, CO
A 2009 Trailblazer has a inner seal part # 22761722. I am unsure if it would work, or why it wouldnt. Its the same Diff I thought?
 

Mooseman

Moderator
Dec 4, 2011
25,347
Ottawa, ON
GM is likely getting out of supplying parts for this platform since it's been over 10 years since it last rolled off the assembly line.

AFAIK, it should be the same seals. I'd go with the aftermarket ones just in case there was a minor difference.
 

Reprise

Lifetime VIP Donor
Supporting Donor
Member
Jul 22, 2015
2,724
Mini afternoon update...

- Both axles are out (I'll spare pics)...

My advice is to remove the knuckle. That's the only way I was able to extract the P/S axle.
Doing the same on the D/S allowed me to get that axle out in roughly 30-45min.
All other items in that area can stay as-is -- sway bar, shock tower, etc.​
The caliper rests nicely on the disconnected tie rod / LCA​
(I see I'll need a new outer tie rod on the D/S... )​

The 'loose' disconnect... was the top / front half of it. The back end is still embedded, but it should be easy enough to get that out. The only connection to the diff is via the intermediate shaft, which I'll punch out after lunch. So I'm leaving the disconnect housing for later, provided I can punch out the shaft w/o too much trouble.

Now draining the diff fluid and grabbing a sammich, while looking to see how many bolts hold in the diff (likely four). I know one will be hard to reach. Always is.

Looking at the area again... I'm *still* thinking the diff can be dropped w/o moving the engine.
However, the D/S LCA may need to be dropped, as part of removing the crossmember / brace in that area.

If it means actually having the diff out of the truck, I'm going to go for it (I'll have to realign the front end anyway, after replacing the tie rod ends...). But I'll still check to see if the diff can be manipulated, which was the whole point of doing this 'now'.

Next update will be some hours from now. Probably about 10pm.
Addn'l time spent (add to prior): +3hrs. I'll provide insight on my time estimates later.
 
  • Like
Reactions: Matt

TollKeeper

Original poster
Supporting Donor
Member
Dec 3, 2011
8,056
Brighton, CO
Yeap.. 4 bolts. The 1 rear, and 2 front are easy. The one in the middle you can get to, but you cant get much rotation on it. On the I6 models, they just lift the engine enough to clear the frame, and get a ratchet on it.

The bigger issue is the galvanic corrosion that happens at the center hub to oil pan, as you experienced on the other side with the disconnect.
 
  • Like
Reactions: Matt

Reprise

Lifetime VIP Donor
Supporting Donor
Member
Jul 22, 2015
2,724
Ok. Last update for awhile.
The good news... I got to a point where I know what has to be done to finish removing the diff.

The bad news... the people who came ahead of us (TBSSOwners, etc.) -- were right.
To get it out, you must either...

- Remove the oil pan (this would be my choice, for cleaning / checking the bottom end). The gasket is reusable, and I've done this on the Sierra. Good opportunity to renew the oil pump o-ring, too, along with cleaning out the pan, etc., etc.)

- Move the engine (not my choice, because of all the work that had to be done from the bottom, anyway). If I were going this direction, I'd use a hoist, and work as if you were going to R&R the engine. Lots more work, in my mind -- but you'd gain a lot of room to work, as a result.


Alternately... you could loosen the bolts and try removal from the top -- but you will have to remove the LH exhaust manifold, in addition to everything else you've removed. There's a good chance the exhaust pipe after the manifold will have to come out as well (and I didn't trace that back to see where the next connection is, but I think it's after the crossover to get to the P/S.

The 'small' end of the diff is pointing forward -- so when you look at it from the front, it appears there's a chance. It's when you get to the back end, removing the driveshaft, that your hopes get dashed.

There's a crossmember that will need to be removed, and I saw what's involved with that -- you won't need to touch the LCA.

I'm stopping here for tonight, and I won't be able to work on this tomorrow. When I pick this back up, I will look to see if LCA removal will help, but the LCA alone will NOT eliminate oil pan or engine moving (whichever you prefer). So pick your poison, and get ready to swallow a dose

Over the weekend, I'll start building out the 'at-large' thread on doing this. You've got enough here to go forward. If you have questions, I'll do my best to answer.

Sorry it didn't work out like we hoped.

PS: I did get the rest of the disconnect out 'clean' -- it was actually loose. Just had to wiggle it a little bit, gripping 180" apart. (e.g.; no galvanic corrosion. Yay me.)

PPS: The intermediate shaft is designed to come out / go in via the P/S There's a threaded end on that side that will support a M6 bolt; if you have a slide hammer, use it.
I don't have a slide hammer, so I threaded the bolt on, along with a couple of washers, and hooked up a pair of vice grips (as per @m.mcmillen , from a post years ago (kudos to him!) ). But what worked best for me was driving it out from the other end, with pry bar and long screwdrivers.

Finally, do not try and drive the intermediate shaft from the P/S -- when you look inside at the D/S of the diff, after pulling the axle on that side, you see a piece of the diff (round bar) that crosses the width of the opening. So it has to come out / go in via the P/S.
But if you're careful, you can use something long, thin, and flat, along with your BFH, to drive the shaft out of the diff / pan (driver's side to passenger side). I started with the long pry bar, and ended with two long flat screwdrivers (needs to get smaller & thinner, otherwise, you'll jam the driving tool in the diff).

If you drive it out... don't worry about scratching the end of the shaft (I didn't).
Do clean off whatever you use to drive out the shaft. You don't want to introduce dirt / grit into the gearing, if you're not going to rebuild it.
 
  • Like
Reactions: Matt and Mooseman

Mooseman

Moderator
Dec 4, 2011
25,347
Ottawa, ON
I say you can get it out the top by removing the fan, PCM/TCM with bracket, and battery holder and possibly the PS pump. I know I never took off the manifold or oil pan.
 
  • Like
Reactions: Matt

TollKeeper

Original poster
Supporting Donor
Member
Dec 3, 2011
8,056
Brighton, CO
I say you can get it out the top by removing the fan, PCM/TCM with bracket, and battery holder and possibly the PS pump. I know I never took off the manifold or oil pan.
Im at this point, and it still wont come out..

Where I got to last night.
Both left and right side spindles, CV's, are out.
Drivers side strut is out.
Intermediate shaft is out
Disconnect is out (no bonding! YAY!)
U-Joint disconnected
differential is unbolted from oil pan, and is loose (no bonding! YAY!)
Front driveshaft is out (read below)

As soon as I unbolted the U-Joint, a cap fell off, and needle bearings went everywhere.. New joint is ordered.

The disconnect is in perfect shape. No play in the bearings, smooth turning. My disconnect was kind of a pain to remove, as the tranny lines are still going over the top of it.

I can slide the differential out of the oil pan cup, and can move it forward about 5 inchs. Then it stops as it hits the frame crossmember in front of the harmonic balancer. I cant rotate it front to back, or side to side (much). I think I would gain a little bit if I took the motor mount out. Removing it might make it so I can slide it out the top, but to be honest, its not looking promising. It wont rotate in the space, as soon as you get about 15* of turn the top hits the oil pan, and the bottom hits the strut tower.

I can feel the seals, both inner and outer. I can feel rough spots in the seals. So they definitely need replaced.

My wife is even at the point of telling me to put it back together, and letting a shop do it.. I have to admit, its almost to that point for me. Im not as young as I used to be. It took me a 3 weeks to recover from doing the head/head gasket/lifter/push rods. This so far, feels worse than that.

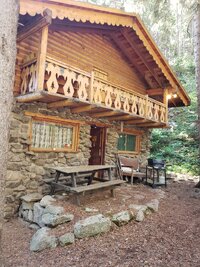
Anyone wanna come down and do the work? I will pay cash! <--Serious request (Plus Flight, Room and Board, and time at the cabin in the woods)

In the grand scheme of things, I am only about 4 hours into the dismantle.
 
Last edited:

Mooseman

Moderator
Dec 4, 2011
25,347
Ottawa, ON
One more thing I removed was the water pump because it was a new ACDelco (although I now don't have any LS engine vehicle to use it in). I don't think that would change anything. I think I twisted and turned it a lot. Sorry I can't remember exactly what I did.

If you're willing to pay my plane tickets, I'll go :biggrin:
 
  • Like
Reactions: Matt

TollKeeper

Original poster
Supporting Donor
Member
Dec 3, 2011
8,056
Brighton, CO
Ottawa to Denver tickets are not cheap! Holy hell! From 500 to 2000!

Im used to flying where ever for around 100 (inside the US)
 

Mooseman

Moderator
Dec 4, 2011
25,347
Ottawa, ON
Yeah, we're on opposite ends on the continent and I don't know if my back can take such a long ride. My offer was in jest since I have enough of my own stuff to do here.
 

TollKeeper

Original poster
Supporting Donor
Member
Dec 3, 2011
8,056
Brighton, CO
But the cabin in the woods?!20200705_090826.jpg
 
Last edited:

TollKeeper

Original poster
Supporting Donor
Member
Dec 3, 2011
8,056
Brighton, CO
So I am ready to spit bullets at this thing. I tried everything I could think of at pulling it out the top..

I gave up, and put it back together.

So do I put another 2000 into it, or sell it back to the dealer for 4000, and let it be there problem.
 

Mooseman

Moderator
Dec 4, 2011
25,347
Ottawa, ON
I'm the type that wouldn't admit defeat and keep it either way. My Saab also had issues but kept it to the bitter end. I could have kept it, swapped a 6.0L in it, but the body was just rotting away on it and it had bad mojo, always having problems.

The Avalanche though I got rid of like a hot potatoes while I was able to and insistance of the wife to get a new truck. I liked it but the cost of the gas, when it was still relatively cheap at the time, made me cry. It was giving me the same mojo as the Saab.

It would be quite tempting to dump it back on the dealer at a profit. As a last resort, you could try a leak sealer. I've had good luck with BlueDevil leak sealer. Used it on the Avalanche's front diff and the TB's R&P.

But like I always say, it's your call.
 

TollKeeper

Original poster
Supporting Donor
Member
Dec 3, 2011
8,056
Brighton, CO
If I had a lift, I wouldn't hesitate doing this repair the right way.

But I only have a jack, Jack stands, and I'm not a thin person. Not a lot of room to work.
 
  • Like
Reactions: littleblazer

Mooseman

Moderator
Dec 4, 2011
25,347
Ottawa, ON
Try the leak sealer. Nothing to lose, and then decide.

I'm wondering how I was able to get mine out. :confused:
 
  • Like
Reactions: littleblazer

TollKeeper

Original poster
Supporting Donor
Member
Dec 3, 2011
8,056
Brighton, CO
Try the leak sealer. Nothing to lose, and then decide.

I'm wondering how I was able to get mine out. :confused:
Do you have a specific one in mind? Never really considered a leak sealer for a rotating piece in a GL5/90W fluid.
 

TollKeeper

Original poster
Supporting Donor
Member
Dec 3, 2011
8,056
Brighton, CO
Also, here is the list of current NEW problems...

The drivers side lower control arm bushing is smoked (worst I have ever seen)
The drivers side tie rod end is bad
The blend door died while I had the truck apart

So the bushing, and tie rod, being bad might explain why the truck pulls when I apply the brakes in a corner.

Its just a piling up bag of $hit. I looked around to see if I could replace the truck for what I would sell it for back to the dealer... The simple answer is NO!
 
Last edited:
  • Sad
Reactions: Matt and Mooseman

Mooseman

Moderator
Dec 4, 2011
25,347
Ottawa, ON

TollKeeper

Original poster
Supporting Donor
Member
Dec 3, 2011
8,056
Brighton, CO

littleblazer

Member
Jul 6, 2014
9,265
The Blue devil I used was more or less brake fluid... seems ro have worked well in what I used it in.
 

TollKeeper

Original poster
Supporting Donor
Member
Dec 3, 2011
8,056
Brighton, CO
Off the wall question... Were any of the GMT360's Flex Fuel?
 

TollKeeper

Original poster
Supporting Donor
Member
Dec 3, 2011
8,056
Brighton, CO

TollKeeper

Original poster
Supporting Donor
Member
Dec 3, 2011
8,056
Brighton, CO
I guess the bigger question should be aimed at @limequat . Can my ECM that you recently tuned be turned on for E85? Its just a E40 PCM isnt it?
 

TollKeeper

Original poster
Supporting Donor
Member
Dec 3, 2011
8,056
Brighton, CO
  • Like
Reactions: littleblazer

Mooseman

Moderator
Dec 4, 2011
25,347
Ottawa, ON
At double the price.
 

TollKeeper

Original poster
Supporting Donor
Member
Dec 3, 2011
8,056
Brighton, CO
At double the price.
I got him down to 7000...

If I sell the Saab to the Dealer.. 4000
Insurance Claim on the GMC.. 2700

The math does work!

Its a weirdly optioned truck thou.. I ran the VIN, it appears to be a AWD, GT4/G80, no SunRoof, and with a B3P RPO.. Which is a odd one, usually reserved for Regency Conversion Vans/Trucks.
 
  • Like
Reactions: Matt

Forum Statistics

Threads
23,332
Posts
638,006
Members
18,537
Latest member
moscoreli

Members Online