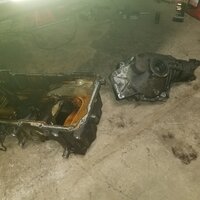
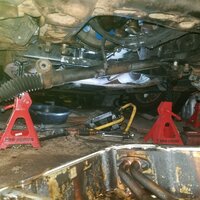
Disassembly completed...

To get here, I had to...
- Pry out the diff casing from the pan, using 2 different pickle forks (if you don't own one, you can rent a set of 3 from AAP or your local auto parts store). Major PITA; the worst part of the experience. Add: +4hrs
- Remove the crossmembers / braces
The front plate isn't terrible, but one of the 4 x 21mm bolts was stuck, and I couldn't get it off with my impact. Couldn't find my breaker bar, so went and got another (aka: 'upgraded'). Had to 'leg press' the bolt with the breaker, while it was braced to keep the bar / socket in place, as the bolt faces downward. Fun times.
The other (3) 21mm bolts came out without much of a problem. Except that I had my palm bracing the bottom of the impact gun for one of the bolts, and the concrete floor underneath my hand. So when I pulled the trigger... ouch. Thankfully, I didn't break any bones, but I think I did some damage, b/c I still have some pain in the area that got crushed.
The thought occurred to me just before pulling the trigger that it isn't well-regulated (it's kind of 'all or nothing'). Too bad I didn't pause a moment to consider what I was doing. Thankfully, I was able to act quickly and reverse the gun to free my hand (I did have mechanics' gloves on, or I probably *would* have broken something).
Be careful, kids!

The rear brace will appear to be welded in on the sides, but it's not... it's just attached with addn'l 15mm bolts. However, it won't actually come 'out', unless you lift up the exhaust on one side to get it out (you can see it turned sideways, below, resting on the bracket it connects to). It can be actually removed more easily once the pan is out, if you want it out (rust removal / paint, etc.)
I just wanted more room to clear the pan, and for the next thing that had to be removed...

This is the passenger side of the steering rack. There's 1 x 21mm bolt / nut that has to be removed, which was tedious (no room for my big @ss electric impact, for one). I wound up removing the nut by hand, on the creeper, two ratchet clicks at a time (limited swing), while holding the bolt in place from behind with the new breaker bar with my other hand (long story, and this post is long enough, as-is).
Note that the driver's side of the rack can be left intact / as-is, as can the connection to the steering linkage, and you don't have to evac the lines (leave them in place, as long as they're not too corroded -- mine were fine). Just the
one bolt will need to be removed for the clearance you need.
Add: +1hr for the rack drop, the way I did it.
With the rack dropped down on the one side, you'll (finally!) have room to remove the pan. GM states to secure the diff to the frame rail, but I found it sits there nicely, and I just used one hand to keep it from moving while I maneuvered the pan off and out with the other.
From there, it's wide open, and the diff will come right out (it's heavy, so be ready!)
If you didn't disconnect the rubber vent tube at the top of the engine bay, the weight of the diff should rip it right off when you drop it out. At least it did, for me.

Addn'l items...
While the propeller shaft (front driveshaft) doesn't absolutely have to be removed, I wanted the extra room, so I did pull it out. I'll show that in my own thread. It takes three different manipulations back / forth to remove it, but I got it out.
Also, add about +1hr to remove the oil pan bolts (most are 10mm; you also have the two bottom A/C compressor bolts on the passenger side (15mm), two bellhousing cover bolts (also 15mm), the two long 8mm (M6) in the rear of the pan, and one more 10mm at each side of the rear of the pan that holds a plastic cover in place on each side (the DS one will come right out; the one on the PS encapsulates the circumference of the starter, so just leave it in place, after removing the hold down bolt from the pan).
(BTW... I didn't have those little plastic covers at the rear of the pan on my Sierra, with its 4L80, so
this surprised me a little bit. Not terrible, once you know they're there.)
I did
not have to loosen or remove the starter.
There's also the one 10mm on the lower DS front that holds the wiring harness bracket (which comes off, via a plastic tab on the PS after removing the hold down bolt. Standard LS wire routing.
The oil dipstick tube / holder will pull right out of the pan; no need to disconnect it at the block, at least during disassembly.
I did not have to remove or loosen the shock towers, the LCAs, or the swaybar links. Just remove the spindles / axles / splined disconnect / intermediate shaft / diff from pan, and the remainder of stuff from this post.
Next steps (for me)...
With this diff out, I'm going to replace the oil pan gasket (leaking), and leave this thing in RWD-only mode for a bit, while I put everything else back together, along with replacing a couple of suspension joints, etc. Then I'll rebuild the diff, replacing seals & bearings where needed, along with properly sealing the case so it doesn't leak all the fluid out any longer. Finally, I'll put the diff back in. Before winter. Maybe. (I only use 4WD one or two days a year, so while I've got the diff out, I'll just ziptie the actuator to the frame, so I don't have a 'Service 4WD' light on the dash for the next few months).


 Probably less, TBH.


