What did you do to your GMT today?

Status
Not open for further replies.

blazinlow89

Member
Jan 25, 2012
2,088
HARDTRAILZ said:
Can you take some pics of how much you cut off all your wheel studs please? Really wondering if on the rear you get into threaded portion.

No pics from my end, but when installing the set I got off you I measured to see what the minimum size could be. I measured the depth to the edge of the lugnuts that came with it and 1" sounds about right. Also you may lose 1-2 threads per stud at that depth. However when I ground down my studs I only had to take off a tiny amount, less than 1/8". Still had .18 of the un threaded portion left. I contemplated turning them down the extra .3" to suck my wheels in a bit, but the change would have been minimal. Also the look has really grown on me, even got some thumbs up from some Jeep guys last week.
 

MAY03LT

Original poster
Member
Nov 18, 2011
3,431
Delmarva
dmanns67 said:
Now you need to install a set of RedLine Tuning hood struts :thumbsup:

Wonder why GM decided not to put lights under the hood on the TB :undecided: Guess no one ever needs to look at the engine compartment at night.

I don't know if the redlines will be able to support the hood now....there's enough deadener to make it feel like a brick and it closes the first time every time now:wootwoot:

Yeah from what I read all the cool stuff that the 02s got were ditched to cut costs. So we get no underhood light, no glove box light, and no front engine bay cover. My 03 didn't come with the OEM light (drivers side) or wiring but it had the mounting holes under the liner, and the liner didn't have a layer of insulation in that spot. So getting the drivers side in was a snap. The pass side, not so much.
 

jrSS

Member
Dec 4, 2011
3,950
dmanns67 said:
Nice, looks like my grille. Are you upgrading to LT headlights too?

Nope...he cut off the end pieces on the cross bar. (Guy I bought it from)
 

Short Bus

Member
Dec 2, 2011
1,906
I got my tires installed and I got to say I like 'em!!

mms_picture_zps9d3d22af.jpg


mms_picture_2_zps9d3ee653.jpg


The bad news is I did a little off-roading and damaged my bumper cover. How do I take the cover off to realign it?

mms_picture_1_zps6408867b.jpg


mms_picture_zps15a20051.jpg


jrSS said:
Nope...he cut off the end pieces on the cross bar. (Guy I bought it from)

Is he sending you the crossbar ends, or are you going to cut yours?
 

Blckshdw

Moderator
Nov 20, 2011
10,779
Tampa Bay Area, FL
Short Bus said:
... How do I take the cover off to realign it?

I like those tires too. :thumbsup:

For the bumper cover, remove the grille, there will be a pair of 10mm bolts and one push pin securing it to the top of the impact bar. Underneath that section (behind the license plate holder) will be 4 plastic push pins you'll have to pry out. There's another push pin on the bottom of the driver's side, the passenger one looks like it got ripped out already. Once everything is free, slide the bumper cover forward an inch or so to release it from the mounts on the wheel wells, and it's off.
 

Short Bus

Member
Dec 2, 2011
1,906
Blckshdw said:
I like those tires too. :thumbsup:

For the bumper cover, remove the grille, there will be a pair of 10mm bolts and one push pin securing it to the top of the impact bar. Underneath that section (behind the license plate holder) will be 4 plastic push pins you'll have to pry out. There's another push pin on the bottom of the driver's side, the passenger one looks like it got ripped out already. Once everything is free, slide the bumper cover forward an inch or so to release it from the mounts on the wheel wells, and it's off.

Thanks :thumbsup: I tried to get a push pin at Auto Zone, but they didn't have one that was big enough. I'll have to hit up a body shop or the stealership. I got it back on the mount without taking it off, is there a way the adjust the gap?
 

Blckshdw

Moderator
Nov 20, 2011
10,779
Tampa Bay Area, FL
Short Bus said:
Thanks :thumbsup: I tried to get a push pin at Auto Zone, but they didn't have one that was big enough. I'll have to hit up a body shop or the stealership. I got it back on the mount without taking it off, is there a way the adjust the gap?

That gap sucks. I don't think there's a way to fix that. As for that bottom push pin, I lost both of mine, so I just looped a zip tie in there. If I need to get it off, they can be cut quick and easy.
 

Wooluf1952

Member
Nov 20, 2011
2,663
Milwaukee, Wisconsin
Short Bus said:
Thanks :thumbsup: I tried to get a push pin at Auto Zone, but they didn't have one that was big enough. I'll have to hit up a body shop or the stealership. I got it back on the mount without taking it off, is there a way the adjust the gap?

I bought some of those pins from a dealer a few years ago. They were only 70 cents each. :twocents:
 

Short Bus

Member
Dec 2, 2011
1,906
I got the cover off. 3 of the 4 clips under the plate holder was gone. 2 of the 4 plastic tabs that hold the mount to the bumper cover was broke, I'm trying Gorilla Glue to fix it. I think I'll have it looking good again when I put it back together later.
 

ryan

Member
Dec 4, 2011
30
Finally got sick of my stock speakers working some days and not others. Installed 4 kenwood 2 way speakers,wow what a difference. :thumbsup:
 

jrSS

Member
Dec 4, 2011
3,950
Short Bus said:
I got my tires installed and I got to say I like 'em!!

mms_picture_zps9d3d22af.jpg


c30984d7-65fd-46f9-88f8-202f1645e465_zps9c4a7167.jpg


The bad news is I did a little off-roading and damaged my bumper cover. How do I take the cover off to realign it?

mms_picture_1_zps6408867b.jpg


mms_picture_zps15a20051.jpg


Is he sending you the crossbar ends, or are you going to cut yours?

I bought his cut ones. ..i would never cut mine.
 

smokey262

Member
Sep 15, 2013
147
In the last few days I have been taking care of maintenance chores. Here is what I have done; Install new lift supports for the hatch, install new lift supports for the glass, change the front diff lube, change the transfer case lube, change the rear diff lube, change the oil and oil filter. I have only had this truck for about 3.5 weeks now so I am establishing a baseline of where the vehicle is at because who knows what the previous owners have done and when.

Looks like I have to get a new type of filter wrench. The pivoting head strap one I was using today made the job harder that it ought to be.

Think I will do some searching to see if anyone has done a remote filter on these trucks.
 

chief0299

Member
Jul 1, 2013
67
Changed water pump, heater hoses, upper and lower radiator hoses and thermostat. Watched the temps via dash command and running temps went from 173 degrees before to 205 after.

Water pump was leaking a little from the weep hole and thermostat was stuck open. Bought this thing with 135,000 miles. Got 138,900 on it now. Next payday, oil change, drop the trans pan and changed the front diff oil, rear diff oil and transfer case fluid.

One of these days I need to get a tune to get it running with more power and kill that damn secondary air pump system.
 

jbacklund

Member
Dec 16, 2012
118
Drove into this when I was parking at the grocery store. Came too close but no damage done thanks to the guard.


Simon01

Member
Dec 5, 2011
116
Hung pads and rotors on all 4 corners on the TB. Man, the inside surface of the rotors were rusted bad! Gotta love the north and road salt. :mad:

Not too bad for about 72K miles. At least the caliper brackets came off without too much fuss.
 

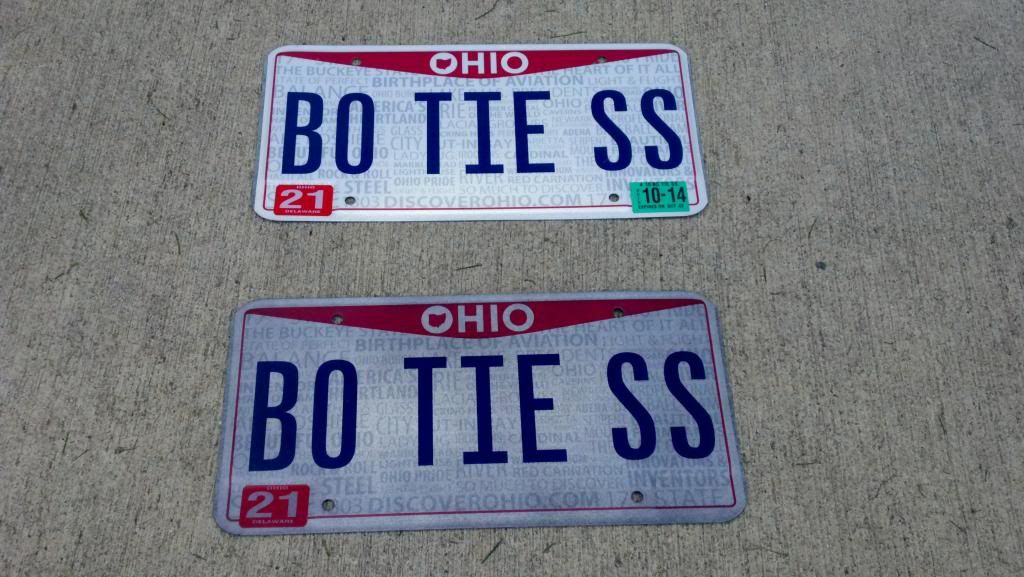
BO TIE SS

Member
Nov 18, 2011
1,497
Installed my new tags today.


Oops, looks like my front tag accidentally got some VHT over spray on it. I wonder how that happened? :wink:

2013-09-29_14-28-50_880_zps891bdbc6.jpg
 

DenaliHD66

Member
Dec 4, 2011
597
jbacklund said:
Drove into this when I was parking at the grocery store. Came too close but no damage done thanks to the guard.


How much weight do those bumper guards withstand? Like are they strong enough to put a strap on and pull another vehicle out of the mud with?
 

Short Bus

Member
Dec 2, 2011
1,906
DenaliHD66 said:
How much weight do those bumper guards withstand? Like are they strong enough to put a strap on and pull another vehicle out of the mud with?

My wife has 1 on her Nitro. I wouldn't try pulling anything with it. They're mainly for looks.
 

jrSS

Member
Dec 4, 2011
3,950
Drove her about 1.5 ht away to pick up my last steely I needed to run for the winter. I have some plans for the winter months plus maybe some go fast parts.
 

MAY03LT

Original poster
Member
Nov 18, 2011
3,431
Delmarva
underhood019_zpsb5b43158.jpg


underhood022_zpsaf6483ad.jpg


underhood029_zps1bbd7732.jpg


I got the first underhood light modded up and had to take it for a whirl. It's got the OEM beat for sure.

The last pic shows the coverage of the pass side light. I think when that guy gets modded the engine bay is going to light up like the fourth of july.:wootwoot:
 

HARDTRAILZ

Moderator
Nov 18, 2011
49,665
DenaliHD66 said:
How much weight do those bumper guards withstand? Like are they strong enough to put a strap on and pull another vehicle out of the mud with?

No way. Just a couple lil plates bolt to frame. They would crumple in a heartbeat. The guard itself is really thin metal. Mostly appearance only.
 

gmcman

Member
Dec 12, 2011
4,673
Gave the daily drivers their bi-annual dose of BG 44K. Once at fall to clean up before all the crappy winter gas, then again in spring after the crappy winter gas. Not that summer blend is perfect but these are good maint times.
 

xtitan1

Member
Jun 5, 2013
467
MAY03LT said:
underhood019_zpsb5b43158.jpg


underhood022_zpsaf6483ad.jpg


underhood029_zps1bbd7732.jpg


I got the first underhood light modded up and had to take it for a whirl. It's got the OEM beat for sure.

The last pic shows the coverage of the pass side light. I think when that guy gets modded the engine bay is going to light up like the fourth of july.:wootwoot:

Do you manually turn those on, always on, or turn on with the hood? Those are sick, I'd be able to see all of your tools I dropped real easy with those babies!
 

Matt

Member
Dec 2, 2011
4,042
MAY03LT said:
underhood019_zpsb5b43158.jpg


underhood022_zpsaf6483ad.jpg


underhood029_zps1bbd7732.jpg


I got the first underhood light modded up and had to take it for a whirl. It's got the OEM beat for sure.

The last pic shows the coverage of the pass side light. I think when that guy gets modded the engine bay is going to light up like the fourth of july.:wootwoot:

I would hope there's a how-to coming. :biggrin:
 

Matt

Member
Dec 2, 2011
4,042
Changed the oil and filters in the TB and the wife's Rav4. Mobil 1 and Wix.
 

jpimp

Member
Feb 1, 2013
176
got the old 4x4 disconnect off.

took the running boards off.
 

MAY03LT

Original poster
Member
Nov 18, 2011
3,431
Delmarva
xtitan1 said:
Do you manually turn those on, always on, or turn on with the hood? Those are sick, I'd be able to see all of your tools I dropped real easy with those babies!

They're going to come on automatically when the hood opens and also have an independent off switch. They have a mechanism inside that moves which makes/breaks electrical contact when the hood is opened/closed. That's cool for getting them to turn on, but (in the 02s) they shared power with the interior light circuit so after 15 or so minutes they would time out and turn off even with the hood open. I think it would be better to have control of when they turn off, plus wiring them up to a switch would be easier then tying them into the interior light supply circuit.

Matt said:
I would hope there's a how-to coming. :biggrin:

We can do that!:cool:
 

Blckshdw

Moderator
Nov 20, 2011
10,779
Tampa Bay Area, FL
MAY03LT said:
They're going to come on automatically when the hood opens and also have an independent off switch. They have a mechanism inside that moves which makes/breaks electrical contact when the hood is opened/closed. That's cool for getting them to turn on, but (in the 02s) they shared power with the interior light circuit so after 15 or so minutes they would time out and turn off even with the hood open. I think it would be better to have control of when they turn off, plus wiring them up to a switch would be easier then tying them into the interior light supply circuit.

:undecided: Hmm, the LED mod bug just cracked an eye open after getting a whiff of a potential new mod... I guess that can go on the list of things to look at after these damn headlights get done. :crazy:
 

blazinlow89

Member
Jan 25, 2012
2,088
Why not have something like a hood pin for an alarm. It word only work when open, run a wire straight from the fuse box for power. Ground the hood pin.
 

Short Bus

Member
Dec 2, 2011
1,906
Got the recall taken care of, I pulled up a little before 4:00PM and they had me pull it in and fixed it on the spot, without an appointment :cool:
 

Sparky

Member
Dec 4, 2011
12,927
:hissyfit:

I won't bore anyone with the details, but I fought with the UCA and the spring/shock assembly for a little while. Got it in, but it was getting dark. Figured I'd go ahead and attach the UCA to the ball joint stud, but in the process I didn't have it aligned right, cross threaded the retainer nut on the bolt, and totally stripped it out :duh:

Anyone know where I can get a replacement bolt and nut????? Dealer perhaps? I'm at a standstill, AGAIN, until I can get a new nut and bolt for UCA ball joint pinch.

What a project :lipsrsealed:

At least my new Makita impact makes pretty short work of the spring compressor.
 

chief0299

Member
Jul 1, 2013
67
Sparky said:
:hissyfit:

I won't bore anyone with the details, but I fought with the UCA and the spring/shock assembly for a little while. Got it in, but it was getting dark. Figured I'd go ahead and attach the UCA to the ball joint stud, but in the process I didn't have it aligned right, cross threaded the retainer nut on the bolt, and totally stripped it out :duh:

Anyone know where I can get a replacement bolt and nut????? Dealer perhaps? I'm at a standstill, AGAIN, until I can get a new nut and bolt for UCA ball joint pinch.

What a project :lipsrsealed:

At least my new Makita impact makes pretty short work of the spring compressor.

Hardware section at Lowes or Home depot. Get some grade 8 nuts and bolts.
 

xtitan1

Member
Jun 5, 2013
467
chief0299 said:
Hardware section at Lowes or Home depot. Get some grade 8 nuts and bolts.


Maybe the Home Depot and Lowes around me are abnormal, but whenever I go to the hardware section and try to find specific pieces that come in those little baggies, they're always completely misplaced and even if you do find what you are looking for, someone has just opened the baggie and taken everything.
 

Sparky

Member
Dec 4, 2011
12,927
Stopped by the Home Depot, bought some grade 8 bolts, nuts, and lock washers (since they had no grade 8 lock nuts, what the heck), then put the driver side suspension back together, tore down the passenger side, and rebuilt it too :thumbsup: Also swapped its upper ball joint pinch bolt just so both sides would match :biggrin:

Passenger side went much smoother. Clearance to those UCA bolts was better, the new UCA didn't have the bushings pushed in too far like the driver side UCA did, so I didn't have to fight those bolts to get them lined back up. I did fight the shock in the lower shock arm as it did NOT want to come out near as easily as the driver side did, but I got it out and swapped.

I did find my passenger side upper ball joint is a little loose however :no: It isn't too bad as I cannot detect any play in it yet, but it doesn't take much effort to move the stud around. Guess I may need to look into replacing it again soon-ish. At least it is the upper and not the lower joint, those are a pain.

Also managed to hyperextend the CV on the passenger side so that was fun getting it seated back in the tripot properly while supporting everything else :crazy: All back together now so all good :biggrin:

Tomorrow: Do the rear end (sway links, spacers), then hopefully Thursday the new tires and front end alignment :wootwoot:

Let me just say again how AWESOME that Makita cordless impact is. It does a great job breaking stuff free, compressing the spring compressor, etc. Totally worth the purchase IMO!
 

Sparky

Member
Dec 4, 2011
12,927
I'm beat, eaten and itching in a million places from mosquitoes, but everything is installed except for the driver rear sway bar end link. I cannot figure out how I got it installed so tight :crazy: But screw it, I'm done fighting this thing, it stopped being fun after a couple nights and the mosquitoes coming out in swarms. When I get the alignment and the tires tomorrow I'll just have the shop chop that thing off and install my new link I have ready to go. I have no desire to crawl under this truck with a wrench for a while now!

I do hope to get some electrical stuff done on it, but that's a different type of thing so I'll be OK with it.
 

nygiantsfan

Member
Sep 30, 2013
8
first time poster, long time lurker here...replaced both upper ball joints today.. about an hour for each one, thanks for the tips on this site, i was able to set up quickly and get it out of the way. THANK YOU GMT NATION!!!
 

xtitan1

Member
Jun 5, 2013
467
nygiantsfan said:
first time poster, long time lurker here...replaced both upper ball joints today.. about an hour for each one, thanks for the tips on this site, i was able to set up quickly and get it out of the way. THANK YOU GMT NATION!!!

Welcome, fill out your garage in your profile!
 

Porkins

Member
Dec 5, 2011
6,960
nygiantsfan said:
first time poster, long time lurker here...replaced both upper ball joints today.. about an hour for each one, thanks for the tips on this site, i was able to set up quickly and get it out of the way. THANK YOU GMT NATION!!!

Welcome to the Nation!
 
Status
Not open for further replies.

Forum Statistics

Threads
23,756
Posts
642,998
Members
19,351
Latest member
Court H.

Members Online