More PIDs for Torque App

TJBaker57

Original poster
Lifetime VIP Donor
Member
Aug 16, 2015
3,199
Colorado
Here I have substituted the binary of the three outputs A, B, C in that order in place of the english wordings. Might this work for your purpose?? (do check my work of course for accuracy)

View attachment 101011


Always check your work as well as the work of others.

Sure enough I hosed this up.

The "A>5" is a bit shift operation that moves the bits 5,6,7 to the right where they become bits 0,1,2. On top of that the TFP switch designations of A, B, and C appear in the PID from the low bit to the high bit, not the other way around as I knew but didn't think about when I wrote the equation.

Here is ( I believe) what I should have written to have the switch designations of ABC to appear from left to right in the display. The Tech 2 displays the switch positions as High and Low and so the display of this equation will retain the format, 1 = High, 0 = Low....

Well crap!! Site issues prevent uploading a screen shot so here it is in text... better if anyone wanted to copy it anyway...

Lookup(A>5::3='110':5='101':6='011':4='001':2='010':7='111':1='100':0='000')
 
  • Like
Reactions: YUKON87

TJBaker57

Original poster
Lifetime VIP Donor
Member
Aug 16, 2015
3,199
Colorado
When testing a PID, could you turn header printing on than run a broadcast header when testing a PID to see which module respononds? If I can remember correctly I tried this many months ago with success.


I just happen to be at my testbench setup right now. I'll check. But related thought.... in testing I have seen that most always PID numbers seem to be grouped in ranges particular to the module involved.
 
  • Like
Reactions: YUKON87

TJBaker57

Original poster
Lifetime VIP Donor
Member
Aug 16, 2015
3,199
Colorado
When testing a PID, could you turn header printing on than run a broadcast header when testing a PID to see which module respononds? If I can remember correctly I tried this many months ago with success.


Yes it works, and the result code of "7F" responses indicate the reason when not supported. A "31" as thd next to last byte indicates that the request of PIDs by mode 22 is supported but the specific PID address is out of range for that module. An 11 in the same location indicates that module does not support requesting PIDs by mode 22. A 12 in that same location indicates the request format is incorrect, such as where I neglected to add "01" at the end of the request.

Cannot uoload imagery at the moment so hopefully the pasted text below isn't too much af a hairball...


14:40:29.555 >14:40:42.007 221941
14:40:42.033 6C F1 1A 7F 22 19 41 11 11
14:40:42.039 6C F1 10 7F 22 19 41 12 B0
14:40:42.047 6C F1 40 7F 22 19 41 12 F4
14:40:42.055 6C F1 60 7F 22 19 41 11 FB
14:40:42.088
14:40:42.088 >14:40:52.911 22194101
14:40:52.936 6C F1 40 7F 22 19 41 01 31 07
14:40:52.950 6C F1 10 62 19 41 00 00 9A
14:40:52.954 6C F1 1A 7F 22 19 41 01 11 8F
14:40:52.962 6C F1 60 7F 22 19 41 01 11 EF
14:40:52.994
14:40:52.994 >14:42:29.035 22212401
14:42:29.360 6C F1 1A 7F 22 21 24 01 11 A5
14:42:29.368 6C F1 10 7F 22 21 24 01 31 4A
14:42:29.377 6C F1 40 62 21 24 FF CF
14:42:29.383 6C F1 60 7F 22 21 24 01 11 C5
14:42:29.436
14:42:29.437 >14:42:52.285 22221c01
14:42:52.406 6C F1 10 7F 22 22 1C 01 31 D4
14:42:52.411 6C F1 40 62 22 1C 0C 80
14:42:52.411 6C F1 60 7F 22 22 1C 01 11 5B
14:42:52.411 6C F1 1A 7F 22 22 1C 01 11 3B
 
  • Like
Reactions: YUKON87

YUKON87

Member
Nov 15, 2019
73
Al
Yes it works, and the result code of "7F" responses indicate the reason when not supported. A "31" as thd next to last byte indicates that the request of PIDs by mode 22 is supported but the specific PID address is out of range for that module. An 11 in the same location indicates that module does not support requesting PIDs by mode 22. A 12 in that same location indicates the request format is incorrect, such as where I neglected to add "01" at the end of the request.

Cannot uoload imagery at the moment so hopefully the pasted text below isn't too much af a hairball...


14:40:29.555 >14:40:42.007 221941
14:40:42.033 6C F1 1A 7F 22 19 41 11 11
14:40:42.039 6C F1 10 7F 22 19 41 12 B0
14:40:42.047 6C F1 40 7F 22 19 41 12 F4
14:40:42.055 6C F1 60 7F 22 19 41 11 FB
14:40:42.088
14:40:42.088 >14:40:52.911 22194101
14:40:52.936 6C F1 40 7F 22 19 41 01 31 07
14:40:52.950 6C F1 10 62 19 41 00 00 9A
14:40:52.954 6C F1 1A 7F 22 19 41 01 11 8F
14:40:52.962 6C F1 60 7F 22 19 41 01 11 EF
14:40:52.994
14:40:52.994 >14:42:29.035 22212401
14:42:29.360 6C F1 1A 7F 22 21 24 01 11 A5
14:42:29.368 6C F1 10 7F 22 21 24 01 31 4A
14:42:29.377 6C F1 40 62 21 24 FF CF
14:42:29.383 6C F1 60 7F 22 21 24 01 11 C5
14:42:29.436
14:42:29.437 >14:42:52.285 22221c01
14:42:52.406 6C F1 10 7F 22 22 1C 01 31 D4
14:42:52.411 6C F1 40 62 22 1C 0C 80
14:42:52.411 6C F1 60 7F 22 22 1C 01 11 5B
14:42:52.411 6C F1 1A 7F 22 22 1C 01 11 3B
Not at all this is my specialty. Good work.
 

YUKON87

Member
Nov 15, 2019
73
Al
Brilliant! Tried to do things like this from the basic bit and byte look up formula based on theory alone, made a little headway, however, not much success. This is very valuable to me on equation. So, thank you sir!
 
Last edited:

Sb350

Member
Jul 8, 2021
8
Finland
I have 2001 lm7 with hptuners 2 bar os. Torque shows only 105kpa max while in boost. What kind a custom pid I have to create to get the right MAP data? Tried to search data but couldn't figure it out..
 

TJBaker57

Original poster
Lifetime VIP Donor
Member
Aug 16, 2015
3,199
Colorado
I have 2001 lm7 with hptuners 2 bar os. Torque shows only 105kpa max while in boost. What kind a custom pid I have to create to get the right MAP data? Tried to search data but couldn't figure it out..


What PID are you using in Torque Pro for MAP?? There is usually more than one PID for this.
 

Sb350

Member
Jul 8, 2021
8
Finland
I tried all the stock ones that I can find from the add gauge menu.. never used the custom ones so not really familiar with them. I guess I need the pid number and correct math to make it work?
 

YUKON87

Member
Nov 15, 2019
73
Al
I just happen to be at my testbench setup right now. I'll check. But related thought.... in testing I have seen that most always PID numbers seem to be grouped in ranges particular to the module involved.
Just saw this for some reason. That's very observant. I've noticed the same such as a PID 20XX or 21XX, where that would be BCM. Or where 19XX, for an example, would be, I believe, transmission or TCM.
 

TJBaker57

Original poster
Lifetime VIP Donor
Member
Aug 16, 2015
3,199
Colorado
I tried all the stock ones that I can find from the add gauge menu.. never used the custom ones so not really familiar with them. I guess I need the pid number and correct math to make it work?


So the stock ones will be using what are called standard PIDs as defined in SAE J1979. MAP will likely be service 01 and PID# 0B. Custom PIDs for GM will usually list a MAP sensor at service 22, PID# 1142.

To begin with, turn your key to RUN but do not start the engine. Start the Torque Pro app and tell me what the MAP. sensor reading is. Also can you say what the elevation is where you are, as in feet above sea level??

Also, in the Torque Pro app, go to settings, then manage extra PIDs/sensors, the at top right click the three vertical dot menu, then select Add Predefined set. Now select the entry Pontiac/GM/Opel/ Vauxhall. This will add a slew of GM custom PIDs. Some will work, some will not. They still won't read your 2 bar sensor right as these are for standard vehicles but we can correct this when we get some more data.
 

TJBaker57

Original poster
Lifetime VIP Donor
Member
Aug 16, 2015
3,199
Colorado
Just saw this for some reason. That's very observant. I've noticed the same such as a PID 20XX or 21XX, where that would be BCM. Or where 19XX, for an example, would be, I believe, transmission or TCM.


It is easy for me to spot these things as I have scanned the entire possible range from 0000 to FFFF on several modules. For aTrailBlazer P10 PCM for example almost all non-standard PIDs are located between 1100 and 19FF. There is another large group at FC00 to FCFF. I have done the same. for my 2005 Yukon with LM7/P59 but cannot recall the results offhand.

edit: on the TrailBlazer PIDs in the 31xx range are TCCM, the 41xx range is Liftgate, 21xx & 22xx is BCM. I do see some overlap for example one or more 21xx in the Liftgate and a few FCxx in the TCCM.
 
Last edited:
  • Like
Reactions: YUKON87

Sb350

Member
Jul 8, 2021
8
Finland
So the stock ones will be using what are called standard PIDs as defined in SAE J1979. MAP will likely be service 01 and PID# 0B. Custom PIDs for GM will usually list a MAP sensor at service 22, PID# 1142.

To begin with, turn your key to RUN but do not start the engine. Start the Torque Pro app and tell me what the MAP. sensor reading is. Also can you say what the elevation is where you are, as in feet above sea level??

Also, in the Torque Pro app, go to settings, then manage extra PIDs/sensors, the at top right click the three vertical dot menu, then select Add Predefined set. Now select the entry Pontiac/GM/Opel/ Vauxhall. This will add a slew of GM custom PIDs. Some will work, some will not. They still won't read your 2 bar sensor right as these are for standard vehicles but we can correct this when we get some more data.

It shows 99kpa when the engine is not running. I live in Finland. The elevation is 141meter/463feet.
I have added the extra GM PIDs from the menu. Knock retard, commanded afr and few others are in use now. Thanks for helping!
 
  • Like
Reactions: TJBaker57

TJBaker57

Original poster
Lifetime VIP Donor
Member
Aug 16, 2015
3,199
Colorado
It shows 99kpa when the engine is not running. I live in Finland. The elevation is 141meter/463feet.
I have added the extra GM PIDs from the menu. Knock retard, commanded afr and few others are in use now. Thanks for helping!


Well now that is not what I was expecting for a MAP reading. I must confess I have no knowledge of how HPTuners works and have no first hand experience with 2 bar sensors. I expected to see a MAP reading in Torque of about half of actual kPa. This was a guess based on having a sensor that reports about twice the normal range but only having the same 0 to 5 volt scale to fit it into. You did replace the original MAP sensor with a 2 bar version, is this correct?? What sensor did you use? Any chance of finding a datasheet for it?

I downloaded a few datasheets from a couple of sensor manufacturers and the sheets have the required calibration values from which to formulate an equation.
 

Sb350

Member
Jul 8, 2021
8
Finland
Well now that is not what I was expecting for a MAP reading. I must confess I have no knowledge of how HPTuners works and have no first hand experience with 2 bar sensors. I expected to see a MAP reading in Torque of about half of actual kPa. This was a guess based on having a sensor that reports about twice the normal range but only having the same 0 to 5 volt scale to fit it into. You did replace the original MAP sensor with a 2 bar version, is this correct?? What sensor did you use? Any chance of finding a datasheet for it?

I downloaded a few datasheets from a couple of sensor manufacturers and the sheets have the required calibration values from which to formulate an equation.
Yeah it's weird. In hptuners everything works just like it should, I have compared the hptuners values to an analog gauge. Yes I have 2 bar sensor, can't remember where I got it.. but it is a GM product. Not sure if the torque map reading below 100kpa is 100% true, but it's close..

Im gonna make a new dash and fit 10" tablet as a gauge cluster, so it would be nice to have the boost show up correctly..
 

TJBaker57

Original poster
Lifetime VIP Donor
Member
Aug 16, 2015
3,199
Colorado
Yeah it's weird. In hptuners everything works just like it should, I have compared the hptuners values to an analog gauge. Yes I have 2 bar sensor, can't remember where I got it.. but it is a GM product. Not sure if the torque map reading below 100kpa is 100% true, but it's close..

Im gonna make a new dash and fit 10" tablet as a gauge cluster, so it would be nice to have the boost show up correctly..


I am puzzled by where Torque Pro is getting the 99 kPA (which is accurate for your elevation) but failing at boost. I know Torque is reading the SAE defined standard PID of Mode 01, PID OB. .... unless HPTuners alters the normal PCM internal calculations for the MAP sensor?? I have no clue. There is often a GM specific PID for MAP I will add a guess below here...


So I am assuming you have been using a Torque Pro built-in gauge for Intake Manifold Pressure. I don't think the GM set included a MAP sensor PID. I will give you something to try.... The equation is based on some volts to kPa specification I found online claiming to be for a GM 2 Bar MAP sensor #16040609... the PID is a common PID for MAP.... with luck it will be close but I have no way of testing here.

Add this as a new PID in Torque Pro. From the same three dot menu where you added the GM set select "Add custom PID"... Click the "OK" ....

ODB2 Mode and PID: 22114201
Long Name: GM 2 Bar MAP
Short Name:MAP-2
Min Value:0
Max Value:205
Scale Factor:x1
Unit Type:kPa
Equation: (A/51+0.2111)*39.2156
Header:6C10F1
 

Sb350

Member
Jul 8, 2021
8
Finland
I am puzzled by where Torque Pro is getting the 99 kPA (which is accurate for your elevation) but failing at boost. I know Torque is reading the SAE defined standard PID of Mode 01, PID OB. .... unless HPTuners alters the normal PCM internal calculations for the MAP sensor?? I have no clue. There is often a GM specific PID for MAP I will add a guess below here...


So I am assuming you have been using a Torque Pro built-in gauge for Intake Manifold Pressure. I don't think the GM set included a MAP sensor PID. I will give you something to try.... The equation is based on some volts to kPa specification I found online claiming to be for a GM 2 Bar MAP sensor #16040609... the PID is a common PID for MAP.... with luck it will be close but I have no way of testing here.

Add this as a new PID in Torque Pro. From the same three dot menu where you added the GM set select "Add custom PID"... Click the "OK" ....

ODB2 Mode and PID: 22114201
Long Name: GM 2 Bar MAP
Short Name:MAP-2
Min Value:0
Max Value:205
Scale Factor:x1
Unit Type:kPa
Equation: (A/51+0.2111)*39.2156
Header:6C10F1

Tested this today: It Works! Didn't have the time to really compare the analog gauge and this new PID but looks like it is close enough. Thanks ! !
 
  • Like
Reactions: TJBaker57

TJBaker57

Original poster
Lifetime VIP Donor
Member
Aug 16, 2015
3,199
Colorado
Tested this today: It Works! Didn't have the time to really compare the analog gauge and this new PID but looks like it is close enough. Thanks ! !

It should be close. Please do report back when you have had time to evaluate it a little more. Threads like this can only go so far unless others participate. And if you have other things you might want to see on that 10" screen toss them out here as they come up.

Earlier today I though that maybe I would put up an explanation of how I derived that equation. The steps involved and such...
 

Sb350

Member
Jul 8, 2021
8
Finland
It should be close. Please do report back when you have had time to evaluate it a little more. Threads like this can only go so far unless others participate. And if you have other things you might want to see on that 10" screen toss them out here as they come up.

Earlier today I though that maybe I would put up an explanation of how I derived that equation. The steps involved and such...
Did some driving today, it seems to be exact now 👌 All the info will help to understand how it works 👍

The only parameter I'm missing is the oil pressure, but the ecu does not support it right now. Might be able to add it, but I need to do some research on that.
 

YUKON87

Member
Nov 15, 2019
73
Al
I tried all the stock ones that I can find from the add gauge menu.. never used the custom ones so not really familiar with them. I guess I need the pid number and correct math to make it work?
Whatever sensor circuit you're using to read find the PID for it you may have to run a custom calculation I'm very Rusty the tuning side of this I know this is a little late but thought I'd ad my one or two cents
 

TJBaker57

Original poster
Lifetime VIP Donor
Member
Aug 16, 2015
3,199
Colorado
Did some driving today, it seems to be exact now 👌 All the info will help to understand how it works 👍


So here I will try to explain how I got the equation.

Many of the engine sensors output to the PCM a varying voltage that represents the value of the measured parameter. In this case we are looking at the Intake Manifold Absolute Pressure.

So this variable voltage comes from the sensor to the PCM and at some point the PCM converts this analog voltage to a digital value, in this case expressed as a single hexadecimal byte in the range of 0x00 to 0xFF. This corresponds to a decimal value in the range of 0 to 255 representing the number of bits in the hexadecimal. It is this decimal value that Torque Pro represents with the token "A" in equations. There are other parameters such as engine RPM that report with a two byte value for higher precision and in these cases Torque Pro (as well as other apps) assign "A" to the first byte and "B" to the second byte.

So the first step is to convert the decimal value of "A" back to the original voltage output from the sensor. There will be a very mimimal amount of degredation but too little to be of concern. The voltage came to the PCM in the nominal range of 0 to 5 and got cast to the range of 0 to 255 bits where 0 volts = 0 bits and 5 volts = 255 bits. So 255/5 = 51 bits per volt. Thus A/51 = volts.

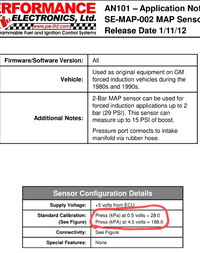
So now I need to convert this voltage back to the kPa value that the sensor saw when it ouput the varying voltage to the PCM. In this case I searched online for "2 bar map" and came up with a few suppliers and datasheets. The datasheets supplied some kPa vs output voltage calibration data. Here is one from pe-ltd.com...

Screenshot_20210712-145147~2.png

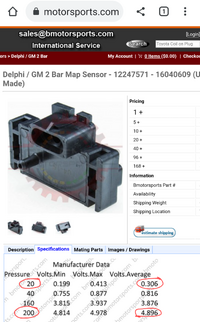
Circled above are the output vs kPa values from this particular sensor. I could have used these values, they would have worked, but I searched further for some values atribbuted to a GM sensor itself. I found a sensor at Bmotorsports.com which at the time I thought was a genuine Delphi / GM sensor but upon further review just now I see is also an aftermarket sensor. They say the China made Delphi sensor has quality control issues. At any rate I used the values I found there, seen below...

276667.png

So here we see a range of values and corresponding voltages. We have a kPa of 200 down to a kPa of 20 for a difference of 180 kPa. We have corresponding voltages from 4.896 (@200 kPa) down to 0.306 (@20 kPa) for a difference of 4.59 volts. So there we see a change of 180 kPa for a change of 4.59 volts. 180/4.59 yields 39.2156862745 kPa per volt. This is our scale,,,, but we are not through yet.

If we were to use what we have thus far we would have A/51*39.2156862745. Lets try that for one of the values stated in the sensor spec... we will use the 0.306 volts = 20 kPa.

0.306/51*39.2156862745=12. We are low by 8 kPa. Lets try the upper spec for the datasheet, 4.896 volts = 200 kPa...

4.896/51*39.2156862745=192. Again we are low by 8 kPa. There is an 8 kPa offset (linear) in the values.

So adding the offset to the equation we have.....

(A/51*39.2156862745)+8

The above is clearly not precisely what I posted a few messages ago, but is closely equivalent. Earlier I moved the offset to the other side of the multiplication and somehow came up with a very slightly different value in doing so, no idea how but the difference at 200 kPa amounts to about 4 hundreths of one psi so I figure close enough!!
When I was about 9 or 10 years old, at school, a sister (attended parochial school) looked over my shoulder while I was doing some work with a compass or the like and stated "Whatever you do in life, you are going to do it with precision".

Naturally this equation could be simplified and sometimes I do that but I find leaving them in this form can make deciphering them later much easier.

One further note: the above equation yields the MAP value as kPa as well as an absolute value. As one desired it could be converted to psi by multiplying the result by 0.145037738 (round as desired). Alternatively you could go back to the sensor spec, convert the 20 and 200 kPa to psi and refigure the equation
for psi instead of kPa. And you could also offset for atmospheric pressure if desired to display gauge pressure as opposed to absolute pressure.


So this is my methodology if that is the proper word for working out some equations. Often there is no datasheet to work from so I have to collect sample data points from the vehicle and that introduces a good bit of error from a lack of precision in the readings of varying data as well as an inability to view the extremes of the measured parameter.
 

Sb350

Member
Jul 8, 2021
8
Finland
So here I will try to explain how I got the equation.

Many of the engine sensors output to the PCM a varying voltage that represents the value of the measured parameter. In this case we are looking at the Intake Manifold Absolute Pressure.

So this variable voltage comes from the sensor to the PCM and at some point the PCM converts this analog voltage to a digital value, in this case expressed as a single hexadecimal byte in the range of 0x00 to 0xFF. This corresponds to a decimal value in the range of 0 to 255 representing the number of bits in the hexadecimal. It is this decimal value that Torque Pro represents with the token "A" in equations. There are other parameters such as engine RPM that report with a two byte value for higher precision and in these cases Torque Pro (as well as other apps) assign "A" to the first byte and "B" to the second byte.

So the first step is to convert the decimal value of "A" back to the original voltage output from the sensor. There will be a very mimimal amount of degredation but too little to be of concern. The voltage came to the PCM in the nominal range of 0 to 5 and got cast to the range of 0 to 255 bits where 0 volts = 0 bits and 5 volts = 255 bits. So 255/5 = 51 bits per volt. Thus A/51 = volts.

So now I need to convert this voltage back to the kPa value that the sensor saw when it ouput the varying voltage to the PCM. In this case I searched online for "2 bar map" and came up with a few suppliers and datasheets. The datasheets supplied some kPa vs output voltage calibration data. Here is one from pe-ltd.com...

View attachment 101136

Circled above are the output vs kPa values from this particular sensor. I could have used these values, they would have worked, but I searched further for some values atribbuted to a GM sensor itself. I found a sensor at Bmotorsports.com which at the time I thought was a genuine Delphi / GM sensor but upon further review just now I see is also an aftermarket sensor. They say the China made Delphi sensor has quality control issues. At any rate I used the values I found there, seen below...

View attachment 101137

So here we see a range of values and corresponding voltages. We have a kPa of 200 down to a kPa of 20 for a difference of 180 kPa. We have corresponding voltages from 4.896 (@200 kPa) down to 0.306 (@20 kPa) for a difference of 4.59 volts. So there we see a change of 180 kPa for a change of 4.59 volts. 180/4.59 yields 39.2156862745 kPa per volt. This is our scale,,,, but we are not through yet.

If we were to use what we have thus far we would have A/51*39.2156862745. Lets try that for one of the values stated in the sensor spec... we will use the 0.306 volts = 20 kPa.

0.306/51*39.2156862745=12. We are low by 8 kPa. Lets try the upper spec for the datasheet, 4.896 volts = 200 kPa...

4.896/51*39.2156862745=192. Again we are low by 8 kPa. There is an 8 kPa offset (linear) in the values.

So adding the offset to the equation we have.....

(A/51*39.2156862745)+8

The above is clearly not precisely what I posted a few messages ago, but is closely equivalent. Earlier I moved the offset to the other side of the multiplication and somehow came up with a very slightly different value in doing so, no idea how but the difference at 200 kPa amounts to about 4 hundreths of one psi so I figure close enough!!
When I was about 9 or 10 years old, at school, a sister (attended parochial school) looked over my shoulder while I was doing some work with a compass or the like and stated "Whatever you do in life, you are going to do it with precision".

Naturally this equation could be simplified and sometimes I do that but I find leaving them in this form can make deciphering them later much easier.

One further note: the above equation yields the MAP value as kPa as well as an absolute value. As one desired it could be converted to psi by multiplying the result by 0.145037738 (round as desired). Alternatively you could go back to the sensor spec, convert the 20 and 200 kPa to psi and refigure the equation
for psi instead of kPa. And you could also offset for atmospheric pressure if desired to display gauge pressure as opposed to absolute pressure.


So this is my methodology if that is the proper word for working out some equations. Often there is no datasheet to work from so I have to collect sample data points from the vehicle and that introduces a good bit of error from a lack of precision in the readings of varying data as well as an inability to view the extremes of the measured parameter.

Good explanation, thanks! Didn't know how these hexadecimal bytes work. I've been working on Megasquirt, older GM eprom type fuel injections and now this newer LS stuff. But never really needed to understand that how the analog voltage is converted to digital.
 
  • Like
Reactions: TJBaker57

TJBaker57

Original poster
Lifetime VIP Donor
Member
Aug 16, 2015
3,199
Colorado
@TJBaker57
This is terrific work. Do you have spreadsheet with all your discovered PID's combined?


I have hundreds of spreadsheets!! Unfortunately my organizational skills are lacking so they are not in any reasonably shareable form. I have made a couple attempts at putting together separate lists of PIDs that apply to my 2002 TrailBlazer 4.2 LL8 & P10 PCM, and my 2005 Yukon LM7 & P59 PCM. But thus far nothing has made it through the other end of the pipe!!
 

TJBaker57

Original poster
Lifetime VIP Donor
Member
Aug 16, 2015
3,199
Colorado
Does your '05 have a current sensor on the battery negative cable?
I would love to find PID's for battery current, smart charging regime, or generator field duty cycle.

My 05 LM7 does have that system. I'll have a look and see what I have for that.

I know I saw field duty for my TrailBlazer today...
 

TJBaker57

Original poster
Lifetime VIP Donor
Member
Aug 16, 2015
3,199
Colorado
Does your '05 have a current sensor on the battery negative cable?
I would love to find PID's for battery current, smart charging regime, or generator field duty cycle.


Well it turns out the field duty cycle PID already posted earlier in this thread works for both the LL8 in my 2002 TrailBlazer and the LM7 in my 2005 Yukon. That can be seen at this link and I will note that the equation is ever so slightly incorrect there. Should have used 255 instead of 256, I was still learning then!!


I had a look at the 05 Yukon Generator Battery Control Module. Found it is located at network address 0x16. unfortunately like the TCCM, HVAC, EBCM etc. It does not support service 22, Request Diagnostic Data by PID. This means that data like the amperage that would otherwise be available in Torque Pro or equivalent is not available. I might scan some memory addresses of that module to see if I can locate something of interest. I have had limited success doing this with the TCCM, though the addresses shift slightly between revisions/calibrations.
 

TJBaker57

Original poster
Lifetime VIP Donor
Member
Aug 16, 2015
3,199
Colorado
what device and protocol are you using?

The protocol is determined by the vehicle(s) under study. I work only with GM vehicles from the early 2000s because that's the message structure I have learned. This would be the SAE J1850 VPW protocol.

For vehicle network access my go to device is a Veepeak mini bluetooth OBD2 adapter. I have 5 adapters of various manufacture but the Veepeaks have proved themselves most reliable.


For scanning tasks and the like I use a free Android app from Kai Morich called Serial Bluetooth Terminal. With macro support and session logging as well as a few other essential features it made the difference for me in getting anywhere with this endeavor.


With Google spreadsheets I generate a series of commands which I copy/paste to a macro in Serial Terminal, turn on the session logfile, then connect up to the Veepeak and execute the scan. Copy/paste the logfile into another Google spreasheet set up to break down and filter the serial data and see what I have.
 
  • Like
Reactions: azswiss
Nov 12, 2019
12
Canuckistan
By protocol, I was referring to the application layer (ISO15031/J1978/J1979/J2190/J2534 etc.), not the physical signalling.


For instance, how did you discover your Generator Battery Control Module, since it doesn't respond to S22 requests? Typically, OBD compliant control modules only respond to node addresses in the 0x7DF to 0x7E7 range. Node address 0x16 h doesn't seem to conform to OBD/UDS specification. This is the reason cheap dongles (such as the Veepeak) aren't able to read/clear SRS/EBCM codes.

Can you describe how you do your memory address probing?
 

TJBaker57

Original poster
Lifetime VIP Donor
Member
Aug 16, 2015
3,199
Colorado
By protocol, I was referring to the application layer (ISO15031/J1978/J1979/J2190/J2534 etc.), not the physical signalling.


For instance, how did you discover your Generator Battery Control Module, since it doesn't respond to S22 requests? Typically, OBD compliant control modules only respond to node addresses in the 0x7DF to 0x7E7 range. Node address 0x16 h doesn't seem to conform to OBD/UDS specification. This is the reason cheap dongles (such as the Veepeak) aren't able to read/clear SRS/EBCM codes.

Can you describe how you do your memory address probing?


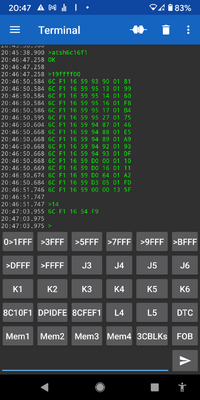
Well now you have gone above my knowledge level!! I generally just learn enough to do what I need to do. Like read and clear EBCM codes with a cheap dongle!! I do it regularly in fact since learning how in a thread from 2011. This is done with mode $19 requests for diagnostic trouble codes by status and a single mode $14 "clear diagnostic information" message.

For example, right here I read the code status for all codes of the Generator Battery Control Module and then clear any current codes of that module alone (which there currently were none as indicated by the 7th byte). Does not affect any other module of the vehicle so your emissions monitors remain intact.

Screenshot_20210717-204707.png


I think I recognize the 0x7DF and 0x7E7 addresses you gave as being CANBUS which my old trucks do not have or use. I know doodley-squat of CANBUS. I have a 2002 TrailBlazer with the LL8 4.2 and a 2005 Yukon with the LM7 5.3. Neither one uses CANBUS, which as I understand it is ISO 15765-4?? There is no message traffic on my trucks using that sort of addressing.


Now, for discovering node addresses I set the header to a node to node message type and broadcast to 'FE', all nodes. Then I send a mode 20, "Return to normal mode" message and all nodes on the network respond....

Screenshot_20210717-204548.png

Here we see responses from 0x40 (BCM), 0x10 (PCM), 0x16 (GBCM), 0x1A (TCCM), 0x29 (EBCM), 0x58 (SRS), and so on.....


Now then, memory addresses I use mode $23 messages, "Request Diagnostic Data by Memory Address". I create a macro of the range of addresses I want to read and set the between line delay appropriately, enable logging and send. It is not fast. Returns 4 bytes per message. Here is a snippet from a spreadsheet showing where I was reading out memory from the Yukon radio...

Screenshot_20210717-211603.png
 
Nov 12, 2019
12
Canuckistan
I think I recognize the 0x7DF and 0x7E7 addresses you gave as being CANBUS which my old trucks do not have or use.

Of course.. I forgot. Pre-CAN vehicles use 1-byte addresses. :duh:

Like read and clear EBCM codes with a cheap dongle!! I do it regularly in fact since learning how in a thread from 2011. This is done with mode $19 requests for diagnostic trouble codes by status

I'm surprised your EBCM responds to standard DTC requests. Most people aren't successful reading ABS/Airbag DTCs using the widely available low cost OBD tools out there. You would think if it was this easy, they would all do it. (Scanguage, ELM+Torque Pro etc) . I had always presumed it required more sophisticated tools and proprietary interfaces. I'll have to try it some day.

By the way, do you know the difference between service $03, $13, an $19? and between $04 and $14 ?


For example, right here I read the code status for all codes of the Generator Battery Control Module and then clear any current codes of that module alone (which there currently were none as indicated by the 7th byte).
Where did you learn to use service $19? I can't find the syntax documented anywhere, or how to interpret the responses.

Now, for discovering node addresses I set the header to a node to node message type and broadcast to 'FE', all nodes. Then I send a mode 20, "Return to normal mode" message and all nodes on the network respond....
Again, I'd love to know more about what mode $20 is, what it's for, and how to use it. Or all the modes for that matter. Got any links?


Here we see responses from 0x40 (BCM), 0x10 (PCM), 0x16 (GBCM), 0x1A (TCCM), 0x29 (EBCM), 0x58 (SRS), and so on.....
How did you know that 1A is the TCCM, 29 is the EBCM etc?

I'm going to have to try it. It's possible some modules are protected on later model vehicles to prevent tampering, or they simply were meant to respond on UDS.

Now then, memory addresses I use mode $23 messages, "Request Diagnostic Data by Memory Address"....
Memory address has nothing to do with PID I presume. So this is ROM or RAM memory within each module? How large is the memory typically?
And it contains temporary data? permanent? Program code? combination of everything?
It must be a monumental task to interpret that raw data into something meaningful a person can use.


Thank for the insight.
 

TJBaker57

Original poster
Lifetime VIP Donor
Member
Aug 16, 2015
3,199
Colorado
Where did you learn to use service $19? I can't find the syntax documented anywhere, or how to interpret the responses.

Much of what I found was from old posts about the web. I later found that much is from SAE J2190. For some reason GM used mode $19 for what appears to be mode $18 in J2190.

Here are a few of the postings that got me started....


Some folks do crosswords.... I do this!
 
  • Like
Reactions: MountainManJoe

TJBaker57

Original poster
Lifetime VIP Donor
Member
Aug 16, 2015
3,199
Colorado
By the way, do you know the difference between service $03, $13, an $19? and between $04 and $14 ?
Where did you learn to use service $19? I can't find the syntax documented anywhere, or how to interpret the responses.
Again, I'd love to know more about what mode $20 is, what it's for, and how to use it. Or all the modes for that matter. Got any links?


A lot of this can be found in this document. I'm not sure how I found this link but I did...


Memory address has nothing to do with PID I presume.

Actually, it does... So here in a lame attempt to bring this thread back on topic.... In the previously linked document can be found the specifications for mode $21, $22, & $23. Three different ways of requesting the same data, by offset, by Parameter ID (PID), or by memory address. Many of us are familiar with mode $22 as that is the mode almost universally used to get our PID data in apps like Torque Pro, OBD Fusion, Car Scanner, etc. We request data by PID, the software in the module takes that PID, looks up the memory address for that data and sends us the data. (oversimplified of course)

This might sound familiar to followers of the thread. So to not repost what has already been posted I will now toss us back to the earlier post where this was discussed...


YUKON87

Member
Nov 15, 2019
73
Al
A lot of this can be found in this document. I'm not sure how I found this link but I did...


Actually, it does... So here in a lame attempt to bring this thread back on topic.... In the previously linked document can be found the specifications for mode $21, $22, & $23. Three different ways of requesting the same data, by offset, by Parameter ID (PID), or by memory address. Many of us are familiar with mode $22 as that is the mode almost universally used to get our PID data in apps like Torque Pro, OBD Fusion, Car Scanner, etc. We request data by PID, the software in the module takes that PID, looks up the memory address for that data and sends us the data. (oversimplified of course)

This might sound familiar to followers of the thread. So to not repost what has already been posted I will now toss us back to the earlier post where this was discussed...

I know unlocking your PC M may have something to do with mode 23 although TJ Baker has polled Mode 23 pids or memory addresses. I've been doing this for a long while now myself however my PCM is unlocked as far as I know. Then there's Mode 2C etc.
 

azswiss

Member
May 23, 2021
998
Tempe, AZ
Came across the following list of GM Extended PIDS (ref - https://torquebhp.fandom.com/wiki/GM_Extended_PIDs)

All models:
"AC Hi Side Pressure -F", "AC Pres", "221144", "A/51", 0, 5, "Volts", "Auto"
"AC Hi Side Pressure2 -F", "AC Pres", "221144", "(A*1.83)-15", 0, 400, "PSI", "Auto"
"Fuel Tank Pressure -F", "FuelTnkPr", "22114E", "A/51", 0, 5, "Volts", "Auto"
"HO2S1 Crossover Counts -F", "HO2S1-X", "2211AF", "A", 0, 255, "Counts", "Auto"
"HO2S2 Crossover Counts -F", "HO2S2-X", "2211B0", "A", 0, 255, "Counts", "Auto"
"EGR Closed Position Volts -F", "EGR Cls", "2211BB", "A/51", 0, 5, "Volts", "Auto"
"EGR Test Counts -F", "EGR Test", "2211BD", "A", 0, 255, "Counts", "Auto"
"EGR Position Error% -F", "EGR Err%", "2211C1", "A/2.55", 0, 100, "%", "Auto"
"HO2B1S1 Warm Up time -F", "HO2B1S1-W", "2211CA", "A", 0, 255, "Secs", "Auto"
"HO2B1S2 Warm Up time -F", "HO2B1S2-W", "2211CB", "A", 0, 255, "Secs", "Auto"
"HO2S3 Warm Up time -F", "HO2S3-W", "2211CC", "A", 0, 255, "Secs", "Auto"
"MAF Frequency Hz -F", "MAF Freq", "221250", "(A*256)+B", 0, 31999, "Hz", "Auto"
"Barometric Pressure -F", "Baro Pres", "221251", "A", 0, 37, "kPa", "Auto"
"Fuel Tank Level% -F", "Fuel Lvl%", "2212C5", "A/2.55", 0, 100, "%", "Auto"
"Engine Run Time -F", "Run Time", "2211A1", "((A*256)+B)/60", 0, 999, "Mins", "Auto"
"Desired Idle Speed -F", "Idle Target", "221192", "((A*256)+B)/4", 0, 7000, "RPM", "Auto"
"Throttle at Idle -F", "Thrt@Idle", "221107", "(A&128)/128", 0, 1, "Bit", "Auto"
"VTD Fuel Disable -F", "Fuel Disab", "221106", "A&1", 0, 1, "Bit", "Auto"

V6 engines only:
"Fan-1 status -F6", "Fan1 V6", "221103", "(A&64)/64", 0, 1, "Bit", "Auto"
"Fan-2 status -F6", "Fan2 V6", "221103", "(A&128)/128", 0, 1, "Bit", "Auto"
"AC Request -F6", "AcReqV6", "221103", "A&1", 0, 1, "Bit", "Auto"
"AC Pressure Out of Range -F6", "AcPrXV6","221103", "(A&4)/4", 0, 1, "Bit", "Auto"
"AC Relay -F6", "AcRlyV6", "221103", "(A&2)/2", 0, 1, "Bit", "Auto"
"PRNDL A State -F6", "PRNDL-A", "221100", "A&1", 0,1, "Bit", "Auto"
"PRNDL B State -F6", "PRNDL-B", "221100", "(A&2)/2", 0,1, "Bit", "Auto"
"PRNDL C State -F6", "PRNDL-C", "221100", "(A&4)/4", 0,1, "Bit", "Auto"
"PRNDL D State -F6, "PRNDL-D", "221100", "(A&8)/8", 0,1, "Bit", "Auto"
"1-2 Solenoid -F6", "1-2 Sol", "221101", "(A&32)/32", 0, 1, "Bit", "Auto"
"2-3 Solenoid -F6", "2-3 Sol", "221101", "(A&64)/64", 0, 1, "Bit", "Auto"

V8 engines only:
"Fan-1 status -F8", "Fan1 V8", "221100", "(A&64)/64", 0, 1, "Bit", "Auto"
"Fan-2 status -F8", "Fan2 V8", "221100", "(A&128)/128", 0, 1, "Bit", "Auto"
"AC Request -F8", "AcReqV8", "221100", "A&1", 0, 1, "Bit", "Auto"
"AC Pressure Out of Range -F8", "AcPrXV8","221100", "(A&4)/4", 0, 1, "Bit", "Auto"
"AC Relay -F8", "AcRlyV8", "221100", "(A&2)/2", 0, 1, "Bit", "Auto"
 
  • Like
Reactions: Mektek

YUKON87

Member
Nov 15, 2019
73
Al
A lot of the earlier GM pids carry over no matter what the engine configuration. At least for VPW protocols. Some may work and some may not. Certainly isn't going to hurt anything to try them.
 

Forum Statistics

Threads
23,681
Posts
641,974
Members
19,138
Latest member
wentzben

Members Online