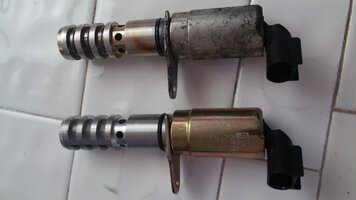
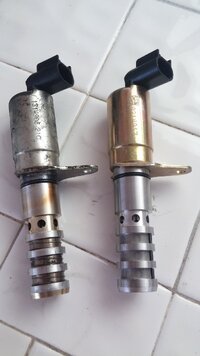
If by 'rotated' you mean that yours is capable of having the BODY of the CPAS rotate independent of the short Angle Bracket that secures it to the outside of the Engine Head... I would have to say Yes. The outer-most portion of course is the Black Plastic Connector and should be rigidly attached to the CPAS Body being hard wired to the Solenoid Coil nested inside of the CPAS Body. So for the Body to move independent of that Connector would either mean the Angle Bracket has gotten loose and lost its grip.... or the internal wires have snapped off and in such an event ... the CPAS would cease to work. It is possible that over time and due to how dynamic the internal Solenoid is moving the center pin back and forth... that these opposing actions with the CPAS Body could fight against it... and over tens of thousands of these motions... it could work the CPAS Body loose from the Hold Down Bracket and allow a certain amount of play.
However... Please know that when you are either removing ...or installing the CPAS.... Once the Bracket Hold Down Bolt is completely removed... it is normal and necessary to use the outer edge of that Bracket to rotate the CPAS Body clockwise and counter-clockwise while either pulling or pushing it to guide it in ...or out. This is required during removal in order to loosen it from the hollow tube and guide the device outwards. When installing ONLY AN OEM version of the CPAS (No After-Market here...) the New, Slightly Over-sized "O" Ring will need just a dab of Engine Oil to get the CPAS pushed smoothly back inside the tube while making small clockwise and counter-clockwise motions. Push it in as far as possible (I know... there is a Bad Joke in here somewhere)... before re-installing the Hold Down Bolt and snugging it in place. Do NOT use the action of Tightening the Hold Down Bolt in the Angle Bracket to order force or draw the New CPAS Body inside of the Engine Head. You could strip out the Threads or damage the "O" Ring doing so.
While many of these tests require the use of GM (or a "GYMKO") Tech2 Scanner ...this link might prove helpful when using a Digital Multi-Meter on the CPAS and so this "Cam Phaser Diagnostic Flow Chart" can describe which things to look at along the way...knowing that the CPAS is often the pivotal player in "The Failure Show":
http://s557.photobucket.com/user/60...GINEREPAIR/CAMPHASERDIAGNOSTICS?sort=4&page=1
Last edited: