Let the fun begin...pulled the head on my 4.2L

Status
Not open for further replies.

NJTB

Member
Aug 27, 2012
612
Flemington, NJ
I think the switch you're asking about is the low pressure A/C switch. It will kill the A/C if the freon gets too low.
If I remember correctly, it has a schrader valve on it, so you can change it without discharging the system.


It runs! Hahahahahaha.


Talk about a relief! No service engine light, either. No leaks so far. Got a miss on one cylinder, it feels like. Other than that, no issues whatsoever.

Well, except that the positive wire on the starter was touching the small wire and it tried to Crank when I hooked up the battery. Straightened that out, and cranked it 10 or 12 more times with the fuel pump relay and ign coil fuse removed. Replaced both and it cranked up immediately. Only thing missing is the hose going to the 2 ports on the intake. Other than that, I just need to reassemble the front end and drive it, I think.
 

midnightbluS10

Original poster
Member
Feb 18, 2017
109
Shreveport, LA
Cool. I went back and got the front end on. My only issues were P0300 and P0068.

Cyl 6 is misfiring a lot. Need to check it out and see what's up. Then it's off to the dealership for the 1/2", 90* hose connecting the 2 ports on the intake. That's what is causing the P0068, MAP/MAF CORRELATION or something. I hooked up a temporary hose and that code cleared. I'm really hoping the misfire is something simple like the coil isn't plugged in or something lol. It drives.

Hoping I can get the misfire knocked out. It's not picking up that well and I'm pretty sure that's the cause. We'll see.


I think the switch you're asking about is the low pressure A/C switch. It will kill the A/C if the freon gets too low.
If I remember correctly, it has a schrader valve on it, so you can change it without discharging the system.

I did get that taken care of, also. It's listed as a pressure switch or pressure transducer. Murray Part # 36698. Four Seasons has the same part with the same number.
 
Last edited:

Mooseman

Moderator
Dec 4, 2011
26,174
Ottawa, ON
Just don't drive it too much with the missing cylinder or you'll kill your cat.

Easy way to check the coil is to swap it with another and see if the misfire follows it.
 

midnightbluS10

Original poster
Member
Feb 18, 2017
109
Shreveport, LA
It's the coil. When I was installing them, I noticed that the big o(val)-ring/seal was missing from one when I found it in the engine bay while doing a pre-start inspection. I was hoping that was contributing to the problem, but couldn't be sure it was #6 that it had fallen from.

Fast forward to yesterday. I pulled the upper airbox thing and immediately noticed that it was #6 that was missing the o-ring/seal. Unfortunately, I didn't get that lucky on the diagnosis. I replaced the seal and swapped it to #5, also. Put it back together and it's missing on 5. So it wasn't the seal missing that's causing it to misfire.

Leaving in a few minutes to go pick up the coil I just ordered from Advance Auto Parts. I do 90% of my local parts shopping there as they always have coupons for at least 20% off available if you buy online and pick up in store. If it's not something I need immediately, I'll price shop online at Rock Auto and Amazon mainly to see if I can get it cheaper, quicker. And always from a legit seller @ Amazon so there's no question of authenticity of parts.


Anyone have any knowledge of the connection at the condenser on the drivers side? Specifically, what and how many gaskets go there between the a/c line and where it bolts to? I have one, and it's not near thick enough when the line is tightened to the condenser. So it doesn't seal. Should there be 2? There's enough distance left between the seal and the other sealing surface to fit another. I faintly remember seeing a gasket/seal very similar to what's on it and it was laying below the truck on the floor. Can somebody go check theirs out? See if they can tell how many theirs has? It's fairly easy to see. Bring a flashlight.

Thanks.
 
Last edited:

midnightbluS10

Original poster
Member
Feb 18, 2017
109
Shreveport, LA
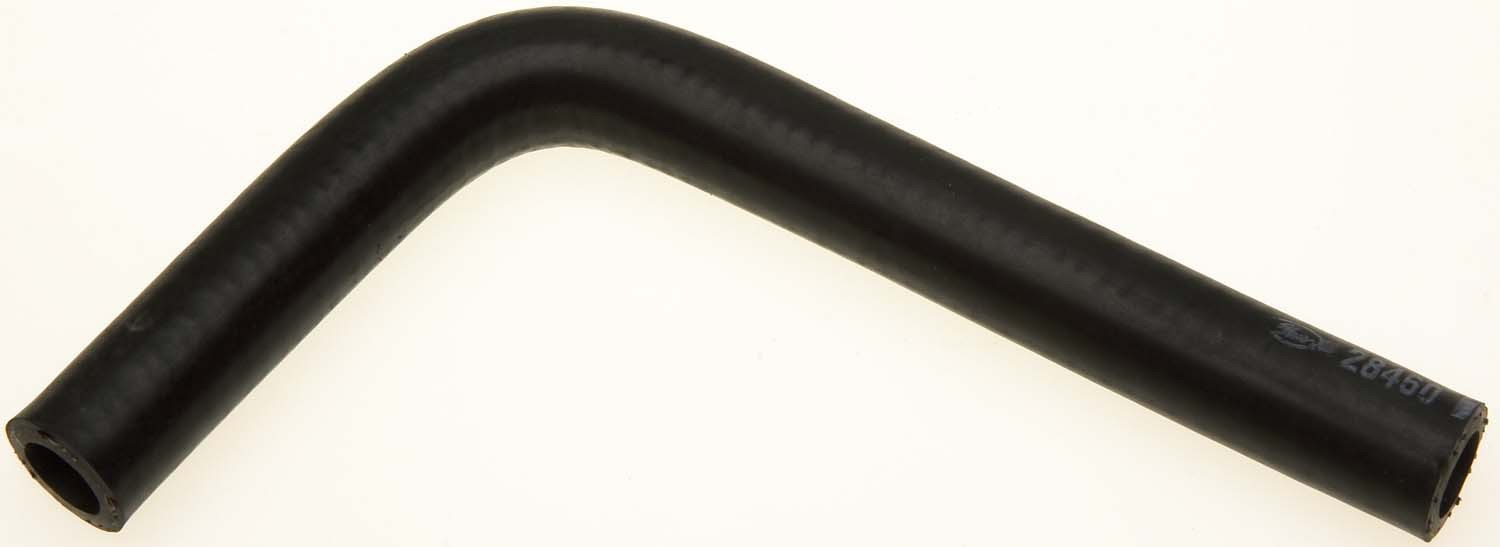
So I got the a/c fixed. Missing the 90* pcv hose from the intake to the other intake nipple. After a search here, I found the OEM part number, 12575660. I updated the thread that I found with the part # and a pic of the hose, which comes with a single clamp. The hose is around 5.1" long at centerline with 1/2" inner diameter at both ends.

You can get a similar hose from the parts store but it's incorrect. The ID is around .618" so it's too big. Dayco Part # A71877 I tried a clamp on it but that didn't cut it. Going to pick up an OEM replacement shortly.

I believe that's the only thing left, other than topping off the freon in the A/C.

There's another Dayco hose that may work. 80393, I think. It's in the other thread I posted about previously. Gates Part # 28460

28460.jpg
 
Last edited:
  • Like
Reactions: Mooseman

midnightbluS10

Original poster
Member
Feb 18, 2017
109
Shreveport, LA
I was incorrect. The transmission shows no fluid on the stick. Topped it off and everything is 100% done.

HA! Whooped that mother! Lmao.

[Mod edit: Post edited due to language]
 
Last edited by a moderator:
  • Like
Reactions: m.mcmillen

Mooseman

Moderator
Dec 4, 2011
26,174
Ottawa, ON
Very nice! :2thumbsup:
 

midnightbluS10

Original poster
Member
Feb 18, 2017
109
Shreveport, LA
Update:

The truck is running superbly. No issues so far, other than an intermittent code for the cooling fan. Can't recall the code but it pops up very rarely and usually goes off within a minute. I'm guessing something is up with the clutch or the harness. I'll take a look at it if it gets any worse.

For now, I've still got to replace the fan clutch on the 4wd Trailblazer so it will blow cold a/c at idle. It's obvious that the clutch is bad. In 100* heat, I can almost count the fan blades as they rotate. That's SSLLLOOWWWWWW compared to my 2wd truck.
 

mrrsm

Lifetime VIP Donor
Supporting Donor
Member
Oct 22, 2015
8,303
Tampa Bay Area
Justin...

I'm sorry I missed out on your initial completion back in June (my eyesight crashed and needed a lot of surgical work afterwards) to offer Congratulations on getting the job finished in good order... So your news of late is a breath of fresh air around here with a few people in trouble with their own Atlas Engines needing major work or outright R&R. Outstanding Brother!
 

mrrsm

Lifetime VIP Donor
Supporting Donor
Member
Oct 22, 2015
8,303
Tampa Bay Area
Now that @midnightbluS10 has entered the history books at GMTN for his completion of this difficult repair procedure, I can’t think of a more appropriate OT Thread to place and post these additional GM 4.2L Engine Head R&R Videos. If the idea here is to obtain and memorialize as much experience and information as possible to make life easier for other Members staring these problems in the face... these videos are complimentary in visually placing what follows as a Stark Failure when contrasted against the aforementioned Successful Procedures completed by Justin:

This "OZ" fellow shows an interesting and thoughtful method for removing the GM 4.2L Engine Head Bolts with less chance having them Snap Off:


And in a (5) Part Series… Mr. Jack Crayne goes through his painful Step-By-Step Procedures when performing the GM 4.2L Engine Head R&R for the Head Gasket Replacement... But the most significant value to watching these videos... is watching how many things can go wrong... and how many times those things can be REPEATED ...if you don't assess the problems before turning any wrenches and getting deeper and deeper into trouble.

We can learn from Jack's problems and mistakes by reading this entire thread from Top to Bottom... before doing ANYTHING. It has been wisely said... "If you are Nearly Correct when Working on the GM 4.2L Engine... Then you will be Precisely WRONG!" If we are lucky... we can get wise to all of these problems ...beforehand.


What are the things that Jack may have overlooked during his Re-Assembly?

(1) Were the Head Bolt Holes in the Engine Block Chased via an 11MM X 2.00MM Thread Chaser and then sprayed out with Canned Air?

(2) Was any Permatex Engine Assembly Lube used in VERY Small Amounts on the Cleaned Up Threads and undersides of the Cap Screw areas of the Brand New Head Bolts?

(3) Assuming the Head Bolt Installation went EXACTLY according to the Book Specs of 22 Ft Lbs of Torque on the First Pass and eventually applying 155 Degrees of additional Torque Angle... Was the Engine Turned Over 14 Times to assure that the #1 Cylinder was at Top Dead Center... The Back Cam Flats were Upright, Flat and Horizontal... The Timing Marks of the Intake and Exhaust Sprocket were Aligned with the Black Links of the Timing Chain ...and ALL of the Red Paint Marks between the Harmonic Balancer and the Timing Cover were perfectly Re-Aligned after the Hand Rotations? And if NOT... WHY do all of the labor of putting all of the other Engine Components via TTY Bolts that needed to be replaced several times BACK on the Engine and Run the Motor... BEFORE all of these Alignments have been confirmed?

(4) If nothing else... I can Congratulate Jack for his Perseverance... But going through TWO Sets of Head Bolts ...and then settling for a Mis-Matched New & Used Head Bolt Set in the end and having them all being Under Torqued is to invite ANOTHER Head Gasket Failure due to a lack of proper Holding Power during the coming Engine Heating Up and Cooling Down Cycles.
 
Last edited:

midnightbluS10

Original poster
Member
Feb 18, 2017
109
Shreveport, LA
Well, it's finally time for one final update.


This truck is no more. A 5-7 mph wreck totalled it. I almost couldn't believe it. A guy backed out of a parking spot into the driver's side fender, light, and grille while driving a brand new F350. He never even saw me. Windows were so black he had them down and half his body hanging out to be able to see when he did leave. It needed the usual stuff replaced in that type of accident with the addition of the inner fender, steering, and suspension pieces. Looking over the estimate, they wanted 1400 in labor mainly for R&I of all the stuff on that side. I could've easily done that all myself being that it's been part of my career since I started in the auto industry in 2011. In the end, even giving them all of my stellar documentation for upkeep and reconditioning of the engine, I only got $400 more than their initial offer. Considering I faxed them over $1200 in receipts, I was surprised, to say the least.

What makes me the most disappointed about the entire thing is I'll never know what happens with that engine. I never had a single issue after the first day, when it had a bad coil.

I guess I did come out on top in the entire thing, though. Picked up a 2009 Envoy yesterday. Only 110k? miles. And it's paid for, so no new car note or anything. :woohoo:


Funny thing... I already have parts for the first brake job on this new truck lol. I mistakenly ordered parts for a 2006 when doing them on the '05 so pads didn't fit, but only barely so I tried to make em fit lol and scored and scratched them up in the process so I had to keep it all. I guess it's a good thing I didn't just throw it all out!
 
Last edited:

mrrsm

Lifetime VIP Donor
Supporting Donor
Member
Oct 22, 2015
8,303
Tampa Bay Area
Think of it in this way... While you were still in school when you started on this difficult repair journey... you eventually managed to do one of the most difficult repair jobs in the history of Modern GM Auto Mechanics... and that includes beating the Dealership side of the Industry at its own game.

And in the process ...you had the chance for some very valuable hands-on experience and successfully learned how to get the LL8 engine put back together and to Run Right as Rain from then on... And THAT makes all of this very worthwhile... in fact... it was worth the weight of a Trailblazer or your "New" Envoy... In Solid Gold. :>)
 
  • Like
Reactions: Mooseman

Mooseman

Moderator
Dec 4, 2011
26,174
Ottawa, ON
Agreed. You got a nice deal out of all this. And all the knowledge you gained will serve you to maintain this one.

It's pure luck to find such a "fresh" version of these trucks, just like me when I found my '07 with only 87k km (50k miles).

Enjoy!
 
  • Like
Reactions: xavierny25

midnightbluS10

Original poster
Member
Feb 18, 2017
109
Shreveport, LA
One thing I forgot. They even offered me a job as a service tech at the GM dealership it was at. Unfortunately, it's just over an hour drive each way...about 60 miles or so. Maybe 65 at the most. So I politely declined. It was even smaller than the first one I worked at from 2011-2012. Not saying that's a bad thing. I loved it at Springhill Motor Co. and they're extremely small and about 45 mins away. But this place didn't look near as established and not as in good of condition, shop-wise. I'd do it for enough money, but it'd have to be more than the 25/hr I made at Springhill Motors. We were so small that we didn't even have specialists. Everybody did everything. It was great. Anyway. That's all I've got. I know that's off-topic from the original post. Sorry.
 
  • Like
Reactions: RibDigger870

Mooseman

Moderator
Dec 4, 2011
26,174
Ottawa, ON
Just brings this part of your adventure to a close, as well as this thread.

:lock_it:
 
  • Love
Reactions: 808
Status
Not open for further replies.

Forum Statistics

Threads
23,748
Posts
642,935
Members
19,328
Latest member
Nayel

Members Online