The operative expressions rife among most Scanner-Code-Reader Threads usually centers around "What IS an Affordable Scanner...?". None of us are immune to just how hard getting a truly manifestly POWERFUL, FULL- FEATURED SCANNER can be (with the Windows Tablet(Touch Screen) Features, WIFI, etc.) because invariably, it always comes down to Three Things: PRICE, PRICE and PRICE that moves most of these amazing devices out into that Hindered Realm of becoming "Geez... I wish I could afford one of THOSE...". Somehow though, they always seem to settle out in the $1,500 to $4,000 Range.
But as with all Technologies, in time and with a great amount of patience, we occasionally see that the Prices DO come down and hope that we can all get lucky enough to locate Complete, High Quality, Full - Featured Scan Tool Kits possessing Excellent Bi-Directional Diagnostic and Live Module Testing capabilities over on eBay.
Of course, besides handling all of the needs of our beloved GM and GMC Vehicles, being able to Accurately Diagnose other North American Makes and Models of Domestic Cars & Trucks as well as most of the European and Asian Vehicles would also be a Serious Bonus.
Well... The Autel MAXI-DAS DS-708 Scanner is one of THOSE Types of Scan Tools in this category of being "High End" enough to cover all of those bases. If you browse around eBay via THIS Link ASAP and look at ALL of the on-topic sub-pages there, you might find something starting in the range of $250 (Scanner ONLY) and wind up with the Full Kits being in the Range of $500 to $850.
Damaged, Non-Working Units are NOT Repairable if the SD-CARD is MISSING or Un-Readable!!!:
Autel Maxidas Ds708 for sale | eBay
Get the best deals for Autel Maxidas Ds708 at eBay.com. We have a great online selection at the lowest prices with Fast & Free shipping on many items!
www.ebay.com
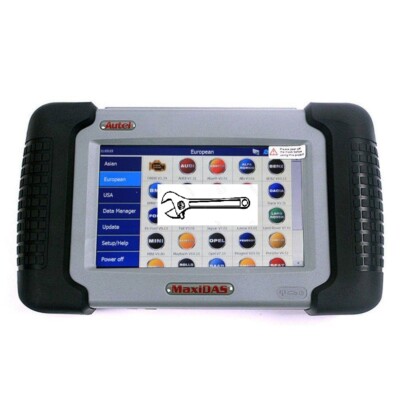
I found this imaged Complete Autel MAXI-DAS DS-708 Scan Tool Kit there this month (02/2022) for just under $400 and I jumped all over Making That Buy. The Un-Boxing and "Proof of Operation" images shown below will speak for themselves:


The purpose of THIS Thread though, is to create a "Scatter-Gun" sort of coverage with the use of these additional Links and Videos related to this Autel MAXI-DAS DS-708 Scan Tool Kit and provide some additional resources that will help those among us anxious to Take The Next Step and NOT Go Broke in the process to succeed:
If you even THINK you might be getting one of these Kits... Download the Original Autel MAXI-DAS DS-708 Software Suite HERE… DO THIS ASAP... and if needs be, you can always install the Autel Software Suite onto your Windows Based Computer later on if the Original Factory Autel CD-DVD happens to be MISSING from your eBay Purchased Kit or Individual Scan Tool Item:
https://www.autel.com/download.jhtml
Some Additional Autel MAXI-DAS Resource Information and Use Examples:
How to Repair a Power Disconnect Problem on an Autel MAXI-DAS DS-708 Scanner:
How to Change the Touch Screen on an Autel MAXI-DAS DS-708 Scanner:
GM Throttle Body Re-Set for a 2007 GMC Yukon using an Autel MAXI-DAS DS-708 Scanner:
How to Replace the PCM in a 2005 Honda Pilot using an Autel MAXI-DAS DS-708
How to Re-Program a Pair of 2012 Hyundai Ignition Keys via an Autel MAXI-DAS DS-708:
And Now... For the "NERDS" and the "NONNERDS" Alike:
Okay… Great! Now that you’ve got yourself a Professional Grade Auto Scanner in this Autel MAXI-DAS DS-708 Machine… But Beware! Your Very First Action should be to Create a Back-Up of the Original SD-Card stuck down inside of the Media Card Slot located in the Bottom Panel of the DS-708 Scanner. THIS may be the Real Achilles Heel in ANY System that relies entirely upon Removable, Non-Solid State Storage that WILL degrade over time.
If THAT Little Item is either Damaged or LOST… You will NOT be able to use the Machine in its present working form and in all likelihood, you’ll have to purchase an inexpensive, Blank SD Card and Go Online to the Autel Site, Register the Machine anew and then Pay for a One Year Subscription for around $500.00 in order to put things right with "The Box" once again.
There is NOTHING preventing you from setting up your own account at Autel and then Paying for their Subscription Services. However, make certain that you've carefully recorded your Legible Serial Number from the permanent label on the back side of the Unit first. Take some Blow Up images of that Serial Number as it might be very hard to make out with the Naked Eye.
To AVOID having these entanglements, the follow on procedures for doing this action ARE a BIT more complicated than merely Copy-Pasting Files from One SD Card over to Another, so let’s get started in figuring out just How To Do IT:
If you are a Linux User, Open up a Terminal and Copy-Paste THESE Dark High-Lighted Commands preceded by sudo quite literally as you find them here below and then Press the <E> Enter Key after Each One until all of these steps are completed and a Brand New Back-Up SD Card has been Created:
sudo fdisk -l
You should see something like THIS Screen appear:
Device Boot Start End Sectors Size Id Type
/dev/mmcblk0p1 * 2048 2099199 2097152 1G c W95 FAT32 (LBA)
/dev/mmcblk0p2 2099200 31116287 29017088 13.9G 83 Linux
In my system the SD card is ID'd as /dev/mmcblk0 (the *p1 and *p2 are the partitions).
First, you’ll have to unmount the SD Card Device before taking any actions :
sudo umount /dev/mmcblk0
Now, we need to create an *.img File as in Create a ‘Mirror Image’ of the device on the (SD-Card):
sudo dd if=/dev/mmcblk0 of=~/sd-card-copy.img bs=1M status=progress
This will take a while...
Once it's finished copying these System Files from the Donor SD-Card System Files and Apps as a BIN File (*.img) onto your Hard Drive, Remove the Donor SD-Card and insert the Brand New Empty (32) Gig SD Card. If the device Location ID is different (USB or other type of SD card reader) verify its Name and Path and be sure to unmount it before proceeding:
NOTE: the Spelling of the Command 'umount' is NOT a Typo-Error of 'unmount'
sudo fdisk -l
sudo umount /dev/mmcblk0
Now... Write the Saved Image File onto the New (32) Gig SD-Card device:
sudo dd if=~/sd-card-copy.img of=/dev/mmcblk0 bs=1M status=progress
The "Write Operation" taking place will be much slower than it was before.
When copying Large Amounts of Data, you should set a 'bigger than default block size' like (bs=1M) to (bs=4M), otherwise, you may have to wait for a very long time for the Data Transfer to complete after using THIS Command String:
sudo dd if=/dev/mmcblk0 of=~/sd-card-copy.img bs=4M
With a Little Patience, you’ll not only have a reproduce-able Image (*.img) of your Original SD Card, but now you can SAVE that New *.img File as Reliable System Back-Up and create MORE SD Cards later on, if needs be.
When I followed these Steps, I used the Original (8) Gigabyte SD-Card as my Source Card and chose an Identical, But LARGER SIZE Formatted Card at (32) Gigabytes so as to have MORE Storage on the Card available for Extensive Data-logging, etc.
If You are a Windows User, there are some excellent Disk Management Software Suites available with similar features as those used herein (perhaps @Blckshdw can assist us here). At the completion of these tasks, place the Newly Created Back Up SD Card into the Base of the Autel MAXI-DAS DS-708 Scanner and TEST IT OUT to ensure that the Scanner Device will Boot Up and Function Properly. Put the Original SD Card and the Newly Created *.img Files away in a Safe Place.
*Whew* Well... I Hope This Information will Help Us ALL.... MRRSM
Last edited: