Replacing Crankshaft Front Seal [SOLVED]

Ric_Whit

Original poster
Member
Sep 24, 2012
71
Hi all,

I have a 2002 Trailblazer Short Wheel Base 2WD 4.2L L6 Engine and I about to replace the leaking crankshaft front seal of my ride and I order new seal (Part Number: 89017621) new bolt (Part Number: 11609792) and new Serpentine Belt (Part Number: 12593774).

Maybe I need to replace the harmonic balancer (Part Number: 12571619) as well.

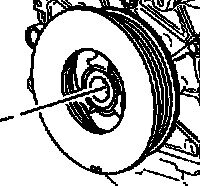
I see on here and on YouTube that a washer behind the crankshaft (Part Number: 12573950) (Number 906 on the pic below) have to be replace.

But the washer and the harmonic balancer are discontinue by GM and are not making any more.

Now there are a 2nd design harmonic balancer (Part Number: 12578069), seal (Part Number: 89017622) and washer (Part Number: 12578073)

My question is:
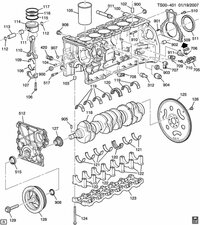
  1. Can I replace the 1st design seal and bolt without replace the washer behind the harmonic balancer???

  2. Can I replace all the 1st design to the 2nd design set mention above on a 1st design crankshaft????
Hope you guys can help me with this.
Engine 4.2L L6.jpg
 

Mooseman

Moderator
Dec 4, 2011
26,026
Ottawa, ON
I'm pretty sure the two designs aren't interchangeable as it was a shaft size change. Balancers are available from Dorman. Again, IIRC, the first design was the type that had the round plate on the front of the balancet that required a Spent-Moore tool to pull it off. Second design is like the one picture in your graph. Not too many of the first design out there. I've seen only one ever in a yard.

Look for my threads on replacing the timing chain in the FAQ. I have a pic of the first design on there and lots of info on the designs. For the seal, you shouldn't need to pull the cover.
 

Ric_Whit

Original poster
Member
Sep 24, 2012
71
I'm pretty sure the two designs aren't interchangeable as it was a shaft size change. Balancers are available from Dorman. Again, IIRC, the first design was the type that had the round plate on the front of the balancet that required a Spent-Moore tool to pull it off. Second design is like the one picture in your graph. Not too many of the first design out there. I've seen only one ever in a yard.

Look for my threads on replacing the timing chain in the FAQ. I have a pic of the first design on there and lots of info on the designs. For the seal, you shouldn't need to pull the cover.
Unfortunately the Dorman 594-220 harmonic balancer is 2nd design and it stated: Requires Seal Kit 89017622 and Washer 12578073

Bottom line is I need to buy that Spent-Moore tool J-44226 to pull the balancer out.

What about the washer that are behind the balancer that have to replace or can I reused it??
 

Mooseman

Moderator
Dec 4, 2011
26,026
Ottawa, ON
I reused it on mine. I have the tool except parts of it are lost. I'm terrible to.my tools. I think I can get the main parts of it and sell it to you. But it is ONLY for the first design that can't work with a normal 3 jaw puller. Did you look at my threads? I'm on my phone and difficult to link stuff.
 

mrrsm

Lifetime VIP Donor
Supporting Donor
Member
Oct 22, 2015
8,202
Tampa Bay Area
In place of using the expensive Kent Moore J-44226 TOOL… This OTC one will work as well and for much less money:

https://www.amazon.com/dp/B000P6UT2I/?tag=gmtnation-20

And to assist @Mooseman in finding his famous GMT Nation write up while he is on his cellphone:

https://gmtnation.com/forums/threads/how-to-replace-i6-timing-chain-and-tensioner.12240/#post-351898

These five videos ( watch all five) will show how the job is done and describes the seal and HB differences and how to use the special OTC Puller. All five videos are worth downloading:

 
  • Like
Reactions: gmcman

Mooseman

Moderator
Dec 4, 2011
26,026
Ottawa, ON
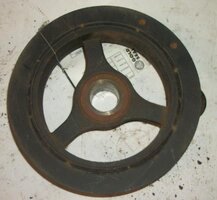
Just to be clear, only if the balancer looks like THIS ONE:
122997-a0411185d7a1c5794a57c810f5db5afc.jpg

Then you MUST use the Kent-Moore tool. A 3 jaw puller will not work on this balancer.

If however it looks like this one:
122998-4a6288fe684b92b03953482cd1bdf30e.jpg

Then a 3 jaw puller will work and the Kent-Moore tool is not required. The one that @MRRSM linked is excellent but again, ONLY FOR THIS BALANCER.
 
  • Like
Reactions: mrrsm

Ric_Whit

Original poster
Member
Sep 24, 2012
71
I reused it on mine. I have the tool except parts of it are lost. I'm terrible to.my tools. I think I can get the main parts of it and sell it to you. But it is ONLY for the first design that can't work with a normal 3 jaw puller. Did you look at my threads? I'm on my phone and difficult to link stuff.
I get a good deal on a complete Kent Moore J-44226 TOOL for $75,-
Yes I did see your threads.
 

Ric_Whit

Original poster
Member
Sep 24, 2012
71
In place of using the expensive Kent Moore J-44226 TOOL… This OTC one will work as well and for much less money:

https://www.amazon.com/dp/B000P6UT2I/?tag=gmtnation-20

And to assist @Mooseman in finding his famous GMT Nation write up while he is on his cellphone:

https://gmtnation.com/forums/threads/how-to-replace-i6-timing-chain-and-tensioner.12240/#post-351898

These five videos ( watch all five) will show how the job is done and describes the seal and HB differences and how to use the special OTC Puller. All five videos are worth downloading:

Thanks MMRSM I know about that OTC tools and I see all five video.
As Mooseman said the different harmonic balancer is the problem I have the first design balancer and the Kent Moore J-44226 TOOL is the one
 

Ric_Whit

Original poster
Member
Sep 24, 2012
71
Guys Read email what GM partsdirect has told me about 1st design and 2nd design.

From:
Customer Service <customerservice@gmpartsdirect.com>
Sent: Thursday, October 19, 2017 7:38 PM
To: Ricardo Whitfield
Subject: Re: Technical question 1906

Hi,
Per the current licensed General Motors parts catalog, the part number we have supplied are the correct original equipment General Motors parts for VIN 1GNDS13S622163586


Thanks,
Floyd
Your customer service agent for
www.GMPartsDirect.com
GM Parts Direct: Your direct source for Genuine GM Parts

www.gmpartsdirect.com
Online sales of genuine GM and AC-Delco parts and accessories for all GM makes and models. Also offers GM restoration parts.

On Thu, Oct 19, 2017 at 3:33 PM, Ricardo Whitfield < ricwhit@hotmail.com> wrote:


Hi Floyd,

Thanks for your prompt response.
What I understand here from you is that those 2nd design parts fit my 1st design crankshaft (vehicle information supplied)?
This is just for confirmation before I order parts.
Even I have been told that the 1st design crankshaft (vehicle information supplied) have different shaft size.
The two design aren't interchangeable.

Regards,
Ricardo

From: Customer Service <customerservice@gmpartsdirect.com>
Sent: Thursday, October 19, 2017 7:04 PM
To: Ricardo Whitfield
Subject: Re: Technical question 1906

Hi Ricardo,
Please accept my sincerest apology for the delay in responding to your inquiry.

I have entered your supplied information into our licensed GM parts catalog (not the third party catalog used on the website) and below are the part numbers requested and verified as correct per the vehicle information supplied.

12578069 BALANCER, CRANKSHAFT (INCLUDES 12578073 WASHER) (REQUIRES SEAL KIT 89017622)

11609792 BOLT, CRANKSHAFT BALANCER (HEX HEAD WASHER, M16 X 2)
These parts should ship from our facility in North Carolina 3-5 business days (Monday-Friday) from the date of your order.
You can go to www.GmPartsDirect.com on our home page you will have to enter your part number into the SEARCH space provided on our homepage. You will then have to add this number to your shopping cart to see total charges with shipping and handling delivered to your door.

GM Parts Direct: Your direct source for Genuine GM Parts
www.gmpartsdirect.com

Online sales of genuine GM and AC-Delco parts and accessories for all GM makes and models. Also offers GM restoration parts.

If a member of our customer service team supplies (or verifies) a part number (special order items included) and the part number supplied is incorrect per the information supplied to www.GMPartsDirect.com by our customer, the incorrect part number can be returned for a full refund.


GM Parts Direct: Your direct source for Genuine GM Parts
www.gmpartsdirect.com

Online sales of genuine GM and AC-Delco parts and accessories for all GM makes and models. Also offers GM restoration parts.

Thanks,
Floyd

Your customer service agent for
www.GMPartsDirect.com


GM Parts Direct: Your direct source for Genuine GM Parts
www.gmpartsdirect.com

Online sales of genuine GM and AC-Delco parts and accessories for all GM makes and models. Also offers GM restoration parts.

On Wed, Oct 18, 2017 at 1:47 PM, Ricardo Whitfield < ricwhit@hotmail.com> wrote:

Hi,

I have a 2002 Trailblazer Short Wheel Base 2WD 4.2L L6 Engine VIN: 1GNDS13S622163586.

I need to replace the leaking Front Crank Seal and the harmonic balancer pulley.

I see the Front Crank Seal - GM (89017621) 1st design are available.

I see the Crankshaft Balance Bolt - GM (11609792) 1st and 2nd design are available.

I see that the Vibration Damper - GM (12571619) 1st design are not available Discontinue.


My question is can I use the below parts on my 2002 Chevy Trailblazer:

Vibration Damper - GM (12578069) 2nd design (Kit with Washer)
Crankshaft Balance Bolt - GM (11609792) 1st and 2nd design
Front Crank Seal - GM (89017622) 2nd design

Looking forward on your prompt response.
Ricardo


Mooseman

Moderator
Dec 4, 2011
26,026
Ottawa, ON
The crankshaft itself never changed, same size. Just the diameter of the balancer's outer shaft and seal size did. As long as you use 2nd design balancer and seal, you should be good. Even the timing cover didn't change.
 

Ric_Whit

Original poster
Member
Sep 24, 2012
71
The crankshaft itself never changed, same size. Just the diameter of the balancer's outer shaft and seal size did. As long as you use 2nd design balancer and seal, you should be good. Even the timing cover didn't change.
That was my second question from the beginning (2.Can I replace all the 1st design to the 2nd design set mention above on a 1st design crankshaft????)
Now it time to order those 2nd design parts and update the harmonic balancer.

Thanks guys.
 

Mooseman

Moderator
Dec 4, 2011
26,026
Ottawa, ON
Normal right hand but it uses a ton of torque.
 

mrrsm

Lifetime VIP Donor
Supporting Donor
Member
Oct 22, 2015
8,202
Tampa Bay Area
EDIT:

I've since done some additional investigation of the source for this information and it appears that this particular Crankshaft Holding Tool is meant for use on the 5 Cylinder Sister Versions of the GM 4.2L Engine found in the Colorado Trucks and is NOT specifically designed to work on the GM 4.2L Motors-> Transmission-> Flex-Plate Repairs. The one described below as a Parkerized Steel Rigid Arm with the 12 Point 15 MM Deep Socket welded on as a Crank-Case - Oil Pan Pass Through Tool to Lock Down the Flex-Plate by aligning One of the Three 10.9 Flex-Plate Bolts is the CORRECT Tool to Use.

When the GM 4.2L Engine is inside of the Vehicle... This is the only certified tool that can be fitted through the bottom of the GM 4L60E Transmission port at the bottom where the opening is fitted with rubber plug(s) removed and set against the Flexplate Teeth to hold the Crankshaft perfectly still. (This tool application GIF Image comes from Autozone Auto Parts and is an excerpt from a more complex set of correlated engine repairs ...located at this link...)

https://www.autozone.com/repairguid...ver-Chain-Sprockets-Seal/_/P-0996b43f80cb38c9


0996b43f80201352.gif


https://www.toolsource.com/harmonic...1_139_155/flywheel-holding-tool-p-211028.html

However... if the Harmonic Balancer is being removed or installed while the engine is mounted on an Engine Stand... The Flex-Plate can be locked securely using a pair of Needle Nose Vice Grips while braced against the engine stand mounting bolts by squeezing down just on the outer edges of the fire hardened gear ring.
 
Last edited:

BrownHP800

Member
Mar 19, 2014
91
Oh how fun. Another tool. Maybe this job isn't for me. lol.

(I didn't start taking it off yet, just trying to get everything I need first)
 
  • Like
Reactions: Redbeard

mrrsm

Lifetime VIP Donor
Supporting Donor
Member
Oct 22, 2015
8,202
Tampa Bay Area
This is the Higher Quality OTC Flex-Plate Holding Tool that is being offered on Amazon (with six (6) left in stock as of November 1st, 2017) for a little less money than the Tool Jobbers

https://www.amazon.com/dp/B075GX5RYG/?tag=gmtnation-20

One last suggestion that will obviate the need to use a Torque Angle Meter when installing the New TTY Harmonic Balancer Bolt is to first secure the Flex-plate-Crankshaft in Place with the EN-46547 Holding Tool and then torque down the Crankshaft TTY with 110 Ft. Lbs of force. Then... Mark a vertical line that runs from the Top Timing Cover straight down across the face of the TTY Bolt and end the paint line just below on the Timing Cover using a White Enamel Permanent Paint Pen. Then… using a long 1/2” Breaker Bar and length of galvanized pipe as an added lever… slowly rotate the TTY Bolt 180 Degrees clockwise until the White Paint Line is once again lined straight up and down. Done ! EZ-PZ… :>
 
Last edited:
  • Like
Reactions: Reprise

Ric_Whit

Original poster
Member
Sep 24, 2012
71
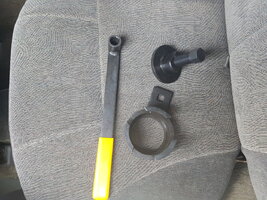
@MRRSM What about the tool on the left on this pic?
This tool is for holding the flex plate or something to prevent the engine from turning?
In one of the 5 video (above) the guy explain about insert a socket true a hole to hold the engine.
GM call for the J-44226 Tool to remove the balancer.20171109_151034.jpg
 

Mooseman

Moderator
Dec 4, 2011
26,026
Ottawa, ON
I was never able to figure that one out neither. Could be a tool for another engine that uses the same main parts of the tool.
 

mrrsm

Lifetime VIP Donor
Supporting Donor
Member
Oct 22, 2015
8,202
Tampa Bay Area
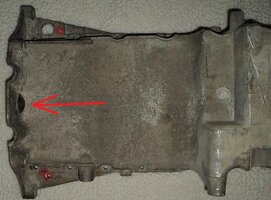
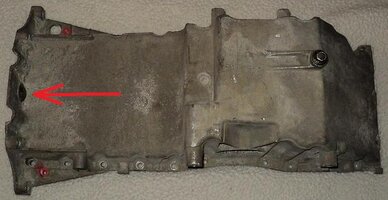
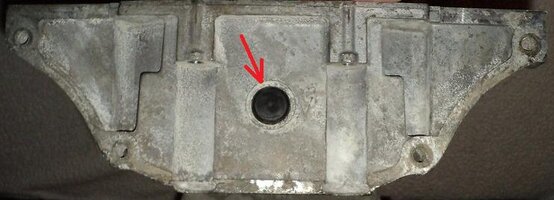
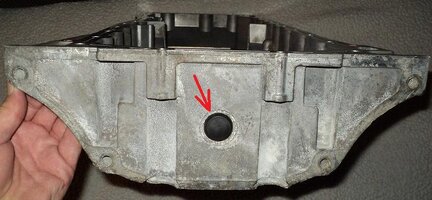
Look over these images of the Crankcase-Oil Pan for a Black Plastic Plug in-dwelling and insert the Tool Socket through this Hole:

GM42LHARMONICBALANCERTOOLKIT1.jpg


CRANKCASE4.jpgCRANKCASE3.jpgCRANKCASE2.jpg

Once it is removed and after One of the Three 10.9 Torque Converter Bolts lined up with the other side of the opening to the Flex Plate... Use a 15 MM Deep Socket (or in this case...the Black Steel Handle Tool with the 12 Pt Socket End welded on the end that you are referring to in your image)

Pass that socket end of the Tool through the hole down there and once fitted and held in place by the Handle... this should fix the Flex-Plate in place while the Crankshaft TTY Bolt Installation Procedures as follows:

Use a Brand New TTY Crankshaft Bolt, Tighten to 110 Foot Pounds, then Mark a Vertical Paint Pen White Line from 12:00 to 6:00 Positions and Tighten the last portion 180 Degrees of Finishing Torque Angle.

You're Done
...
 

Attachments

  • CRANKCASE1.jpg
    CRANKCASE1.jpg
    55 KB · Views: 0
Last edited:

Ric_Whit

Original poster
Member
Sep 24, 2012
71
@Mooseman @MRRSM
In this manual by point #3 they are mention the torque converter holding tool from the J 44226 kit
May be that tools in my pic is for holding the torque converter??
[pdf]82346[/pdf]
 

Attachments

  • Engine Mechanical.pdf
    76.8 KB · Views: 34

Mooseman

Moderator
Dec 4, 2011
26,026
Ottawa, ON
Could be but frankly, I don't know why they would supply that tool when a socket and ratchet or breaker bar could do the exact same thing.
 

mrrsm

Lifetime VIP Donor
Supporting Donor
Member
Oct 22, 2015
8,202
Tampa Bay Area
Probably Liability... or Reliability... since the entire Tool Kit is of a pretty robust design and to round out everything needed to complete the job(s) of working on the Front Seal, Timing Chain, etc.

But for the sake of the argument ...and to paraphrase the issue... on the subject of employing Capitalist methods in his Communist country, the Leader of China, Deng Xiaoping once said:

"I Don't Care if the Cat is Black... or White... as Long as it Catches MICE!" ;>)

About the installation of the New Front Crankshaft Seal before the installation of the New Harmonic Balancer... this is the J-41478-A Tool that is mentioned in your attached PDF. And once again, it is also an expensive one that can be side-stepped if the seal is carefully slid over the cleaned up nose of the Crankshaft... so as not to collapse the two inner opposing lip portions of the PTFE seals... and then lightly and uniformly tapped into place either with an out-sized cylinder or even a small chunk of 2"X4" wood to spread around the impacts and drive it home evenly flush against the Timing Cover:

http://smhttp-ssl-43434.nexcesscdn....eab33525d08d6e5fb8d27136e95/j/-/j-41478-a.jpg

...and available here if needed:

http://www.freedomracing.com/front-...MIk8GYoeGz1wIVkLfACh0e1QqeEAEYASAAEgLUdPD_BwE
 
Last edited:

Ric_Whit

Original poster
Member
Sep 24, 2012
71
Helllll nooooo that tool is to expensive I will go with a out-sized cylinder or 2"X4" wood.
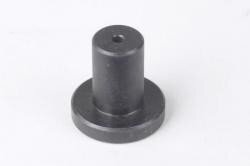
And also in the manual (2 pages before) they mention to use J 41816-2 tool (Crankshaft End Protector) when removing the harmonic balancer.
J41816-2.jpg
There have side-stepped for this tools also??

Before I forget again I want to thanks @Mooseman for all the manuals.
 

mrrsm

Lifetime VIP Donor
Supporting Donor
Member
Oct 22, 2015
8,202
Tampa Bay Area
I would not risk trying to use anything other than the "Correct Button" here... as if either the nose of the Crankshaft gets accidentally Mushroomed by the force of the Pointed Conical Bolt in your Tool Kit ...or the Internal TTY Bolt Thread lines get FUBARed ... then your problems will get very serious and expensive if you have to replace the entire crankshaft afterwards for the sake of not using a $25.00 Proper Tool:

http://www.freedomracing.com/j-41816-2-crankshaft-end-protector-en-41816-2.html

...and from my Photobucket... more images of the expensive K&M Flavor:

http://s557.photobucket.com/user/60...NEREPAIR/TRAILBLAZEREPAIRTOOLS?sort=3&page=15
 
Last edited:

Mooseman

Moderator
Dec 4, 2011
26,026
Ottawa, ON
I would not risk trying to use anything other than the "Correct Button" here...

Pfft. I've used a one or two size smaller hardened bolt to do the same thing.
 

BrownHP800

Member
Mar 19, 2014
91
I went and purchased a EN-46547 tool to hold the engine from turning to do the seal on my 2002 Trailblazer. I do not know if all years are the same, but that tool did not fit.

So I do have one that is basically brand new other than a few scratches from being on the garage floor under the car I would like to sell. I bought it for $120 and I will sell it for $90 shipped. Let me know if you are interested.
 

mrrsm

Lifetime VIP Donor
Supporting Donor
Member
Oct 22, 2015
8,202
Tampa Bay Area
There are two variants on the access port to get near the teeth of the bottom of the Flex-Plate. One has Two Holes that are normally blocked off the Rubber Plugs that conceal the last two Lower Rear Crankcase Bolts holding the Crankcase to the back rail of the Engine Block. The other facing half of the lower 4L60E Bell Housing should have an Off Set Straight Slot that should still give enough room to insert this tool… but it has to he guided in from a flattened position and then carefully rolled into place to line up the teeth on the Flex-Plate with the Tool. This action must be done without using any excessive force… lest the tool get jammed hard inside and damage or bend the Flex-Plate out of shape...and throw it out of balance.

However… if your variant only has the half-moon holes on BOTH sides of the clamshell between the back of the engine block and the lower lip of the transmission forming access tubes to get to those bolts… then this tool will not work. If it were my vehicle and the 4L60E transmission did have the Cut Out Half Slot available as shown in the link to my Photobucket below… then I would consider trying this again and if necessary… I’d Modify the Tool to fit the situation (NOT the back of the Engine Block and NOT the Transmission Bell Housing lest they crack under the stress) with either an angle grinder, a 4" chop saw or grinding wheel to make any “Edits” needed to suit these purposes.

It only has to work once to be worth such an effort. The other options of using the 15MM Handle and Socket through the underside of the back of the Engine Block or using a 15MM Deep Socket with a medium sized Breaker Bar as a brace have also been covered in the data of the last few posts…. So those bear revisiting and reading as well. Please take heart… and take another look at the situation and see if you can get some images of the areas under there to post up here… We will continue to sort out the problems.

http://s557.photobucket.com/user/60...NGINEREPAIR/GM4L60ETRANSMISSION?sort=3&page=1
 

Mooseman

Moderator
Dec 4, 2011
26,026
Ottawa, ON
Even though the removal tool wasn't required for my second gen damper, I used it to hold the damper while I was reefing (torquing) on the main bolt. Worked for me.
 

BrownHP800

Member
Mar 19, 2014
91
I thought about cutting the tool down to use but then I read about the socket trick and while I didn't think that would work, I gave it a shot and to my surprise it worked well. I never thought it would hold pulling all of that torque but it did. Maybe I got lucky. But it is all back together again.
 

Ric_Whit

Original poster
Member
Sep 24, 2012
71
3 weeks ago I did this job and now I can report to you all.
And no leaks

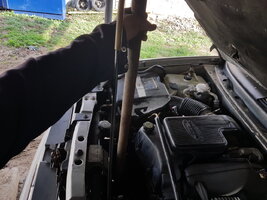
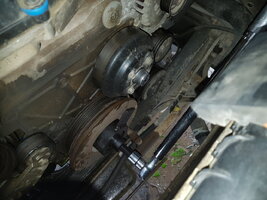
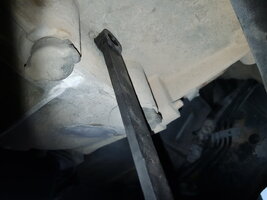
With a 1 1/2" pipe 1 meter long the old bolt does not look as tough as is seem to be.
20171118_084631.jpg

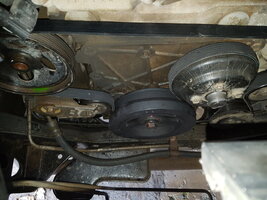
Here you can see both tools in place.
20171118_085621.jpg 20171118_101251.jpg

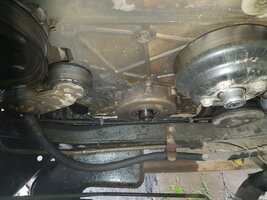
Old Harmonic Balancer removed
20171118_090058.jpg

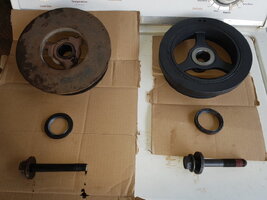
Now lets see the different between the 1st and 2nd design
1st design on the left 2nd design on the right
20171118_090458.jpg

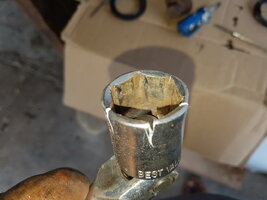
When applying the half turn after torqueing the socket give away
20171118_100654.jpg

Now I have 2nd design Harmonic Balancer, Front Seal and Bolt on my 1st design engine.
20171118_103334.jpg

I want to give thanks to @Mooseman @MRRSM for they input
 

mrrsm

Lifetime VIP Donor
Supporting Donor
Member
Oct 22, 2015
8,202
Tampa Bay Area
Congratulations, Brother...and also for finishing this job with a Perfect "Sticky" Worthy Photo-Play and Write Up! Ric... I'm sorry I forgot to mention about the need to use an "Impact Wrench Grade Socket" on the Crankshaft Bolt because of the enormous Torque needed during the R&R.

Don't Forget ...To Edit your Thread Title to read [SOLVED]. I'll bet you felt like you could "Walk on The Clouds..." after you Finished The Job... and Fired up Your Engine... There is just No Better Feeling in the world!"
 
Last edited:

Mooseman

Moderator
Dec 4, 2011
26,026
Ottawa, ON
Added to FAQ. :thumbsup:
 

bspurloc

Member
Dec 27, 2012
295
Do you have electric fans in this vehicle as I see no mention of the fan being a pain and the fan clutch.
I see my daughters front seal is leaking. but I converted hers to electric fans and think I have enough room to do this without removing the fan assembly.
I have a feeling hers has been leaking for years which would explain why she is always 2+ quarts low each change. 260k miles I figured it was just burning it as I only occasionally see a drip from her car.
 

Ric_Whit

Original poster
Member
Sep 24, 2012
71
@bspurloc I don’t have electric fan I have the normal fan clutch.
Two years ago I replace the fan clutch at that time it was a pain but I put anti seas on the thread.
 

Forum Statistics

Threads
23,681
Posts
641,971
Members
19,138
Latest member
wentzben

Members Online