How to replace I6 timing chain and tensioner

Mooseman

Original poster
Moderator
Dec 4, 2011
26,411
Ottawa, ON
This is the last of several articles during my work to replace the timing chain and tensioner.

How to replace the I6 timing chain and tensioner.

Difficulty (out of 5): 8 (I'm not kidding)
Tools required: Assortment of wrenches, ratchets, extensions, screw drivers. Socket sizes: 7mm, 8mm, 10mm, 11mm (or 7/16), 13mm, 14mm, 15mm, 17mm, 18mm, 21mm. Hammer, pry bar, long punch or drift, slide hammer with screw attachment.
Time required (removal and install): I don't really know

First of all, I would rather set my truck on fire than do this again. It was an exercise in frustration. It took me 1 and half months to do mine due to just life getting in the way, work, weather (I don't have a garage), broken tools and injury when I cut my hand open while working on it by tripping and falling on something sharp.

I elected to replace the chain, guide shoes and gears along with the chain tensioner just to be sure. My engine was "knocking" irregularly at the top front at idle

Use these instructions at your own risk and sanity.
  • Remove the intake manifold and valve cover
  • Remove the oil pan
  • Drain the cooling system
  • Remove the cooling fan and shroud
  • Remove the water pump
  • Remove the belt tensioner and idler pulley (now is a good time to check their condition, especially the bearings)
  • Remove the #1 spark plug and put a screwdriver in it to help you determine top dead center
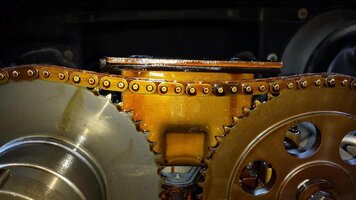
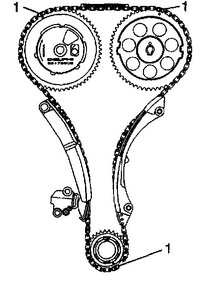
  • Turn the engine using the harmonic balancer bolt clockwise until it's at top dead center and that the timing marks on the camshaft gears and chain are lined up. There is a mark on each gear and there are dark links on the chain that must be lined up. Another indicator is that the work "Delphi" on the camshaft phaser is horizontal with the head. 20140918_171626 (Large).jpg 20140918_171633 (Large).jpg
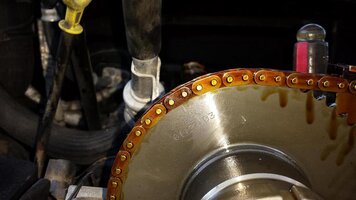
  • Remove the harmonic balancer bolt. An impact wrench and socket should work if available but that bolt is on there with a lot of torque. You could put a large screwdriver in an intake gear hole to prevent it from moving while using a socket and very long breaker bar. You might have to extend it with a bar.
  • Pull the harmonic balancer with a puller. Depending on which balancer you have, you may need a special Spent-Moore tool to pull. If you have an early 2002 model and your balancer looks like there is a large thick ring steel plate on the front of it like in this picture, then you will need Kent-Moore tool J 44226 to pull it. Early balancer.jpg
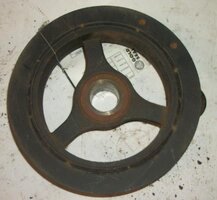
  • If you have a "normal" looking balancer like this one, then a 3 jaw gear puller should work. Balancer.jpg I say should because this was the most difficult part of the job. It kicked my ass for more than 2 weeks. Broke two gear pullers and another heavy duty one kept slipping off. I bought another specialized one from Amazon: OTC 6667 Harmonic Balancer Puller . Good thing Amazon has a great return policy because I broke it using a breaker bar on the bolt. That balancer was not coming off! After I got the replacement puller, I used the torches to heat the crap out of it and it finally came off. When I went to my local U-Pull yard to get another, it came right off without hardly any issues or a lot of torque on the puller at all. Go figure.
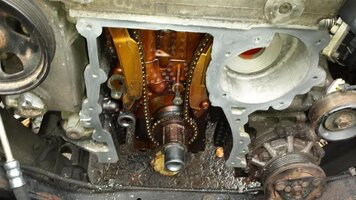
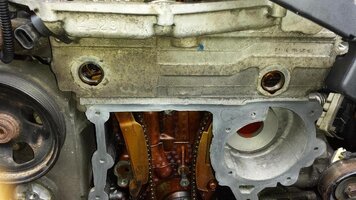
  • Remove all the bolts holding the front timing cover. The small one in the middle may break, like it did for me. You should be at this point: 20141006_144904 (Large).jpg Also, it was very evident that my chain tensioner was not its job: 20140918_170759 (Large).jpg
  • With the screwdriver still in the camshaft gear, loosen the camshaft phaser and intake camshaft gear bolts.
  • Remove the chain tensioner by removing the two bolts
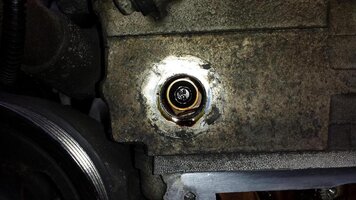
  • Remove the chain tensioner guide shoe and the other guide shoe. To access the bolt to remove it and the other shoe, remove this plug (now you know what it's for): 20141006_144958 (Large).jpg20141006_145003 (Large).jpg
  • Remove the upper chain guide located between the two camshafts
  • Remove the camshaft phaser and intake camshaft. Unhook the chain from the crankshaft gear and pull the chain off
  • There is a very thin spacer/washer on the crank snout in front of the crank gear. Pull it off and carefully set aside.
  • Pull the crank gear. No puller required.
This is where I say install is the reverse of removal with the following notes:
  • When installing the new chain tensioner, you might need to install it with one bolt first and then the other while twisting it into place. Mine was tight with the new chain and shoes
  • When installing the exhaust cam phaser, you have to be sure it's turned clockwise. While torquing down the bolt, it will turn itself in the right direction.
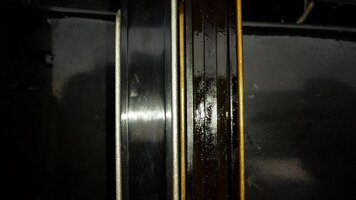
  • Double and triple check that the chain is installed correctly with the marks on the gears and dark chain links lined up: Timing marks.jpg
  • The cam phaser bolt torque is 18 ft. lbs + 135 degrees rotation
  • The intake cam gear bolt torque is 15 ft. lbs + 100 degrees rotation
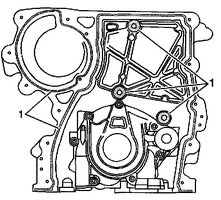
  • The timing cover should be cleaned and resist the temptation to turn the oil pump as it must be aligned with the the notches in the crank gear. Apply silicone sealant (I used Permatex Ultra Grey) in a bead on the sealing surface as well as the three standoffs and around the water pump hole. Timing cover sealant.jpg
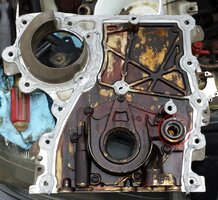
  • Do not forget to replace the crank seal and oil pump passage seal: Timing cover oil pump seal.jpg
  • The harmonic balancer needs a shitload of torque. It's 110 ft. lbs + another 180 degrees rotation. For that final 180, I used a breaker bar with another bar added to it and guesstimated the degrees. I've never torqued anything that much before. I used the Kent-Moore tool (which I didn't need) to hold the balancer in place with another breaker bar. I wouldn't use the cam gear for this one.You might have to get somebody to hold it at the flywheel.
Apart from the gaskets, seals and replacement parts, set aside some money to pay for therapy or alcohol. I think the latter is more effective :biggrin: .

EDIT: Re-reading this, I remembered that my phaser was damaged and I had to replace it later on because of the way I installed it. While torquing the bolt, use a wrench on the hex on the exhaust camshaft to hold it in place otherwise you will overextend the phaser and damage it. If reusing your old one, you should also use a wrench while removing the bolt.
 
Last edited:

PProph

Member
Dec 7, 2011
220
That's a great article. Don't know if I'd ever tackle such a project but if I thought about it this article would make me a lot more confident.
 

Mooseman

Original poster
Moderator
Dec 4, 2011
26,411
Ottawa, ON
Thanks. I think I meant it more as a warning to others. And I even have the scar to prove it!
 
  • Haha
Reactions: 808

808_LS_EXT

Member
Aug 28, 2014
305
After reading Mooseman's 3 articles pertaining to the timing chain and oli pan,
I am solidly convinced that
.
.
.
.
.
.
.
.
.
.
.
.
.
.
.
.
should the timing chain on my 4.2L need replacing,

I am converting the TB to Carb'd V8!

:celebrate:
 
  • Like
Reactions: Mounce

Mooseman

Original poster
Moderator
Dec 4, 2011
26,411
Ottawa, ON
Which is also one reason I just bought an 06 Saab 9-7x with the 5.3L V8!

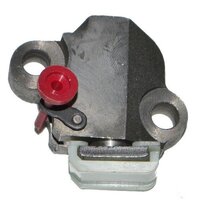
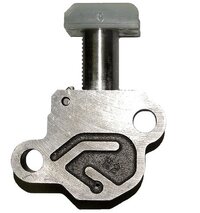
I also wanted to point out how my tensioner failed. The chain made noise only while idling, right at the top front of the engine but at anything but idle, it was fine. The tensioner is oil pressure fed and has a ratcheting mechanism that holds the tension when the oil pressure is lower, like at idle. The oil pressure part takes up the slack as the chain, gears and shoes wear down and the ratchet holds the "new" position. The ratchet partially failed that it wouldn't hold the new position. The old parts had worn enough that the tensioner would have been 3/4 of the way through its full range. With all new parts, the new tensioner was completely compressed.

Here's what the tensioner looks like. That red "golf tee" holds it in its compressed position until removed and you can see the oil feed on the back.

Tensioner.jpg Tensioner back.jpg

Here's the wear on the shoes compared to new parts:

20141006_152824 (Large).jpg 20141006_152831 (Large).jpg
 

Mooseman

Original poster
Moderator
Dec 4, 2011
26,411
Ottawa, ON
Well, now I also need a CASE relearn because the correlation between the camshafts and crankshaft has changed, giving me a P1345. Makes sense since I put in a new chain and gears. Good thing I can borrow a Tech2 at work.
 

mrrsm

Lifetime VIP Donor
Supporting Donor
Member
Oct 22, 2015
8,461
Tampa Bay Area
Not sure how that applies to @Mooseman 's Epic Post on doing this hard job... Can you elaborate?
 
  • Like
Reactions: Mooseman

Mooseman

Original poster
Moderator
Dec 4, 2011
26,411
Ottawa, ON
This video came up on my YT feed and it brought back some PTSD of doing this job.

Go grab your favourite alcoholic bevey and some snacks, it's as long as a movie. He shows everything, including the removal of the 4x4 components and the R&P. Watch it a 2x speed as he is a bit slow.

 
  • Love
Reactions: mrrsm
Mar 25, 2025
2
Ozarks
This is the last of several articles during my work to replace the timing chain and tensioner.

How to replace the I6 timing chain and tensioner.

Difficulty (out of 5): 8 (I'm not kidding)
Tools required: Assortment of wrenches, ratchets, extensions, screw drivers. Socket sizes: 7mm, 8mm, 10mm, 11mm (or 7/16), 13mm, 14mm, 15mm, 17mm, 18mm, 21mm. Hammer, pry bar, long punch or drift, slide hammer with screw attachment.
Time required (removal and install): I don't really know

First of all, I would rather set my truck on fire than do this again. It was an exercise in frustration. It took me 1 and half months to do mine due to just life getting in the way, work, weather (I don't have a garage), broken tools and injury when I cut my hand open while working on it by tripping and falling on something sharp.

I elected to replace the chain, guide shoes and gears along with the chain tensioner just to be sure. My engine was "knocking" irregularly at the top front at idle

Use these instructions at your own risk and sanity.
  • Remove the intake manifold and valve cover
  • Remove the oil pan
  • Drain the cooling system
  • Remove the cooling fan and shroud
  • Remove the water pump
  • Remove the belt tensioner and idler pulley (now is a good time to check their condition, especially the bearings)
  • Remove the #1 spark plug and put a screwdriver in it to help you determine top dead center
  • Turn the engine using the harmonic balancer bolt clockwise until it's at top dead center and that the timing marks on the camshaft gears and chain are lined up. There is a mark on each gear and there are dark links on the chain that must be lined up. Another indicator is that the work "Delphi" on the camshaft phaser is horizontal with the head. View attachment 60959 View attachment 60960
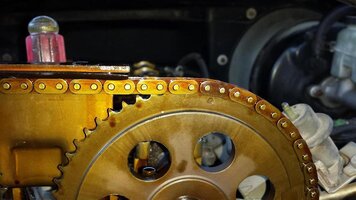
  • Remove the harmonic balancer bolt. An impact wrench and socket should work if available but that bolt is on there with a lot of torque. You could put a large screwdriver in an intake gear hole to prevent it from moving while using a socket and very long breaker bar. You might have to extend it with a bar.
  • Pull the harmonic balancer with a puller. Depending on which balancer you have, you may need a special Spent-Moore tool to pull. If you have an early 2002 model and your balancer looks like there is a large thick ring steel plate on the front of it like in this picture, then you will need Kent-Moore tool J 44226 to pull it. View attachment 60967
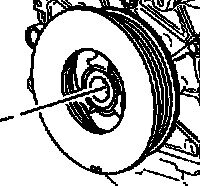
  • If you have a "normal" looking balancer like this one, then a 3 jaw gear puller should work. View attachment 60968 I say should because this was the most difficult part of the job. It kicked my ass for more than 2 weeks. Broke two gear pullers and another heavy duty one kept slipping off. I bought another specialized one from Amazon: OTC 6667 Harmonic Balancer Puller . Good thing Amazon has a great return policy because I broke it using a breaker bar on the bolt. That balancer was not coming off! After I got the replacement puller, I used the torches to heat the crap out of it and it finally came off. When I went to my local U-Pull yard to get another, it came right off without hardly any issues or a lot of torque on the puller at all. Go figure.
  • Remove all the bolts holding the front timing cover. The small one in the middle may break, like it did for me. You should be at this point: View attachment 60969 Also, it was very evident that my chain tensioner was not its job: View attachment 60970
  • With the screwdriver still in the camshaft gear, loosen the camshaft phaser and intake camshaft gear bolts.
  • Remove the chain tensioner by removing the two bolts
  • Remove the chain tensioner guide shoe and the other guide shoe. To access the bolt to remove it and the other shoe, remove this plug (now you know what it's for): View attachment 60971View attachment 60972
  • Remove the upper chain guide located between the two camshafts
  • Remove the camshaft phaser and intake camshaft. Unhook the chain from the crankshaft gear and pull the chain off
  • There is a very thin spacer/washer on the crank snout in front of the crank gear. Pull it off and carefully set aside.
  • Pull the crank gear. No puller required.
This is where I say install is the reverse of removal with the following notes:
  • When installing the new chain tensioner, you might need to install it with one bolt first and then the other while twisting it into place. Mine was tight with the new chain and shoes
  • When installing the exhaust cam phaser, you have to be sure it's turned clockwise. While torquing down the bolt, it will turn itself in the right direction.
  • Double and triple check that the chain is installed correctly with the marks on the gears and dark chain links lined up: View attachment 60973
  • The cam phaser bolt torque is 18 ft. lbs + 135 degrees rotation
  • The intake cam gear bolt torque is 15 ft. lbs + 100 degrees rotation
  • The timing cover should be cleaned and resist the temptation to turn the oil pump as it must be aligned with the the notches in the crank gear. Apply silicone sealant (I used Permatex Ultra Grey) in a bead on the sealing surface as well as the three standoffs and around the water pump hole. View attachment 60974
  • Do not forget to replace the crank seal and oil pump passage seal: View attachment 60976
  • The harmonic balancer needs a shitload of torque. It's 110 ft. lbs + another 180 degrees rotation. For that final 180, I used a breaker bar with another bar added to it and guesstimated the degrees. I've never torqued anything that much before. I used the Kent-Moore tool (which I didn't need) to hold the balancer in place with another breaker bar. I wouldn't use the cam gear for this one.You might have to get somebody to hold it at the flywheel.
Apart from the gaskets, seals and replacement parts, set aside some money to pay for therapy or alcohol. I think the latter is more effective :biggrin: .

EDIT: Re-reading this, I remembered that my phaser was damaged and I had to replace it later on because of the way I installed it. While torquing the bolt, use a wrench on the hex on the exhaust camshaft to hold it in place otherwise you will overextend the phaser and damage it. If reusing your old one, you should also use a wrench while removing the bolt.
I skimmed the article and didn't notice if you mentioned that the oil pan needs to come off to remove the oil pump pickup tube to get the cover off. This is a ordeal. The rack and pinion steering cylinder needs to be dropped to get the clearance to remove the pan. You may be able to just leave it hang on the two steering knuckles. IF you have a 4x4, God help you... You will NEED it. Remove both brake callipers, rotors, left and right steering knuckles, CV axles, the front wheel disconnector from the oil pan on the passenger side and the front differential from the oil pan on the driver's side. There is a 12" or so splined coupler shaft that needs to be pulled out. This is because the front axle on a 4x4 goes THROUGH the oil pan. Now you can remove the oil pan. Basically remove the front suspension and drive train - eg: remove the vehicle from around the timing chain.

That harmonic balancer bolt is a TTY bolt. It "should" be replaced, not reused. There us unbelievable Godzilla torque on it. With the 130 something initial ft/lbs + 180 degrees, that puts it somewhere near 600 ft/lbs. Good luck locking up the crank without tearing up stuff with some jury rig. My favorite trick is to hydrolock a cylinder with oil. Remove the spark plug, rotate the engine up to TDC compression stroke then back it off about 10 degrees and dump about 1 or 2 oz of oil in the cylinder then put a old plug back in. When you loosen or tighten the damper bolt, it will lockup solid when it hits the slug of oil it cant compress with nowhere to go. You can use any liquid. I suggest oil but coolant will work just as well. .
 

mrrsm

Lifetime VIP Donor
Supporting Donor
Member
Oct 22, 2015
8,461
Tampa Bay Area
It would better for your Readers to have as much accurate information available as possible about the methods that are actually involved and much preferred while doing this "touchy" work:

(1) The Method for securing the Crankshaft is that after establishing TDC on Cylinder #1, it follows on as being necessary to pass a Lengthy Socket THROUGH the Back of the Crankcase Oil-Pan after removing the Black Plastic Plug and guiding in an Impact Grade 15mm 6 Point Socket over one of the Three Torque Converter to Flex-Plate Bolts and fitting in a Breaker Bar for the counter-resistance to the CCW Force being applied to the Main Crank Bolt during its removal... and replacement. The images below also illustrate a Special Tool (Orange Plastic Coated Handle) made for this purpose by Kent-Moore.

(2) The Crankshaft cannot be properly restrained in any other way that does not invite risking damage to the Harmonic Balancer and the Nose and Internal Threads of the Crankshaft which is NOT fitted with a Factory Woodruff Key that would ordinarily prevent it losing its grip and then spinning freely in the CCW "Unwind" Direction.

(3) When installing a Brand New GM TTY Crankshaft Bolt, the Torque required is 110 Foot Pounds, followed by marking the face of the TTY Bolt with a Vertical Line and simply carefully applying the necessary force to turn the Hex portion of the Crank Bolt 180 Degrees Clockwise from the 6:00 Position to the 12:00 Position and that completes the process.

(4) Using any Hydro-Lock tactic is an invitation to Bending the Connecting Rod and damaging the Mains Bearing Soft Babbitt Material unnecessarily and distorting and risking damage to the VERY Long Crankshaft itself along its impressive length in this Atlas Vortec Motor.

(5) This is a unique and very difficult engine to work upon and properly repair without having and using the Correct Specialty Tools...and in their proper manner. For example... it becomes necessary to ensure the motor is not 180 Degrees Out Of Phase by not only ensuring that the #1 Cylinder has the Piston right at Top Dead Center... the Intake and Exhaust Camshafts must be restrained in their aft positions with confirmation that their Flats appear horizontal and even,, facing UP and held in place with the likewise Half Moon Specialty Tool illustrated below.

(6) The other tools shown are used under varied conditions, depending upon the Year of Manufacture for changes in the design of the Old versus the New Harmonic Balancers and for restraining the Crankshaft near the back of the engine at the Crankcase and restraining the Harmonic Balancer at the front of the engine, before during and after the removal and replacement of the TTY Crankshaft Bolt.

29528233788_6bdf51c6f2_c.jpg43350776442_4d17354f7f_c.jpg42511258345_4e1d9594b0_c.jpg50109140523_3f33267e62_c.jpg50109710506_51c1551847_c.jpg50109948562_b2644393ce_c.jpg51961014201_4e2f6028d0_c.jpg51960020712_16a93ffcda_c.jpg51961306634_ce5f1cd713_c.jpg51961014181_cb99f2d0d1_c.jpg51961584515_32cdfe73e9_c.jpg51961306589_ab687a81fc_c.jpg50109140228_218675dbb2_c.jpg51961584590_79a1126c76_c.jpg50109948652_6161ae4301_c.jpg50109140498_1dc61b7f7d_c.jpg50109710516_842c5d8038_c.jpg50109948852_ab68f0b37b_c.jpg50109948832_90e989ce1c_c.jpg50109948597_4b123536e0_c.jpg
 
Last edited:
Mar 25, 2025
2
Ozarks
Why do all the blogs get into useless petty bantering back and forth, which I am not going to do. First off, most of tje unfortunate GM owners of a Trailblazer, Envoy etc looking at this blog are a do-it-yourselfer and are not going to take it to a dealer and spend upwards of $3000 to replace a chain on a 4x4. At that point, you have a dispos-a-vehicle. In the same train of thought, they are neither inclined to drop near $2000 in "special tools" for a one shot deal. They are not professional mechanics or have a media sponsor budget to work from. The flywheel bolt technique often chews up the flywheel bolt head and possibly the hole in the oil pan as the socket cants on the flats with the extreme torque. I said nothing about removing the balancer but since you brought it up you are flat out wrong about a taper. It is what's called in engineering circles (which I am from - retired) a "press fit" of a few ten thousandths. A "self locking taper", which you imply, the parts will easily separate once the two surfaces break contact. Usually with a audible sound such as a click or snap. The balancer is a dead friction pull for the entire hub length engagement. A hydrologic will NOT "bend a connecting rod" if the piston is a few degrees off of TDC. It is almost a right angle vector on a "I-beam" rod profile PLUS the extreme torque load expressed as a PSI load on the top of the piston evenly distributed into the rod. Certainly FAR BETTER and much more stable than the same load expressed on the head of a flywheel bolt through a wobbling, canting unsupported socket. There are a couple if posts about wedging a breaker bar with the 15/16 socket on the frame then hit the starter. You talk about dangerous and chewed up... Don't give me the line about bearings. It is NOT a impact load. BTW, "babbet" hasn't been used as bearings since the 1960's. This "blog bickering" is boring me to extreme. Recognize your audience and taylor what you say to THIER capabilities and budget. THEY want to know jow THEY can do it with the resources THEY have.
 

Forum Statistics

Threads
23,844
Posts
644,022
Members
19,642
Latest member
NZGTRAHAN

Members Online

No members online now.