Replacing Crankshaft Front Seal [SOLVED]

djjunior305

Member
Jul 10, 2020
23
Miami FL.
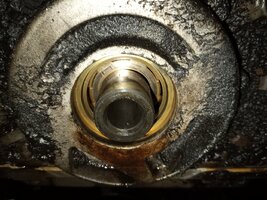
Hello brother's so I finally got the job done sorry for the long wait I been working and been busy with the wife and kids but I was able to finally get into this hell of a job so I have good news and bad news the oil leak is gone but there was a little bit of metal particles in the oil and I still have vibration what do you guys think thanks
 

Attachments

  • 20200919_212228.jpg
    20200919_212228.jpg
    628.7 KB · Views: 21

Mooseman

Moderator
Dec 4, 2011
26,209
Ottawa, ON
Oh that's not good. Is the engine noisy? I'd have the old oil analyzed. Open the oil filter to look for more metal.
 
  • Love
Reactions: Redbeard

Mooseman

Moderator
Dec 4, 2011
26,209
Ottawa, ON
  • Like
Reactions: djjunior305

Mooseman

Moderator
Dec 4, 2011
26,209
Ottawa, ON
Just keep an eye on the oil and, like I mentioned, an oil analysis at the next oil change could tell you how long you have.
 

Mooseman

Moderator
Dec 4, 2011
26,209
Ottawa, ON
A fubar'd bearing or some other part grinding itself to death :cry:
 

Redbeard

Member
Jan 26, 2013
3,653
Blackstone does a fine job analyzing oil. I haven't used them in a while but for about 10 ish years I sent oil to them from both my vehicles. They will send you free bottles to put your oil in (about a 4oz. container). Give a little "run down" on what has happened recently and any other pertinent info. There is an area on their paperwork for you to put this down on.
This would give you a good piece of mind on what's happening inside your engine.
just my 2 cents,
redbeard
 

djjunior305

Member
Jul 10, 2020
23
Miami FL.
Blackstone does a fine job analyzing oil. I haven't used them in a while but for about 10 ish years I sent oil to them from both my vehicles. They will send you free bottles to put your oil in (about a 4oz. container). Give a little "run down" on what has happened recently and any other pertinent info. There is an area on their paperwork for you to put this down on.
This would give you a good piece of mind on what's happening inside your engine.
just my 2 cents,
redbeard
Thank you brother for that info God Bless
 
  • Like
Reactions: Redbeard

mrrsm

Lifetime VIP Donor
Supporting Donor
Member
Oct 22, 2015
8,337
Tampa Bay Area
This particular Video deserves its place on this Signature Front Crankshaft Seal R&R Thread as an Example of How NOT to perform this Task. The VOP (Video Original Poster) remains an Honest Broker of The Truth though and he redeems himself in the end by explaining some of what he did that went so very, very wrong.

There are too many things to make notes on that went sideways... but understanding how badly this can go is worth knowing in advance for anyone about to attempt this work on Early Model GMT-360s and anxious NOT to Fail:


Mooseman

Moderator
Dec 4, 2011
26,209
Ottawa, ON
As soon as I saw that balancer, I knew he would use the wrong seal. Surprised he was able to get it off using only a 3 jaw puller.
 
  • Like
Reactions: mrrsm

Ric_Whit

Original poster
Member
Sep 24, 2012
71
What's-up guys,
Well guys next month will be 4 years I did this mod.
And I can report that till today Sept 7, 2021 I still have the same vehicle and with NO issue, problem or leak.
Still going strong.
(Knock on wood)
 
  • Love
  • Like
Reactions: mrrsm and ZD3SF

mrrsm

Lifetime VIP Donor
Supporting Donor
Member
Oct 22, 2015
8,337
Tampa Bay Area
This is a very interesting, contemporary and VISUAL Overview of this Job; with the added opportunity here of POINTING OUT WHAT NOT TO DO as well during the R&R of any GM 4.2L LL8 Engine Harmonic Balancer:


(1) AVOID using an Impact Gun to Remove "The Jesus Bolt". Instead... align One of the Three Torque Converter Bolts while looking through the Un-Plugged Rear Under-Flange of the Crank-Case-Oil-Pan and PIN the Crankshaft In Place by passing a 15mm Deep Socket through that small opening... then encircling the carefully aligned 15mm Bolt Head of the Torque Converter Bolt and secure it by using a Breaker Bar to Hold It In Place.

(2) REPLACE the Front Timing Cover Oil Seal EACH AND EVERY TIME this opportunity presents itself after Removing the Harmonic Balancer for any reason.

The VOP (Video Original Poster) MEANS Well by suggesting the use of an Alternative Tool for Holding the HB still while Tightening a Brand New TTY Crankshaft Bolt with 110 Foot Pounds, PLUS 180 Degrees of Bolt Rotation (From 12:00 to 6:00).


(3) THIS IS NOT THE CORRECT METHOD... The Crankshaft Bolt will STILL be able to Spin the Crankshaft inside of the Harmonic Balancer because there is NO WOODRUFF KEY Tang & Groove inside to Lock the Two Together. Instead... Use the Method and Procedures described above in (1) to avoid this problem.
 

richphotos

Member
Feb 26, 2016
298
St. Louis Park, MN
I have to tackle this project this summer after reading this I'm not sure I'm up for the job.
I've luckily got an 04 so it's not the early style hb and have the mechanical ability but I'm really questioning myself on this one.
With being on the spectrum sometimes instructions and procedures can confused me and let me tell you, with all the special tools I have read I need, man idk.
I might just keep an eye on the oil level for now.
When I look at the hb the pulley and bolt don't wobble so that is good it seems but it's really throwing some oil
 
  • Like
Reactions: mrrsm

mrrsm

Lifetime VIP Donor
Supporting Donor
Member
Oct 22, 2015
8,337
Tampa Bay Area
Since I am primarily "A Visual Learner" and in addition to having my own Hands-On experiences with actually doing this job... Please find comfort in watching THIS Superb Multi-Part Series on "How to Replace a Leaking Oil Seal" on ANY Chevrolet Trailblazer, GMC Envoy, Buick Rainier AND as in THIS Case... The Oldsmobile Bravada with the 4.2L LL8 Engine.

I truly like THIS Instructional version above all the others... including noting the VOP's extreme anger with his Idiot Neighbor racing his Motor-Cycle Engine nearby while he was filming. In my case, it was always the arrival of 500 Crows swirling over my house while filming stuff years ago. Those GD'd "Flocking" Crows... AHHHRRrrggg!.

But It's ALL Here, Brother. So if you Download, Save and then Watch all of these at YOUR Leisure, you'll to feel more comfortable about how to do this ENTIRE process and perhaps tackle it later on when you feel up to doing the work: :>)

Part 1 of 4:

Part 2of 4:

Part 3 of 4:

Part 4 of 4: (even though its shows up on YT as Part 5):

This Lisle Instructional Video is Generic...but shows WHY using this Type of Specialty Tool is Essential in ensuring that the Harmonic Balancer is pressed on evenly and completely. The Only Fault I could find in the 4th Installment Video above is to hand Press on the Friction Washer to the inside of the Harmonic Balancer WITHOUT using ANY Oil since the reason for it being there is to apply additional FRICTION between the HB and the Crankshaft.

The same critique applies to the Installation of the Oil Seal into the opening of the Timing Cover: Do NOT use ANY Oil... That Brown Goop around the Outer Diameter on the Metal part of the Seal is an additional Rubber Adhesive to prevent any oil leaks between the Outer Seal and the front Hollow Inner Circular Cavity in the Timing Cover:


THIS OEM TOOLS Model # 27306 Kit provides the Correct Tool Set needed to Install the Harmonic Balancer having the correct Inner Thread Dimensions in the Nose of the Crankshaft shown as M16 X 2.00 and the correct Threaded Rod Length to avoid Stripping Out those inner Threads by making the Mistake of using the Old Harmonic Balancer Bolt to try to PULL the Harmonic Balancer all the way onto the Crankshaft. DO NOT TRY THIS:


91aM61ElkHL._AC_SL1500_.jpg
 
Last edited:
  • Like
Reactions: richphotos

richphotos

Member
Feb 26, 2016
298
St. Louis Park, MN
Since I am primarily "A Visual Learner" and in addition to having my own Hands-On experiences with actually doing this job... Please find comfort in watching THIS Superb Multi-Part Series on "How to Replace a Leaking Oil Seal" on ANY Trailblazer, Envoy, Rainier AND as in THIS Case... The Oldsmobile Bravada with the 4.2L LL8 Engine.

I truly like THIS Instructional version above all the others... including noting the VOP's extreme anger with his Idiot Neighbor racing his Motor-Cycle Engine nearby while he was filming. In my case, it was always the arrival of 500 Crows swirling over my house while filming stuff years ago. Those GD'd "Flocking" Crows... AHHHRRrrggg!.

But It's ALL Here, Brother. So if you Download, Save and then Watch all of these at YOUR Leisure, you'll to feel more comfortable about how to do this ENTIRE process and perhaps tackle it later on when you feel up to doing the work: :>)

Part 1 of 4:

Part 2of 4:

Part 3 of 4:

Part 4 of 4: (even though its shows up on YT as Part 5):

This Lisle Instructional Video is Generic...but shows WHY using this Type of Specialty Tool is Essential in ensuring that the Harmonic Balancer is pressed on evenly and completely. The Only Fault I could find in the 4th Installment Video above is to hand Press on the Friction Washer to the inside of the Harmonic Balancer WITHOUT using ANY Oil since the reason for it being there is to apply additional FRICTION between the HB and the Crankshaft.

The same critique applies to the Installation of the Oil Seal into the opening of the Timing Cover: Do NOT use ANY Oil... That Brown Goop around the Outer Diameter on the Metal part of the Seal is an additional Rubber Adhesive to prevent any oil leaks between the Outer Seal and the front Hollow Inner Circular Cavity in the Timing Cover:


THIS OEM TOOLS Model # 27306 Kit provides the Correct Tool Set needed to Install the Harmonic Balancer having the correct Inner Thread Dimensions in the Nose of the Crankshaft shown as M16 X 2.00 and the correct Threaded Rod Length to avoid Stripping Out those inner Threads by making the Mistake of using the Old Harmonic Balancer Bolt to try to PULL the Harmonic Balancer all the way onto the Crankshaft. DO NOT TRY THIS:


91aM61ElkHL._AC_SL1500_.jpg
Thank you so much. bookmarking this
 
  • Like
Reactions: mrrsm

richphotos

Member
Feb 26, 2016
298
St. Louis Park, MN
I am keeping this bookmarked for future reference and thank you again for all the helpful info but I wanted to come and update this with some good news.
It turns out the crank seal is NOT leaking and its the water pump instead. The pump is not bad, just reused the old TTY bolts and that is biting me in the ass. So new bolts it is.
I am so glad its that and not the seal ooooo man.
 
  • Like
Reactions: mrrsm

mrrsm

Lifetime VIP Donor
Supporting Donor
Member
Oct 22, 2015
8,337
Tampa Bay Area
Check Out @Matt 's Classic "How To" on the Water Pump R&R:


By the way...if the substance you have found contaminating the Front Timing Cover is Oily... another possible source that mostly decorates the Passenger side of the Engine Block is the CPAS (Camshaft Position Actuator Solenoid).

What happens is this: Over time, the constant movement of the Solenoid Piston cycling in and out inside of the CPAS that causes the Outer casing to move very slightly in opposite directions. This action gradually damages and flattens out the CPAS "O" Ring over time and eventually, Engine Oil leaks out via Newton's Law of Gravity (@ 9.8 MPS/PS) helping distribute it down along the Right Side of the Engine Block.

We can also thank Sir Isaac Newton for explaining this issue with his "Third Law of Motion" within the CPAS. The unpressurized Motor Oil can also exit along the CPAS Electrical Connector, contaminating the Plug contscts and causing the engine to Stumble and Stall at idle from having an intermittent electrical signal.
 
Last edited:
  • Like
Reactions: richphotos and Matt

richphotos

Member
Feb 26, 2016
298
St. Louis Park, MN
Check Out @Matt 's Classic "How To" on the Water Pump R&R:


By the way...if the substance you have found contaminating the Front Timing Cover is Oily... another possible source that mostly decorates the Passenger side of the Engine Block is the CPAS (Camshaft Position Actuator Solenoid).

What happens is this: Over time, the constant movement of the Solenoid Piston cycling in and out inside of the CPAS that causes the Outer casing to move very slightly in opposite directions. This action gradually damages and flattens out the CPAS "O" Ring over time and eventually, Engine Oil leaks out via Newton's Law of Gravity (@ 9.8 MPS/PS) helping distribute it down along the Right Side of the Engine Block.

We can also thank Sir Isaac Newton for explaining this issue with his "Third Law of Motion" within the CPAS. The unpressurized Motor Oil can also exit along the CPAS Electrical Connector, contaminating the Plug contscts and causing the engine to Stumble and Stall at idle from having an intermittent electrical signal.
Thank you. I am certain it is the water pump now, I got out of lazy mode and put my finger down there and it was orange.
Its all on just the front of the engine too. Ive done the water pump a couple times on this thing and neither of the times did I replace the bolts (first time I had no idea they were TTY and the second time I was in a pinch and could not get any locally right away and needed the truck on the road)
The second time was 2 years ago.
I also recently replaced the CPAS and its wire harness because of this exact problem you described
Thank you again so much for all the helpful info
 
  • Like
Reactions: mrrsm

mrrsm

Lifetime VIP Donor
Supporting Donor
Member
Oct 22, 2015
8,337
Tampa Bay Area
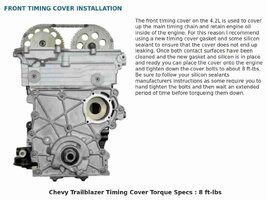
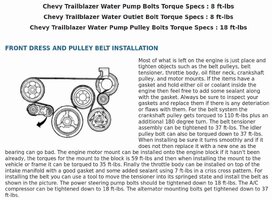
I'm more than just a Little Concerned about your impression that the Front Timing Cover (and Water Pump) Bolts are the "TTY" Flavor of Fasteners... Please ... Review THESE Images to get the 'Straight Dope' on the fact that NO MORE THAN 8 FOOT POUNDS OF TORQUE should ever be applied to any of those Timing Cover and Water Pump Small Fasteners because the "Lost Foam" Aluminum Engine Block Casting cannot take a great deal more without Stripping Out the Bolt Holes around the perimeter of The Timing Cover - Water Pump Combo (which seems to be Leaking on your Motor right now...and so it gives rise to my concerns...)

FOOTPOUNDSTOINCHPOUNDS.jpg


Please Review these images and data for the correct information:
FRONTIMINGCOVERFASTENERTORQUE.jpg
ACCESSORIESINFORMATION.jpg

If you have a problem with Loose Fasteners around the perimeter of the Front Timing Cover and Water Pump Combo...it WILL be possible to perform a TIME-SERT repair based upon following THIS Link to investigate getting the proper Kit and number of Metric Threaded Steel Cylinder Inserts needed for any such repairs:


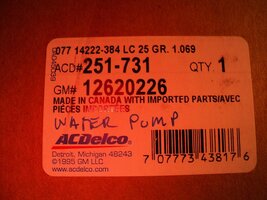
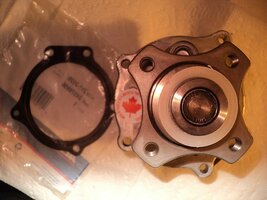
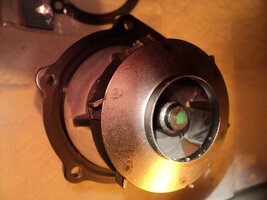
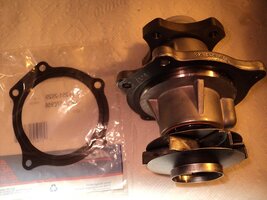
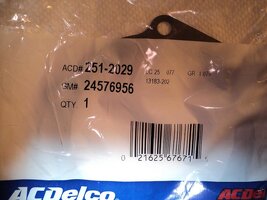
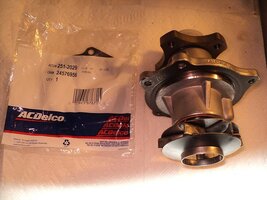
THESE are the ACDelco OEM Water Pump and Coated Metal Gasket Items you will want to purchase:

43350773062_8162120568_c.jpg29528230828_646a8b7b25_c.jpg43350773022_f4e28013ff_c.jpg29528230658_325464c592_c.jpg43350772942_0ac0ef4ecd_c.jpg29528230478_13b296c193_c.jpg

Source:

 
Last edited:
  • Like
Reactions: richphotos

richphotos

Member
Feb 26, 2016
298
St. Louis Park, MN
I'm more than just a Little Concerned about your impression that the Front Timing Cover (and Water Pump) Bolts are the "TTY" Flavor of Fasteners... Please ... Review THESE Images to get the 'Straight Dope' on the fact that NO MORE THAN 8 FOOT POUNDS OF TORQUE should ever be applied to any of those Timing Cover and Water Pump Small Fasteners because the "Lost Foam" Aluminum Engine Block Casting cannot take a great deal more without Stripping Out the Bolt Holes around the perimeter of The Timing Cover - Water Pump Combo (which seems to be Leaking on your Motor right now...and so it gives rise to my concerns...)

View attachment 107583


Please Review these images and data for the correct information:
View attachment 107581
View attachment 107582

If you have a problem with Loose Fasteners around the perimeter of the Front Timing Cover and Water Pump Combo...it WILL be possible to perform a TIME-SERT repair based upon following THIS Link to investigate getting the proper Kit and number of Metric Threaded Steel Cylinder Inserts needed for any such repairs:


THESE are the ACDelco OEM Water Pump and Coated Metal Gasket Items you will want to purchase:

View attachment 107575View attachment 107576View attachment 107577View attachment 107578View attachment 107579View attachment 107580

Source:

Is this not correct?

Oh BTW, I did torque them down to proper spec (89 inch pounds)

And the pump I got is a gates that had the metal gasket. I think we may be looking too far into this.
I'm not totally incompetent 😆
 
Last edited:

mrrsm

Lifetime VIP Donor
Supporting Donor
Member
Oct 22, 2015
8,337
Tampa Bay Area
"Whoa Son... Tamp Down The Dyspepsia..." (...from the Movie "Lincoln")

Be aware that EVERYTHING we mention here on anyone's behalf is always meant to be Benign Assistance and Spoken OUT LOUD in order to be as cautious and conservative as possible so as to Prevent People from doing anything that might inadvertently make matters worse and destroy their engines.

So bristling about anything someone says in abstract to you while trying to help you with their sincere concerns and while spending a considerable amount of Time, Energy and Thought while trying to sort out why you came here ...will not be productive.

Think of what we try to do here as an Analog to the Medical Hippocratic Oath:

"First... Do No HARM..."

I have NO Idea what the Skill Levels (or lack thereof) are of anyone who comes here asking for help.. But the truth is that most of the time, many of them manage to get their Elbows Stuck in their Ears and they have NO idea How in Holy Hell that could POSSIBLY have ever happened. Nonetheless, we bend over backwards NOT to insult people about it.

So when we seem to be, "Overstating The Obvious...' when much of what we discuss here is NEVER obvious, you can just about count one One Hand the number of people who have enough Skills, Empirical Knowledge and Insights to be able to solve every single problem "In 25 Words...or Less." Most of us are just NOT that Good.

Tell me something.... With the Technical Understanding that "TTY" stands for "Torque To Yield" and with the knowledge that in order to DO this, it requires applying enough 'Twisting Moment' along the Length of the entire Bolt Shank as the thread lines tighten and cause it to deform in a Plastic State and actually...

...S--t--r--e--t--c---h...

... those Bolts keeping the Parts Together as the Engine Heats Up and Cools Down. Does it make ANY sense to you at all that Applying ONLY 89 Inch Pounds of this "Twist" would be ENOUGH
to cause a TTY Bolt to Deform and actually be necessary on a Non-Load Bearing, Soft Metal Plate?

No? Naw? Well Guess What! ME Neither...! and that "Dude' over at TV that was documenting all this Rubbish tells me is that he was NOT using anything inside of his Coconut for Brains and Common Sense when he wrote what he said....and maybe the REAL Reason that his "Bolts Keep Backing Out of the Water Pump" was because he Over-Torqued them and THEY STRIPPED THE ALUMINUM THREADS ... RTF OUT OF THE ENGINE BLOCK.
 
Last edited:
  • Like
Reactions: richphotos

richphotos

Member
Feb 26, 2016
298
St. Louis Park, MN
"Whoa Son... Tamp Down The Dyspepsia..." (...from the Movie "Lincoln")

Be aware that EVERYTHING we mention here on anyone's behalf is always meant to be Benign Assistance and Spoken OUT LOUD in order to be as cautious and conservative as possible so as to Prevent People from doing anything that might inadvertently make matters worse and destroy their engines.

So bristling about anything someone says in abstract to you while trying to help you with their sincere concerns and while spending a considerable amount of Time, Energy and Thought while trying to sort out why you came here ...will not be productive.

Think of what we try to do here as an Analog to the Medical Hippocratic Oath:

"First... Do No HARM..."

I have NO Idea what the Skill Levels (or lack thereof) are of anyone who comes here asking for help.. But the truth is that most of the time, many of them manage to get their Elbows Stuck in their Ears and they have NO idea How in Holy Hell that could POSSIBLY have ever happened. Nonetheless, we bend over backwards NOT to insult people about it.

So when we seem to be, "Overstating The Obvious...' when much of what we discuss here is NEVER obvious, you can just about count one One Hand the number of people who have enough Skills, Empirical Knowledge and Insights to be able to solve every single problem "In 25 Words...or Less." Most of us are just NOT that Good.

Tell me something.... With the Technical Understanding that "TTY" stands for "Torque To Yield" and with the knowledge that in order to DO this, it requires applying enough 'Twisting Moment' along the Length of the entire Bolt Shank as the thread lines tighten and cause it to deform in a Plastic State and actually...

...S--t--r--e--t--c---h...

... those Bolts keeping the Parts Together as the Engine Heats Up and Cools Down. Does it make ANY sense to you at all that Applying ONLY 89 Inch Pounds of this "Twist" would be ENOUGH
to cause a TTY Bolt to Deform and actually be necessary on a Non-Load Bearing, Soft Metal Plate?

No? Naw? Well Guess What! ME Neither...! and that "Dude' over at TV that was documenting all this Rubbish tells me is that he was NOT using anything inside of his Coconut for Brains and Common Sense when he wrote what he said....and maybe the REAL Reason that his "Bolts Keep Backing Out of the Water Pump" was because he Over-Torqued them and THEY STRIPPED THE ALUMINUM THREADS ... RTF OUT OF THE ENGINE BLOCK.
My comments on being incompetent and looking too far into this were merely a joke, I guess it did not translate well on the interwebs, Sorry about that.
That all makes sense on what you are saying, But I do have one question on the situation regarding the poster in the link.
Why did the new bolts fix their issue?
Back to my issue with the water pump, its a VERY slow leak. I suppose the water pump could be bad, again? If that is the case, what could cause them to wear out so quickly?
I know the first one that I installed was a cheap-o amazon unit before I knew to get good so I know why that failed so early. What would cause a good unit like a gates or delco to fail in 2 years?
Fan clutch is new, The only thing I could think of besides the bolts is the actual fan itself? I have heard of them being slightly bent which throws it out of balance which can make the water pump bearings wear out faster.
hmmmm But I do know that the threads are not stripped out of the engine block on my case.
 

mrrsm

Lifetime VIP Donor
Supporting Donor
Member
Oct 22, 2015
8,337
Tampa Bay Area
It would probably be a good idea to begin a "Fresh Thread" now since the Water Pump repair with all of these extraneous entanglements are Off Topic now that you know it is NOT the Front Crankshaft Harmonic Balancer Oil Seal leaking.

In the mean time, let's analyze what the 'Mechanical Dynamics' are that might either combine or be contributory enough to cause a Water Pump to Fail prematurely:

(1) Using a Non-OEM Water Pump and /or re-using the Old Metal Gasket if any of the Rubberized Sealant has worn off.

(2) Having any damage or changing the shape of the 4 Bolt Smooth Pulley mounted over the water Pump Flange.

(3) Having a Worn Out Serpentine Belt Tensioner.

(4) Using the WRONG length of Serpentine Belt that can change the Translational Speed of just how fast the Water Pump spins. Even the SLIGHTEST increase or decrease in the Belt Length can have profound negative effects.

(5) This is Important to understand.... The Plastic Radiator Fan that is fitted to the 4 Bolt Water Pump Flange is MASSIVE at its Outer Orbit... and if ANY of the Clip-On Balance Weights that are applied upon the Blades during its Factory Manufacture were either Dislodged or Lost... It can change the Weight and Balance of the Entire System enough to induce an Out-Of-Balance Wobble that might never be noticeable. This could have a profound negative result by placing off- angle, Out Of Round stresses to the rotating inner Water Pump Bearings and cause their Premature Failure. A close examination of the Plastic Fan assembly will reveal the absence of any of these Balance Weights because the areas will be outlined from Dirt and Debris on the perimeter but the inner shaped portions will be clean.

As far as making any efforts to try and validate the actions or explanations of another person from a different "Non-GMTN" site...Good Science indicates "It is Impossible to Prove a Negative..." and so I will not even try. We have enough people here to validate their own Water Pump R&R experiences that are worth investigating via a Basic Topic Search and get more opinions in this way that should assuage any further doubts you may harbor about these other ideas.
 
Last edited:
  • Like
Reactions: richphotos

richphotos

Member
Feb 26, 2016
298
St. Louis Park, MN
It would probably be a good idea to begin a "Fresh Thread" now since the Water Pump repair with all of these extraneous entanglements are Off Topic now that you know it is NOT the Front Crankshaft Harmonic Balancer Oil Seal leaking.

In the mean time, let's analyze what the 'Mechanical Dynamics" are that might either combine or be contributory enough to cause a Water Pump to Fail prematurely:

(1) Using a Non-OEM Water Pump and /or re-using the Old Metal Gasket if any of the Rubberized Sealant has worn off.

(2) Having any damage or changing the shape of the 4 Bolt Smooth Pulley mounted over the water Pump Flange.

(3) Having a Worn Out Serpentine Belt Tensioner.

(4) Using the WRONG length of Serpentine Belt that can change the Translational Speed of just how fast the Water Pump spins. Even the SLIGHTEST increase or decrease in the Belt Length can have profound negative effects.

(5) This is Important to understand.... The Plastic Radiator Fan that is fitted to the 4 Bolt Water Pump Flange is MASSIVE at its Outer Orbit..., and if ANY of the Clip-On Balance Weights that are applied on the Blades during its Factory Manufacture were either dislodged or lost... It can change the Weight and Balance of the Entire System enough to induce an Out-Of-Balance Wobble that might never be noticeable. This could have a profound negative result by placing off- angle, Out Of Round stresses to the rotating inner Water Pump Bearings and cause their Premature Failure. A close examination of the Plastic Fan assembly will reveal the absence of any of these Balance Weights because the areas will be outlined from Dirt and Debris on the perimeter but the inner shaped portions will be clean.

As far as making any efforts to try and validate the actions or explanations of another person from a different "Non-GMTN" site...Good Science indicates "It is Impossible to Prove a Negative..." and so I will not even try. We have enough people here to validate their own Water Pump R&R experiences that are worth investigating via a Basic Topic Search and get more opinions in this way that should assuage any further doubts you may harbor about these other ideas.
I had no intention on keeping this going in this thread and no need to keep it going.
When I have a chance I will look over the fan really well and might just get a replacement water pump since it has life time warranty,
Thanks again for the help and sorry for the misunderstanding. Take care.


Mods can delete these posts from here if needed.
 

Forum Statistics

Threads
23,766
Posts
643,112
Members
19,378
Latest member
inumaro

Members Online