You are using an out of date browser. It may not display this or other websites correctly.
You should upgrade or use an alternative browser.
You should upgrade or use an alternative browser.
Pulling the transmission this weekend
- Thread starter 6716
- Start date
Tiggerr
Member
Rear main seal comes to mind...
trans lines...trans mount obviously.....
Heater hoses might be easier with it out...remove the SAIS if your so inclined...
trans lines...trans mount obviously.....
Heater hoses might be easier with it out...remove the SAIS if your so inclined...

Rear main seal is a must. Sadly enough mine is leaking again, after it was replaced a few months ago (my bud was a little too hard on mounting the seal)............. It's a minimal leak, so i'm pretty much saying eff it unless I have the trans out again in the future.
Check your differential yoke for too much play, also check out your slip yoke too.
Check your differential yoke for too much play, also check out your slip yoke too.
- Jul 24, 2012
- 822
Rear main seal comes to mind...
trans lines...trans mount obviously.....
Heater hoses might be easier with it out...remove the SAIS if your so inclined...
Trans lines are relatively fresh, so I'm good there.
Trans mount is a good tip.
What is the SAIS?
Heater Hoses maybe
Thx
Rear main seal is a must. Sadly enough mine is leaking again, after it was replaced a few months ago (my bud was a little too hard on mounting the seal)............. It's a minimal leak, so i'm pretty much saying eff it unless I have the trans out again in the future.
Check your differential yoke for too much play, also check out your slip yoke too.
I'm pulling the transmission and bringing it to a rebuilder. I'll put rear main seal on the list of questions.
I have to look up the yokes, I don't know what those are yet.
Thanks for the tip
The slip yoke is the part of the driveshaft that slides & mates into your transmission. The diff. yoke is what the rear part of your driveshaft mates to on the rear axle. Its what those bands gets bolted to that secure it.Trans lines are relatively fresh, so I'm good there.
Trans mount is a good tip.
What is the SAIS?
Heater Hoses maybe
Thx
I'm pulling the transmission and bringing it to a rebuilder. I'll put rear main seal on the list of questions.
I have to look up the yokes, I don't know what those are yet.
Thanks for the tip
- Jul 24, 2012
- 822
Stuck now getting the transfer case off the transfer case adapter. Do I just need a bigger pry bar? I have the trans jack right there ready to catch it if I can just wiggle it loose a little. It looks like there are only four bolts in the instructions, and I have the four nuts off.
I also never found the vent hose that the instructions say to disconnect from the transfer case assembly.
I also never found the vent hose that the instructions say to disconnect from the transfer case assembly.
- Jul 24, 2012
- 822
Turns out there are five bolts between the transfer case and the transfer case adapter, not four.
https://www.harborfreight.com/800-lb-low-lift-transmission-jack-60234.html
Glad I picked this jack up. With the chain around it the transfer case came down nice and easy.
Not sure I'll get the transmission itself down tomorrow though.
https://www.harborfreight.com/800-lb-low-lift-transmission-jack-60234.html
Glad I picked this jack up. With the chain around it the transfer case came down nice and easy.
Not sure I'll get the transmission itself down tomorrow though.
djthumper
Administrator
Mooseman
Moderator
- Jul 24, 2012
- 822
I'd drill them out and use nuts and bolts.
That could work, thanks.
I think we will finally get it pulled this morning. Just a little left to do.
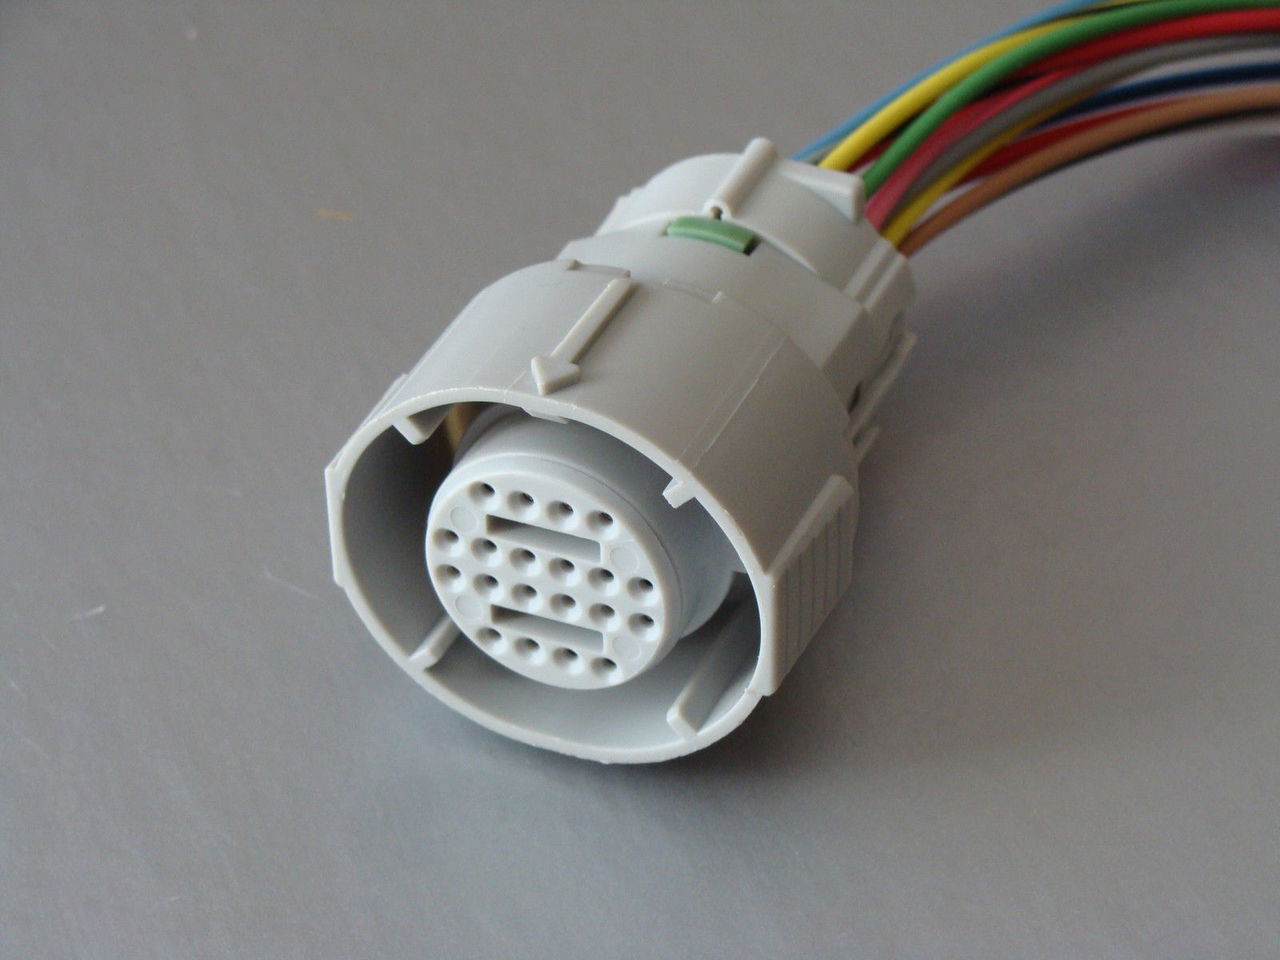
Any secret on the main transmission electrical connector coming off. I don't know if it is easy or difficult, I can't quit see it yet so I wonder what it will take to remove that.
Sparky
Member
- Dec 4, 2011
- 12,927
I used the nut and bolt method on my old car when they sheared off.
The electrical connector is slightly oval shaped, you have to squeeze both sides of the oval to get it to unlatch. The sides you have to squeeze have flats that make them a bit easier to find.
The electrical connector is slightly oval shaped, you have to squeeze both sides of the oval to get it to unlatch. The sides you have to squeeze have flats that make them a bit easier to find.
- Jul 24, 2012
- 822
I used the nut and bolt method on my old car when they sheared off.
The electrical connector is slightly oval shaped, you have to squeeze both sides of the oval to get it to unlatch. The sides you have to squeeze have flats that make them a bit easier to find.
Huh. Well that was the easiest connector of them all to take off.
And the transmission is down!
Was the torque converter supposed to come off with it? I saw the bit about a strap to keep that in place, but it stayed put on the engine. Or flywheel. Or whichever.
- Jul 24, 2012
- 822
So I got a quote for $600 to rebuild the whole thing.
I already did the transgo shift kit with the pinless accumulators, and the torque converter lock-up two years ago. So part of this is already done.
Since it still goes forward (I have 1st, 2nd, and reverse) it is probably the 3-4 clutch pack caused by the o-ring failing on the 3-4 piston. Or so it seems from the research I have done.
Just doing the 3-4 clutch pack and the piston is a tempting option. It seems like a simple enough procedure, and the parts could be had for less than $100. So with the parts, new transmission jack, shop supplies and some new sockets, I could be done with this for less than $600.
The flip side of that is that there are two other o-rings in there that might be ready to fail if I don't do the whole rebuild. But maybe they will be just fine.
- Jul 22, 2015
- 2,724
Couple of things...
Before taking the trans out, you could have swapped the shift solenoids to see if the shift issue moved to the 1-2. But no use crying over spilled milk...lol.
Technically, you want to unbolt the TC from the flywheel and remove it with the transmission. When it goes back in the truck, you want the TC seated in the case (it 'locks' in by spinning it one rotation, a second one seats it to the tabs, and a THIRD finally seats it properly (you'll have 1 1/4 max clearance from the TC bolt pads to the edge of the bellhousing.)) The strap comes in handy for that.
$600 is actually not a bad price for a rebuild, as long as you get all-new internals (clutches / steels, 2nd / intermediate band, etc.) And if you get some kind of warranty with that, I think that would sway me toward having it done, vs. me doing it personally.
Good luck, with whatever choice you end up with.
Last edited:
- Jul 24, 2012
- 822
Thanks for your input.Couple of things...
Before taking the trans out, you could have swapped the shift solenoids to see if the shift issue moved to the 1-2. But no use crying over spilled milk...lol.
Technically, you want to unbolt the TC from the flywheel and remove it with the transmission. When it goes back in the truck, you want the TC seated in the case (it 'locks' in by spinning it one rotation, and then a second one seats it properly.) The strap comes in handy for that.
$600 is actually not a bad price for a rebuild, as long as you get all-new internals (clutches / steels, 2nd / intermediate band, etc.) And if you get some kind of warranty with that, I think that would sway me toward having it done, vs. me doing it personally.
Good luck, with whatever choice you end up with.
I plan on getting a new TC, and I haven't read far enough ahead to know how to get it back on the truck. The trick with doing it myself is that I don't know what I don't know, of course.
I'm not entirely sure a warranty would sway me, since I'd have to take the thing back down and back to the rebuilder, but yeah they seem to be reputable and rebuilds are all they do.
After more research my current plan is to replace the 3-4 clutch pack, the other clutch pack in that part of the drum (when I figure out exactly what that is), the 3-4 piston, 2-4 band, sunshell, and then the servo.
The truck is a hobby now that it is not my daily driver, and any money I save on other people's labor is money I have for more parts.
So I'm kind of leaning towards doing it myself.
- Jul 24, 2012
- 822
So that's where all the oil was going!Rear main seal comes to mind...
Two observations:
1) There is like a 1/4" of play when I turn the rear diff yoke before the wheels move. That measurement is not scientific. I also seem to recall a little bit of a clunk when going into gear or shifting to/from reverse, but I haven't driven the truck much lately due to the trans issue.
2) The front tires don't spin when I spin the front diff yoke, and I expected them to. Maybe this is not an issue.
Are those problems, or normal?
- Jul 24, 2012
- 822
1) Ok, I found that the front diff is acting normally.
2) Now I remember what the rear-end noise was. Moving at good speed, if I came off the throttle, and then in a couple of seconds got back on it, there was for sure a clunk. Something is wiggly for sure.
2) Now I remember what the rear-end noise was. Moving at good speed, if I came off the throttle, and then in a couple of seconds got back on it, there was for sure a clunk. Something is wiggly for sure.
Mooseman
Moderator
- Jul 24, 2012
- 822
Ok, cool. So, nothing to worry about? What would I do to fix it if I were so inclined? Rebuild the diff? I don't have the locking diff.That could just be the slack from the wear in the ring and pinion gears.
Mooseman
Moderator
- Jul 24, 2012
- 822
Other than reverse (of course) what does the low/reverse clutch pack do on our platform? I think I read that first gear is different from low, that the forward gears are in the forward input drum. What if I put the selector in "1"? Is that still first gear in the forward input drum?
Then I wondered if it had anything to do with the 4Hi / 4Lo selector but then I thought that selector just worked the transfer case, but maybe not.
Then I wondered if it had anything to do with the 4Hi / 4Lo selector but then I thought that selector just worked the transfer case, but maybe not.
Mooseman
Moderator
Then I wondered if it had anything to do with the 4Hi / 4Lo selector but then I thought that selector just worked the transfer case, but maybe not.
Yep totally separate. Has nothing to do with tranny.
As far as the inner workings of the tranny is concerned, it's just magic voodoo to me

- Jul 24, 2012
- 822
As far as the inner workings of the tranny is concerned, it's just magic voodoo to me
I must know!

This pdf seems to suggest that it is for Manual First gear, if I am reading correctly. http://www.atra.com/Dash/Sprag/01Sprags.pdf
In Manual First – First Gear, the low and reverse clutch is
applied to hold the reaction carrier assembly stationary to the
transmission case. The low and reverse clutch prevents the
reaction carrier and inner race from rotating clockwise and
overrunning the roller clutch when the throttle is released. Power
flow is then transferred back through the transmission gear sets
and to the torque converter, allowing engine compression to
slow the vehicle. The low and reverse clutch is also applied in
Reverse to provide the necessary power flow to obtain Reverse.
**But in the other selector positions (other than R) the low reverse roller clutch keeps the low reverse clutch from engaging in first **
The roller clutch is overrun by the reaction carrier assembly and
inner race when the throttle is released during First gear operation
with the selector lever in Overdrive, Manual Third and Manual
Second. When the throttle is released, power flow from vehicle
speed drives the reaction carrier assembly and inner race in a
clockwise direction. The inner race moves the rollers down the
ramp, overruns the rollers and rotates freely in a clockwise direction.
** I think **
- Jul 24, 2012
- 822
Well screw it. I have a recommended rebuilder picking up the transmission later today. He'll have it done by next weekend and I would be futzing with it for weeks. Plus it would have been an even bigger mess than I have going in the garage right now. Plus I'd for sure have done something wrong and had to pull it down again.
He quoted $900 for new everything, steels, frictions, solenoids, torque converter. Plus he is going to pick it up and drop it off. All together with the mount and the transfer case gasket and the transmission jack I'll probably be into it for $1250. Plus as a bonus I get to replace the rear main seal.
I had another quote for $600 but something about those guys was shady. I'm in sales and I know BS when I hear it. And that didn't include the torque converter. And I would have had to bring it there ... except the Trailblazer is the vehicle I would want to use to transport it. I don't want to get the wife's car all messy, or my daily driver.
jsheahawk
Member
A calibrated bullshit meter is often the best tool in the garage.I had another quote for $600 but something about those guys was shady. I'm in sales and I know BS when I hear it. And that didn't include the torque converter. And I would have had to bring it there ... except the Trailblazer is the vehicle I would want to use to transport it. I don't want to get the wife's car all messy, or my daily driver.
- Jul 24, 2012
- 822
Got the transmission back from the rebuilder yesterday. If I'd have rebuilt it myself I think I would have spent just as much, based on how I was going to do it. The one thing I for sure wasn't set up to do was the case bushing.
Now, though I have the rear main seal cover off. I bought a replacement cover and gasket, but it turns out that is for the 5.3, not the 4.2.
As far as I can tell I have to use RTV for the whole gasket thing there. There wasn't a gasket that came off, it was RTV all the way.
Now, though I have the rear main seal cover off. I bought a replacement cover and gasket, but it turns out that is for the 5.3, not the 4.2.
As far as I can tell I have to use RTV for the whole gasket thing there. There wasn't a gasket that came off, it was RTV all the way.
- Jul 24, 2012
- 822
So, O2 sensors.
I figured I would replace them since I think they haven't ever been in 235,000 miles.
I've tried and failed to get the one out of the cat section so far I'm starting to round the corners so I'm waiting til I figure something out. Do I need to heat up the pipe to make it easier? I hit it with PB blaster and my shiny new impact tool. Nada.
And then, I can't seem to get the one out of the manifold either.
So I figured I would replace the manifold, so I started to take the heat shield off. Sheared one bolt off, and then, the bottom heat shield bolt, it seems like it is not the same size as the others. But it shouldn't be, but the ratchet just spins when I get it there.
Any thoughts?
Mooseman
Moderator
You shouldn't have to pull the manifold but with that many miles, it would need good heat from an oxy/acetylene torch. Same on the pipe for the post cat.
I've also found that 7/8 sockets and wrenches are a tad big on the sensor. 21mm 6 point socket fits perfect. I modded an impact socket with a slit for the wire, works perfectly.
I've also found that 7/8 sockets and wrenches are a tad big on the sensor. 21mm 6 point socket fits perfect. I modded an impact socket with a slit for the wire, works perfectly.
- Jul 24, 2012
- 822
Thanks for the tip. I'll have to start with a small hand torch, but I will give that a shot. I'm not worried about the wire at the moment, since those are both coming out, so it just occurred to me I can clip it since they are coming out.You shouldn't have to pull the manifold but with that many miles, it would need good heat from an oxy/acetylene torch. Same on the pipe for the post cat.
I've also found that 7/8 sockets and wrenches are a tad big on the sensor. 21mm 6 point socket fits perfect. I modded an impact socket with a slit for the wire, works perfectly.
Am I heating the pipe or the sensor primarily?
Does it help to pull the heat shield on the manifold to heat that up? Three out of four nuts are off. One sheared as I mentioned. Bottom one seems like it is going to suck. Maybe I'll heat that as well.
Mooseman
Moderator
Heat the surround area, not the sensor itself. You want to expand the surrounding metal away from the sensor threads.
I don't think it's necessary to pull the heat shield. I didn't with oxy/acetylene torches but it did get burned a bit.
I don't think it's necessary to pull the heat shield. I didn't with oxy/acetylene torches but it did get burned a bit.
- Jul 24, 2012
- 822
Heat the surround area, not the sensor itself. You want to expand the surrounding metal away from the sensor threads.
I don't think it's necessary to pull the heat shield. I didn't with oxy/acetylene torches but it did get burned a bit.
Bought a butane torch and got the one out of the cat section.
Still haven't gotten the one out of the exhaust manifold. Maybe I didn't heat it up enough?
Heated, hit it with the impact driver, heated it again, hit it again. Still nothing. Did manage to burn off some of the PB blaster, that was momentarily exciting.
The heat shield is loose. The lower bolt is stuck but that doesn't matter actually because the shield had corroded away from it anyway. I've got to get at least the engine oil dipstick out of the way to get it out of there.
I think I'll try again heating it with the heat shield off, and if that doesn't work, then maybe I pull the manifold.
Mooseman
Moderator
About 25 years ago, I bought a used set of oxy/acetylene torches from a garage going out of business. They've saved my bacon so many times, I still smile every time I use them. Seized and rusted bolts, cutting metal and exhaust pipes, stuck bearing races, a stuck harmonic damper were no match. I could live without my air tools but not my torches.
Taking out the manifold might introduce even more headaches, like broken manifold bolts in the most awkward places in the head, if they're not already broken.
Taking out the manifold might introduce even more headaches, like broken manifold bolts in the most awkward places in the head, if they're not already broken.
This is also a REALLY Important thing to do…
If you have not as yet installed the Rebuilt Transmission, it is highly recommended that you Flush and Reverse Flush the Transmission Cooler nested inside of your Radiator. Failing to do this will allow the 200,000+ Miles of Dirt, Metal Particles and Friction Pad Wear Cast Off from your Old Transmission ...to re-infect your Replacement Transmission with all of that junk.
This is a bit messy… but after using a Rubber Stopper Adapter Nozzle Spray Handle on your compressed air hose... SLOWLY pressurize the Transmission Fluid Cooler Lines until the greater blockage of the Dirty Fluid comes out of the Cooler. Then it will be a fairly easy job to "Clean out the Innards" if you purchase 2-4 cans of the ATP-200 Automatic Transmission Flush follow the instructions in the video below to collect all of the Old Purple-Black Mung and Dirt that will squirt and expel out of Both lines in BOTH directions by simply using the first can on the Outlet Line and then the other can on the Inlet Line to get all of that crap out of there and flush the cooling system clean.
Your New Tranny will love running Longer, Cooler and Cleaner if you take the time to do this job. Make certain you know precisely how many Quarts of Fluid the entire system takes when refilling it… and allow enough time for the transmission to warm up and gradually top off the Last few Quarts so you do not accidentally over-fill the Transmission:
https://www.amazon.com/dp/B000NW157M/?tag=gmtnation-20
...here is a Basic Video on the Transmission Cooler Flushing Procedures:
Last edited:
You are Welcome....
But there is a another batch of Transmission Installation Quicksand to be aware of as well...
The GM Trailblazer, Envoy and Ranier naturally have two hoses serving to deliver heated engine block water to the heat exchanger in the cab; One Short Hose on the passenger side rear section of the engine ...and a Long binary hose made of Aluminum Tubing and Rubber Hosing leading from the driver side of the engine... over the top rear portion of the 4.2L Engine.
This Pipe-Hose has TWO METAL TANGS that normally drape IN FRONT OF THE 4L60E Bell Housing and MUST be moved above and out from between that Bell Housing Flange and the very back of the Engine Block when installing the Transmission to the Engine Interface … or they will NOT mate up as a resulting 1/8th “ Gap will obstruct the two from doing so. (This is the point where you make certain to have ensured that the Torque Converter alignment tangs are properly seated as far back into the Transmission Hydraulic Fluid Pump as possible... for the very same reasons)
The images on my Photobucket will show the need to either hold the Aluminum Pipe and Flanges up and out of the way using some string to tug them upwards if you are doing this job alone... or use a length of stick of wood to pry up and brace the pipe upwards ...BEFORE attempting to bring the 4L60E Bell Housing Flange flush and even with the back of the GM 4.2L Engine Block:
http://s557.photobucket.com/user/60...ERENGINEREPAIR/HEATERHOSELAYOUT?sort=3&page=1
Last edited:
- Jul 24, 2012
- 822
At this rate I should surely have the truck back on the road by 2019. 
I got the O2 sensor out of the manifold finally. Getting the heat shield out of the way helped me get the torch in the right spot. Finally. Took me three tries. I think I didn't want to risk overheating anything, but it was on the third try I had the torch on it for maybe five minutes and it finally popped. Glad I picked up the impact tools. I clipped the wire on the sensor and used a regular 22mm on it.
Now, since I have gone through all this I wonder if I should replace the cat section. I don't think I was getting codes on it (but the battery has been disconnected for two months now, so the existing codes are gone, right?).
I think I wonder how I would know if it were partially blocked. Like, it would be just my luck to put it back in when it is right on the edge of needing replacement anyway.
If the Platinum-Vanadium impregnated ceramic honeycombs inside the front end of the CAT are healthy... they will have a tope-tan-gray color with an air-brushed appearance to them and they will transmit light down their entire length. If they are gooped up and blackened...Bad Valves and Rings can be suspected for so much incomplete combustion by-products.
If you suspect the Honeycombs have fractured and cracked...you can just use a small Dead-Blow Hammer to lightly tap on the bottom of the CAT Can and determine whether or not you hear any rattling that sounds like small fasteners or pocket change rattling around in a teapot. The CAT will need to be replaced if that turns out to be the case. The other thing that can be problematic is that very large flakes of Rust can fracture and peel off the inside from the constant heating up, cooling down and the regular dynamic flexing of the Cast Iron Exhaust Manifold and these tend to fall down inside to partially cover the front of the Ceramic Honeycomb insert... and these will be very apparent if present inside there.
So while you have the front end of the CAT opened up, if you want to see what all this stuff looks like ...up close and personal... perhaps obtaining something like this digital mini-camera will let you examine the CAT innards and film or take some images what you are seeing on the inside via your cell phone screen. There are other styles and types like this one that cost less... but this one was the first one to appear on Amazon just now.:
https://www.amazon.com/dp/B01CL1QUCW/?tag=gmtnation-20
Last edited:
Mooseman
Moderator
- Jul 24, 2012
- 822
Nice. I might check that one out.
Good to knowMine was partially blocked and it gave no codes. Apart from a boroscope, like @MRRSM said, a backpressure test will confirm it.