SOLVED! No Start, Multiple U1000 codes, Class 2 Serial Communication Problem

jrbaldwin

Original poster
Member
Nov 5, 2018
19
Washington
2005 Chevy Trailblazer LT, 2-Door, 4WD, I6 4.2L engine

Won't start or turn over. No starter signal at starter relay but when jump relay will turn over but not start.

No check engine light. All instrument light on when first to key on the go out except battery & gauge warning light stay on. Gas gauge was working but now show MT and yellow gas warning light is on but tank over 3/4 full.

When leave key in on position for a while security lights come on

Dash lights, head light, heater, radio, turn signal, windows, wipers and everthing seems to work.

Normal code reader cannot comunicate with or read codes. But power to OBDII plug.

Snap-On scanner can read codes but only recognizes 10 systems and 8 codes with cleared and return. Snap-On Scanner will not Auto ID car and says Comm problem. Snap-On scanner can run run function test of lights, windows, power down, ect in Bode Control Module. Checked CIGAR fuse #13 under the hood and is good. Checked for battery voltage at the rear fuse block big red wire & 12 volts. All fuses in both fuse boxes look good.

Reconized Modules
1. Anti-lock Brakes - 0 codes
2. Airbag - 2 Codes
- U1000 Class 2 Data Link Fault (Current & History)
3. Body Control Module - 2 codes
- U1000 Loss of Class 2 Serial Communications
4. Door Module - Drive - 0 codes
5. Heating Air Conditioning - 2 codes
- U1000 Class 2 Data Link Fault (Current & History)
6. Instrument Panel Cluster - 0 codes
7. Lift Gate - 0codes
8. Passenger Presence System - 1 code
- U100 Class 2 Serial Communication Problem (Current)
9. Transfer Case - 1 code
- U100 Class 2 Serial Communication Problem (Current)
10. Door Module - Passenger - 0 codes (History)

Scap-On scanner says the following modules exist but can not communicate with or read any data from
1. Engine
2. Radio - Aftermarket
3. Seat module - driver
4. Theft Deterrent
5. Transmission

Past History
Has a occasional starting issue where would not start unless disconnected battery for 10 -15 minutes then would start properly again for a week or two. No codes found with normal code reader. Talked to Chevy Dealer who said needed to be towed in while in no start condition to read codes and diagnosis. Had spare BCM and had dealer program to car.

Home now and have access to my tools & test equipment. Need a step by step test to identify the electrical serial buss issue causes or eliminate possible causes. Searched but not much information found other than disconnect modules one at a time to check if one is going bad and corrupting the serial bus.

Thinking first step is to test all fuses with multi-meter. Then inspecting all wiring in engine compartment for mouse damage. Had a mouse build nest under air cleaner and chew thru some injection wiring last year.

Thanks, Jim
 
Last edited:

budwich

Member
Jun 16, 2013
2,173
kanata
Your best bet would be to check all fuses with a meter as opposed to your eyes... it is tough seeing electricity. check the fuse themselves (resistance wise) and then the fuse holder pins (carefully with thin gage wire adjunct to not spread them too much) to see voltages at appropriate pins especially with key on and key start for fuses of interest (pcm, starter, fuel, etc).

further when you say "no check engine light" is that with just key on? or during the "all lights test" at the start of "key on" sequence?
 

jrbaldwin

Original poster
Member
Nov 5, 2018
19
Washington
Currently have LED indicating fuses installed so small LED lights when fuse bad. Also pulled and looked at fuse elements which looked good. Going to check each fuse with multi-meter. Can check voltages with fuses in place as have small test pads on top. Can check both sides on the fuses for voltages. Want to do things in an step by step manner keeping a check list of completed items. So far Ignition switch, multimeter test of fuses, voltage test of both sides of each fuse to check for voltage / wiring issues.
 

jrbaldwin

Original poster
Member
Nov 5, 2018
19
Washington
Sorry out getting lag bolts to secure the wifes new green house. Yes no "check engine light" with the key turned on but comes on during the "all lights test" at the start of "key on" sequence. But will check again to confirm all lights test.
 

DocBrown

Member
Dec 8, 2011
501
First thing, start with the basics. Test your battery. After sitting for at least 10 minutes, it should be showing 12.7 volts or higher. Any less and you probably need a new battery. Also check the voltage at the starter.

And make sure the cables are on tight. I did that over the winter, my Sierra wouldn't start and I started troubleshooting everything else. The cause was a slightly loose negative battery cable. Cleaned it, tightened it, and all is well. :duh:
 

budwich

Member
Jun 16, 2013
2,173
kanata
Sorry out getting lag bolts to secure the wifes new green house. Yes no "check engine light" with the key turned on but comes on during the "all lights test" at the start of "key on" sequence. But will check again to confirm all lights test.
well that's the problem. With the key turned to ON, the check engine light MUST remain on for as long as the key is in ON. Your "all lights test" indicates that the bulb is good so your problem is "no check engine light". This indicates that the PCM has NOT got proper "stimuli" to basically run. This could mean a bad PCM or bad power / ground. Check those conditions on the pins of connectors leading to the pcm.
 

jrbaldwin

Original poster
Member
Nov 5, 2018
19
Washington
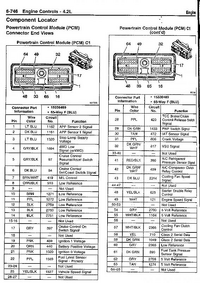
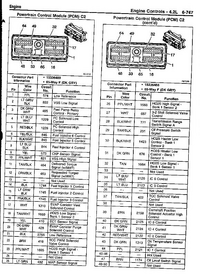
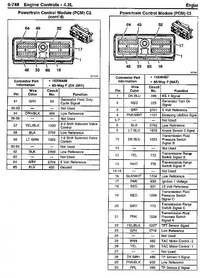
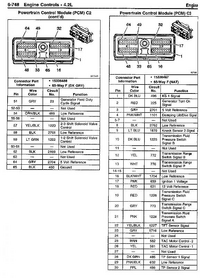
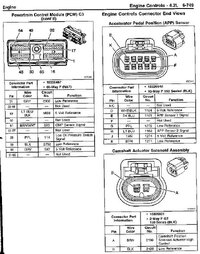
Thanks. Thought the BCM set the Check Engine Light. So makes sense to start with the PCM as it is one of the 4 modules the scanner can not communicate with. Will start checking the power / grounds and also clean all the PCM plug pins to insure good contacts. A couple of months ago found a mouse nest almost on top of the PCM. Took care of the mouse and checked the wiring and found no damage. Maybe the mouse pissed on the PCM connectors causing corrosion. Already have a diagram of PCM connections C1 & C2. Will have to look for a diagram of connection C3.

Battery only around 2 months old but checked it with a load tester and test good. Been down that road before with almost new batteries going bad.
 

mrrsm

Lifetime VIP Donor
Supporting Donor
Member
Oct 22, 2015
8,189
Tampa Bay Area
Post #4 at this Link has All of the PCM Pin-Out Diagrams for C1, C2 & C3 Connectors:


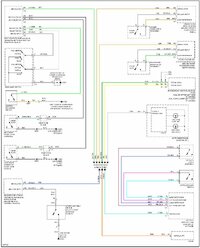
This is a good article on Diagnosing Problems with The GM Class 2 Network...which may either be caused by a Short To Ground.... or a Short to Power (12VDC).


It is important to remember that ANY Module on the Single Wire - Class 2 Network can suffer either one of these conditions and affect OTHER Modules in turn. The Common Ground Splice Pack under the Driver's Side Under-Dash deserves to be pulled free and inspected and then re-connected... it literally could be something as simple as this to solve the problem:

...and this from TV on the Subject of the U1000 Code & some in depth information at Post #11 :

 
Last edited:

jrbaldwin

Original poster
Member
Nov 5, 2018
19
Washington
Thanks for all the information GM Class 2 Network and the PCM connections. Looks like after checking at all the fuses and voltages at the fuses & changing the ignition switch I will start with the splice packs and take everything off the network except the BCM and PCM eliminating everything take could be corrupting the network. If still can't talk to the PCM with the scanner will start checking the connections and voltages to the PCM. Might be next week before have the time.
Jim
 
  • Like
Reactions: mrrsm

Mooseman

Moderator
Dec 4, 2011
25,992
Ottawa, ON

mrrsm

Lifetime VIP Donor
Supporting Donor
Member
Oct 22, 2015
8,189
Tampa Bay Area
When time permits... If you Download and SLO-MO this Video via Videolan (VLC) around the disassembly portion of the Under-Dash Panels for this 2002 Trailblazer HVAC Blend Door Actuator - Re-Calibration Video... You'll get a beautiful look at the location of the Class 2 Network Common Ground Splice Pack Comb at around 7:15 into the Video. This will make searching for and exposing this Splice Pack easier to deal if it comes down to a necessity:


jrbaldwin

Original poster
Member
Nov 5, 2018
19
Washington
Read everything on No Crank, Like Attempting To Start In Drive and will clean & check the fuse box after checking the fuses and voltages. Have a spare engine fuse box. But leaning towards something on the network going bad corrupting the network signal or network wiring issue. I have 4 modules the scanner can not communicate with. Plan to take everything out of the network and see if the scanner can communicate with the PCM. If not will clean the PCM plugs connections then start checking wiring and voltages at the PCM plug connections.

Thanks for the video on the location of the forward Class 2 Network Common Ground Splice Pack Comb. It will save a lot of time looking. Downloading now. Yes have and use VLC.
Jim
 

mrrsm

Lifetime VIP Donor
Supporting Donor
Member
Oct 22, 2015
8,189
Tampa Bay Area
I recommend using CRC Lectra-Motive Parts Cleaner for use inside of the Tech 2 Logic--Mobo and Peripherals AND for spraying out both the PCM Pins Sets inside of C1,C2 &C3 as well as the Three Colored Connectors. It is important to allow a sufficient amount of time for these components to completely dry and evaporate any residual solvent:


CRCLECTRAMOTIVE.jpg
 

jrbaldwin

Original poster
Member
Nov 5, 2018
19
Washington
Thanks will pick up a couple of cans.

Here is what i could find for the splice packs on a Trail Blazer. Comes from a 2004 Trail Blazer wiring diagram. Doe it look correct for a 2005?

Splice Pack SP205 Behind Left Side of Dash Near Headlamp Switch Connector
A. Purple (PPL) W/O Immobilizer to Data Link Connector (DLC)
- Bottom Left Side of Dash
A. Purple (PPL) W/ Immobilizer Theft Deterrent Control Module
- Circuit 1132
B. Dark Green (DK GRN) Power Train Control Module (PCM)
- Circuit 1049
- Upper Left Side of Engine
C. Dark Green White (DK GRN/WHT) Transfer Case Shift Control Module
- Circuit 1133
- Behind Lower Left Side of Dash
D. Yellow (YEL) Digital Radio Receiver
- Circuit 5579
E. Light Blue (LT BLU) Electronic Brake Control Module (EBCM)
- Circuit 1122
- On Inner Left FGrame Rail Beside Transmission
F. Dark Blue (DK BLU) Inflatable Restraint Sensing & Diagnostic Module
- Circuit 1128
- Below Rear of Center Console
G. Gray (GRY) Instrument Panel Cluster
- Circuit 1036
H. Dark Blue / White (DK BLU/WHT) to Splice Pack SP306
- Under Right Rear Seat
J. Orange (ORG) Radio
- Circuit 1044
K. Gray (GRY) Auxiliary HVAC Control Module
- Circuit 2289
- Under Lower Console
L. White (WHT) HVAC Control Module
- Circuit 1038
- Center of Dash
M. Light Green (LT GRN) Body Control Module (BCM)
- Circuit 1037
- Beneath Left Rear Seat on Rear Fuse Block

Splice Pack SP306 Under Right Rear Seat
A. Light Green / Black (LT GRN/BLK) - Vehicle Communication Interfac Module (On Star)
- Circuit 1088
- Under Right Rear Seat
B. Brown / White (BRN/WHT) - Driver Memory Seat Module
- Circuit 1048
- Below Right Front Seat
C. Light Blue (LT BLU) - Liftgate Module
- Circuit 2288
- Center of Lift Gate
D. Not Used
E. Dark / Blue (DK BLU) - Audio Amplifier
- Circuit 2272
F. Yellow / Black (YEL/BLK) - Digital Video Disc (DVD) Player
- Circuit 6485
G. Not Used
H. Not Used
J. Tan (TAN) - Front Passenger Door Module
- Circuit 1047
- Below Front Passenger Door Switch Panel
K. Brown (BRN) - Drivers Door Module
- Circuit 1046
- In Left Fron Door
M. Dark Blue / White (DK BLU/WHT) To H Connection of Splice Pack SP205
 
  • Love
Reactions: mrrsm

tak13

Member
Apr 2, 2019
14
NH
Scap-On scanner says the following modules exist but can not communicate with or read any data from
1. Engine
2. Radio - Aftermarket
3. Seat module - driver
4. Theft Deterrent
5. Transmission


I don't have the wiring diagrams, but the fact that you can't read engine and transmission modules may point to the PCM in some way, since the PCM contains both ECU (engine control) and TCU (transmission control). Have you checked/cleaned the ground connection(s) for the PCM (and maybe the BCM as well, since the other 3 falls under that)?
 
Last edited:

mrrsm

Lifetime VIP Donor
Supporting Donor
Member
Oct 22, 2015
8,189
Tampa Bay Area
Before you get '...Too Deep Into The Weeds' of running down any wiring issues... a little detective work might 'short circuit' the need to go any further than figuring out whether or not one of 'The Kids' intentionally inserted any loose change or paper clips into the opening of the CD Player Caddy Door... which could of course, Short the Radio-CD Player to 12 VDC Power and Ball up the Module communications of the rest of the Class 2 Network as a result.

In such a case... the removal of any such metallic foreign objects would allow the Network to return to its normal 0-7 (not 5 VDC) Status. Think about examining the recent Vehicle History and if possible, interview anyone who may have done something or changed anything to any one of the on board Modules.

Something as seemingly innocuous as a Lift Gate Module that has Shorted Out Wiring in the Harness that passes through from the Lift Gate Rubber Grommet leading into the Body Structure at the Hood Line. It is that bad Junction that allows those wires to 'work harden' from the bending motion and eventually, letting the Copper Wires to get broken apart; shorting them out between each other as well as intermittently Grounding to the Body Frame.

So this is yet another place where the Wiring to and from the Lift Gate with 12 VDC Power AND the Low Voltage Reference Wiring for the LGM to PCM Communications could well be the Culprit. These two locations are examples of easy to access places to investigate first on the GM Class 2 Network ...without having to tear into anything involving the System harnesses and Splice Packs just yet and eliminate them both from your Investigative or Diagnostic Check List. You never know ...You might get lucky... "Even a Blind Hog in The Woods... Finds an Acorn, Once in a While..." :>)
 
Last edited:
  • Like
Reactions: Mooseman

Mooseman

Moderator
Dec 4, 2011
25,992
Ottawa, ON
I agree. Sometimes a single module can screw up the whole data bus. You should pull the comb at the main data connector and jump one module at a time to the OBD connector to.see if each one is alive and able to communicate.
 
Last edited:
  • Like
Reactions: mrrsm

jrbaldwin

Original poster
Member
Nov 5, 2018
19
Washington
Never use the CD player, but will check. No kids to stick thing where they don't go. Only driver of the blazer.

Only recent things I have done except having the dealer reprogram and installing the spare BCM last month to correct various random issues with the passlock system. Car would not start at random times weeks or months apart until I disconnected the battery negative for 10 minutes then would start normally. No codes showed on my basic code reader and was traveling without access to my snap-on scanner. No other changes to any of the other modules. Think now maybe was the beginning of the blazers issues. But also have had mouse issue in the past including one deciding to eat some fuel injector wiring

Yes want to do the easy items first but like working from a check list one item at a time eliminate one item at a time. Then know what has been checked with list of completed items to reference. Also like to have the diagrams of the systems, connections voltages, grounds and signals before starting to make sure I understand the systems.

Will change the ignition switch with the spare, check all the fuses, check voltages in fuse boxes, clean all the PCM connections & check the engine wiring for mouse damage, clean engine fuse box connections (easy to do just clean spare fuse box before installing, check grounds before moving into the network connections.

Good idea to check the Lift Gate Module and wiring in the Harness.

Then if I don't find anything want to go the the splice packs & measure voltages and see if I can figure out my Snap-On scanner to look at the signal on the buss.

When you say to "pull the comb at the main data connector" you mean the splice packs or is there another data connector I should look at? I was planning of removing everything from the buss at the splice packs and installing one item at a time looking at each with the scanner. Was planning on jumping each to the Dark Blue / White network wire. Sounds like it would be easier to jump to the ODB connector

Traveling to visit parents and family tomorrow and won't be home till next week.

Thanks for all the information. Jim
 
  • Like
Reactions: mrrsm

Mooseman

Moderator
Dec 4, 2011
25,992
Ottawa, ON
It's basically the main splice pack for the data lines. It's under the dash driver side, black and taped up. The schematics and manuals are available from the link in my signature.
 
  • Like
Reactions: mrrsm

mrrsm

Lifetime VIP Donor
Supporting Donor
Member
Oct 22, 2015
8,189
Tampa Bay Area
While you are wielding around that can of CRC Lectra-Motive... Take a moment to pull the Green, Gold and Gray Ribbon Cable Connector off of the BCM under the Rear Driver's Side Seat and Spray around inside the Female Slot and onto both sides of the Male Gold Connection Points.

That "Tesseract" - looking BCM Cube might be mounted low and positioned at Mid-Body inside the SUV... but if you examine the Gold Contact Strips on the Green & Gold Ribbon Cable closely, you'll see that there will be some asymmetrical contact rubbing and friction wear from where it joins up with the boxy sub-components and gets bounced around and vibrates during normal driving.

This action may allow for breaks in electrical continuity between the BCM Sub-Systems. If you examine it carefully and discover any tears or crimps in that Ribbon Sub-Component... They've been available on eBay in the recent past and were not too expensive to obtain. If nothing else, doing so will follow the precision and diagnostic method you have wisely chosen to follow.
 

mrrsm

Lifetime VIP Donor
Supporting Donor
Member
Oct 22, 2015
8,189
Tampa Bay Area
When time permits... Check out Post #37 in this Linked Thread for a Decent Color GM Class 2 Network Layout Wiring Diagram that can help you visualize ALL of the Modules on "The GM Net" and... it could become a companion to your Diagnostic Plan as a 'One Over The World' View of your Check Off List:


jrbaldwin

Original poster
Member
Nov 5, 2018
19
Washington
Finely getting back to the Blazer after a lot of other projects including rebuilding the front end of my tractor.

Yesterday evening checked battery and tested good with 90% charge after sitting a month.
Battery connections, power connections to both fuse boxes good with 12 volts.
Cleaned spare front fuse box and let dry over night to have ready and on hand.
Cleaned and inspected PCM connections. Looked good without corrosion.
Cleaned BCM connections and inspected. Looked good without corrosion.
Cleaned and inspected the gold contact strips on the green & gold ribbon cable and they looked good.
Inspected the green & gold ribbon cable and no tears or crimps.
Everything allowed to dry overnight.
Inspecting all easily accessible wiring in engine compartment for mouse damage. None visible. Had a mouse build nest under air cleaner and chew thru some injection wiring last year. The Fresh Cab Rodent Repellent and Rodent-B-Gone spray seems to be working. No new nests.

Today replaced the ignition switch with my spare. No help. Still same issues
Thanks for all the information on the Class 2 network and splice packs
Removed both splice packs today to remove everything from the network.
Connected the BCM and communicating properly.
Connected the rear splice pack and rear network communicating properly Except
The Driver Memory Seat Module - Don't think my trailblazer has this option
The Vehicle Communication Interface Module - Think because PO replace with after market system.
The Audio Amplifier - Think because PO replace with after market system.
The Digital Video Disc Player - My trailblazer does not have this option.

Added in items on the forward splice pack one at a time and
The PCM is not communicating.
The Digital Radio Receiver is not communicating - Think because PO replace with after market system.
The Auxiliary HVAC Control Module is not communicating- My trailblazer does not have this option?
The Radio is not communicating - Think because PO replace with after market system.

Left any module not communicating disconnected from the network while testing to eliminated them as possible cause.

Tomorrow will test the PCM connector pins for power and grounds and check the fuse box for power to the PCM.

One issue on the instrument cluster that I don't think is related is that the instrument warning light is on and the gas gauge reading MT with the yellow low gas warning light on.
 

jrbaldwin

Original poster
Member
Nov 5, 2018
19
Washington
Just notice that PCM C1 Pin 22, PPL Wire, Circuit 1589 is Fuel Level Sensor Siganl - Primary and Pin 61, Dk Grn wire, Circuit 890 is the Fuel Tank Pressure Sensor Signal. So probably part of the PCM issue.
 

mrrsm

Lifetime VIP Donor
Supporting Donor
Member
Oct 22, 2015
8,189
Tampa Bay Area
For anyone following along with @jrbaldwin 's line of thinking vs. the Network Wiring Layout... Here is The Color Diagram of the Class 2 Network AND the PCM PINOUT Diagrams for C1,C2,C3 & ACC Pedal. (When trying to Diagnose Class2 Network Problems... You Can't Tell The Players... Without a Program...)

GMCLASS2NETWORK.jpeg

GMCLASS2NETWORK.jpegPCMC1.pngPCMC2A.pngPCMC2B.pngPCMC2C3.pngPCMC3ACCPEDL.jpeg
 

jrbaldwin

Original poster
Member
Nov 5, 2018
19
Washington
Was checking the PCM connections and wiring and while pulling on the PCM wiring harness lost the entire Class 2 network and blew the fuse 10. Pulled splice packs and retested entire network and everything good except no PCM. Found several PCM wires with damaged insulation which I repaired then replace fuse 10. Gas gauge started working, car started. Cleared all U1000 errors and they did not return.
 

mrrsm

Lifetime VIP Donor
Supporting Donor
Member
Oct 22, 2015
8,189
Tampa Bay Area
Congratulations "JR"....

For Your Diligence, Perseverance and for Showing us ALL some Damned Fine and Outstanding Diagnostic Skills at solving this very difficult PCM Class 2 Network Problem... YOU DESERVE to receive...

The GMTN... "Five Thumbs-Up Award" ...

👍 👍 👍 👍 👍
 
Last edited:

mrrsm

Lifetime VIP Donor
Supporting Donor
Member
Oct 22, 2015
8,189
Tampa Bay Area
I meant to come back to this Thread because @jrbaldwin deserves to have a Video which is Absolutely SPOT-ON for the UXXXX Code Diagnostics being performed by Will Robinson here using the very same Systematic Approach with the correct Tools (A "Scope On a Rope", A Power Probe, A Tech 2, An Autel and a PICO Scope) well worth following for ANY Class 2 Network Failures.

NOTE:

IT IS NOT ABSOLUTELY NECESSARY TO POSSESS ALL OF THESE EXPENSIVE DIAGNOSTICS TOOLS IN ORDER TO MAKE USE OF WILL ROBINSON'S TACTICS TO SOLVE THESE CLASS 2 NETWORK PROBLEMS.


When carefully followed, these thoughtful, well explained Step-By-Steps that Will takes 'will' make Experts out of anyone without any prior universal experience with trying to sort out the 'Mysterious Single Wire Network Communications Problems' that often present themselves on GM and GMC Cars, SUVs and Trucks:

 
Last edited:
  • Like
  • Love
Reactions: ek02 and Mektek

Forum Statistics

Threads
23,662
Posts
641,748
Members
19,090
Latest member
Agent_Smity

Members Online