Very likely a blown fuse. Check your rear fuse block, under the left seat. Under the lid is a diagram of what fuse is where, check your DDM fuse, if it's blown, replace it and try the module again.ncphotographer said:OK.....so I completely took the lights out of the controls and hooked it up to see if any of the buttons worked.....none of the buttons worked....the door lock button, the window button, the heated seat buttons....none of them worked......so I took the control and hooked it up to the passenger side and all the buttons worked.....does that mean I have a blown fuse or.....?
You are using an out of date browser. It may not display this or other websites correctly.
You should upgrade or use an alternative browser.
You should upgrade or use an alternative browser.
LED Mod Thread
- Thread starter Blckshdw
- Start date

Thanks......I'll check it tomorrow......I'm at the point where I'm so frustrated I don't want to get mad and break something.....I'll calm down and check tomorrow......or I may just head down to Tampa from NC and let you fix it for me.
That's a long ass drive just to have someone replace a fuse! 
I keep a bag of spare fuses in the glovebox, if you're going to mod stuff in your truck, you are most likely going to need them.
I keep a bag of spare fuses in the glovebox, if you're going to mod stuff in your truck, you are most likely going to need them.
Hey Blckshdw, it was indeed a blown fuse.....changed it and every things working again. So I started back on the lights.....got everything hooked up and it's working........BUT 4 of the lights shine bright like they should and the other 4 are dimmer......and idea why? I bought a voltage meter and checked out the pads like you said......one side was measuring like it should while the other side was only measuring about a 4th of what the first one did. Could that be the problem....and if so is there a fix?
Glad the first fix was an easy one. So you're saying one set of contact pads put out the full 14.x volts when the engine was running, and the other one put out less than 4V?  No idea how that can happen, since the pads are fed by the same source. Without knowing the specs on what you're using, I can only say instead of using 4 LEDs on 1 resistor, to use a pair of 2 LEDs to 1 resistor to double their brightness. Or a 1 to 1 setup if they are still dim compared to the other set.
No idea how that can happen, since the pads are fed by the same source. Without knowing the specs on what you're using, I can only say instead of using 4 LEDs on 1 resistor, to use a pair of 2 LEDs to 1 resistor to double their brightness. Or a 1 to 1 setup if they are still dim compared to the other set.OK......so what I have now is 4 positive wires connected together, attached to a wire, that's attached to a resistor, that's attached to the positive contact pad.....and 4 negative wires attached together, attached to a wire and attached to the negative contact pad. To do what you suggested does that mean to have 2 LEDs and 1 resistor connected to the contact pad and then repeat the steps and connect it to the same contact pad? Seriously doesn't anyone want to let me pay them to fix this for me? 
ncphotographer said:To do what you suggested does that mean to have 2 LEDs and 1 resistor connected to the contact pad and then repeat the steps and connect it to the same contact pad?

ncphotographer said:Seriously doesn't anyone want to let me pay them to fix this for me?
In my case, please see signature
Honestly, once you do these mods a couple of times, it will seem very easy, and you'll wonder why you ever considered paying someone to do it for you. Just slow down, and don't freak out. Now if you're having issues where your truck won't start, or you only have reverse and neutral, then it's time to freak out a little bit,
OK OK OK.......I'll slow down and try a little patience.........NOPE didn't work!  HAHA So does that mean I have to split up the negative wires as well or can they still all 4 be connected? I really do appreciate all the help....and I do get satisfaction in doing it myself.
HAHA So does that mean I have to split up the negative wires as well or can they still all 4 be connected? I really do appreciate all the help....and I do get satisfaction in doing it myself.ncphotographer said:So does that mean I have to split up the negative wires as well or can they still all 4 be connected?
 You had it right the first time.
ncphotographer said:To do what you suggested does that mean to have 2 LEDs and 1 resistor connected to the contact pad and then repeat the steps and connect it to the same contact pad?
OK......you have to explain things to me like I'm a 4 year old......you're saying I can leave the 4 negative wires connected but split up the 4 positive into 2?
If its resistor issue couldn't he run 4 LEDs in series with no resistors?Blckshdw said:
OK......so what I did was split the 4 positive wires into 2 sets, each with a resistor......left the 4 negative wires connected together and hooked everything back up and............BAMMMMMMM they all lit up and all have the same brightness.........BUT......and here's where it gets funny to me........the lights stay on ALL THE TIME.....they don't go off......AND they blink on and off with the left turn signal.
Your DDM's circuit board is damaged. Probably by whatever caused the fuse to pop. You'll need to replace it, cheapest bet is to get a used one from a junk yard, or Ebay, that has the same functions as yours, then it will be plug and play. Brand new one would require dealership programming.
Noooooooo, please be joking....I finally got the lights right and now I've got to start over. I'll be right back I'm gonna go cry. I'm certainly not questioning your knowledge but is there any chance that one of the wires could be touching something on the circuit board causing it to do what it's doing?
Sorry I haven't been on in a while been doing alot of projects at once but started on my final switch tonight got the top three done


And here's my headlight switch I swapped the greens to match my 4wd switch and changed the headlight killer to red

And here's my headlight switch I swapped the greens to match my 4wd switch and changed the headlight killer to red
Hey guys, I got one more question before I buy another window control unit......like I said yesterday I got the lights working, but they stay on all the time and blink when the turn signal is on......well I played around with it and redid a couple of wires and everything is working fine....the lights are bright, they don't blink when the turn signal comes on.....BUT they still stay on all the time.....could it be a simple wiring issue or definitely a messed up circuit board?

Finally done after two days and this is the only time I will complain about heated seats cause there is literally only room for the led in the slot so it has to be perfect[emoji25]
Aarkon, I know that LEDs don't use much power but I was worried it would kill my battery staying on all the time? And may I ask you what that clear snot looking stuff is that you have holding your lights in place.
You have nothing to worry about it would take years of sitting for those leds to kill your battery but other stuff would do it before then and its glue from a hot glue gun to keep them in placencphotographer said:Aarkon, I know that LEDs don't use much power but I was worried it would kill my battery staying on all the time? And may I ask you what that clear snot looking stuff is that you have holding your lights in place.
")
Thanks Aarkon.....I might just re-wire it and hook it back up.....only problem is I'm a little Anal, and it might drive me crazy knowing it's always on.
Blckshdw....I'm looking at the pics you posted for the Home Link and Voice Recorder......it looks like that the positive is on the right side for the first 2....and on the left for the last one...is that correct?
Blckshdw....I'm looking at the pics you posted for the Home Link and Voice Recorder......it looks like that the positive is on the right side for the first 2....and on the left for the last one...is that correct?
Thanks, I'll keep that in mind. While I'm here let me ask another question......I've put LEDs in my side mirror turn signals.....they work perfect except when I apply the break and have my left turn signal on it hyper flashes.....it ONLY does it when I push on my break.....and ideas?
Anybody ever seen the "radio shack 7 color blinking LEDs?" by grounding the mode pin you can switch between the "7" colors and then one mode is where it blinks between all of the colors. I think it'd be good for mod purposes. I just don't have the know-how to calculate what resistor it would need to run on +/- 12vdc. It has a operating voltage of 3.2vdc. If anyone knows what resistor to use for that, let me know and I might toy around with a couple of them.
Edit: found an LED circuit calculator thingy. Says for a 3.2v LED that runs at 35mA that for a 13v system I'd need a 300ohm resistor or for 12v I'd need a 270. This sound about right?
I just don't have the know-how to calculate what resistor it would need to run on +/- 12vdc. It has a operating voltage of 3.2vdc. If anyone knows what resistor to use for that, let me know and I might toy around with a couple of them. Edit: found an LED circuit calculator thingy. Says for a 3.2v LED that runs at 35mA that for a 13v system I'd need a 300ohm resistor or for 12v I'd need a 270. This sound about right?
Mounce said:Anybody ever seen the "radio shack 7 color blinking LEDs?" by grounding the mode pin you can switch between the "7" colors and then one mode is where it blinks between all of the colors. I think it'd be good for mod purposes.
Edit: found an LED circuit calculator thingy. Says for a 3.2v LED that runs at 35mA that for a 13v system I'd need a 300ohm resistor or for 12v I'd need a 270. This sound about right?
 At $3 a pop, a project could get expensive pretty quickly. Although most things sold by Radio Shack are overpriced compared to other available outlets. After doing some reading, it appears to be a self contained RGB LED with a built in controller, which is pretty cool. BUT, you have to cycle through the colors in order, you can't pick and choose your color choice at will. The cheaper, and likely easier alternative, depending on how many of these you were going to run, and where you were going to run them, would be to buy regular RGB LEDs or RGB LED strips, and connect them to your dime-a-dozen RGB controller.
Nice find though!

I was just thinking of maybe using just a couple for little accents. Thanks for the tips though man!
OK been away for a while but reading through the last year worth of posts has me going again. I made a Life Mod and a big one at that ( added 1 girl and changed everything!!!!! LOL ).
So Here goes on my cluster mod some of you have been looking at ........
As for the diffusers on the back of the stock cluster.... I did not touch them. I had 1 led in each bulb position and wanted the needles to light as well as the gauge faces. However the light output from the 1000mcd LED I had was nothing. So I looked for a cheap source for something brighter and found some old Tahoe side mirrors that I stole the turn signals out of ( 1 of the advantages of being in a dealership I see broken mirrors a lot). I then removed the LEDs from those and installed them in my cluster. Now I had huge hotspots and almost no light elsewhere. So apart it came again. and this time I added a LED strip to the inside and it was a lot better..... But no where near the brightness of the rest of the dash. So this time I took it apart and separated the gauge faces from the white housing they are stuck to. I then cut the LED strips (plain with no waterproofing) into 3 LED sections. By separating the LED strip into the small sections it was far easier to attach to the cluster. I then used solid strand wire (telephone or CAT5e) pieces to connect all the sections together in series. I installed the cluster back in the truck and was pleased with the result however..... after a few days I smelled that burning electrical smell. I really did not "see" a change in the light but I thought it looked a bit dim. I let it go until I lost 2 things almost at the same time, first the fuel level sensor went so no fuel gauge, and that was followed by the odometer display(man is hard to judge where empty is that way). So when I opened the cluster to fix the odometer I found that 1 of the LED strips had the trace burned out of it there by taking out the LED strips after it. So I replaced the damaged section and added an addition power tap off the other side of the cluster to reduce the load through the strips. This setup has been working fine for about a year now, but the other day a noticed the fuel gauge LED flickering. So when I go back in there I will take some pics without it lighted so you can see the details.
And Blckshdw I just noticed your title
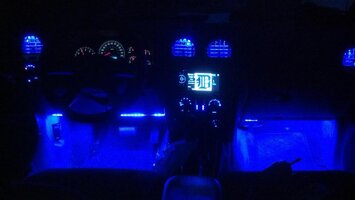
Here is a pic of my latest addition to the envoy. I got all the vents lit up. When I first saw this done i thought I'd get around to it eventually because I didn't think it would make that much difference in the look, man was I wrong. This may be my favorite lighting mod I've done yet. I think the look is awesome and I love it. The only bad is it makes my cluster look REALLY bad. I guess its time to bite the bullet and crack that sucker open. 
Attachments
yeah its actually not that bad in that pic, the other day I was doing 35mph at 7000rpms!Blckshdw said:Yeah, and take care of your tach's stepper motor too, sheesh!!
I've thought about doing the quad mod with mine in passing, been lazy and haven't gotten around to it yet though.Aarkon said:Anyone with depo tails made them run top and bottom lights at the same time?
Should be able to with the Depos, got park, brake, and ground connections on the bottom, and just turn and ground connections on the top. Would have to add some additional logic to make the park/brake signal blink off when the turn signal becomes active, or disconnect some of the tail light connections and feed in the trailer connections in their place.Sparky said:Don't know if the depos can be done that way. I know my Eagle Eyes can't as there is no LED dim circuit in the lower portion.
 Shouldn't be too difficult really.
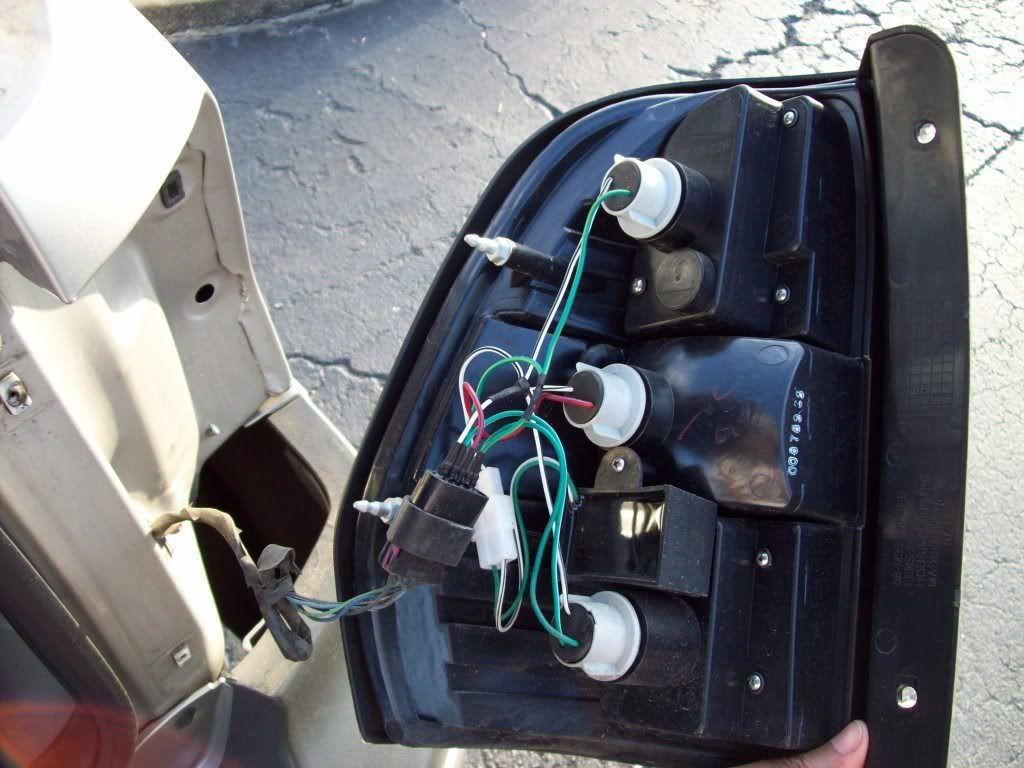
Wouldn't have to touch the white wires, just splice in the green ones, and some diodes to prevent backfeeding of the turn signals.