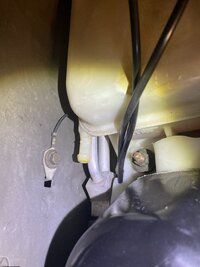

NEED HELP 2003 Trailblazer EXT w/rearAC evaporator tube.

BikeShoe

Member
Joined
Jul 4, 2026
Posts
7
Location
Redding, California
Hey there everyone. I’m a longtime lurker and first time poster. I’ve made many repairs with advice from this site.

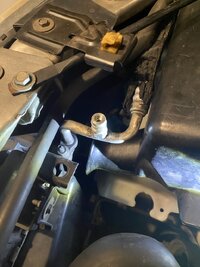
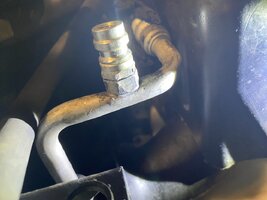
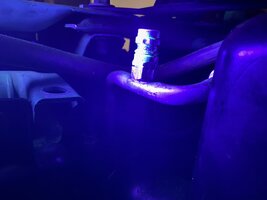
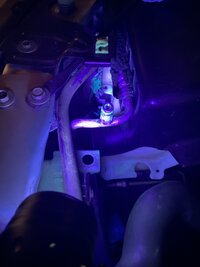
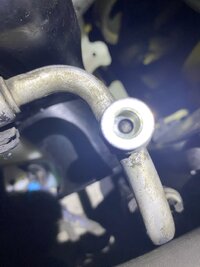
So, the high side ball-valve port failed, and it is not coming loose. I’ve tried all methods (no heat), but the line itself won’t withstand the force needed to break the port free. I—and the mechanic—so far cannot locate another evap line.

Is removing this line to isolate the wrenches’ torque to just the valve and the line’s welded nut feasible? I’m thinking clamping a socket in a vise, put the port into it, and using an open-end wrench & breaker bar
to undo the nut (and entire tube assembly.)

This TB is the ride for my very elderly parents, and no AC cannot happen.

Redding, California fwiw.

Thanks.
 
  • Wow
Reactions: movietvet
Welcome to GMT Nation...

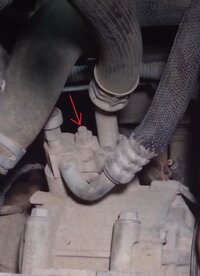
Not sure if this Video concerns the A/C Compressor HI/LO Manifold involved on your GMT360 here...but take a look at at it anyway and advise if the views will help narrow down where your issue is... The Aluminum A/C Compressor Hi/Lo Manifold should not have an enormous amount of Torque on such a Fastener:

GMT360ACMANIFOLD.jpg

Posting some Pics from what you can presently see in plain sight and access right back here would really help:

 
Last edited:
  • Like
Reactions: movietvet
Thanks for the welcome, mrrsm.

This port is truly torqued. Or some sort of thread to thread interference fit.

Edit: I did two open-end wrenches indexed together so I could squeeze them together cww and I could not get it to move, but the tube really wants to flex at that point.

2nd edit: I wonder if disconnecting from the condenser would relieve this wrench-induced tube flex/twist?
 

Attachments

  • IMG_0891.jpg
    IMG_0891.jpg
    215.6 KB · Views: 14
  • IMG_0892.jpg
    IMG_0892.jpg
    173 KB · Views: 11
  • IMG_0893.jpg
    IMG_0893.jpg
    119.1 KB · Views: 13
  • IMG_0894.jpg
    IMG_0894.jpg
    294.1 KB · Views: 7
  • IMG_0895.jpg
    IMG_0895.jpg
    248.4 KB · Views: 10
Last edited:
  • Like
Reactions: movietvet
Okay... THAT Liquid Line HVAC High Side Manifold Port is ONE PIECE OF ALUMINUM ...Shaped as it is to achieve an easier way of TIG Welding it onto the other line assembly at the Factory.... I know...I know... it is frustrating to find this out... but the ONLY replaceable part of it... is the Internal Schrader Core Valve screwed deep inside of that High Side Port.

And of course... You would NEVER want to try to use the High Side to introduce either Gas or Liquid R-134A into a running system at THAT exact location ...unless you have a Death Wish or intend to instantly Freeze your "Graduated Eye Balls" with an unintended explosion of Liquid Freon getting all over you.

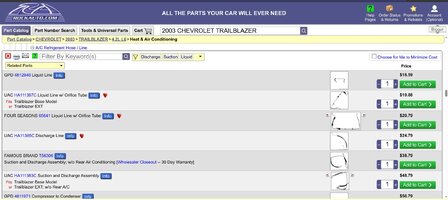
The Fill (Low Side) (Blue) Port is on the outside upper portion of the Accumulator near the Passenger Side Firewall under a Black Sealing Cap. If that thing is now FUBAR'd... To REPLACE that Entire Liquid Line... Visit Rock Auto and Pick from THIS List according to your Sub-Model SUV:


HIGHSIDEACLIQUIDLINE.jpg


Welcome Aboard... Hope this info Helps...
 
Last edited:
  • Like
Reactions: movietvet
Welcome to the forum, from Oregon.

When I was in shops, I did a fair amount of a/c work and I had a habit of back up/brace wrenches when attempting to break a fitting/line loose.
 
Thanks for the advice and RockAuto link, mrrsm.

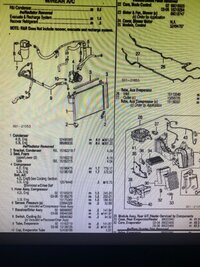
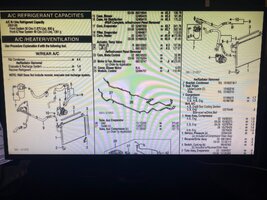
It’s a bolt-on port. I’m thinking it got attached very tightly at the factory. Also OEM rubber ball valve. Replacement will be schrader. And into the bargain, rear AC get a more involved evap tube (grainy schematic item #9).

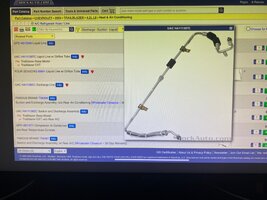
The RockAuto photo is a non-rear AC tube, and it has that coupling at its middle, my extant tube instead has this block with those two tubes exiting.

I’m musing that perhaps I could get the RockAuto tube, and graft it onto mine with one of those splice kits, somewhere near the middle of the air box. Sure seems it perhaps might be a simpler task if doable. Thoughts?

Edit: Fourth picture: rear AC to the left, non-rear AC to the right.
 

Attachments

  • 804894458.jpg
    804894458.jpg
    331.7 KB · Views: 4
  • IMG_0896.jpg
    IMG_0896.jpg
    609.3 KB · Views: 4
  • 804895036.jpg
    804895036.jpg
    236.8 KB · Views: 3
  • 804894768.jpg
    804894768.jpg
    415.3 KB · Views: 3
  • 804893169.jpg
    804893169.jpg
    365.2 KB · Views: 4
  • 804893618.jpg
    804893618.jpg
    278.2 KB · Views: 4
  • 804893647.jpg
    804893647.jpg
    505.5 KB · Views: 5
Last edited:
  • Like
Reactions: movietvet
Welcome to the forum, from Oregon.

When I was in shops, I did a fair amount of a/c work and I had a habit of back up/brace wrenches when attempting to break a fitting/line loos
Welcome to the forum, from Oregon.

When I was in shops, I did a fair amount of a/c work and I had a habit of back up/brace wrenches when attempting to break a fitting/line looser

Thanks for the welcome. Yes, this is what I meant by indexing two wrenches. I had them about two inches apart or so—where I could get a good leveraged squeeze. But then the tube wanted to yield. Sad times.
 
  • Like
Reactions: movietvet
I didn't see if you said. Were you using 2 open end wrenches? Try an open end on bottom with a socket on top with a 3/8" impact or 1/2" impact that centers the torque down the middle instead of at end of the top/second wrench. Thread penetrant and a "burp" effect to the impact.

If is that tight, I would bet some of the threads will come with it. get a new line.
 
I didn't see if you said. Were you using 2 open end wrenches? Try an open end on bottom with a socket on top with a 3/8" impact or 1/2" impact that centers the torque down the middle instead of at end of the top/second wrench. Thread penetrant and a "burp" effect to the impact.

If is that tight, I would bet some of the threads will come with it. get a new line.
Two open end. Did try ratchet on top but the handles were too far apart to control the bottom open end with any decent stability. Been applying penetrant every few hours for a few days now. The way that pipe wants to twist I’m not sure I can control an impact sufficiently.

A second-hand line so far hasn’t presented itself. An OEM option I’ll look into this week.

If all comes to nothing I’ll splice and see how that works.
 
  • Like
Reactions: movietvet
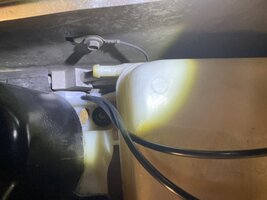
It appears from the second picture that the top nut and the bottom "receiver nut" are "aligned" so that a box end 6 point can slip down to fit only on the bottom nut. IF that is the case, it can be the "platform" for using a socket on the top nut with an impact gun (carefully...:-) or breaker bar. Using shims or washers to give the exact offset to ensure that only the top nut is being "torqued". Further, the picture appears to show a "flange" with a hole in it. Use the flange and bolt a wooden block (or other material... angle iron). Set this up to act as a "platform" for the box wrench to rest on. Then, use a clamp or some form of bolting / screws to anchor the box end wrench to the platform to prevent it from turning and thus holding the piping in one position during the exercise. Hopefully you get the idea and have some materials on hand. I hate when nuts and bolts don't co-operate.... :-)
 
Last edited:
  • Like
Reactions: movietvet
It appears from the second picture that the top nut and the bottom "receiver nut" are "aligned" so that a box end 6 point can slip down to fit only on the bottom nut. IF that is the case, it can be the "platform" for using a socket on the top nut with an impact gun (carefully...:-) or breaker bar. Using shims or washers to give the exact offset to ensure that only the top nut is being "torqued". Further, the picture appears to show a "flange" with a hole in it. Used the flange and bolt a wooden block (or other material... angle iron). Set this up to act as a "platform" for the box wrench to rest on. Then, use a clamp or some form of bolting / screws to anchor the box end wrench to the platform to prevent it from turning and thus holding the piping in one position during the exercise. Hopefully you get the idea and have some materials on hand. I hate when nuts and bolts don't co-operate.... :-)
Yeah, all this. And I understand wrt your box end advice. Gonna have a go tomorrow. I must say the tube itself is rather soft. And space is short.
 
  • Wow
Reactions: movietvet
Since that ball port is already leaky, I would put some heat to it from a propane torch to loosen either any thread locker or corrosion. Then use a six point wrench on the bottom hex and a six point socket on the top one with an impact as previously explained.

Failing that, might have to replace that whole pipe assembly. Since this is an EXT, they might be hard to find. Maybe find a good used one at a pick a part and trying to remove the port first to make sure you can replace it. . Looking at RA, it's called "liquid line" and the one from UAC, says that it fits both SWB and EXT.
 
  • Like
Reactions: movietvet
Thx for the advice, everyone, I reapply appreciate all of it.

The RA line is for non-rear AC. Seems all the available lines are. The shop guy was from the very first not at all optimistic regarding getting this line. A very unfortunate event, this.

This photo is from TrailVoy when an owner had the same stuck port, and broke the line. The GM part number from that post crossed to several RA units (UAC HA111397C Liquid Line w/ Orifice Tube) (FOUR SEASONS 65641 Liquid Line w/ Orifice Tube) (GPD 4812946 Liquid Line), and napa (Part #: TEM 212048) came back to the non-rear AC line. AutoZone? Same. I’ve been looking for salvage and there are some spread about the country. Here’s what I’m going to do—

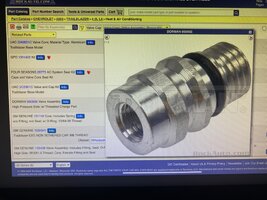
—Dorman-splice either my pipe after I sever it somewhere behind the air box and hopefully get that port off using a vise&cheater bar, or get the RA non-rear pipe and graft the donor ported portion.

This has to be doable. Be a whole heap easier than replacing the entire line. I’m seeing many variations on this theme on yt.

My climate for the next good while is hot and low humidity dry. Are there any issues I should consider when this system is open to atmosphere?

I’m eager for optimistic encouragement.
 

Attachments

  • IMG_0027.webp
    IMG_0027.webp
    716.5 KB · Views: 3
  • Wow
Reactions: movietvet

Forum Statistics

Threads
24,320
Posts
649,280
Members
20,860
Latest member
backyarder

Members Online

No members online now.