Got motor mounts done, on mom's 2008 Trailblazer LT 2WD, with the mighty 4.2L. I watched a number of youtube videos and then attacked it.
Biggest curve ball, I couldn't get the darn fan off. I needed the fan disconnected so I could jack up the motor. I tried a bunch of things, including renting the tools from autozone. Some idiot must have tightened it to 500 ft-lbs. (hehehe that was me)
I finally used the same trick that I used to get it off last time (my pic):

I removed airbox/duct related hoses/sensors, and unplugged a couple of things, top-back of motor. Almost thought I could get away with just that, but then capitulated and removed the computer as well, which was quick and easy. The strategy I cobbled together from watching videos but didn't see that often, was to do one side, then the other. Jack up the motor a little, and have one side tilt up, and the other side remain attached basically. From my high school geometry, this should allow more lift on each side, without topping out in the center where several things will want to run interference with the area below the cowling.
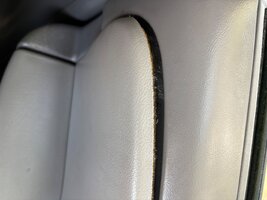
Driver side is the hard side, because even though I removed the computer and had a decent view of the motor mount, the bracket the computer mounts to remained attached (I could not figure out how to remove it). Most of my 18mm sockets would not work. They were either too short and the extra long stud coming up from the motor mount prevented those short sockets with swivel-joint/wrench, from fully seating, OR the socket was too long, and I could not get swivel joint and extension to work. I had just one socket that was not too long or too short. Just barely long enough to bite, but not too long for it and a swivel joint to hit the computer bracket. Anyway, once I found the right combo, I zipped it out with the impact. Jacked up car, placed stands, and zipped out bottom nut. Did the same for passenger, but hand tightened the passenger nuts back into place. Lowered the TB, and used a small piece of wood on the jack, and jacked up the motor under the oil pan. Right side tilted up. The only place it makes contact with is that I could see is here (upper red arrow,stock pic from the internet btw):

That oblong plastic cover runs under the cowl and makes firm contact, at which point I needed one more millimeter. So I jacked a little more. Why do the studs need to be so long!!! But I got my extra millimeter. I slid the bottom stud out first, but with the motor mount now angled, the top stud was binding in it's mounting hole. I took a 3/8 extension, put the side with the square opening on the top of the motor mount stud, and gave it a few love taps with a hammer, and it easily pushed downwards and was free. Yippee.
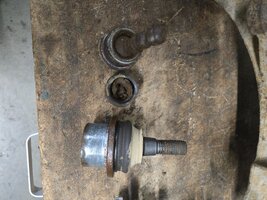
Getting the new mount in ,on the driver side seemed like it was going to be a no-go, because comparing old to new, the newer one was a wee bit longer. (OEM GM from RockAuto), I think the old one was "settled". Anyway, I jacked a couple of more times, and grimaced as I was waiting for something to break, but no nasty sounds, I got another millimeter of lift. And I slid in the new motor mount by hand. I tightened top bolt, lowered motor, put front on jack stands again, and tightened up the lower bolt for driver side mount.
Passenger mount was easier, took a little less lifting.
I made sure that on both new mounts I rotated till I got the keys aligned and dropped into place. Also the passenger side had a heatshield which wasn't that bad to get aligned while installing the new mount.
If I had to do it again, save for the engine fan, I could do the job pretty quickly. I would say that lifting one side at a time, allowed me a bit more clearance.


 So off to the store first thing this morning. Hadn't realized how expensive these things had gotten, I was tempted to get the 6 pack, but the budget won't allow for that, especially after replacing the tires unexpectedly.


 .
. 

