Oh those sexy front curves

Shdwdrgn

Original poster
Member
Dec 4, 2011
568
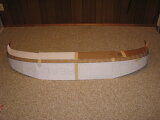
Today I finished up my initial cardboard cutouts (finally) for my new bumper, and got them taped together. I have mentioned in other threads that my goal is to match the curve of the stock bumper, but give it the clearance of a decent off-road bumper. I'll tell you, trying to transfer the original shape onto paper and then to cardboard - its no easy task! I had to smooth some lines by hand and generalize the size of some areas, but I think the result gives a nice even look. Now, on to some pics...

The overall piece... I still need to make a pattern for the underside lip, but this is the bulk of the bumper. Keep in mind it is laying back on the carpet, so you lose the perspective of the taper towards the outer edges. The front center piece is 8" tall, and tapers up to 4" around the sides. The tow rings will have their mounting bars attached to the outside of the frame mounts, leaving clearance for the brush guard. On the right side you can see where I drew the outline for the fog light - these should be in roughly the same location under the headlight as stock, but slightly higher. Also to the right of center, I drew in an idea for cutting air vents to allow more air to the radiator. Once the radiator skid is in place, these vents could be very useful.
View attachment 20079

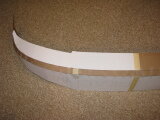
Top view of the pattern... Just under the masking tape in the center of the image, you can see the lines where the brush guard will go. To the left of that, the block where the tow rings will mount. The top flat piece has a couple of notches where it follows the grill. About 75% of the steel will be curved in some form or another, which will likely take about 75% of my build time to actually form.
View attachment 20080

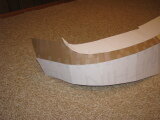
Surprisingly everything lined up just right with the exception of the front vertical piece, which is about 1/4" too long on either end. I will have to re-cut the ends into a single smooth line, but that should be easy enough. Note how the top white piece curves up to meet the bottom of the side fender... this will be another one of those tricky areas to get the final curve nice and smooth.
View attachment 20081

I was considering going with 9ga steel to save a little weight, but its impossible to find around here, so I am sticking with the 3/16" for the final bumper. Additionally, all those curves will add their own reinforcement to the overall structure.

This project hasn't been moving as fast as I'd hoped because life has thrown other things in my way, but at this point I should be able to start cutting out steel pieces and getting them shaped. To be continued...
 

Attachments

  • img_6633.jpg
    img_6633.jpg
    16 KB · Views: 1,054
  • img_6634.jpg
    img_6634.jpg
    17.9 KB · Views: 1,050
  • img_6635.jpg
    img_6635.jpg
    17.9 KB · Views: 1,055

Shdwdrgn

Original poster
Member
Dec 4, 2011
568
Whew it's been awhile since I was able to work on the new bumper, but I'm poking at it when I can. Today I started cutting out the front plate. I have an angle-grinder to make all of my cuts with, and despite the thickness of the steel, its actually going pretty smooth. At the moment I am letting the grinder cool down, so I figured I'd post some pics.

I've added an album for the build... http://gmtnation.com/members/shdwdrgn/albums/front-bumper/

Doing my initial cuts to set the lines. (Lines were marked from the cardboard template, but you cannot see them in the pic)
6971-making-cuts-front-steel.JPG


One side finished and the other side in progress. This piece is nearly 8 feet long, and will be one of the hardest to finish because I need to bend it into a smooth curve.
6972-nearly-8-feet-long.JPG


Once I finish bending this piece, I can check my lines and make a template for the underside piece. The top two pieces will require a lot more cutting, but remain fairly flat as they are welded together.
 

Sparky

Member
Dec 4, 2011
12,927
So you're going to stick with the factory style fog lights? It may be easier to do round aftermarkets (projectors perhaps?) since a round hole is simpler than the trapezoid shape of the OEM fogs.
 

Shdwdrgn

Original poster
Member
Dec 4, 2011
568
Sparky said:
So you're going to stick with the factory style fog lights? It may be easier to do round aftermarkets (projectors perhaps?) since a round hole is simpler than the trapezoid shape of the OEM fogs.

I agree it would be 'easier' to do with round lights, however after weighing my options I realized that I do not have any hole saws that large, so I would be laying out the expense of both the hole saw and new lights, and likely still be putting nearly the same amount of work into finishing the fogs... so I may as well stick with the factory pieces. Besides, one of the goals is to create something that could be mistaken for a stock bumper, just because I like to mess with people's heads :biggrin:
 

Shdwdrgn

Original poster
Member
Dec 4, 2011
568
Well this will by no means be a "fast" project... I have been contemplating exactly how I would obtain the curve of the front piece of steel, since I, like most people, do not have access to big fancy machinery. An idea finally hit me the other day, and I had a chance to try it out today.

The idea is to use two long rails for leverage. I had on hand some old 14-foot 2x6's. I cut four pieces of 2x4 that were 12" long, and nailed them in place between the rails. While bending the steel, I had my wife stand on the back ends of these boards to keep them from moving around.
7867-img-6921.jpg


The first board near the back was simply a spacer for the rails, and placement was not important. The other three boards were nailed in place at one end - two at the top, and one at the bottom, with about 6" in between them. This gave a good spacing to slip the steel sheet in between, lift up, and create small shallow bends every 2-3 inches.
7866-img-6923.jpg


As I made each bend, I would see the scale on the steel wrinkle up slightly, and I could judge how much I was bending each spot by the appearance of the wrinkling. I started working across the center first, making very slight bends about 3" apart, then came back to the corners and did a little harder bends at 1" apart. You can see here the perpendicular lines in the scale where each bend was made.
7873-img-6928.jpg


Eventually I had the basic shape I needed. I knew the curve was going to end up sharper than what was needed, but I have been finding it is easier to ease out a curve, than the create the initial bend.
7869-img-6925.jpg


Of course my initial bends are off by quite a bit (it looks much narrower than it is because the steel is sitting down on the floor). I still need to flatten the front curve a bit, and the corners were taken in about 3" too near the center on either side. However since the temperatures are well into the 90's today and I'm working in the sun, I called it quits at this point...
7870-img-6931.jpg


We have some thunderstorms moving in and are supposed to be back in the 80's through the weekend, so I'm hoping to get a chance to shape out this piece a little better then. The next step will be getting the last large piece of 3/16" plate, from which I will cut out the large curves of the top and bevel. I'll have a lot of scrap left from the inside curves of these two pieces, which can be used to build the inner support braces.
 

Shdwdrgn

Original poster
Member
Dec 4, 2011
568
I finished up the curve of the front piece today. Turns out I wasn't as far off as I initially thought. Once I flattened out the center a bit, the corner curves were actually very close to the right position. To make it easier to get the right alignment on the final bends, I took off the pushbar this morning. The mounts for the pushbar made a great place for resting the steel on as I marked where to make adjustments. I think this piece still should be straightened slightly across the front-center, but as I start welding the top pieces in place, it will bring this piece into proper alignment.
7886-img-6939.jpg


An initial look at the difference in clearance provided to the tires with the new bumper. This piece of steel will sit about 1" higher than pictured, but it will also have a 3" or 4" wide skirt tapering back at 45 degrees on the underside. Even so, I think the side of the finished bumper may still be above the center of the tire.
7887-img-6940.jpg


Once I get the top pieces welded together, it will be time to take off the old bumper and build the mounts to hold the new bumper to the frame. Then it will be time to find the final positions and cut holes for the receiver hitch and fog lights.

[EDIT] I forgot to add in an earlier post... not only do I have my album on this forum, but I also have an album on my own server with all the pictures I have taken. For those interested... http://www.sourpuss.net/projects/vehicles/trailblazer/front_bumper/
 

Sparky

Member
Dec 4, 2011
12,927
So where are the fogs going to mount? The stock fogs are lower than the sheet of metal you have cut. Are they just going to be inset a little more to compensate for the higher bumper or moved inward toward the center a tad?
 

Shdwdrgn

Original poster
Member
Dec 4, 2011
568
That's one of those details to be worked out as I go. I am *hoping* that there is room to move the fogs straight up from their current position, but I still haven't had time to actually take off the old bumper and confirm that space is available. Yeah, its a bad way to proceed, but that's the reality of where I'm at.
 

Shdwdrgn

Original poster
Member
Dec 4, 2011
568
I had a chance to check the clearance underneath last weekend, and there's definitely no problems with moving the fog lights to exactly where I need them. That entire area behind the bumper is pretty much empty space.

I finished cutting out the bevel piece today, and got half of the top piece cut out. I finally finished up another project that was taking all my time, so hopefully I can really start digging into this bumper now. Unfortunately my body has other ideas, so I can only do so much in a day before my back and hips start killing me. Ah well, it will get done eventually...

8222-top-partially-cut-bevel-finished.jpg


I can't wait to finish cutting out the top, because then I get to start welding!

[EDIT] Hmm I just noticed this was the first mention of these parts here. These two pieces are being cut out of a chunk of 18"x90" steel, also 3/16 thick. As you can see, there is going to be a lot of scrap left in this piece, which I plan to use to cut out the curves for the bevel on the bottom side, plus the reinforcement pieces for the back side of the bumper. The only substantial piece of steel I still need to buy is the rectangular tubing to attach the bumper to the frame, which will probably put me right about $200 in material costs.
 

Shdwdrgn

Original poster
Member
Dec 4, 2011
568
Lots more cutting yesterday, and I finally started welding today!

First, the three main pieces all cut out...
8258-three-primary-pieces-ready-weld-together.jpg


The top bevel took some coaxing to get the primary bends in the right places. Then I went across and tack-welded the pieces together. Thinking I could do some hammering to try and make adjustments to the bends, I managed to hit it one time too many and ALL of the tacks across the front center broke free at once. Even after grinding out the welds, I still couldn't get the pieces to come back together with the tools on hand, so I had to buy a pipe-clamp to really muscle the pieces together. Lesson learned, I will finish welding the entire seam before I get back to hammering...
8259-first-pieces-tacked.jpg


After I finished welding the entire front side, I took the grinder to the weld to make sure it was coming along ok. From the back side, it looks like my penetration is about 1/2 to 3/4 of the way through, so when I do the weld on the back side, I should have fully intact seams all the way through. I may turn the voltage up another notch though, just to make sure. However at this point it is finally starting to look like something.
8260-first-pieces-fully-welded-some-grinding-done-center.jpg


Tomorrow I will weld a pass from the back side, then go after it with the hammer again. There's not a lot of adjustment to do, just some flat spots in the bevel that need to be a little rounder, and make sure the angle of the bevel is consistent all the way across. I found that I can hook a come-along to either end of the assembly and draw it in, so before I weld the top piece in place, I'll get a final measurement of the width of the sides, then draw them in to position, and use the top piece to hold that measurement. Then its back to a lot of grinding down the welds, and taking another pass across everything on the back side to build up the thickness of the joints.
 

Shdwdrgn

Original poster
Member
Dec 4, 2011
568
Another day, another weld. I'm having a lot of trouble with the wire feed on the welder, and I've had the wire fuse itself to the welder tip a number of times. I think I'm on my fourth tip today. Anyone familiar with small mig welders - would it cause any big problems if I used an .035 tip with my .030 fluxcore wire? [EDIT] Nevermind on this... I've been reading tonight, and learned that the wire drive wheel has TWO grooves in it. The side it is set on from the factory is for MUCH larger wire than I am using, thus the wire was simply slipping in the groove. I flipped the wheel around to the other side, and the wire is feeding nice and smooth now. Finishing up the welding on Monday should be a piece of cake now!

So the welding has been slow and painful, but I got the top welded on today. This had the effect I was hoping for in that it drew in the sides and is holding them in place at the right width. The little flared tip at either end of the top piece will mate with a flat piece capping off the sides. Its not quite right yet, but once the flat piece is welded in, I'll grind off the excess.
8272-img-7034.jpg


Thank god its the weekend, because I need a break! Next Monday I will probably spend the whole day finishing off my welds and grinding down the outside to smooth the seams. Once that is done, the original bumper will come off and I can get my mounting points set in the new bumper. After the mounting point is set, I have about 3" of extra material on either side that will get cut off to define the inside of the wheel-well.
 

Shdwdrgn

Original poster
Member
Dec 4, 2011
568
I've continued to have a lot of trouble with the wire feed... Changing the roller made a huge difference, but after doing a long line, the tip gummed up. Figuring it was time to change it out, I waited for it to cool down, grabbed the pliers and tried to unscrew the tip - No luck. Getting a bit more physical with it, the tip started to unscrew slightly, then just broke right off inside the brass fitting. Ugh! I managed to get the copper tip drilled out, and re-tapped the threads in the brass holder, so I'm up and running again, just taking it a bit slower on the amount I weld at any one time.

So I finally finished up the welding yesterday, and got the front side of the bumper smoothed out fairly well. Next up, the initial fitting. This part is really hard to do when you don't have a helper! It was kind of scary seeing how there is almost nothing actually holding the front plastic bumper cover in place, but once that and the bumper were off, I got a better look at the damage from last Winter's accident. Not too terribly bad, its mostly just the sheet metal that holds the radiator in place. I got one side hammered back into shape, and will probably get the other side fixed up at some point, however when I pulled the metal bumper off, something that I assume is the transmission cooler fell on the ground. The mount on the passenger's side had fallen completely off, and it was just laying inside the bumper. A few wraps of wire to reattach the mounting bracket, and I had it bolted back into place.

At long last, I was ready for that initial fitting to see if I'd really screwed up anything in my pattern. So far, not too bad! The top piece needed a sharper curve to go around the underside of the headlights - nothing that a 3# hammer couldn't fix. The only other issue is that the outside wings are angled so they are narrower at the top, and of course they need to actually be narrower at the bottom. I need to make up some kind of wrench to pull the steel around into the proper angle, then I can try refitting it again.

8347-initial-fitting.jpg


There's going to be a lot of trimming on the wheel-well plastic, but I am hoping to salvage the point where it attaches to the original bumper and create a mounting point in the new bumper so that the plastic is still solidly attached.

8353-front-after-adjusting-curve-under-headlights.jpg


Looks like progress is going to stall again. I start a new job tomorrow, so I won't have as much free time to kill. But I have some measurements, and some adjustments to make, which should keep me busy until the weekend. My goal is to get the mounts finished up and hopefully bolt on the new bumper next week.
 

v7guy

Member
Dec 4, 2011
298
It's turning out to look pretty good. Look forward to the updaates when you get to it.
 

Bartonmd

Member
Nov 20, 2011
545
Looking pretty good!

Couple things:

1. I'm sure you're going to, but you'll want to put a flange on the bottom, or the sides under the headlights will just rotate all over the place.

2. The part that the tip screws into is called the "diffuser," is a service part, and usually costs around $12-$15

Mike
 

Shdwdrgn

Original poster
Member
Dec 4, 2011
568
Bartonmd said:
Looking pretty good!

Couple things:

1. I'm sure you're going to, but you'll want to put a flange on the bottom, or the sides under the headlights will just rotate all over the place.

2. The part that the tip screws into is called the "diffuser," is a service part, and usually costs around $12-$15

Mike

1) Yep, planning on it, it's just a complicated shape because of the curves, so I was waiting until I got the main part properly shaped before I made the pattern for the bottom flange. Plus, no need for the extra weight while I'm pulling the bumper on and off trying to get the mounting brackets in place. :smile:

2) I'm completely lost on this one... What are you talking about here?
 

Sparky

Member
Dec 4, 2011
12,927
I think #2 is referring to your welder.
 

Shdwdrgn

Original poster
Member
Dec 4, 2011
568
Oh!!! OK that makes more sense now. Yeah I didn't figure it would be an expensive part, it was just a matter of not being able to find one locally, and not wanting to wait a week for something to show up in the mail.
 

Bartonmd

Member
Nov 20, 2011
545
Oh, I forgot you have the Clarke... Local welding shops always stock that stuff for Lincoln/Miller/Tweco/Bernard, but you may have to order something for yours, depending on what brand your gun is.

Mike
 

Shdwdrgn

Original poster
Member
Dec 4, 2011
568
Not much picture-worthy progress the last few days. I've been doing some trimming and adjusting, working towards making the bumper fit correctly. Something isn't sitting quite right because I'm having to make adjustments which seem to be the opposite of what I find on the original bumper cover... but it is certainly getting closer. If I can just get it to sit in the right location, then I can get the frame mounts cut out and welded in place, and could actually start driving around with the bumper on (to make sure nothing shakes loose). I believe the problem I'm having is that the new bumper will actually sit closer in the the frame than the bumper cover did, so I'm having to cut more clearance at the top where the bumper sits near the grill. The whole thing needs to push back another 1/2 inch to match the outside edges with the fender lines, then I think I can set the mounting points.

There's a lot more work to be done, I hate being stuck on one step for days, but if I don't get this part right and get it aligned properly to the rest of the body, it will just look like crap.
 

Shdwdrgn

Original poster
Member
Dec 4, 2011
568
I ran into a snag today... after making measurements from the old bumper and seeing where the new bumper is sitting, I determined that the problem is not that the new bumper needs to sit further back, but rather that the curves on the outside corners are too far forward...

8417-curve-has-re-cut-match-fender.jpg


This means a lot of cutting and re-welding, but it also gives me a chance to properly fix the bend that runs underneath the outside corners of the headlights. I think I'm going to cut the outside edge to the proper curve, then completely cut out the flat top piece on each end so I can correctly shape a small piece to fit back in place and match the headlight curve.

Also note on the front flat piece, towards the left of the picture, I had to cut a slit through the corner so that I could get the outside wings to twist to the right angle. I basically had to take out a V-shaped chunk, about 1/2" wide at the bottom, so that the rest of the metal would fall into position. I hate having to make all these adjustments, but its the details that make the final piece come out right.
 

HARDTRAILZ

Moderator
Nov 18, 2011
49,665
Nice progress
 

Shdwdrgn

Original poster
Member
Dec 4, 2011
568
The ugly reconstruction is finally done. I just cut a chunk out of each corner, then made a new cardboard pattern to fit, cut those pieces out of steel, and shaped them up on the anvil before welding them into place. Piece of cake, right? :no:
8473-major-reconstruction.jpg


So after all that hammering and welding and grinding and hammering and hammering, I finished with a much nicer profile following the underside of the headlights.
8471-profile-under-headlight-fixed.jpg


And after much more hammering along the sides, I have the curve of the bumper very closely following the curve of the fender. At this point I was able to set a mounting tab at the back-center of the bumper to screw in the hole under the grill. This gives me a fixed point to work off of from this point forward, so I can start fine-tuning the exact fit. I can also now trim off the extra steel on either side to define the inside of the wheel wells.
8472-getting-closer.jpg


Now I'm waiting for the welding shop to cut a couple pieces of steel for me to use for the frame mounts. Those shouldn't be too much trouble to shape out and weld in, then maybe I can get started on the fog lights.
 

Shdwdrgn

Original poster
Member
Dec 4, 2011
568
I took it easy today and didn't get a lot done, but I made good progress at it! :smile: Since I planned on making the cross-braces to mount the bumper to the frame, the first thing I needed to do was figure out the exact location of the fog lights. After getting good measurements from the original bumper cover and verifying the angles were still right on the new bumper, I figured out I could make the top brace 48.5" wide, which should put it right against the can that holds the fogs. That should give the lights a little more rigidity, and finishes off the ends of the brace.
8488-pattern-fog-lights.jpg


With that worked out, I used the actual bumper to draw out my lines on the cross-braces. The top piece will go over the top of the frame. The bottom piece will sit underneath, and will also be welded to the sides of the 2" receiver. I'll have another vertical piece spanning between the top of the receiver and the underside of the top cross-brace, which should box in the receiver and give it good strength in all directions. I'm still not certain how the bottom cross-brace will be finished off on the ends, but I'll figure that out before the brace gets welded in place.
8486-cross-pieces-mount-bumper-frame.jpg


And finally, the frame has some nubs sticking up where the mounting bolts go through. I want the cross-piece to sit flush across the top of the frame, so I am going to cut out a rectangular notch in the cross-piece on both sides, then weld these smaller pieces in place over the hole. My hands are cramped up from trying to hold on to these while hammering the lip over the three sides, but these should fit perfectly. Tomorrow I will get the notches cut out and weld these pieces in place.
8487-raised-pieces-go-over-mounting-nubs-frame.jpg


After those pieces are welded down, I can mark and drill the holes for the mounting bolts, then I'm ready to weld the top brace into the bumper and test-fit it actually bolted in for the first time. Then I'll get the ends of the bumper trimmed up, and should be able to start driving around with the (unfinished) bumper in place. :biggrin:
 

Bartonmd

Member
Nov 20, 2011
545
So... Why on earth didn't you just grind the top of the frame flat, like all of us did? Grinding the top of the frame flat also gives more surface area to clamp on, which is what really holds the bumper in place; much like it's not the wheel studs that hold the wheel in place, but the friction of the wheel on the wheel mounting surface, applied by the lug nuts.

Mike
 

Shdwdrgn

Original poster
Member
Dec 4, 2011
568
Bartonmd said:
So... Why on earth didn't you just grind the top of the frame flat, like all of us did? Grinding the top of the frame flat also gives more surface area to clamp on, which is what really holds the bumper in place; much like it's not the wheel studs that hold the wheel in place, but the friction of the wheel on the wheel mounting surface, applied by the lug nuts.

Mike

Er...uh...because...?

Actually it comes down to not wanting to modify the original components. I guess that's just one of those things I've always been hesitant about. Then again, once the new bumper is in place, I'll be chopping up the wheel-well plastic.

If I were to grind off both the top and bottom, am I right in assuming there would no longer be any weld to hold that piece of pipe in place that the mounting bolt goes through? I'm thinking I might grind off the bottom side smooth, since I already have the offsets made for the top side.
 

Bartonmd

Member
Nov 20, 2011
545
The only weld would be what penetrated when they welded it. You could grind the bottom flat, or you could grind the top flat, and put the offset at the bottom. The main reason I did just the top, is so my radiator skids work with stock bumpers and my custom bumpers.

I did go back to the stock bumper for a bit after I made the first bumpers. All you have to do is put a pair of 5/8" washers, and the stock stuff bolts up just fine, again...

Mike
 

Shdwdrgn

Original poster
Member
Dec 4, 2011
568
Oh my body is gonna kill me tonight... 7 straight hours of working on the bumper today. I probably should have stopped for lunch, but oh well...

So it turns out those special little riser pieces I hammered out last night were completely wrong, and a total waste of time. Once I got the old bumper off again this morning, I realized that with the 3/16" thickness of the plate, all I had to do was shave a hair off the top of the mounting points in the frame, without affecting the weld, and slap a flat piece of steel over the top of it. So a cut out my pieces and welded it together, and ended up with this.
8510-top-frame-mount.jpg


After more cutting and measuring and drilling the holes for the mounting bolts, here's how the plate ended up (bumper is laying upside-down)
8512-img-7095.jpg


And a detail shot of the mounting points... I had some pipe with 3/16" walls laying around which fit in here perfectly. A few tack welds to hold it in place, and now I can drop a mounting bolt in from the top of the bumper, and I will weld a nut onto the bottom mounting brackets. You can also better see the raised portion which goes over the frame nubs.
8513-detail-upper-frame-mount.jpg


The sides are finally cut to fit, and I've trimmed the tops so I have about 3/16" clearance between the bumper and frame on each side. I need to make a clip which fits to the mounting brackets on each side to keep the bumper exactly in position so it doesn't rub the fender while driving, and I need to make a bracket to hold the wheel-well plastic.
8514-sides-finally-cut-fit.jpg


Tomorrow I'll try and get the bottom mounts and the hitch receiver in place. It feels pretty strong already, though. With the mounting bolts tightened down, I can't move it at all.
 

Bartonmd

Member
Nov 20, 2011
545
Couple things...

1. Don't do the tubes and extra-long bolts that stick out the top of the bumper. It's really easy to go from the bottom with the bolts, and get your hands up in there on top of the frame, to hold the nuts from the top. That way, your bolts don't show from the top, and look tacky...

2. You'll want at LEAST 3/8", if not 1/2" from the top of our "wings" to the fenders. Keep in mind that the body pretty much keeps its shape while the frame flexes around as you flex out. I've got close to 1/2" between mine, and the compressed side ALMOST touches when I flex out and hang a rear tire. ETA: 3/16" will probably rub as you're running down the road.

Mike
 

Sparky

Member
Dec 4, 2011
12,927
Oh so that's why there is such a huge gap between the factory fender and bumper. I never even thought of that.
 

Bartonmd

Member
Nov 20, 2011
545
Sparky said:
Oh so that's why there is such a huge gap between the factory fender and bumper. I never even thought of that.

Stock stuff isn't a big deal, because it's plastic, is attached to the fenders, and will flex with them. The issue is that the metal bumper is mounted in the center, and there's a bit of a multiplication of how far the sides move, compared to the frame. The issue there is that it doesn't flex, and isn't mounted to the fenders, so it ends up moving around quite a bit out there.

Mike
 

Shdwdrgn

Original poster
Member
Dec 4, 2011
568
Erg, you're right about the gap. I had to go back and look at some older pictures of my truck, and there is definitely a good sized gap in the original plastic bumper. I was just going off of the gap at the rear fender, which is tiny in comparison. So, I guess I'll be trimming down the top of the bumper a little more tomorrow.

The bolts I got to hold the bumper are black, and they're tucked back partially under the grill, so they are not very visible anyway (See this picture). For the ease of access, and not having to worry about watching to make sure the bolts didn't fall out, I had already decided to just drop them right through the top of the bumper. If it weren't for the fact that I need hardened bolts, I could have gone with a carriage bolt, and had a nice rounded-top, but once I get a new grill-guard made, the hex-head bolts will be fairly hidden anyway.
 

Bartonmd

Member
Nov 20, 2011
545
You can't compare to either stock bumper to what you're making, because they're plastic, and they'll flex with the body. I'm telling you that 1/2" is a good measurement from wing to fender in the front, to not hit when you're flexing out.

Eh... I don't know that anybody's ever had one fall out from the bottom, and like I said in PMs, the factory bolts are a slight interference fit, so they DO NOT come out once they're tight. I just hate having to take the grille out every time I want to take the bumper on and off, and am not a big fan of seeing the bolts. Your show, so do what you want, though...

Mike
 

Shdwdrgn

Original poster
Member
Dec 4, 2011
568
Today I got the side clips made up to hold the outside edges in place. These work great to perfectly guide the bumper into place when I put it back on and keep it from rocking up and scraping across the underside of the fender. I also re-cut the clearance to the fender so there's a good 3/8" gap now. These clips prevent the bumper from rocking on the mounting bolts, however when I drove it around, I could hear them rattling (metal-on-metal) so I need to find some kind of plastic trim to line the inside of the clips with. Plasti-dip would be a great solution, but I doubt it would hold up for long.
8524-side-clip.jpg


I also welded a couple small loops inside each corner so I would have a point to wire the wheel-well plastic to. There was nothing to prevent it from being blown around while driving, but a simple piece of wire will keep the plastic out of the tires until I can make up actual mounting points on the new bumper.

This gets me wrapped up for the weekend, and I can now drive around with the new bumper in place to see if anything shakes loose. Next week I'll get the shackles installed, then the bottom frame mounts and hitch receiver get welded in place, and finally draw out the pattern to add the underside bevels and skid-plate mounting points. It looks like I may save the fog lights for last... cutting out the holes is going to be the worst part of that, really wishing I had a plasma cutter to do the bulk of the work. Gonna have to make another trip to Harbor Freight next week for another pack of cutting discs and a new angle-grinder.
 

Bartonmd

Member
Nov 20, 2011
545
Man, I'm really sorry, and I really hate to come off all negative, because I like what you're doing here, overall... But... You do not want to attach (2) non-flexable parts that are held together by a flexible part. Never, ever a good idea. Your bumper will rotate a little bit out there and flex a little bit, but once you get the bottom boxed in, it will not flex. It not flexing isn't a problem, and the fender not moving (or at least not SUPPOSED to be moving) is fine, as well. However, the frame will flex as it gets loaded offroad, or under winching, jacking, or extraction; so I would be REALLY concerned about the bumper bending your fenders up and messing up the body shape in that case.

In the rear, on Kyle's, I went ahead and attached the bumper to the rear wheel well, but that was only because the "wing" was very long and did flex some, and the rear is built for trailering, so the frame is very stiff back there (unlike the front)...

Mike
 

Shdwdrgn

Original poster
Member
Dec 4, 2011
568
You know, I actually considered mounting those clips to some heavy-duty springs. It wouldn't take too much to cut them off, I just have to find the right spring for the job. I have a bucket of old trampoline springs, but I don't think they would be heavy enough. I would think the ideal spring would be stiff enough that it wouldn't bend simply under the weight of the bumper, but would still flex if the truck body shifted around. Ah well, something to keep an eye on. I have no immediate plans to go off-road, so I think it'll be fine for now.
 

Bartonmd

Member
Nov 20, 2011
545
The thing is, there's no reason to do it at all, especially with springs. Even without spring and without going offroad, the body/bumper/frame relationship still changes, as you've heard running down the road. Being that all the fender stuff is sheetmetal, I'd be concerned that it would fatigue and crack the body, or bend it. It's always going to move, but it's never going to move very far (less than 1/2"), so there's really no reason to tie them together.

Mike
 

Forum Statistics

Threads
23,625
Posts
641,221
Members
19,001
Latest member
JCherry2016

Members Online