The best approach is to delve into what your
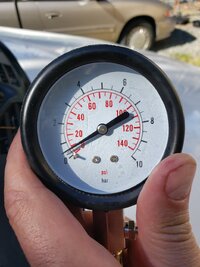
actual oil pressure is doing under operating “Analog” conditions. Take your “Pick-Of-The-Litter” from the Oil Pressure Test Kits shown in this Amazon Link and then choose the one with the most readable Oil Pressure Gauge Head and sporting an Extra Long Hose Length of around 5 Feet or Longer:
https://www.amazon.com/dp/B0016BQN80/?tag=gmtnation-20
View attachment 108378
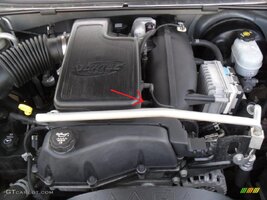
This will allow you to interface the opposite end of the Hose to thread inside of an M16 X 1.5 Threaded Adapter to its internal ¼” NPT (National Pipe Thread) after securing the adapter into the Lower Right Front Passenger Side of the Engine Block, in front of the Oil Filter Manifold area of the engine block using an H-8 Tool on a 3/8" Long Handled Ratchet:
https://www.amazon.com/dp/B0894LDF76/?tag=gmtnation-20
View attachment 108379
Then snake that Hose & Gauge up and around anything that is Moving or HOT to a position under the hood (so it can be closed for taking any Test Drives) ...but close enough to be seen along the bottom of the Windshield. Nominal Oil Pressure begins at 12 PSI at an Idle of 600 RPM and settles around 65 PSI in the range of 3,000 RPM.
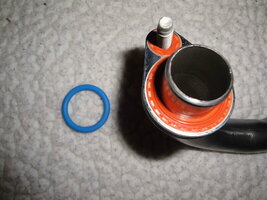
You are fortunate in one respect here… The 2006 GM 4.2L LL8 Engines should be fitted with a Modified Orange Silicone Impregnated Grommet Style Washer Seal AND the upper portion of the Oil Pump Pick Up Tube was lengthened to fit deeper inside of the updated and modified Gerotor Oil Pump Inlet Manifold. This design did away with the Ordinary, Failure Prone "Viton" (Blue) Teflon Style Seal and thus, reduced the chances for air cavitation and loss of any vacuum at the newer designed inlet side of the Gerotor Oil Pump:
View attachment 108382
But that leaves the OTHER question of whether or not the Screen on the Oil Pick Up Tube has become packed solid with flaked off chunks of collected Greasy Carbon accumulating and clogging up the Screen over time from excessive In-Cylinder Gas Blow-By during all of the Compression and Power Strokes.
If you find that the Tip of the Oil Dipstick has a heavy odor of Gasoline…
THAT is a strong indicator that even on a relatively “Youthful” Engine such as yours with only 165K Miles… Having the “Low Tension” Compression Rings Stuck TIGHT by this "Gas-Gum Lacquer" and held deep within the inner Lands and Grooves of the Pistons… allows all of that Burning In-Cylinder Junk to By-Pass the Rings during each Power Stroke and contaminate the inner Engine Block.
This condition also serves to ruin Oil Lubricity and its usefulness much sooner than later.
So... Trying to Wring out the Oil Change frequency just to save a few Bucks from the necessary 3.000 Miles rate up to say... 5,000 Miles ... is an invitation for this problem to develop. Used Motor Oil...Like Human Blood...becomes a Liquid with CARBON SOLIDS suspended within its volume over time.
If you’ve been wondering for some time, “WHERE IS ALL THAT ENGINE OIL GOING?” when you believe that you have checked it often enough for having the proper level, but somehow… it just keeps disappearing, then THIS is an explanation concerning How and Why this is probably happening:
(1) The Low Tension Compression Rings on the Pistons get “Gas-Gummed” up and stuck Tightly to the inner Lands and Grooves of the Six Pistons. Using ACDelco Top Engine Cleaner featured here at GMT Nation in several Posts can offer some improvement and relief by dissolving the Heavy Carbon Deposits around the Valve Seats, on the Piston Tops and "UN-Glue" the Lacquered Upper Compression Rings to return their "Latent Springiness" and SEAL the Cylinders better:
(2) The phenomena of Gas Blow-By allows combustion gasses and the residual solid by-products of durable Carbon to pass down inside of the Crank-Case and increase the atmospheric pressure down there.
(3) Those gasses seek an escape point that leads from the lower Crank-Case Oil-Pan up through the Engine Passages and out through the small PCV Pipe positioned in the upper front of the Valve Cover.
(4) Thus Engine Oil and Burned Fuel and Oily Vapors get thrown around by the spinning motions of the Rotating Valve Train collects inside and driven out under this excess pressure through the Small Rubber Elbow leading into the Intake Resonator.
If you remove the Resonator and after tipping it over, any Engine Oil Pours out...Right THERE is your PROOF.
(5) From there, it moves with the added assistance of a vacuum through the in-coming air-stream entering the Throttle Body and then travels back down through the Intake Manifold Runners to be ingested right back inside the Cylinder Head to get Burned inside the cylinders instead of escaping out into the Atmosphere.
(6) This Cycle of Poor Combustion processes eventually populate the inner structures of the lower end with so much of this Black “Mung” that it literally flakes off and drops down into the Oil Pan waiting to be vacuumed up into the Oil Pick Up Inlet Screen and form the disabling blockage.
(7) At around 240,000 Miles of Engine Life at an approximate use rate of say 18 MPG...the average LL8 Engine will burn nearly 12,000 Gallons of Gasoline and use 175,000 Gallons of Air to Oxidize it all. Thus these “Engine Carbon Coking” events lead to these problems that proceed from the Cradle to Grave on these Amazing Atlas Motors.
Recently, I noticed that the Snap-On Model #BK5500 Fiber Optic Probe Cameras sporting a
more rigid Camera Line that is better suited for probing have become available over on eBay at reasonable prices. Since then, I’ve pondered the idea of whether or not it would be possible to Pull the Oil Drain Plug from underneath the 4.2L Engines and after allowing the Oil to thoroughly drain from the Crankcase, use this Water-proof - Oil-proof Camera to more closely investigate the condition of the Oil Pick Up Tube Screen from directly below.
If this is possible… Cleaning it off very directly with a Powerful Spray Solvent might sort things out without requiring any major mechanical repair intervention. Check out these images via THIS “Tool Talk” Posting #814 and #815 via the Link below to see if this idea appeals to you:
Paraphrasing Shakespeare... (Hamlet, Act 4, Scene 7) "That we 'WOOD' Do, We SHOULD Do When We 'WOOD'... For THIS 'WOOD' Changes..." If Wood Building Materials and Deck Screws are ALL that you've got available and the immediate need arises for having a Safe, Working, E-Z-2 Build Set of...

gmtnation.com
It seem like the presence and position of the Drain Port in THIS location would fairly optimize the Optical Camera and Cleaning Spray Nozzle access to the Oil Pick-Up Tube Screen hidden inside of this Oil Pan.
View attachment 108381
I suspect that if you can actually
SEE that Damned screen… then once its hidden orientation is revealed ...Spraying it out using Berryman’s B-12 ChemTool might actually improve upon this disgusting condition. But first and foremost... You'll need to find out for yourself first hand what is actually occurring with your Oil Pressure when the engine is running, idling or when having an elevated RPM and then decide what if any actions might be necessary to take from those results:
If this becomes necessary to do, it might be more practical to use this stuff via a partially filled Plastic Garden Sprayer Hopper fitted with a Wand made of a Lengthy Thin Plastic Tube having a Tapered Rubber Stopper made by Drilling it out though the center and wind up with a Spray Nozzle on the End that can be slid through the Drain Plug Hole and then pumped up to a proper cleaning pressure.
Then... while spraying from a safe distance up through the Oil Drain Port... you won't have to be directly positioned up under or too near the Engine Oil-Pan and have exposure with all of the Toxic Black Mung Chemical as it is draining back out all over your face and arms.
Wearing OSHA approved Full Face Mask for Eye Protection along with wearing 11Mil Nitrile Gloves seems like a safer way to approach things when working away down there. Using a LARGE Concrete Mortar Mixing Pan to collect all of this Toxic VOC laden Junk and getting it poured back into a closed container ASAP also makes sense:
Something like THIS:
and having


 .
.