LED Mod Thread

Dec 13, 2013
1,490
Osceola,Ia
Blckshdw said:
If you can get that side panel out easily enough, you won't have to pull the dash panel off. Just reach in from the side and release the tabs.

Good to know since I had panel off today and did the 4wd n rear wiper switch.
tyge8e4y.jpg
 
  • Like
Reactions: CaptainKD
Dec 13, 2013
1,490
Osceola,Ia
PapaBear229 said:
I am having such a hard time with my door panel switch lights. I just cant seem to get them to work. I've changed my dome lights, and cluster lights to LED's so far. Soldering isn't a problem for me. Does the fact that i'm not using resistors have anything to do with it?

Yes you have to use resistors. If not it will burn the LEDs out right now.. don't ask me how I know. :what: :wink: I used 560 ohm 1/4 watt resistors on all of my LEDs.
 

Blckshdw

Original poster
Moderator
Nov 20, 2011
10,776
Tampa Bay Area, FL
PapaBear229 said:
I am having such a hard time with my door panel switch lights. I just cant seem to get them to work. I've changed my dome lights, and cluster lights to LED's so far. Soldering isn't a problem for me. Does the fact that i'm not using resistors have anything to do with it?

:confused: So what lights did you put in your cluster, if you didn't use resistors on those either?
 

Blckshdw

Original poster
Moderator
Nov 20, 2011
10,776
Tampa Bay Area, FL
Red is one of the darker colors for LEDs, and nothing compares to white in the brightness department. Everyone who's posted pics in this thread knows exactly what you're talking about with the picture not accurately representing how it really looks. :yes:

Unless the LEDs they sent you had some sort of already built in resistor on them, or there's an issue with your cluster not putting out full power on the illumination circuit (I'd confirm this with a meter to rule it out), I would advise pulling those LEDs off and adding resistors or current limiting diodes to them. If you're getting full power on that circuit and the LEDs didn't blow immediately (which is obvious they haven't) the extra current is going to shorten their lifespans dramatically and they're all going to start burning out on you sooner than later, and probably at an inconvenient time at night. :twocents:
 
  • Like
Reactions: Sib

Blckshdw

Original poster
Moderator
Nov 20, 2011
10,776
Tampa Bay Area, FL
PapaBear229 said:
Well it's been working for about two months now, all of my gauges work fine except the temp gauge. No idea as to why that one won't work.

Bad stepper motor. Should probably replace that, or get a cheap OBDII dongle and run Torque pro to keep an eye on your coolant temp.

Well if the LEDs are working, then I guess leave em. Those are the same LEDs you're putting in your doors?
 

Blckshdw

Original poster
Moderator
Nov 20, 2011
10,776
Tampa Bay Area, FL
Hmm, that explains things a little bit with the LEDs.

If you're having repeated problems with the stepper motor on the temp guage, I would think you've got 1 of 2 problems. Either something is wrong with the cluster's board itself, or there's an issue with the communication coming over the data bus. If nothing else is acting funny (window operation, radio functions, etc) I would lean towards a problem with the cluster.

If you had something to read real time info, you could confirm what the truck/sensor is saying the temp should be, or if you meet any forum members who also have a GMT360/370/305, you can do a temporary cluster swap to see if the funky behavior stays with your cluster or not.
 
Dec 13, 2013
1,490
Osceola,Ia
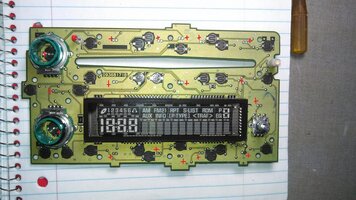
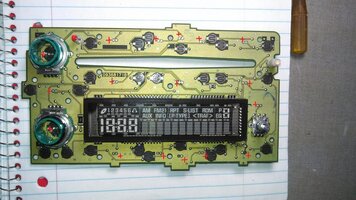
So i have been crusin along with the led swap... and now getting to the radio has me stumped... Im pretty sure i have the polarities right, at least for now, but thought i would double check with you guys to see if maybe im missing something... I have never dealt with series wired before so wanted to make sure im doing this right and not wasting the leds..

its a 6 disc changer btw too.

View attachment 33046
 

Attachments

  • radio polarity.jpg
    radio polarity.jpg
    99.9 KB · Views: 28

Venomhatch

Member
Aug 14, 2013
386
Midnyteryder02 said:
So i have been crusin along with the led swap... and now getting to the radio has me stumped... Im pretty sure i have the polarities right, at least for now, but thought i would double check with you guys to see if maybe im missing something... I have never dealt with series wired before so wanted to make sure im doing this right and not wasting the leds..

its a 6 disc changer btw too.

View attachment 20478

I would even replace the GM Theftlock blinking light if you can that is on when the car is off. I just went aftermarket also. So I have the ability to do custom lights. I have a pioneer and literally does 1000s many colors.
 
Dec 13, 2013
1,490
Osceola,Ia
Venomhatch said:
I would even replace the GM Theftlock blinking light if you can that is on when the car is off. I just went aftermarket also. So I have the ability to do custom lights. I have a pioneer and literally does 1000s many colors.

I will prob end up doing white in that since the only colors I have at moment are pink n white lol.. I will prob just go ahead n start throwing the LEDs in it when I get home tonight n see if they work or not. Still skeptical about the polarities and how its actually wired.. but I will go ahead n be the guinea pig for the nation.. :biggrin:
 

marinegrunt

Member
Oct 13, 2012
110
I will prob end up doing white in that since the only colors I have at moment are pink n white lol.. I will prob just go ahead n start throwing the LEDs in it when I get home tonight n see if they work or not. Still skeptical about the polarities and how its actually wired.. but I will go ahead n be the guinea pig for the nation..

I did the leds in the stock radio in my Sierra. My wife has a 05 Envoy and the stock radio she had in there is the exact same as mine. I don't have the 6 disc but I would think the polarity on most of the buttons would be the same. What I did to figure out polarity was made me a little test light with a led and a couple short wires. I hooked the radio back into the truck while it was taken apart and used the test light to figure out what the polarity was for each button. I think the 6 disc is similar to the single disc except yours has a few more buttons. I'll see if I kept any kind of diagram anywhere. If I come across it I'll post it for you.
 

IllogicTC

Member
Dec 30, 2013
3,452
PapaBear229 said:
Alright guys being a total idiot here, but which side of the led does the resistor go on? and also, normally on an led the longer leg is the negative correct? im having such a blonde moment. :confused::crazy:

Maybe I'm a bit foolish but I would think it wouldn't matter what side it went on. Don't take my word as fact, I'm not an LED mod guy :rotfl: but basic understanding of series circuits tells me that at least at the circuit level the same result should be seen. Maybe I'm wrong.
 

NinjuhhNutz

Member
Oct 15, 2012
720
IllogicTC said:
Maybe I'm a bit foolish but I would think it wouldn't matter what side it went on. Don't take my word as fact, I'm not an LED mod guy :rotfl: but basic understanding of series circuits tells me that at least at the circuit level the same result should be seen. Maybe I'm wrong.

:iagree: it threw me all off the first time I encountered a resistor on the negative leg, but it will work on either. I always put mine on the positive leg for a simple way to keep track of my polarities...
 

IllogicTC

Member
Dec 30, 2013
3,452
NinjuhhNutz said:
:iagree: it threw me all off the first time I encountered a resistor on the negative leg, but it will work on either. I always put mine on the positive leg for a simple way to keep track of my polarities...

Staying consistent is a good idea. Pick one leg or the other and stick with it for all resistors.

PapaBear229 said:
But i am correct on the longer leg normally being the negative?

Longer leg is positive. Some LEDs also have a "flat spot" on the side of the base, which is the negative lead, for extra reference. You can always use a multimeter to test LED polarity, if you have the diode/continuity selection available.
 

Venomhatch

Member
Aug 14, 2013
386
NinjuhhNutz said:
:iagree: it threw me all off the first time I encountered a resistor on the negative leg, but it will work on either. I always put mine on the positive leg for a simple way to keep track of my polarities...

Good point to each their own. I did resistors on negative with the thinking striped wires are negative, and stripes on resistor so...
 

dmanns67

Member
Apr 3, 2013
32,979
Ohio
Here is a video I posted early on about resistors. Goes over what resistors do and how they work. Also, covers the difference between stripes at 3:20.

I have other videos on post #1230 of this thread. Talking about Ohms, How to use digital multimeter, How diodes work, How capacitors work, and lastly about LEDs.

[video=youtube;VPVoY1QROMg]http://www.youtube.com/watch?v=VPVoY1QROMg[/video]
 
  • Like
Reactions: CaptainKD

MAY03LT

Member
Nov 18, 2011
3,426
Delmarva
Midnyteryder02 said:
Figured would throw a pic of my gauges since its the last dash led mod :biggrin:

First had to remove the blue on the numbers:

You got the blue off?!? How did you do it?
 
Dec 13, 2013
1,490
Osceola,Ia
MAY03LT said:
You got the blue off?!? How did you do it?

some goo gone, a copper brillo pad, and lots of elbow grease.. lmao :biggrin: it wasnt too bad, just had to watch around the info display and the turn, high, cruise indicators. every where there is white on the back of the gauges there is blue under it, so when you get done almost all of the white will be gone also. the red on the oil, battery, temp, and fuel gauges is molded into the face, so i didnt worry about going through them and not having the red.
 

MAY03LT

Member
Nov 18, 2011
3,426
Delmarva
Midnyteryder02 said:
some goo gone, a copper brillo pad, and lots of elbow grease.. lmao :biggrin: it wasnt too bad, just had to watch around the info display and the turn, high, cruise indicators. every where there is white on the back of the gauges there is blue under it, so when you get done almost all of the white will be gone also. the red on the oil, battery, temp, and fuel gauges is molded into the face, so i didnt worry about going through them and not having the red.

You have no idea how awesome this is!:wootwoot::cool:

This picture sucks but you can see how much the blue 'dimmed down' the cluster compared to the headlight switch. The same LEDs/resistors are in both:

interiorlights18.jpg


This thing has driven me crazy for years. I wasn't going to buy the usspeedo one that didn't have the blue (it was over $300 and I don't even know if they make it anymore anyway).

Thanks for the help!!!!:thumbsup:
 
Dec 13, 2013
1,490
Osceola,Ia
MAY03LT said:
You have no idea how awesome this is!:wootwoot::cool:

This picture sucks but you can see how much the blue 'dimmed down' the cluster compared to the headlight switch. The same LEDs/resistors are in both:

interiorlights18.jpg


This thing has driven me crazy for years. I wasn't going to buy the usspeedo one that didn't have the blue (it was over $300 and I don't even know if they make it anymore anyway).

Thanks for the help!!!!:thumbsup:

Haha no problem! Glad I could help!
:thumbsup:

I kinda went overboard n put 2 LEDs each where one was.. here is mine all put back together for now. Gotta tear it back apart in another week to replace the stepper motors that decided to take a dive when I pulled everything apart..

8umahega.jpg
 
  • Like
Reactions: CaptainKD

MAY03LT

Member
Nov 18, 2011
3,426
Delmarva
Midnyteryder02 said:
I kinda went overboard n put 2 LEDs each where one was.. here is mine all put back together for now. Gotta tear it back apart in another week to replace the stepper motors that decided to take a dive when I pulled everything apart..

That turned out great! Looks like we're both gonna be tearing apart our clusters real soon.:biggrin:

And I don't think overboard exists in this thread.:cool:

DDonnie said:
So i love midnight's red interior domes, but they arent always practical when i'm looking for something. Thinking about purchasing another set of domes to mount next to each existing one and running an auxiliary switch for it. Anybody think this would be particularly difficult?

Did you ever get around to trying this? I'd love to have white for finding stuff and red for cool mode.
 

Venomhatch

Member
Aug 14, 2013
386
Ok so here is my Dome Lights done. But Not Pictured but can get pics tomorrow. I also did my front floorboard lights also in the same LEDs.

1_zpsd5ee8616.jpg


2_zps9a274513.jpg


3_zpsd6d8844d.jpg


4_zps1880b59e.jpg
 
  • Like
Reactions: CaptainKD

Venomhatch

Member
Aug 14, 2013
386
Midnyteryder02 said:
Those are deff bright!!! :yes: Gonna have to be like the blues brothers and wear shades at night... :cool: :biggrin:

Surprisingly the map function for each seat is about a 1/4 as bright.
 
Dec 13, 2013
1,490
Osceola,Ia
Venomhatch said:
Surprisingly the map function for each seat is about a 1/4 as bright.

there was talk about that before.. mine does the same thing.. but if you just flip your vanity mirror open then the leds will be full power.. i just flip em open n closed real quick.. :thumbsup:
 

Venomhatch

Member
Aug 14, 2013
386
Midnyteryder02 said:
there was talk about that before.. mine does the same thing.. but if you just flip your vanity mirror open then the leds will be full power.. i just flip em open n closed real quick.. :thumbsup:

Yeah I forgot about the vanty lights in the mirrors. Going to have to change those next.

Added: *Where can I find the pics where someone had showed the work on their vanity lights?
 

IllogicTC

Member
Dec 30, 2013
3,452
MAY03LT said:
And I don't think overboard exists in this thread.:cool:

Absolutely. I'd still love to see a project where someone takes an Arduino or some other logic board and makes full-custom setups. Whether it be an EQ visualization in the dash, or an array which makes patterns, perhaps something really cool would be to make something to simulate that all-in-one dummy lamp on the early 2000s Impalas, where one window shows you all the different things. An array could show a battery symbol for the charging system, or the MIL, or maybe just a checkmark if everything is okay, if it could be designed to properly interface with the vehicle's systems either directly or through some sort of "middleman."
 

MAY03LT

Member
Nov 18, 2011
3,426
Delmarva
Venomhatch said:
Why do I picture a submarine at battle stations with all the red lights everywhere. Not for me. Initially it sounded like a great idea but then I just went white.

View attachment 33138

:biggrin:

Venomhatch said:
Yeah I forgot about the vanty lights in the mirrors. Going to have to change those next.

Added: *Where can I find the pics where someone had showed the work on their vanity lights?

This is what I followed when I did mine:

TrailBlazn420 said:
When you go to do them, I do have a suggestion. Pull the fuse for the vanity lights, I believe it's #40. Once you unclip the plastic around the mirror, slide out the mirror to have access to the wires/fixtures. Then take a small (tiny) screwdriver, like the kind for eyeglasses (thinner than a toothpick) and push the bulb out from the back. I tried pulling the bulbs out the first time, and broke them. The second time, by pushing them out from the back, it was smooth sailing.:wootwoot:
 

Attachments

  • Red-October-poster.jpg
    Red-October-poster.jpg
    67 KB · Views: 19

IllogicTC

Member
Dec 30, 2013
3,452
djthumper said:
Funny you ask that! Have you read through this thread lately? http://gmtnation.com/f33/led-mod-thread-944/ It is packed full of information on LED lighting and mods. :raspberry:

There's also 54 pages of it. :eek: my Google Fu is broken after watching the tiny roomie all day and looking up trains :raspberry:

Seems to me like a bunch of people just buy a huge bag of CCC because per-unit it was cheaper than the dirt under their feet. I want something with a known high reliability.
 

djthumper

Administrator
Nov 20, 2011
14,956
North Las Vegas

Forum Statistics

Threads
23,746
Posts
642,864
Members
19,317
Latest member
Trapp

Members Online

No members online now.