LED Mod Thread

Blckshdw

Original poster
Moderator
Nov 20, 2011
10,776
Tampa Bay Area, FL
IllogicTC said:
Not too sure on doing LEDs in the vents myself... even with the LEDs themselves hidden, there'd still be "hotspots" of light and other areas where it isn't as bright. One way I would think of to fix it is to diffuse it with semi-opaque plastic or something, but that'd defeat the purpose of a vent.

That would probably have to be something you play with, number, size and placement of the LEDs to get an acceptable output.

IllogicTC said:
Also, I looked around a few pages and never saw this (I'm not looking through all ~50 to be sure), but anyone ever thought of modifying the TrailBlazer nameplate found just inside the door for LEDS?

My idea would be to mill out the letters and replace with diffusing plastic/glass (so we get more uniform light distribution), then installing LEDs underneath it. Ideally it would light up when one opens the door, and turn off when it's closed. Of course, you wouldn't have to stick with the default metal plate, could always mill a new plate out with the truck's name or your name or something. I just have no clue if there's any real clearance under the plate to do such a thing, or if drilling through to the underside and installing (and weatherproofing) from underneath is feasible.

Kevin (DFWWIZ) gets these made and sells them from his site. :thumbsup: Wix.com LEDS created by dfwizleds based on auto-repair-express | Wix.com

Not sure if you saw it, but I put LEDs in my door scuff plates and upper lift gate trim piece in this post.

IllogicTC said:
Edit: Also, anybody ever considered adding an Arduino device for LED control? I mean, I know you guys are wiring them up to be turned on and off as appropriate, but for some people with "vanity" LEDs that don't actually light up gauges or anything but just various parts of the vehicle, I would wonder if one could use an Arduino to make them do various things like light up in a certain order, or even flashing with music if you get the right board. I know it's getting pretty far up there in advanced wiring, but it sure would be neat.

Most of us aren't quite at that level with wiring and circuitry, I see a lot more talk of Arduinos and advanced stuff like that on HIDPlanet. Makes my head spin reading through some of those threads :crazy: Of course, if you'd like to show us how it's done, then by all means!! :biggrin: :cool:
 

DFWWIZ

Member
Dec 5, 2011
516
Thanks for the props B! I've been telling peeps on TBSS forum about your ideas for some time also.:thumbsup:
I'm just getting ready to start up another batch of sill plates for the SS and also the Aero this time around. The Saab guys want it cut with "Aero" instead of Saab and of course their plate is an elongated oval shape with one centered line. I have these made out of Stainless steel and are illuminated with ribbon lighting not LEDs. And they can be done in a number of finishes starting with the brushed finish and I can powdercoat them in a number of textures and colors as well.
I've been so damn tied up with these new 3600 LM CREE/driver headlights in the past 2 months, it isn't funny. I wish I had someone who could spend some time cleaning up my WIX site (its a mess) and do some editing for me in exchange for some lighting perks. :yes: Lighting products are changing exponentially by the month and I now have 4 factories in Guangzhou that I deal directly with-2 most of the time.
 

DFWWIZ

Member
Dec 5, 2011
516
fr34kout said:
For LED bulbs in the tail light, do some research and don't just do what I did. I tried a set of LED bulbs from a friend, and kept blowing fuses. I had no idea why, until I started to do some research into how our tail light circuit boards are wired in a SRCK style. Basically the grounds are swapped around in a weird way, and with certain LED bulbs when you install them it creates a dead short and pops fuses as soon as the bulb gets power.

From what I remember, you either need to open up the circuit boards and rewire them, or buy SRCK bulbs.

You are dead on Frank! The CK means that the polarity of the bulbs is set so that both negatives are together on opposite side of both positives. A regular bulb has one of each per side. GM did this because it allowed them to run wires easier to configure the different operating sequences of turn, brake, signal and parking lights.
 

IllogicTC

Member
Dec 30, 2013
3,452
DFWWIZ said:
I lost my guy who made the billet aluminum ones (NON lighted) this past year and have been looking for another CNC machinist to do those for me. Just have not had the time to find someone yet.
BUT the stainless lazer cut lighted versions will be done shortly as in this next month.

Pretty hot mod there, actually kinda what I was hoping for. And now I know where to find them when I have the money :wootwoot:
I run CNC machinery! ...but it's pre-programmed, and not for aluminum but plastic, and kinda for my job, lol. So close!


BlckShdw - Nah I didn't see the scuff plate one. A nice idea for those who don't have running boards but still want to illuminate where to step in FOR SAFETY (justification to the wife, anyone?). I was looking for WIZ's setup for the aluminum plate and that's what I was talking about lol.
 

IllogicTC

Member
Dec 30, 2013
3,452
Blckshdw said:
Most of us aren't quite at that level with wiring and circuitry, I see a lot more talk of Arduinos and advanced stuff like that on HIDPlanet. Makes my head spin reading through some of those threads :crazy: Of course, if you'd like to show us how it's done, then by all means!! :biggrin: :cool:


I have no personal experience with Arduino, I'm just sitting on the wagon of hope that with the community we have here someone, anyone would. I mean I understand the basics of it, from the wiring perspective, but not actual setup/programming of the board itself.
 

jimmyjam

Member
Nov 18, 2011
1,634
Blckshdw said:
Most of us aren't quite at that level with wiring and circuitry, I see a lot more talk of Arduinos and advanced stuff like that on HIDPlanet. Makes my head spin reading through some of those threads :crazy: Of course, if you'd like to show us how it's done, then by all means!! :biggrin: :cool:
Lol I've got an arduino board with a can bus shield I'm playing with.... :smile: but for doing stuff with leds it's a bit overkill, I'd use a picaxe
 

Envoy_04

Member
Jul 1, 2013
749
Just ordered the necessary LEDs to upgrade all the dome lighting in my 04. New to this and have a quick question: does the "fading" out of the lights when they go off negatively impact the LEDs? If so, what is done to remedy that?
 

Blckshdw

Original poster
Moderator
Nov 20, 2011
10,776
Tampa Bay Area, FL
Envoy_04 said:
Just ordered the necessary LEDs to upgrade all the dome lighting in my 04. New to this and have a quick question: does the "fading" out of the lights when they go off negatively impact the LEDs? If so, what is done to remedy that?

Nope, you'll be fine. :thumbsup:

What kind did you get? The 194 plug and play type bulbs, or the flat panel style?
 

DFWWIZ

Member
Dec 5, 2011
516
Envoy_04 said:
Just ordered the necessary LEDs to upgrade all the dome lighting in my 04. New to this and have a quick question: does the "fading" out of the lights when they go off negatively impact the LEDs? If so, what is done to remedy that?

LED/SMD lights can function from a volt and a half on up to 30 volts. The only thing different is the OHMs or resistance is going to be a lot less like maybe 1/3, so sometimes you will have function problems that are BCM controlled like pushing the individual dome lights on by themselves won't be as bright as when door opens or all are turned on at the control.
 

Envoy_04

Member
Jul 1, 2013
749
Blckshdw said:
Nope, you'll be fine. :thumbsup:

What kind did you get? The 194 plug and play type bulbs, or the flat panel style?

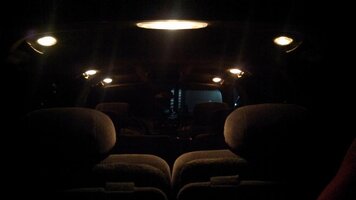
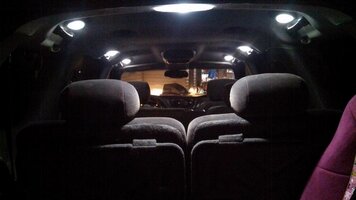
Yes. :biggrin: I got a ten pack of 20 SMD 194 plug and plays, and a two pack of the flat panel 212-2 type for the cargo area - could only find em in 16 SMD. Should be a big upgrade over the stock incandescents, I can barely see at all after dark inside right now, but on Friday (I hope) It'll look like daylight inside the Voy!
 
Dec 13, 2013
1,490
Osceola,Ia
Envoy_04 said:
Yes. :biggrin: I got a ten pack of 20 SMD 194 plug and plays, and a two pack of the flat panel 212-2 type for the cargo area - could only find em in 16 SMD. Should be a big upgrade over the stock incandescents, I can barely see at all after dark inside right now, but on Friday (I hope) It'll look like daylight inside the Voy!

Envoy going leds interior is deff a big upgrade! i bought the 194 10smd plug n plays, and one 6smd 212 bulb for the cargo area.. I couldnt be happier! although the wife thought it was way too bight when i first installed, but now shes came around and loves it too.. lol :biggrin:
View attachment 32056
 

Attachments

  • stock 1.jpg
    stock 1.jpg
    26.3 KB · Views: 20
  • led 1.jpg
    led 1.jpg
    45.8 KB · Views: 19
  • Like
Reactions: CaptainKD

DFWWIZ

Member
Dec 5, 2011
516
Envoy_04 said:
Yes. :biggrin: I got a ten pack of 20 SMD 194 plug and plays, and a two pack of the flat panel 212-2 type for the cargo area - could only find em in 16 SMD. Should be a big upgrade over the stock incandescents, I can barely see at all after dark inside right now, but on Friday (I hope) It'll look like daylight inside the Voy!

I have 48 SMD panels for the cargo area in stock, about 12 different 168/194 types and a ton of other lights including the 3600 lumen quad Cree headlights. :thumbsup:
 

blazinlow89

Member
Jan 25, 2012
2,088
DFWWIZ said:
so sometimes you will have function problems that are BCM controlled like pushing the individual dome lights on by themselves won't be as bright as when door opens or all are turned on at the control.

Remedy for that is to open the mirror cover on the sunvisor after you push any of the dome lights. At least on mine and my buddies Rainier they go to full brightness after we do that. They will stay way until you turn the truck off.
 

gpking

Member
Dec 27, 2013
534
Berkeley Springs, WV
blazinlow89 said:
Remedy for that is to open the mirror cover on the sunvisor after you push any of the dome lights. At least on mine and my buddies Rainier they go to full brightness after we do that. They will stay way until you turn the truck off.
What would we do if we don't have lights in the visor?
My dome lights (when pushed) are never as bright as when a door is open but I just have the mirror in my visors.
 

Envoy_04

Member
Jul 1, 2013
749
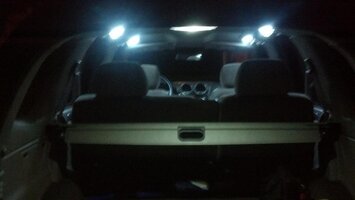
My phone takes TERRIBLE pics in the dark, but here's the results of my LED dome light upgrade!

View attachment 32146

The brightness now is absolutely unreal, I love it!

Bulbs are 20 SMD 194 plug and plays, and one 16 SMD 211-2 plug and play for the cargo area.
 

Attachments

  • IMG_20140117_202243_830.jpg
    IMG_20140117_202243_830.jpg
    39.8 KB · Views: 19

Envoy_04

Member
Jul 1, 2013
749
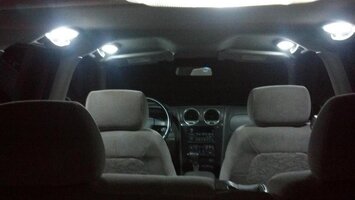
Here's a better pic of the interior LED mod, it shows how much brighter it is now.

View attachment 32192

I found two bulbs out of the 10 I ordered that were flickering/had rows of SMDs not working. Contacted the seller and they're sending out replacements, I hope they get here before I have to go back to school tomorrow evening.

This is by far the easiest mod and the one with the most drastic improvement in looks and functionality that I have done, I really don't know why I waited so long. The remaining two 194s from the pack of 10 I used to replace the cheap AutoZone LEDs in my license plate lamps. They were a really bad set that I got a while back because my incandescent ones burnt out, and they were almost purple in color and not very bright - the new ones are nice and white and illuminate the plate very well. My only slight drawback is the cargo area LED panel - it is slightly "bluer" than the others, but still what would be considered a bright white light - and still a vast improvement over what I had there.
 

Attachments

  • IMG_20140119_180419_085.jpg
    IMG_20140119_180419_085.jpg
    50 KB · Views: 14
  • Like
Reactions: CaptainKD

Envoy_04

Member
Jul 1, 2013
749
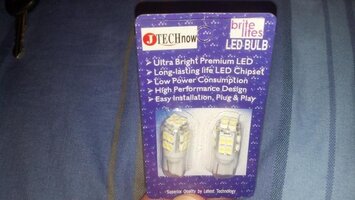
View attachment 32284

My replacements for the defective dome light bulbs sent to me by the seller. These little bad boys are BRIGHT! I realized tonight that when I look in the side mirrors after dark that along with the glow of my taillights on the road I can see the light from these LEDs in my license plate lamps! :biggrin:
 

Attachments

  • IMG_20140123_205908_271.jpg
    IMG_20140123_205908_271.jpg
    83.6 KB · Views: 21
  • Like
Reactions: CaptainKD

Envoy_04

Member
Jul 1, 2013
749
Interesting issue I just noticed - my passenger side map light (the one you can click on that's in front) seems to "flicker" at a very dim level when I'm driving and all the dome lights are off. Operates normally when they're on with the switch and the door's open, but at night, and I assume during the day, I just can't see it, that bulb and that one only seems to be on very dim intermittently. Anyone have this issue with their LEDs? Thinking about swapping the bulb with the one behind it and seeing if the problem continues.
 

Blckshdw

Original poster
Moderator
Nov 20, 2011
10,776
Tampa Bay Area, FL
Envoy_04 said:
Interesting issue I just noticed - my passenger side map light (the one you can click on that's in front) seems to "flicker" at a very dim level when I'm driving and all the dome lights are off. Operates normally when they're on with the switch and the door's open, but at night, and I assume during the day, I just can't see it, that bulb and that one only seems to be on very dim intermittently. Anyone have this issue with their LEDs? Thinking about swapping the bulb with the one behind it and seeing if the problem continues.

I actually had the same issue with my panels when I first put them in. I don't notice them anymore. It was only a couple of the LEDs, like 4 or 5 out of the 60+ would be very very dimly lit. I sometimes notice it with the scuff plate LEDs too (they are tied to the dome lights)
 

Envoy_04

Member
Jul 1, 2013
749
Blckshdw said:
I actually had the same issue with my panels when I first put them in. I don't notice them anymore. It was only a couple of the LEDs, like 4 or 5 out of the 60+ would be very very dimly lit. I sometimes notice it with the scuff plate LEDs too (they are tied to the dome lights)

From some reading I've been doing I guess that this is actually normal with LEDs. I have no clue why, but it seems to be a commonly reported problem. If it continues I'll swap it out with the bulb behind it and see if the condition follows it or is tied to that socket.
 

gpking

Member
Dec 27, 2013
534
Berkeley Springs, WV
I noticed this with my cargo light after I first replaced my dome lights with LED.
For me, it was caused by one of my map lights not having a button. Once I installed a working button, it stayed off when it was supposed to.
 

gpking

Member
Dec 27, 2013
534
Berkeley Springs, WV
This idea has been bouncing around in my head for a while and I think it would look pretty awesome, of course I lack the motivation to do it at the moment; it would probably involve new sockets and scrapping the existing boards/wiring, so I'm sharing it for those ambitious owners who can't find enough stuff to change about their TB. :biggrin:
My idea is to use the reverse lights as turn signals, since they're just back there wasting space when you're in "D".

If you wanted amber, you could do it like this:
Wire the four red lights to operate as both brake and running lights only.
Replace the reverse lights with white/amber switchbacks, wiring them so the white operates as the reverse light and the amber operates as the turn signal.
The amber would provide contrast to all-red bulbs in the rear and would match better if you happen to have amber LED mirror turn signals.
So it would look like this:
_______

___________Brakes and signals on
______
______

_______

___________Brakes and reverse lights on
______
______


If you wanted all red, you could do it like this:
Wire the four red lights to operate as both brake and running lights only.
(Alternately, wire the top two to do brake, the bottom two to do turns, all 4 to do running).
Then replace the reverse lights with white/red switchbacks, wiring them so the white operates as the reverse light and the red operates as the turn signal.
So it would look like this:
_______

___________Brakes and signals on
______
______

_______

___________Brakes and reverse lights on
______
______


The only downside is you can't use the reverse lights while your 4-ways are on.

Maybe someone wants to try this, maybe not. I'm just throwing the idea out there.
 
  • Like
Reactions: Sib and CaptainKD

Blckshdw

Original poster
Moderator
Nov 20, 2011
10,776
Tampa Bay Area, FL
gpking said:
This idea has been bouncing around in my head for a while and I think it would look pretty awesome, of course I lack the motivation to do it at the moment; it would probably involve new sockets and scrapping the existing boards/wiring, so I'm sharing it for those ambitious owners who can't find enough stuff to change about their TB. :biggrin:
My idea is to use the reverse lights as turn signals, since they're just back there wasting space when you're in "D".

If you wanted amber, you could do it like this:
Wire the four red lights to operate as both brake and running lights only.
Replace the reverse lights with white/amber switchbacks, wiring them so the white operates as the reverse light and the amber operates as the turn signal.
The amber would provide contrast to all-red bulbs in the rear and would match better if you happen to have amber LED mirror turn signals.
So it would look like this:
_______

___________Brakes and signals on
______
______

_______

___________Brakes and reverse lights on
______
______


If you wanted all red, you could do it like this:
Wire the four red lights to operate as both brake and running lights only.
(Alternately, wire the top two to do brake, the bottom two to do turns, all 4 to do running).
Then replace the reverse lights with white/red switchbacks, wiring them so the white operates as the reverse light and the red operates as the turn signal.
So it would look like this:
_______

___________Brakes and signals on
______
______

_______

___________Brakes and reverse lights on
______
______


The only downside is you can't use the reverse lights while your 4-ways are on.

Maybe someone wants to try this, maybe not. I'm just throwing the idea out there.


:coffee: Sounds an awful lot like David's idea :book:

http://gmtnation.com/f33/djoness-custom-tail-light-configuration-2706/
 

NinjuhhNutz

Member
Oct 15, 2012
720
gpking said:
The only downside is you can't use the reverse lights while your 4-ways are on.

Maybe someone wants to try this, maybe not. I'm just throwing the idea out there.

Yes, but what if you could? ((Hi 5 to anyone that catches that movie reference :raspberry:))

Why wouldn't you be able to use the reverse lights while 4-ways are on?

Turn signals aren't exactly a priority while in reverse, and there's no brake input for the reverse combo your talking about.
Or, am I missing something?
 

SBUBandit

Member
Dec 5, 2011
597
NinjuhhNutz said:
Yes, but what if you could? ((Hi 5 to anyone that catches that movie reference :raspberry:))

Why wouldn't you be able to use the reverse lights while 4-ways are on?

Turn signals aren't exactly a priority while in reverse, and there's no brake input for the reverse combo your talking about.
Or, am I missing something?

Because you're using a switchback as a turn signal and the reverse light. If you had the 4-ways on in reverse, the turn signal will override the reverse light, so it will just flash the turn signal color. I can't see very many times this would be an issue, but it is how it would work.
 

DDonnie

Member
Mar 26, 2012
2,631
So i love midnight's red interior domes, but they arent always practical when i'm looking for something. Thinking about purchasing another set of domes to mount next to each existing one and running an auxiliary switch for it. Anybody think this would be particularly difficult?
 

Blckshdw

Original poster
Moderator
Nov 20, 2011
10,776
Tampa Bay Area, FL
DDonnie said:
So i love midnight's red interior domes, but they arent always practical when i'm looking for something. Thinking about purchasing another set of domes to mount next to each existing one and running an auxiliary switch for it. Anybody think this would be particularly difficult?

:undecided: That's completely dependent on their size, and how much space you have available. From the other mods I know you've done, I'd say running wiring is a non issue.
 

NinjuhhNutz

Member
Oct 15, 2012
720
SBUBandit said:
Because you're using a switchback as a turn signal and the reverse light. If you had the 4-ways on in reverse, the turn signal will override the reverse light, so it will just flash the turn signal color. I can't see very many times this would be an issue, but it is how it would work.

they why not add in a N/C relay to the turn signal wire, that would be triggered by the reverse light signal? reverse lights come on, the turn signals don't...and who uses a turn signal in reverse?:confused:
 
Dec 13, 2013
1,490
Osceola,Ia
Hey guys im now starting to put leds in front window switches, got the passenger side done, but its not nearly as bright as the back ones. I know its bc the plastic diffuser for the switches, but my question is do you guys put a led in for each switch right below the button like the back doors? do you do away with the diffuser? my passenger front looks good all assembled, but just want it brighter. Thanks, Matt
 

Blckshdw

Original poster
Moderator
Nov 20, 2011
10,776
Tampa Bay Area, FL
Midnyteryder02 said:
Hey guys im now starting to put leds in front window switches, got the passenger side done, but its not nearly as bright as the back ones. I know its bc the plastic diffuser for the switches, but my question is do you guys put a led in for each switch right below the button like the back doors? do you do away with the diffuser? my passenger front looks good all assembled, but just want it brighter. Thanks, Matt

Nice work so far Matt. LED potential, I see in you.
yoda1_zpsb12818e6.gif


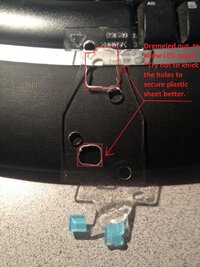
Put an LED under each button. Keep the diffuser, and use it as a brace to align your LEDs. Drill a hole in it where you want the LED to be placed for each button, and insert the LED through the hole. Your wiring should then be between the diffuser and rubber pad, the sandwich effect will keep the LED in place, since your wiring will have to run to the bulb contact pads. :cool:

Edit: Try to use a small gauge of wire, so the thickness doesn't cause the pieces to not fit together well, which in turn will make it a royal PIA to put the module back together. Ask me how I know that... :ugh:
 
  • Like
Reactions: CaptainKD
Dec 13, 2013
1,490
Osceola,Ia
Thanks blckshdw!

Is there any Ill effect to taking the diffuser out? Also was thinking of using a lil hot glue to make the LEDs stay in place, Im using black tape at moment, but thought hot glue would be a lil more rigid.

Right now I have the LEDs n the wiring on the board with black tape as an insulator to protect things front shorting out, I would take pics but want to get things cleaned up first :tongue:
 

Blckshdw

Original poster
Moderator
Nov 20, 2011
10,776
Tampa Bay Area, FL
Midnyteryder02 said:
Thanks blckshdw!

Is there any Ill effect to taking the diffuser out? Also was thinking of using a lil hot glue to make the LEDs stay in place, Im using black tape at moment, but thought hot glue would be a lil more rigid.

Right now I have the LEDs n the wiring on the board with black tape as an insulator to protect things front shorting out, I would take pics but want to get things cleaned up first :tongue:

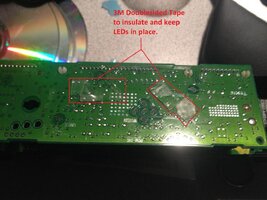
Not really. Unless you're using the filament bulbs, it's not needed function-wise. You only have to worry about shorts, if the positive side of your circuit gets connected directly to a ground point somehow. Since the module is all plastic, and the ground connection is the other contact pad of the board, which should be beneath that rubber pad anyway, the tape isn't really necessary.

I wanted the LEDs at a certain depth so there wasn't a hot spot under the button face, but the emitted light was as bright as possible. To achieve this, I put the diffuser in the module top, drilled holes where I wanted the LEDs to sit, applied power to the LED and inserted it, adjusting the depth to get the look how I wanted it. When the preferred depth was achieved, bent the LED legs out to catch on the diffuser. That gave me the mark to solder my wires and resistors, then tie that back to the circuit board.

Where are you going to apply the glue? Maybe your technique will work, I would like to understand it better. Could be helpful to noobs doing this mod down the road as well :yes:
 
  • Like
Reactions: CaptainKD
Dec 13, 2013
1,490
Osceola,Ia
Blckshdw said:
Where are you going to apply the glue? Maybe your technique will work, I would like to understand it better. Could be helpful to noobs doing this mod down the road as well :yes:

Alright I dont have pics at the moment, since the switch is back in truck right now.. but basically i bent the legs of the leds so they would sit up. placed tape on the board to protect the board from shorting out. and the leds on the tape, then put some more tape on top of leds to keep them in place. All of this is right on the board under the rubber pad. I did also get rid of the diffuser.

I was thinking about applying the glue right on top of the legs on the tape on the board to keep the legs from moving. was just hoping that the glue would stick to the tape, and then also that it would stay through the cold, and vibrations.
 

Blckshdw

Original poster
Moderator
Nov 20, 2011
10,776
Tampa Bay Area, FL
Midnyteryder02 said:
Alright I dont have pics at the moment, since the switch is back in truck right now.. but basically i bent the legs of the leds so they would sit up. placed tape on the board to protect the board from shorting out. and the leds on the tape, then put some more tape on top of leds to keep them in place. All of this is right on the board under the rubber pad. I did also get rid of the diffuser.

I was thinking about applying the glue right on top of the legs on the tape on the board to keep the legs from moving. was just hoping that the glue would stick to the tape, and then also that it would stay through the cold, and vibrations.

You're pretty much doing the same thing, with a lot more work :tongue:

If you put your LEDs and wiring on top of the rubber pad, instead of under it, you eliminate the need for the first layer of tape. The sandwich method with the diffuser keeps everything from moving, rubber and plastic has a lot of friction, and you don't have to worry about the temperature changes or vibrations causing the bonds to break, so no need for more tape and glue.

Give it a try though, and document how things go. :yes:
 

Venomhatch

Member
Aug 14, 2013
386
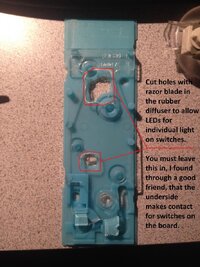
So I have decided to join the club officially and started prepping front passenger switch. It is a back up one I had lying around.

I do not have heated seats so I have it easy lol. I don't like the heated seats anyways, and don't need them in FL.

Here is what I have so far...

View attachment 32746

View attachment 32747

View attachment 32748
 

Attachments

  • securedownload (1).jpg
    securedownload (1).jpg
    94.1 KB · Views: 31
  • securedownload.jpg
    securedownload.jpg
    95.6 KB · Views: 31
  • securedownload (3).jpg
    securedownload (3).jpg
    80.8 KB · Views: 30
  • Like
Reactions: CaptainKD

Forum Statistics

Threads
23,746
Posts
642,870
Members
19,318
Latest member
soRadJad

Members Online