I may have ruined the oil pump?

Sprung Monkey

Original poster
Member
Oct 12, 2017
367
Al
I was informed that I may have ruined the oil pump,the vehicle 07 saab97x 5.3i was stuck in mud took a 3 minute spinning tires very close to redline.
notice zero oil preasure at ignition but then it rises to normal.
saabnovalvecover3 - YouTube

Notice no oil coming though the push rods while she’s running.

I believe the starter needs removing to lock the flywheel, in order to break crank bolt.

How do you Guys lock FW stick a screw driver into a hole or a actuel FW lock tool?or can the FW be locked w/ another method?

Watched a few videos 1st. man said the engine mount needs removing and engine needs to be raised.2nd video man didn’t raise engine however he says 99-06 models, mine is a 07.is there a difference .1999-2006 GM/Chevy: Starter Replacement - YouTube


Could the oil pump be not pumping normalley? Like oil preasure is a constant on or at least immediately, even though the guage reads normal after startup.
could the 3minute close to redline spinning tires ruin a oil pump?
Any tips on oil pump swap is appreciated.
 

Mike534x

Member
Apr 9, 2012
1,019
Sounds more like your engine is going to need a rebuild, start up sounds like the rod knock. Having it pushed near redline for that amount of time is bound to cause issues.

Your best bet for removing the starter is to follow the guides for the TB SS, as its near identical underneath. Maybe drain the oil and check the filter for any metal debris, if there is any. If the oil pump was bad, I'd assume there would be 0 pressure period during start up.
 
  • Like
Reactions: Sprung Monkey

Mooseman

Moderator
Dec 4, 2011
26,107
Ottawa, ON
It could also be the o-ring for the pump pickup tube. It's a fairly common failure. It would lose its prime at startup and eventually starts lumping again. The pump itself if pretty foolproof.
 

TJBaker57

Lifetime VIP Donor
Member
Aug 16, 2015
3,325
Colorado
It could also be the o-ring for the pump pickup tube. It's a fairly common failure. It would lose its prime at startup and eventually starts lumping again. The pump itself if pretty foolproof.

I would go so far as to speculate that extended high rpm operation could even hasten the failure of a comprosmised O-ring.

If the pickup screen is somewhat obstructed with debris, and the pump being a positive displacemnt device, then high rpm operation would cause a higher suction to exist between the obstructed pickup tube screen and the pump.

The normal calculations for friction losses are such that friction varies as the square of the velocity.

Doubling an rpm would therefore causes 4 times the output pressure and 4 times the pressure drop across the pickup screen.

There are pressure relief systems on the output side but no such thing for the inlet side. An old brittle O-ring just might not be able to take it.

This all being theoretical speculation of course..
 

mrrsm

Lifetime VIP Donor
Supporting Donor
Member
Oct 22, 2015
8,267
Tampa Bay Area
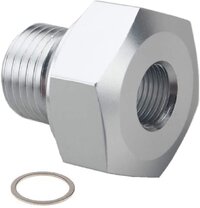
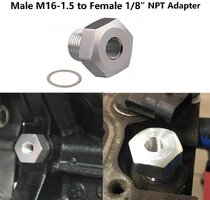
The only way to find out for certain what the True Oil Pressure is at Idle and during elevations in RPM is to remove the Oil Gallery Plug located on the Driver's Side Front Left on the LS Engine and inserting THIS M16X1.50 to 1/8" NPT Oil Line Adapter and attach an Analog Oil Pressure Gauge.

After installing this Gear... Start and Run the Motor VERY briefly and observe whether the Oil Pressure remains nominal as the RPM increases. If your Oil pressure drops off Drastically, suspect as previously suggested, you either have a Compromised Oil Pick Up Tube "O" Ring... or a Clogged Oil Pick Up Tube Screen... or BOTH.

If you are going to use a separate Oil Pressure Gauge made for the 1/8" NPT (National Pipe Thread) Oil Lines (either Coiled Copper or Nylon) then THIS is the One you want... Be careful not to over-tighten this Aluminum Adapter into the side of the Engine Block by using the included Crush Metal Washer:

https://www.amazon.com/G·PEH-Adapter-pressure-adapter-Engines/dp/B0894LDF76/ref=sr_1_3?dchild=1&keywords=LS+oil+pressure+adapter&qid=1625255320&sr=8-3

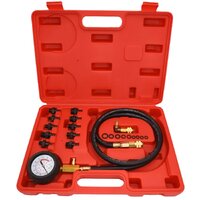
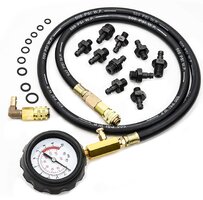
However... THIS is the Best Kit for the Price as it has many SAE AND Metric adapters included and sports a Reliable, Flexible 4 Foot Long Hose in between the Engine Block and The Oil Pressure Gauge, making it much EZR to place it near the Windscreen to obesrve the Oil Pressures from the Driver's Seated position:

Oil Pressure Tester Kit, 0-140 PSI Engine Oil Pressure Tester Gauge Tool Kit for Cars ATVs Trucks Use.

https://www.amazon.com/Pressure-Tester-0-140-Engine-Trucks/dp/B08SGNC5FT/ref=sr_1_4?crid=19S4OQYV4JAH1&dchild=1&keywords=oil+pressure+gauge+kit&qid=1625255955&sprefix=Oil+Pressure+,aps,286&sr=8-4
 

Attachments

  • OILPRESSUREADAPTER.jpg
    OILPRESSUREADAPTER.jpg
    32.9 KB · Views: 2
  • OILPRESSUREADAPTER1.jpg
    OILPRESSUREADAPTER1.jpg
    75.3 KB · Views: 2
  • OILPRESSURETESTGAUGEKIT.jpg
    OILPRESSURETESTGAUGEKIT.jpg
    116.8 KB · Views: 2
  • OILPRESSURETESTGAUGEKIT1.jpg
    OILPRESSURETESTGAUGEKIT1.jpg
    181.9 KB · Views: 2
Last edited:
  • Like
Reactions: Sprung Monkey

aaserv

Member
Dec 1, 2019
408
N of Baton Rouge, La.
Dont know if you have a screen underneath the oil pressure sensor but I once drove a 5.3L down the interstate in 1st gear to "blow it out"....what it did was blow a bunch of gunk into said screen which clogged up the screen and the oil pressure naturally read "0".......scared the crap out of me cus it was a car i was going to sell for a family member and there i was thinking id just blown the motor up within 15 minutes of picking it up!

BTW, i took the crank bolt out of my envoy with an electric impact (harbor freight) and left the belt on it to hold it. Over 200k miles on it and it came right out. Used a cheap (comes with the car) tire tool poking thru the hole in the bell housing to hold it when putting it back on. I know people say the fly wheel can be damaged doing it like that but Ive never seen it happen.... Blame me if it does.......provided you dont live within driving distance of central Louisiana...lol
 
  • Like
Reactions: Sprung Monkey

Sprung Monkey

Original poster
Member
Oct 12, 2017
367
Al
I'll be draining oil and inspecting inside the oil filter.

I've actually done the oil pickup tubes O-ring (blue new improved) on my car.
didn't have to completely drop pan but just lowered the front just enough then I tried metal fishing line around the PU tubes mount bolt for guidance and retrieval just in case I dropped it.
can I swap the oil rig on the 5.3 w/ same method?

I am suspecting some obstruction on the pickup tubes screen maybe clogged w/ sludge.
however the oil pressure builds just after startup zero pressure at initial ignition.I assume the engine must be completely removed to pull oil pan off?

thanks guys for advising. I've turned her around in the driveway so if the engine is toast I can at minium do as much as I can in preparing for engine removal. will report back w/ results.
 

mrrsm

Lifetime VIP Donor
Supporting Donor
Member
Oct 22, 2015
8,267
Tampa Bay Area
This Thread may have some additional information on how you can try to passively dissolve the Sludge Build Up down inside the Crankcase and in particular on the Oil Pick Up Tube Screen... WITHOUT having to resort to removing the Crankcase - Oil Pan. If my Engine's Life were in such Danger and I wanted definitive Help in trying to avoid a long and drawn out repair... I'd consider doing what is covered herein FIRST without the slightest hesitation:

(1) Drain the Oil and Fill the Crankcase with (2) Two Gallons of Berryman's "Chem-Dip" and leave the Engine sit for no longer than (4) Four Hours.

(2) Drain the Berryman's Chem-Dip Install a New Cheap Oil Filter and Re-Fill the Engine with Cheap, Organic Motor Oil, exchanging (1) Quart for one of AT Fluid.

(3) Start & Run the Engine at Idle for 10-15 Minutes ...while CLOSELY Observing the Analog Oil Pressure on the Analog Oil Pressure Adapted Gauge.

(4) IF the Oil Pressure drops BELOW NOMINAL...Shut Down the Motor and consider doing the Oil-Pan R&R to Replace the Gerotor Oil Pump "O" Ring Seal and Clean the Oil Pick Up Tube Screen. If ANY of the Main Bearing Caps have turned Blue or Black, this indicates that the Bearings have been Over-Heated and BURNED and either an Engine R&R or Full Motor Re-Build is likely in order.

(5) IF the Oil Pressure remains NOMINAL and improves with gradual increases in RPM... then SUCCESS!

(6) Drain the Contaminated Cheap Organic Oil and R&R the Cheap Oil Filter too for Mobil1 Oil and either a Mobil1 or a K&N Oil Filter. Change the Oil thereafter at 1,500 once and then every 3,000 Miles thereafter... Religiously.

 
Last edited:
  • Like
Reactions: Nvarela64

Sprung Monkey

Original poster
Member
Oct 12, 2017
367
Al
MRSRM I read the thread you link to. didn't know about the oil pressure release valve. would you recommend me to try the AC delco top engine cleaner w/ some new cheap walmart tech oil & filter w/ 1 quart of trans fuild? before removing front engine cover & lowering the oil pan for O ring inspection? do you have a part# for the longer oil filter I usaely use the fram.
I believe this engine (159K miles ) is 100% original no replaced parts except the lifters.

one thing I didn't mention after I did the dod lifters swap I replaced oem not the dod delete (all odd cylinders 1,3,5,7) the plan was to run some cheap oil for a few hundred miles then replace w/ mobil1.
I accidentally purchased shell rotela SP? where in small print stated was for desil engines I ran this oil for maybe 1K miles could this desil oil ruined/clogged the oil passages.
thanks for advise. I'll drain & screen current 5w-30 oil and report back.
 

mrrsm

Lifetime VIP Donor
Supporting Donor
Member
Oct 22, 2015
8,267
Tampa Bay Area
No... Very sorry for leaving any room for "Mixing Dangerous Chemical Metaphors" or having ANY ambiguity where using Different Solvents are concerned:

(1) NEVER Put any ACDelco Top Engine Cleaner into either the Fuel Tank or directly into the Motor Oil as it will Chemically Break Down ALL of the Oil Lubricity and invite the unintended destruction of the Internal Bearings. ACDelco TOP Engine Cleaner is meant strictly for Dissolving Baked On Carbon Deposits in the Combustion Chamber and on the Piston Tops and within the Lands and Grooves on trapped, impacted Piston Compression Rings. The Motor Oil should always be changed after performing any ACDelco TEC Cleaning Procedures for the very same reasons. These actions should always be taken when working on INSTALLED MOTORS.

(2) I used the ACDelco TOP Engine Cleaner in an unusual way... on a COMPLETELY STRIPPED DOWN MOTOR that afforded me uncommon access to every Single Square Inch of the Engine Interior Surfaces. But as you can see from the linked images in that other Thread, at the time, there were NO In-Dwelling Front and Rear PTFE Oil Seals in need of protection or isolation and NO Exposure possible to the Gerotor Oil Pump PTFE "O" Ring either since the Front Timing Cover was removed from the Engine Block. These actions should only be taken when working on DISASSEMBLED MOTORS on the Engine Stand.

(3) Watch THIS Video as it covers just exactly how truly effective using Berryman's Chem-Dip REALLY is when passively soaking ANY Automotive Component in this stuff for around (4) Four Hours. It is AMAZING Stuff. If a Four Hour Soak of Two Gallons of Berryman's Chem-Dip cannot dissolve virtually ALL of the Oil Pick Up Tube Screen Mung, Dirt, Gas Gum and Sludge... NOTHING Will! Download and Play this Video a few times on SLO-MO to see up close and personal how this stuff works:


One Last Thing....

Regarding using Rotella... If anything, that Stuff would have given you a *Bump* in Oil Pressure... and the only real problem with using Higher Viscosity Diesel Motor Oil is that the CPAS demands having the 5W-30 Motor Oil as this is what the GM Engineers called for in the Atlas Engine Series. Besides that, I don't think that the Extra ZDDP (Zinc-Di-Dithio-Phosphate) Metal Hardening Additive in Rotella would have been inside your Engine long enough at around 1,000 Miles to coat the O2 Sensors and the Rare Earth Metal Impregnated Ceramic Honey-Combs deep inside of the CAT enough to cause them to fail. At least not yet.

It's just this simple... If the Heavy Gauge Metal Screen in the bottom of your Crank Case Oil Pick Up Tube is covered with enough 'Mung' not to be able to pass Oil through it... then the Gerotor Oil Pump may cavitate and lose its required Vacuum with no ability after that to draw enough Motor Oil up and through the Oil Pump. If the Oil Seal is GOOD and the Gerotor Oil Pump is undamaged (?) AND that "SCREEN Gets CLEAN"... Your Oil Pressure should return to Normal. But If ANY of those Three Conditions prevail... Then the Oil pressure will prove insufficient to protect the Motor and the Crankcase must come off for further investigation.
 
Last edited:

mrrsm

Lifetime VIP Donor
Supporting Donor
Member
Oct 22, 2015
8,267
Tampa Bay Area
This deserves a separate Post in response as well instead of just editing my last one...

Please... For the Love of God... STOP using FRAM Oil Filters:


Sprung Monkey

Original poster
Member
Oct 12, 2017
367
Al
thanks for clarifying how you used the AC delco cleaner.


as far as top engine cleaners I use the seafoam every 3rd oil change (just before the next oil change)w/ warm engine slowely pour half the 16oz can into the brake booster tube and hear the sizzle, then pour the remaining 8oz into fuel tank w/ about 5 gallons of fuel and drive it hard for about 40-50 miles then change oil.first time I observed blackish smoke from exhaust, now just observe greyish smoke. never seafoamed the saab this is a new vehical to me.

I've never tryed seafoam in the oil.

yes all what you say about clogged screen/broken Oring seal or damaged pump itself makes sense to me.
remember no oiling though the odd side push rods I bet if I pulled the even side valve cover there wouldn't be oiling there either.

1.Are you saying I can drain all the oil and fill crankcase w/ couple quarts (enough to cover oil pickup tubes lower end of berrymans cleaner
For 4 hours to clean the oil pickup tubes screen?

so it is possiable to clean the oil pickup tubes screen w/ engine still in vehical?

2.or must the engine be removed to completely drop oil pan to gain access to oil pick up tube.I'm thinking yes because the berrymans is so harsh it will eat oil gaskets?
never heard the term mung I'm assumming it's nastier than sludge.

edit I'm suspecting a clogged screen and the pump is fine because it doe's build up to normal presure.
plan to drain the oil tomorrow. thanks again for advise.
 

mrrsm

Lifetime VIP Donor
Supporting Donor
Member
Oct 22, 2015
8,267
Tampa Bay Area
Yes... Precisely. Using Two, Full, LARGE (almost a Gallon) Size Cans of Berryman's Chem-Dip should do the trick...

Berryman's IS Harsh... on anything that contains Carbon but it is NOT harmful to PTFE Seals... It's the ACDelco Top Engine Cleaner that you have to worry about. And besides... if you transpose the Oil in your Crankcase for 2 Gallons of Berryman's Chem-Dip and Do NOT Start the Engine... the stuff will do its job down inside the Oil Pan and NOT come into Direct Contact with either the Front or Rear Crankshaft Oil Seals... unless you are parked near Pike's Peak on an extreme incline in your Driveway.

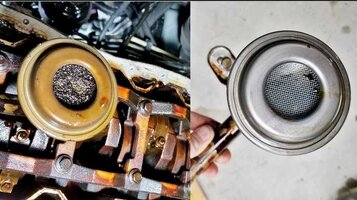
The attached image shows the "Before and After" results of an ACTUAL Passive Soaking of the 'Business End' of a GM 4.2L Vortec 4200 Motor Oil Pick Up Tube... in Berryman's Chem-Dip... (NO SCRUBBING REQUIRED).

And just so you know... when items like GM LM7 5.3L Roller Rockers are soaked in Berryman's for (4) Hours, I've subsequently drained off the excess BCD into another container so I could Re-Use the Stuff. Then I just hand washed off those parts in hot water in the Kitchen Sink... without wearing Nitrile Shop Gloves and I suffered no ill effects.

Naturally, you don't want to use Hot Water Down Inside of the Crankcase... Instead, use the "Cheap Oil Plus One AT Fluid & a Cheap Oil Filter" Oil Change after IDLING the Motor ONLY for 10-15 Minutes. That should follow on immediately after this Berryman's Treatment and will suffice. Then, replace ALL of THAT Stuff with Mobil1 5W-30 Motor Oil and a Mobil1 Oil Filter as the Final Steps.

Of course, I would not suggest leaving ANY Chemical on your skin for very long. Also, unlike the dangers present from inhaling too much ACDelco TEC Fumes. Berryman's has a VERY Low Level of VOCs (Volatile Organic Compounds).
 

Attachments

  • OILPICKUPTUBEB4NAFTER.jpg
    OILPICKUPTUBEB4NAFTER.jpg
    38.6 KB · Views: 12
Last edited:

Sprung Monkey

Original poster
Member
Oct 12, 2017
367
Al
Drained oil didn’t see any chunks of metal same for the filter. Did see the usale metal dust on the drain plug.

Is this the berryman cleaner you suggest?

Amazon.com: Berryman 0996-ARM B-9 Chem Dip Parts Cleaner with Basket and Armlock, 3/4-Gallon Pail: Automotive

Dropping the oil pan w/ the front half shafts appears to be a huge job probably more than I can do in the driveway w/ regular hand tools.
didn't GM start using the new improved blue oil pickup tubes o-ring at some point in time?

edit: I have heard of ppl pouring auto trans fuild into 2 stroke out board engines that have been unstarted for extended periods (like years) of time I assume it lubes better than plain oil. thanks again for advise.
 

mrrsm

Lifetime VIP Donor
Supporting Donor
Member
Oct 22, 2015
8,267
Tampa Bay Area
Yes... THAT is the right stuff... and while it might seem a bit expensive at the outset... if THIS 'solution' turns out to solve the Low Oil Pressure Problem...it will be Money Well Spent. My suggestion though also extends to recommending dialing down looking all over the map for any additional means to accomplish this goal after listening to what amounts to anecdotal suggestions from other Internet Sources ...without showing any proof that their ideas will succeed.

Follow the Steps listed above and do not deviate by mixing and matching anything else involving Basic Chemistry or Tactics at this point. The only reason to attempt this approach is that the alternative will be Time Consuming, Expensive and perhaps, possibly Way out of your Personal Mechanic's Wheel House of Repair Experience. Work the Problem. You now have all of the facts at hand... More than enough to logically proceed from this point on. If this Action does NOT prove out... No Harm Done... You can still "Crack Open Nuts & Bolts" later on as the sad but necessary alternative. But if it DOES Work... Well... Smiles all around... Yes?
 
  • Like
Reactions: Tankcruiser

Sprung Monkey

Original poster
Member
Oct 12, 2017
367
Al
Are you suggesting the 2 gallons of cleaner and not starting the engine because of the current none oiling though push rods?

And not suggesting the engine oil flush before next oil change because this stuff requires the engine to be running? Which would create even more damage running engine for 10-15 minutes.

I’ve never flushed the oil sys. So I don’t know. Thanks again.
 

Sprung Monkey

Original poster
Member
Oct 12, 2017
367
Al
also will 2 gallons fill the engine & clean the push rods and other valve train parts like rocker/valves? I think the knocking sound is a broken valve spring.
 

mrrsm

Lifetime VIP Donor
Supporting Donor
Member
Oct 22, 2015
8,267
Tampa Bay Area
Forget the "Line Of Succession" that the Oil Flow is supposed to take AFTER it works its way up PAST the Gerotor Oil Pump. Your situation is FUNDAMENTAL. The whole Oiling Cycle begins and ends with having an AMPLE SUPPLY. No Oil Being Picked Up? No Oil Pressure. The Engine Does NOT need to be and Should NOT be RUNNING after the Crankcase is filled with the Berryman's Chem-Dip in Quantity to begin dissoving the Obstructions clogging up the Oil Pick Up Tube Screen.

Forget about what the present conditions of the Push Rods are until AFTER you have managed to Re-Create a Working Oil Flow Path. THIS is what we are hoping will happen AFTER the Berryman's Chem-Dip has had ample time to Chemically Dissolve the BLOCKAGE. IF this Technique Works...AND... IF the Oil Pick Up Tube-To-Gerotor Oil Pump "O" Ring Seal is Sound... then Oil Pressure should become restored AFTER A CHEAP OIL AND FILTER CHANGE WHILE IDLING FOR 10-15 MINUTES..

If the Gas Gum, Dirty Mung and Oil By-Product Varnish have obstructed the passing of the Motor Oil enough to virtually Block that Oil Pick Up Tube Screen... attempting an Engine Flush with either Off-The-Shelf Engine Oil Flush Products ...or by using any of the "Mother's Home Brew'' Internet Chemistry I've been trying to dissuade you from trying out ...will NOT work in your present situation.

This product requires NO AGITATION or MANUAL SCRUBBING to work its Magic. Just follow the Precise Instructions for Draining Out the Old Oil and Fill the Crankcase with Berryman's Chem-Dip to a level sufficient to completely submerge the Oil Pick Up Tube Screen Port, Put your Ignition Keys in your Pocket... and walk away from your Vehicle for no longer than FOUR HOURS.

LEAVE AN OLD OR CHEAP NEW OIL FILTER IN THE MOTOR DURING THE FOUR HOUR BERRYMAN'S CHEM-DIP SOAK JUST TO KEEP OUT THE DIRT AND DUST NEARBY.... AND DO NOT START AND RUN THIS ENGINE WHILE IT IS FILLED WITH BERRYMAN'S CHEM-DIP... PERIOD!
 
Last edited:
  • Like
Reactions: JerryIrons

Sprung Monkey

Original poster
Member
Oct 12, 2017
367
Al
when you say "Fill the Crankcase with Berryman's Chem-Dip to a level sufficient to completely submerge the Oil Pick Up Tube Screen Port
will half a gallon of berrymans be enough?
how do you suggest getting the berrymans in engine?
I was thinking of a plastic fuel line w/ a primer bulb and pump it in.
also will regular household rubber gloves protect my skin when I handle the berrymans?

additionally I believe the binging sound is a broken valve spring at is base (lower part) caused by the lack of oiling.
thanks.
 

mrrsm

Lifetime VIP Donor
Supporting Donor
Member
Oct 22, 2015
8,267
Tampa Bay Area
I'm starting to get "Writer's Cramp" covering this Same Topic in TWO, contemporary and essentially Identical Threads... So I'm going to demure to listing THIS Thread Link and put you two together as counterparts while dealing with this same issue at this very same moment:

 
  • Like
Reactions: JerryIrons

Sprung Monkey

Original poster
Member
Oct 12, 2017
367
Al
Again didn’t read the intire thread read upto end of page 1 about 40 posts.

I believe my oil pressure problem is different.

Zero oil pressure at ignition but then it actuelly builds to normal.
 

Mooseman

Moderator
Dec 4, 2011
26,107
Ottawa, ON
I think it's your o-ring, a common problem on LS engines. It makes sense that would be the problem. When you shut off the engine, because of the lost seal, you lose your pump prime and it makes it harder to re-prime it because it's also sucking air.
 
  • Like
Reactions: TJBaker57

Sprung Monkey

Original poster
Member
Oct 12, 2017
367
Al
must be sucking alot of air because there's no oil though the push rods when the pressure builds shouldn't there be a little (less than normal) oiling? guess it's time to
learn how to dissassemble the front drive shafts.
can I get away w/ the thicker oil as you suggested in the other thread? 20w-50? or when this oil heats it thins out. do you think the binging sound that speeds up is top end and not rod knock?
how much speciality tools will be required to remove the front drive shafts, I recall a 35mm socket is needed for hubs.
thanks.
 

Mooseman

Moderator
Dec 4, 2011
26,107
Ottawa, ON
Re-reading some of the posts, I saw that you already replaced the o-ring. Is it possible you may have used the wrong one? Most kits come with two with instructions on which to use as there were two styles of pickup tube ends. When it does build oil pressure, what pressure are you getting? Have you verified with an actual oil pressure test gauge, not relying on the one in the truck?
 

Sprung Monkey

Original poster
Member
Oct 12, 2017
367
Al
Re-reading some of the posts, I saw that you already replaced the o-ring. Is it possible you may have used the wrong one? Most kits come with two with instructions on which to use as there were two styles of pickup tube ends. When it does build oil pressure, what pressure are you getting? Have you verified with an actual oil pressure test gauge, not relying on the one in the truck?
I've done the oil pump pickup tubes O-ring on the car W/LS1 engine so I'm familiar w/ it's procedure, during the cam swap of car, so negatory on O-ring for the Saab.I believe the Saab is completely orginal except for the lifters I recently swapped.

2nd negatory on testing pressure (as Mrrsm suggests and links tool amazon post #5) I assume the smart thing to do at this point is obtain this mechanical real guage and test pressure.
where exactly is the port to attach the guages tube?
maybe I should take a better video of the no oiling though push rods previous videos where kindof crummie w/ bad lighting maybe I'm missing the oiling is like a little squirt or a constant pissing of oil (bad ormalagy) ? I've basically minimized the engine running time.
off topic.
the world will change as we know it tonight.at 8pm cst. but I'll still have to fix this Saab.
thanks
 

mrrsm

Lifetime VIP Donor
Supporting Donor
Member
Oct 22, 2015
8,267
Tampa Bay Area
Just an FYI... But when people keep repeating themselves by asking the very same questions about previously posted and unheeded suggestions... it makes me hope the Mods will reach for THIS Stuff:
 

Attachments

  • TROLLSPRAY.jpeg
    TROLLSPRAY.jpeg
    18.2 KB · Views: 1
Last edited:

Mooseman

Moderator
Dec 4, 2011
26,107
Ottawa, ON
Agreed and it's not the first time we keep suggesting things to do and you go in a different direction. A lot of experience here and suggestions being put out there are sound and required for proper diagnosis. The info has already been posted in post #5.
 

Mektek

Member
May 2, 2017
661
FL
The new Chem Dip is not what it used to be.
Component CAS RN Weight
Water 7732-18-5 40-55%
Heterocyclic Amine Derivatives mixture 15-20%
2-(Butoxyethoxy) ethanol 112-34-5 8-15%
2-Butoxyethanol 111-76-2 8-10%

Very similar to concentrated carpet cleaning detergent:jawdrop2:
That's why some suggest soaking in "Simply Awesome" cleaner.
I'm leery of pouring anything water based into an in-service engine.

The older stuff had several solvents in it - not compliant with new California environmental regulations.

I did the soak with the old formula and found no difference in oil pressure afterward.
One can should be enough to submerge the pickup tube.
I saved the old oil and used it to rinse out the oil pan after draining the Chem Dip.
No need to waste new oil that you're just going to discard.
 
  • Like
Reactions: Sprung Monkey

Sprung Monkey

Original poster
Member
Oct 12, 2017
367
Al
I admit some of my recent posts sounded the same however they where infact different.

I’ve gotten some very usefull infor. Hope mrrsm isn’t mad at me for questioning the chemdip inside engine it did make sense at same time sounded weird.

My next thread will be asking about removing the front half shalfs to access the oil pan removal.
.
One can should be enough to submerge the pickup tube.
I saved the old oil and used it to rinse out the oil pan after draining the Chem Dip.
No need to waste new oil that you're just going to discard.

thanks for the response I actuelly asked the suggester these ? a few times.
the soak doe's make sense (will keep this advise for future reference) however I think mooseman opinon ruined oil pu tube o-ring, make more sense.not to criticize the soak advice.

if engine needs replacing seams the half shafts need removing.will be studying how to do.

Last ?s for right now

1.engine still in vehicle W/ the half shafts removed can the oil pan be lowered enough to swap a new oil pump pickup tubes o-ring and will it be the thicker blue one on my 07 model? Or doe’s the engine need complete removal to acess this
o- ring?
2.engine still in vehicle (maybe loosen the engine mounts an elevate engine) can the oil pan be removed then swapped for a none AWD pan and ditch the front drive stuff?if yes which donor vehicle to get pan maybe a 1500 van or truck or even a F-bodys.
thanks and sorry for being a noob. this is a new vehicle to me so I'm not farminiarl w/ it.
 

Mooseman

Moderator
Dec 4, 2011
26,107
Ottawa, ON
I have replaced the oil pump twice on my Saab 5.3 and once on my Avalanche 6.0 without dropping the pan. This is basically the method I used except for the moving of the holding tab that he was able to swing around whereas on ours, they are welded. I used another method of holding the pickup to the pump as per the linked post.


If you're doing it this way, I would replace the oil pump while you're there in case it's the problem. Be sure to go with a High Volume and pressure type. I used a Melling M365HV.
 

Sprung Monkey

Original poster
Member
Oct 12, 2017
367
Al
Excellent info on swapping oil pump w/out lowering oil pan.

Did you use a gearwrench w/ flex head to remove the oil pump pickup tubes mount bolt?

Looks tight but doable.

Did you use a feeler gauge to center the new oil pump? If yes what thickness?

I’ll be working on removing the starter if the moschetoes aren’t to bad.

What type of harmonic balancer puller do you use?last time I rented one they gave me a universal that had to go back for a GM specific.

Did you use a longer crank bolt to press the balancer back on?

Thanks this is great news knowing the oil pan doesn’t require dropping.
 

Sprung Monkey

Original poster
Member
Oct 12, 2017
367
Al
Did you use a gearwrench w/ flex head to remove the oil pump pickup tubes mount bolt? appears to be 8mm?
 

Mooseman

Moderator
Dec 4, 2011
26,107
Ottawa, ON
Did you use a gearwrench w/ flex head to remove the oil pump pickup tubes mount bolt?
Nope, just a regular wrench to do the majority of it then forceps like in the video. If you drop it, no worries, you can fish it out of the pan with a magnet.

Did you use a feeler gauge to center the new oil pump? If yes what thickness?
Nope. I think that's just BS. Nowhere in any manual does it say to do that except for those anal enough to do it, like blueprinting. After mounting the pump finger tight, I spun the engine a couple of revolutions by hand and tightened the bolts.

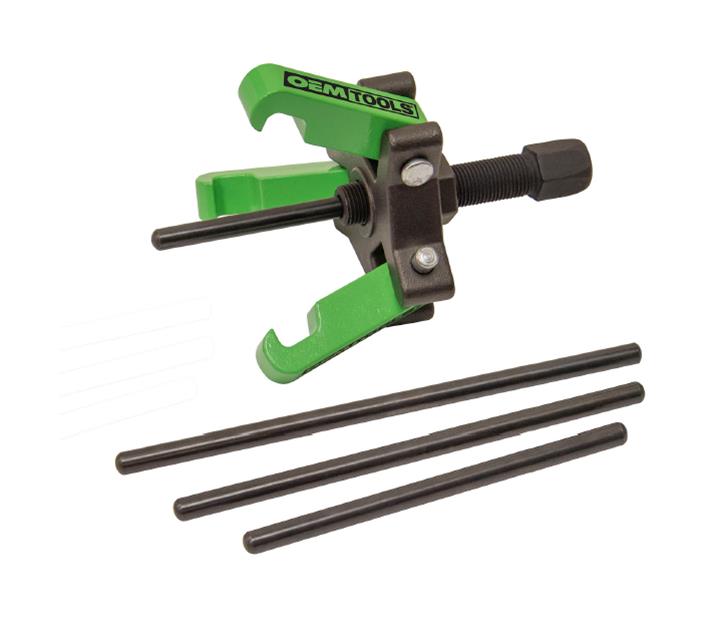
What type of harmonic balancer puller do you use?last time I rented one they gave me a universal that had to go back for a GM specific.
One like this:

oes-25090_xl.jpg


Did you use a longer crank bolt to press the balancer back on?
Nope. Used an installer like this:

71+Yrj7FOoL._AC_SS450_.jpg

Did you use a gearwrench w/ flex head to remove the oil pump pickup tubes mount bolt? appears to be 8mm?
See above. It's 10mm.
 

Sprung Monkey

Original poster
Member
Oct 12, 2017
367
Al
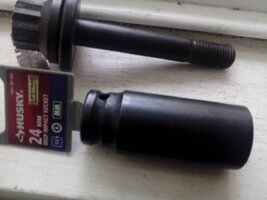
I picked up a 24mm 6 point deep well socket to break the crank bolt, it does say impact on the lable.I'll be breaking& reattaching w/ a 1/2 breaker on a 3' cheater steel tube.

think I'd prefer a flywheel lock tool which one do you use, I'm thinking not to use a big screw driver and ruin the wheel plus I don't currently have an assistant to hold the screwdriver.

Found the longer balancer bolt I used to press the balancer back on for the car.

Can’t remember what tool I used w/ the balancer bolt, 24 is to small.

When I rent the balancer pulley puller tool, is a there usealley another tool

To fit the balancer bolt?

Is your tool a threaded rod? Or a actuele tool?

when I did the cars oil pump pickup oring I used needle nosed pliers to reinstall bolt I like the foreceps idea what size is this tool. edit: I plan to reuse the same bolt location and not grind like in the video.

Thanks for advise
 

Attachments

  • crank removal tools.jpg
    crank removal tools.jpg
    60.2 KB · Views: 2
Last edited:

Mooseman

Moderator
Dec 4, 2011
26,107
Ottawa, ON
Hold the flywheel by removing a rubber plug in the bell housing and putting a socket through it onto a flexwheel bolt.
This is a V8. No such access plug on these. Most methods involve removing the starter.
 

Sprung Monkey

Original poster
Member
Oct 12, 2017
367
Al
I was considering this
Amazon.com: Engine Flywheel Holding Locking Tool for LS 1 2 3 LSX: Automotive
still waiting for response about the longer crank bolt pressing the balancer back on.
edit: just saw the balancer presson tool at amazon would prefer not to spent $20. and use what I have maybe a 26mm 12 point or larger will fit it?

edit decided agaist the chemtool dip since it's a water based solution. the folks at berryman are suggesting there fuel injector cleaner run untill oil reaches operating temp. then repeat if necessary sounds kindof wierd to me fuel injector cleaner in engine oil to clean a oil pump pickup tube.proballey a waste of time & effort.
thanks
 
Last edited:

Forum Statistics

Threads
23,722
Posts
642,618
Members
19,255
Latest member
twkd2

Members Online