How To: Replace Passenger CV Shaft with pictures

Regulator

Original poster
Member
Nov 20, 2011
2,496
I started with the passenger side:

Here are my new parts. 2 - Cardone CV Shafts; 36mm axle socket (35mm also needed if you're removing OEM shafts); Synthetic packing grease; 2 qts Mobile 1 75r90 (not used for CV chaft change - just for the differential)

P8250118.jpg


1) set your emergency brake and chalk the rear wheels
2) loosen front lug nuts
3) lift the front end and support the truck on jack stands
4) remove front tires

P8250120.jpg


5) remove strut assembly
..... a) loosen the two upper nuts (15mm) but do not remove them yet
..... b) loosen the lower nut (15/16ths) back the nut off until there are no longer any threads exposed
..... c) lap a pickle fork into the opening between the lower shock mount and the control arm as pictured
..... d) using a heavy hammer hit the end of the tapered post (make sure the nut is to the end of the threads and your hitting the nut, otherwise you run the risk of fowling the threads on the end of the post.) It only take a few decent smacks to get it to pop free
..... e) remove all three nuts and remove assembly

P8250122.jpg


6) Remove the brake caliper and bracket in one piece (18mm)

P8250123.jpg


7) remove the brake line bracket (10mm)

P8250125.jpg


8) set the brake caliper assembly out of the way (I had enough room due to the body lift to set it on the frame, you may have to hang it up out of the way. Be careful not to strain the brake line.)

P8250126.jpg


9) remove the wheel spacers (if applicable) and the rotors

P8250127.jpg


10) remove the speed/ABS sensor (5mm allen wrench) unclip and move it out of the way

P8250128.jpg


11) remove drive axle nut (35mm stock / 36mm aftermarket) use a prybar to hold the hub stationary

P8250129.jpg


12) remove the three hub assembly bolts (normally you will have to work around the CV Shaft, however mine was broken and has previously been removed)

P8250130.jpg


13) remove the axle from the front axle 4WD disconnect, the easiest method for me was to get a pickle fork on the bottom side of the inner CV housing and give it a couple of good hits with a small sledge. There is a spring clip on the end of the CV shaft that has to compress for it to come loose. This step is going to be entirely trial and error for you until the shaft pops free.

DSC_1817.jpg


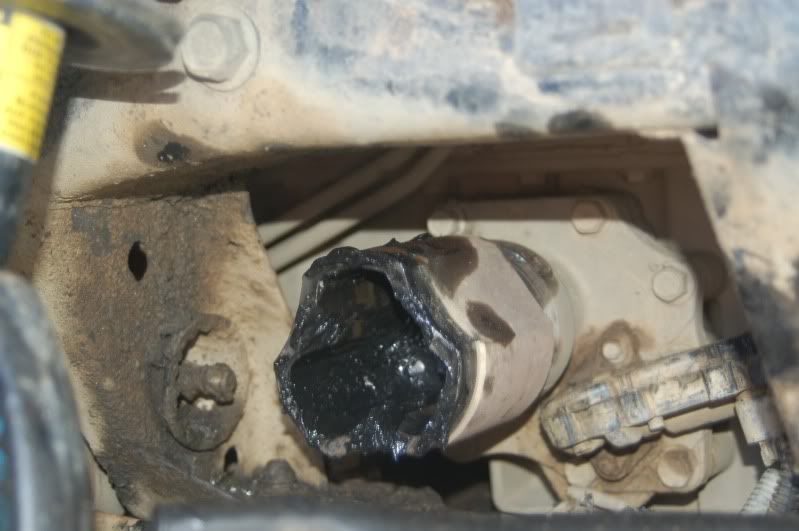
this is a good opportunity to clean out the old the old grease in the front axle 4WD disconnect. Remove the front axle 4WD disconnect from the engine block (4 - 15mm bolts)

P8250131.jpg


once removed from the vehicle remove the remainder of the bolts and you should be able to pry it open.

P8250132.jpg


14) replace front axle 4WD disconnect to the engine block

15) install new CV Shaft and re-install everything in reverse
 

ItsOnVoy

Member
Nov 21, 2011
2,401
Nice write up man!! This should help out for sure in the near future :yes:
 

HARDTRAILZ

Moderator
Nov 18, 2011
49,665
Glad you got this here. I get to do my pass side shortly since the boot is torn.
 

fishsticks

Member
Nov 21, 2011
433
Nice How To. :thumbsup:

FWIW, you can use the 36mm socket to get the 35mm nut off. No need to buy both.
 

Ghoster

Lifetime VIP Donor
Member
Nov 18, 2011
1,444
I made m first attempt at using the automatic article creator on this thread. Click on articles and check it out.:cool:
 

Regulator

Original poster
Member
Nov 20, 2011
2,496
fishsticks said:
Nice How To. :thumbsup:

FWIW, you can use the 36mm socket to get the 35mm nut off. No need to buy both.

Yup, I used the 36mm for both, just putting the correct size out there so that if the user messes something up they can't come back screaming at me that I didn't spoon feed the the correct information to them. :yes:
 

dcrews

Member
Dec 4, 2011
4
FYI- a couple rounds of duct tape on the old nut will take up the 1mm slack if you're that concerned.
 

HARDTRAILZ

Moderator
Nov 18, 2011
49,665
I use a 36 all the time as well.
 

Mark20

Member
Dec 6, 2011
1,630
Good information! Maybe a bit more than I want to tackle at home though.
 

Regulator

Original poster
Member
Nov 20, 2011
2,496
Scooter Scott said:
You do??? I remember either me or regulator doing it the last couple times :tongue:

I am not sure if he has ever actually taken it off himself. He just keeps getting us there with the promise of food and alcohol!
 

HARDTRAILZ

Moderator
Nov 18, 2011
49,665
It would be great if those were the only times they were out, but I have got to do them plenty. I do have another needing replaced if you want food and alcohol
 

rmsg0040

Member
Dec 10, 2011
285
When I did my passenger, I did it a different way and skipped a lot of those steps.


Very detailed write up. Good for ppl to see and get an idea of hows its done.
 

v7guy

Member
Dec 4, 2011
298
Yeah, the process is roughly the same except there is no disconnect and the axle should come out easier because its splines get splashed with oil from the diff.
You dont have to remove the shock but it certaintly gives you more room to work in.
 

VILeninDM

Member
Jan 8, 2012
7
So I'm viewing this thread on GMTNation but all the pictures are still black and telling me to visit GMTNation. Once people switch over, can we give them back the pictures?

btw, nice touch :smile:
 

Jman423

Administrator
Mar 24, 2014
1,878
United States
VILeninDM said:
So I'm viewing this thread on GMTNation but all the pictures are still black and telling me to visit GMTNation. Once people switch over, can we give them back the pictures?

btw, nice touch :smile:

We are working that out. You can always see the official article here: GMTNation - How To: Replace Passenger CV Shaft with pictures

It only has one generic picture that is missing, and I am working with the author to get that fixed.

Thanks!
 

The_Roadie

Lifetime VIP Donor
Member
Nov 19, 2011
9,957
Portland, OR
Looks like regulator is editing the original picture links to make them less attractive to sites that might steal them. And then he or jman has to get around to editing the article and post here with new links.
 

Regulator

Original poster
Member
Nov 20, 2011
2,496
I have edited the article to the new location for the pictures. I am unable to edit the original post here, as well as my original post on offroadtb.com so we are stuck with my "edited for Trailvoy" photos until a moderator can make the changes. As a side note, I did get an interesting mail from an admin over on Trailvoy today.

Originally Posted by TrailblazrI6
This is simply not going to be tolerated. You know the resultant consequence.

"There say there is one thing about burned bridges - the hardest thing in life is figuring out which one to cross and which to burn."

-Trailblazri6

My Reply:

You are exactly correct, actions always deserve consequences.

My actions were the direct consequence of Vertical Scope issuing a DMCA takedown notice to GMT Nation claiming that I copied information that did not belong to me and rather to a dead account that was used to re-post the how to under their name, even though they still used links to the pictures in my photobucket account.

I was perfectly fine with leaving harmoniously and not causing issues. However, when information that I have provided willingly and freely is blatantly stolen from me then I take some offense to that. I have no interest in sharing the information through this site anymore and since it wouldn't be taken down, I made the appropriate edits.

I understand that you are just doing your job, and I have no ill will against you. My issues are with Vertical Scope and their poor effort in managing this site.
 

Sparky

Member
Dec 4, 2011
12,927
You were a little nicer than I would have been. I probably would have bluntly said, "MY pics, I can do what I want with them, so I decided to pull them myself since you wouldn't."

By the way, I'm replacing my driver side CV shaft and hub tomorrow, so I'm curious - why did you remove the shock and spring? just for more room to work?
 

davenay67

Member
Jan 16, 2012
217
Replacement of both driver and passenger CV half shafts will be a springtime job when the weather is cinsiderably warmer than it is right now. They are both leaking grease but function with no noise or sloppiness n the tripots.

I have read plenty of how-to guides, inclusing this nice write-up, but none of them confirm an assumption that I have. Would I be correct in thinking that the spring clip on the inner end of the half shaft stays on the shaft when the shaft is drifted out of the differential (driver side) / 4WD Disconnect (passenger side)..??

Thanks..!!

Dave. :smile:
 

Regulator

Original poster
Member
Nov 20, 2011
2,496
Sparky said:
You were a little nicer than I would have been. I probably would have bluntly said, "MY pics, I can do what I want with them, so I decided to pull them myself since you wouldn't."

By the way, I'm replacing my driver side CV shaft and hub tomorrow, so I'm curious - why did you remove the shock and spring? just for more room to work?

Sorry I missed this. Yes, I removed the strut assembly to provide more room to work. It is very tight to remove the half shaft otherwise.

davenay67 said:
Replacement of both driver and passenger CV half shafts will be a springtime job when the weather is cinsiderably warmer than it is right now. They are both leaking grease but function with no noise or sloppiness n the tripots.

I have read plenty of how-to guides, inclusing this nice write-up, but none of them confirm an assumption that I have. Would I be correct in thinking that the spring clip on the inner end of the half shaft stays on the shaft when the shaft is drifted out of the differential (driver side) / 4WD Disconnect (passenger side)..??

Thanks..!!

Dave. :smile:

Yes, the spring clips will remain on the shaft when it is removed.
 

Hypnotoad

Member
Dec 5, 2011
1,584
FYI, I finally got it out. For anyone else having trouble getting the driver side out, mine took a whole lot of prying, pounding, and cussing. It finally let go and made a huge "pop" sound. I thought I had broke something at first.
 

Forum Statistics

Threads
23,336
Posts
638,054
Members
18,541
Latest member
33chevyrod

Members Online