Mooseman
Moderator
Could just be semantics. The sensors do send "information" or data to the PCM albeit electrically.
Could just be semantics. The sensors do send "information" or data to the PCM albeit electrically.
Yeah. I was thinking of that afterwards. I'm getting better at learning the terminology to better follow along what's being taught to me but it takes me that extra little bit sometimes.Could just be semantics. The sensors do send "information" or data to the PCM albeit electrically.
The difference is analog vs. digital. Sensor data is analog, typically voltage, whereas serial data is high/low (1/0) and is structured (header, sender, receiver, data bytes, checksum) per a specific protocol (Class 2 Serial, CanBus). Sensor lines feed back to specific pins on the PCM (e.g. oil pressure, fuel level, etc.) whereas data signals share a common data bus.
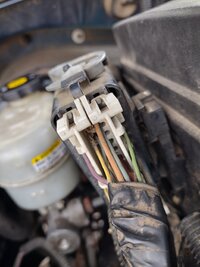
In the harness right next to the fuse box under the hood, there is a highly suspicious yellow wire that seems to be crusted in a block of dirt that was cleaned off with electrical cleaner but it doesn't look right. I'm in the process of going through the diagrams you guys supplied to see what that is responsible for. I'm still learning about when a bad wire means you need a brand new harness versus if it's possible to reset that wire in the connection which is my fear that you can't pin it again. I'm not sure how to explain that correctly but if it can't be pulled out stripped and set again, then maybe I have a continuous problem. I have attached a photo.
there is a highly suspicious yellow wire that seems to be crusted in a block of dirt

They had me disconnect the negative battery terminal, clamp the test light to the battery and touch the probe to the bolted connector (side post battery). He showed me how my light stayed on and told me to go home and remove fuses until I found the one that made the light go out

I actually changed my ignition switch in hopes that would help some of my initial concerns, but it didn't. In any case, I loved what I learned while doing it. I also have speaker problems. I hope you figure it out for her! I'm kind of a baby and was really disappointed that I didn't have rear speakers working. At this point, yes I am thinking I'm going to junk this out to someone which sucks because when all the pieces fall into place, I cannot believe how incredibly smooth the ride is, smooth the transmission is, how much power is still in the acceleration after 20 years, and overall performance is so so nice and then out of nowhere, I feel like I'm driving a jalopy lolThis sucks for you. I/my girl, have the same vehicle and other than my plans to replace the ignition switch, the only problems I have are the speakers. She can live indefinitely without the three speakers working and just listening to one. But I want to make her happy. Sorry to hear about all those problems. Are you saying you are gonna cut bait and get a different vehicle?
She's lucky to have you! My husband is a great man, but an auto mechanic he is not LOLIt was this 2002 with 70k miles on it or a 2006 Toyota Highlander with 185k miles on it with the V6 engine. I used to own a 2002 Tahoe LT. This TB is just a smaller, baser version of that 2002 Tahoe. As I go along I will post here what happens. I have already done a Genuine GM water pump and Genuine GM thermostat with the water outlet housing. I have installed all new Weather Tech mats, front, second row and cargo area. New/used driver's door armrest/pull handle and driver's door check strap. It has the 3.73 gear in it with the G80 rear diff locker. I wish I had that gear instead of the 3.42 I have in my 05 Z71 but I have a BlackBear tune on it and it runs great. Anyway, she wanted this instead of the Highlander and I will get it up to my standards. Anyone who has seen my build thread at the Tahoe/Yukon forum, knows my standards. @TollKeeper is familiar.
Anyway, I wish you better luck and I do have to ask another question, why did you get rid of the Duramax? I used to own an extended cab 4x4 HD2500 with a Duramax and Allison, was an 02. Loved that truck.
I'll hang tight. I took the fuse box apart today as far as removing the top with the clips, inspected everywhere a fuse would slide in and grab and saw no evidence of any damage. I didn't even see a hint of discoloration from overheating actually. I opened each plastic square underneath after freeing them from the bolts and cleaned some dust and a dead bug out LOL I looked at all wiring going in on those 3 outer edge connectors (two on one end, one on the other) which also grabbed firmly. I know Wayne's video on YouTube showed an additional layer that had all the copper wire routing that can require welding (which is what I think you are asking others about in your post) but I did not go further than taking my top layer off and taking out the boxes underneath and inspecting. To be honest, I eventually had so much torn apart in there as the day went on, following wires, cleaning connectors, and double checking everything at the PCM too that I got nervous about going much further lol. I was relieved that it even started again haha.The thought just occurred to me, so I figured I'd logon and see if anyone can confirm from memory...
Does the underhood fuse block on the 360 series have 'wire tracers' connecting everything together on the underside, like the full-size trucks do? I know the ones on the FS 99-06 (800s) are known to have those wires degrade / corrode / break / etc.
If they're similar, it would be worth checking out. I know the underhood box isn't terribly difficult to remove from the FS trucks (of course, there's more room everywhere, too).
It would be a bit of a relief to find out that the issues OP is having could be traced back to a common / central source.
OP -- hang tight until someone confirms (or I find the info, which won't be until tmrw). Thx.


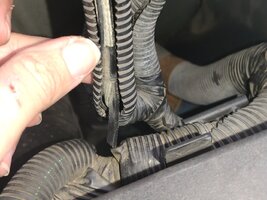
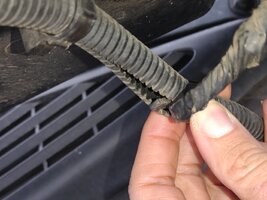
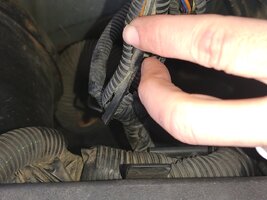
Random guy in parking lot saw me sniffing my engine LOL I said oh just doing the usual sniff test and trying to see if this rubber plastic thing is important and he said oh I think that's a stiffener don't worry about it. Sooooo ok maybe I'm alright there.editing this to add a fourth picture from a distance to show what I'm talking about with the up-close photos. Sorry. I thought of that right after posting and was going to edit to add them and completely got sidetracked. Here you go. It's not really attached to the ground strap but what I'm trying to explain is that it seems to run parallel right up but it against it but can't be serving a function if it's not connected to anything. At first glance, it appeared to be attached to me but I see the electrical tape is what's holding it up tight against it. Picture two is where there is a split in the Y to the hood and then the ground bolt.
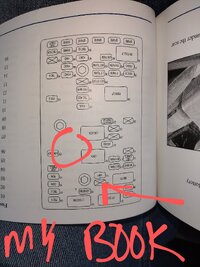
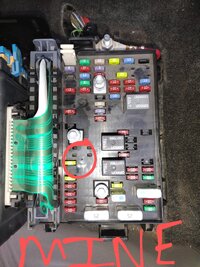
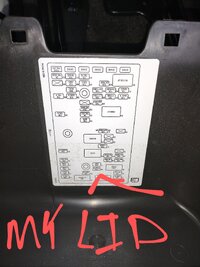
Okay so that makes sense with I think what someone, maybe you, had explained before and I had forgotten. I guess I'm wondering if it's possible I have fuses plugged into spots that may have power but aren't run through a full circuit necessarily. For example I have fuses in the block for a sunroof, and that is in my manual, but my vehicle does not have a sunroof. I suppose it's possible that under the top layer there's not actually any power connected there, but without looking, if there was, would that potentially cause electrical issues since I don't have a full sunroof circuit? Hopefully that makes sense what I'm trying to determine.We don't have RR fog lamps in North America. That's an export option. The same fuse box is used for many different configurations so it's normal if there are empty or undocumented slots. It's the same for the underhood box. If you don't have fog lights or headlight washers, those slots for the fuses and relays would be empty and usually won't even have the connectors inside them.