Removing engine and transmission together

W4UWC

Original poster
Member
Nov 11, 2019
46
Nicholasville, KY
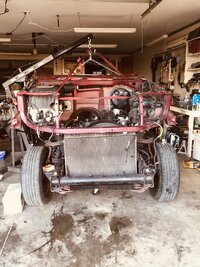
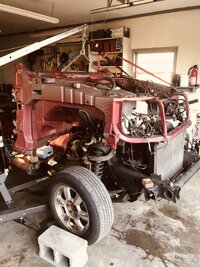
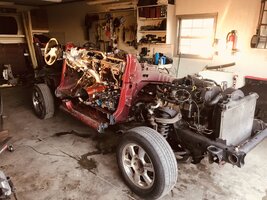
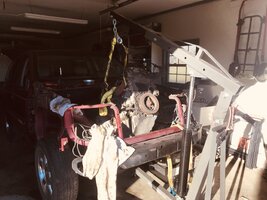
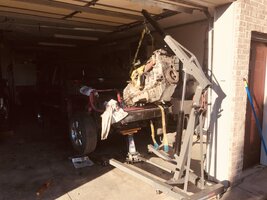
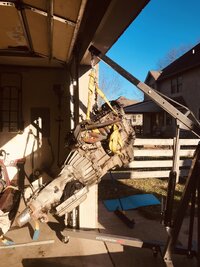
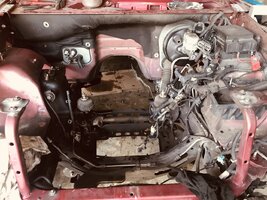
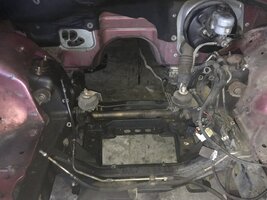
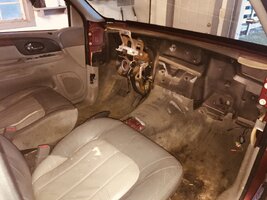
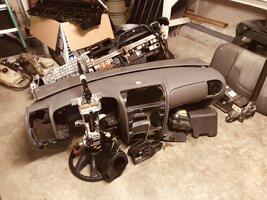
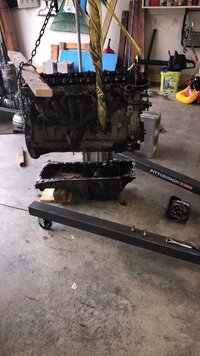
I wanted to post some pictures from this afternoon when I pulled the engine and transmission out of a 2004 envoy. It’s a 2 Wheel Dr. so that made it easier.

i’ve spent a lot of time on her reading about pulling the engine and transmission. If you people claim they pulled both at the same time but couldn’t find any details. It seemed like a better idea to pull them both together. Instead of wrestling around with the transmission under the vehicle then supporting it when taking the engine out.

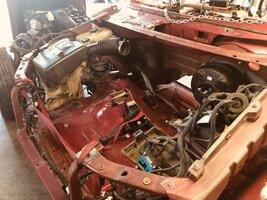
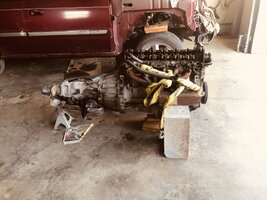
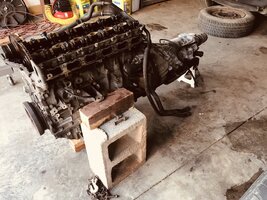
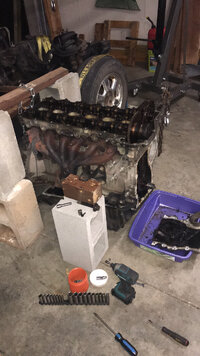
I thought everything went very smoothly. I believe I got lucky when I put the straps on that they were the right link so that the engine was at the right angle to come up and out of the engine bay. I felt like I was stripping the nut when removing a torque converter bolts so that was another reason to loosen the torque converter bolts through the starter hole once the engine and transmission were out.

I was lucky that no bolts or other parts broke during removal.I was lucky that no bolts or other parts broke during removal. Normally I dread anything related to the exhaust but all of the fasteners came out with no problem.

So I wanted to post about my experience and if you have any questions and let me know. I appreciate all of the information that is on this forum so this will help repay those that helped me

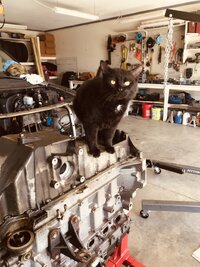
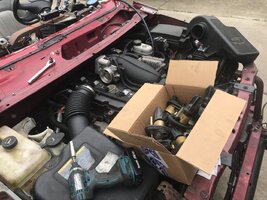
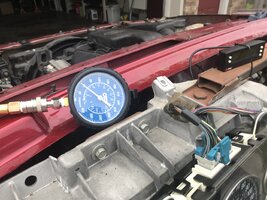
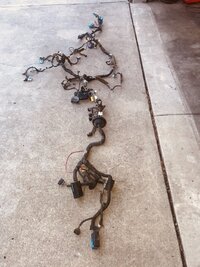
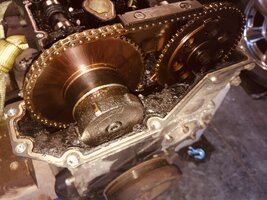
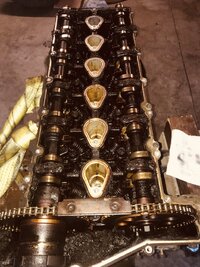
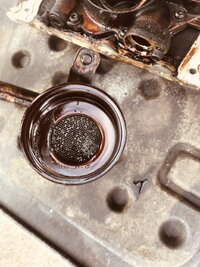
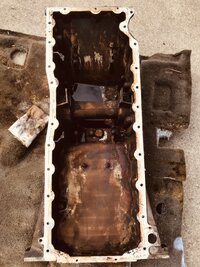
The background for why I removed the engine is several reasons. The vehicle does not have a title so I saw no future in it therefore I’m pulling in as many usable parts off of it as I can. The engine seem to run well although it does have serious sludge. Compression was very good with all cylinders around 180. So I wanted to use it in a 2005 envoy which has cylinder head issues... broken exhaust valve spring and intake Manifold bolts broken in the head. Removing ahead and likely dealing with broken cylinder head bolts didn’t seem worth it. Replacing the engine would be easier.

So I wanted to post about my experience and if you have any questions and let me know. I appreciate all of the information that is on this forum so this will help repay those that helped me
 

Attachments

  • A0900DC0-0FAA-4F81-94AD-292A0067E69C.jpeg
    A0900DC0-0FAA-4F81-94AD-292A0067E69C.jpeg
    438.4 KB · Views: 55
  • C09D51B7-3544-412E-AA62-D13CAF083C7A.jpeg
    C09D51B7-3544-412E-AA62-D13CAF083C7A.jpeg
    421 KB · Views: 49
  • 04EB462A-7F99-464D-9E11-754455307D42.jpeg
    04EB462A-7F99-464D-9E11-754455307D42.jpeg
    422.9 KB · Views: 53
  • BED0653A-2B9B-48B2-BE09-2508BD0302BB.jpeg
    BED0653A-2B9B-48B2-BE09-2508BD0302BB.jpeg
    510.1 KB · Views: 57
  • FC7B3E88-0E30-4A4E-9C0B-A7BC6954CC37.jpeg
    FC7B3E88-0E30-4A4E-9C0B-A7BC6954CC37.jpeg
    530.8 KB · Views: 63
  • 61D7346B-E9C5-4AA8-B099-E48A62B4D7B0.jpeg
    61D7346B-E9C5-4AA8-B099-E48A62B4D7B0.jpeg
    637.4 KB · Views: 59
  • 1ED32C98-5E42-4159-BC47-D6FD88245080.jpeg
    1ED32C98-5E42-4159-BC47-D6FD88245080.jpeg
    553.3 KB · Views: 56
  • 76E2C447-90F0-43E5-B835-19072C133D8B.jpeg
    76E2C447-90F0-43E5-B835-19072C133D8B.jpeg
    645 KB · Views: 56

hockeyman

Member
Aug 26, 2012
726
Removing ahead and likely dealing with broken cylinder head bolts didn’t seem worth it. Replacing the engine would be easier.

Seriously? Compared to just swapping the damaged cylinder head? ...Damn!
I probably would have taken a gamble on possibly getting the cylinder block bolts out (without breaking them) first. That's just me though.
 
  • Like
Reactions: mrrsm

mrrsm

Lifetime VIP Donor
Supporting Donor
Member
Oct 22, 2015
7,741
Tampa Bay Area
Welcome to GMT Nation...

What a remarkable accomplishment! It looks like you left the Motor Mount Brackets On the Engine Block and the "Bulbs" intact on the Engine Nacelle mountings and just removed the Nuts from the upper mounts. Also... it appears that other than removing the 4L60E Cross-Member Brace ...you did NOT have to fiddle around with removing the Exhaust Manifold, the Power Steering Assembly or any of the Front Cross Members, too. That in itself is very encouraging for anyone trying to avoid performing so much more additional labor.

I do have some Questions for you when time permits:

(1) How long did it take you to remove ALL of the Engine Accessories and the Front Radiator, A/C Condenser and Head Light Assemblies to clear an 'Exit" Path? Which of these activities did you do ...FIRST?

(2) Will you be able to clear the entry way you created into the SUV when re-installing the Engine and Transmission as a Combo WITH the Valve Cover installed while the Motor is on an Engine Stand?

(3) What did you Create and Install to protect the Tail Shaft of the Transmission Take Off from Leaking or contact Damage with the Ground?

(4) What is the Height of your Garage Door Frame Entrance Way and also the Inner Garage Door Overhead Panels when completely opened?

(5) In Hind Sight... Could you have left the Power Steering Pump assembly on the Vehicle and still had enough Clearance to exit the Combo from the SUV Chassis?

(6) What is the Height of the Vehicle in its Final Position just before this Combo Removal took place when measured from the Center of the Front Wheel Axle to the Ground that allowed this "Exit" to smoothly take place?

(7) Will you need to re-position the SUV in order to perform other work ...and which (if any) of the two vehicles in your Garage will receive a New (Re-Manned or Used) Engine and Transmission?

(8) Did you manage to do All of this Combo Engine-Transmission Removal Work... Alone?

Back in 2015... I was never able to get a Definitive Answer as to whether or not this could effectively be done. Thanks Very Much for being... A "TrailBlazing" Pioneer!
 
Last edited:

W4UWC

Original poster
Member
Nov 11, 2019
46
Nicholasville, KY
Welcome to GMT Nation...

What a remarkable accomplishment! It looks like you left the Motor Mount Brackets On the Engine Block and the "Bulbs" intact on the Engine Nacelle mountings and just removed the Nuts from the upper mounts. Also... it appears that other than removing the 4L60E Cross-Member Brace ...you did NOT have to fiddle around with removing the Exhaust Manifold, the Power Steering Assembly or any of the Front Cross Members, too. That in itself is very encouraging for anyone trying to avoid performing so much more additional labor.

I do have some Questions for you when time permits:

(1) How long did it take you to remove ALL of the Engine Accessories and the Front Radiator, A/C Condenser and Head Light Assemblies to clear an 'Exit" Path? Which of these activities did you do ...FIRST?

(2) Will you be able to clear the entry way you created into the SUV when re-installing the Engine and Transmission as a Combo WITH the Valve Cover installed while the Motor is on an Engine Stand?

(3) What did you Create and Install to protect the Tail Shaft of the Transmission Take Off from Leaking or contact Damage with the Ground?

(4) What is the Height of your Garage Door Frame Entrance Way and also the Inner Garage Door Overhead Panels when completely opened?

(5) In Hind Sight... Could you have left the Power Steering Pump assembly on the Vehicle and still had enough Clearance to exit the Combo from the SUV Chassis?

(6) What is the Height of the Vehicle in its Final Position just before this Combo Removal took place when measured from the Center of the Front Wheel Axle to the Ground that allowed this "Exit" to smoothly take place?

(7) Will you need to re-position the SUV in order to perform other work ...and which (if any) of the two vehicles in your Garage will receive a New (Re-Manned or Used) Engine and Transmission?

(8) Did you manage to do All of this Combo Engine-Transmission Removal Work... Alone?

Back in 2015... I was never able to get a Definitive Answer as to whether or not this could effectively be done. Thanks Very Much for being... A "TrailBlazing" Pioneer!


MRRSM... thanks and I always appreciate your very detailed replies so you deserve the same from me. I'll get some more information tomorrow when I get back out in the garage.

1. Time. I had experience with disassembly of the front end before so bumper and headlights were easy. My goal was to strip it as much as possible to make it easier and not faster. By easier... I mean I could stand in the engine bay and that makes getting the intake manifold rear bolt out much much easier when there is no radiator or fan. I did it over several day with no goal on when it HAD to be done. I also spent nights reading about it if I hit a speedbump. I'd guess 10-12 hours however if I did it tomorrow then I think I could go from running vehicle to engine/trans out in 5 hours. Maybe 3 hours on the 3rd try. Note: I'll be pulling the engine out of the XL next so I'll time myself. First I started with body work as that gave me good access.

2. Install with the valve cover? This is going into a 4x4 XL so I am not sure about installing engine + transmission. I also believe that with the valve cover on it would probably bind on the firewall/cowl. The engine strap that went to the back of the engine and wrapped around the manifold rubbed on the cowl. I wouldn't recommend installing with the valve cover and definitely not the intake.

3. Tailshaft I wrapped a plastic bag and duct taped it so no leakage. The front tires were on ramps so they were probably 12 inches off the ground, maybe less. The tailhousing wasn't close to dragging on floor. Like I said... I feel like I got lucky in the straps I used that it set the perfect angle to get it out without the whole eng/trans going vertical.

4. I'd have to check but I'd guess 8'. It's a Harbor Freight hoist and it still had a very little bit of lift before it almost hit the garage door. I had it on the 1/2 ton setting as I know the eng/trans wasn't 1000 lbs. I'd guess 600-700? Once trans pan cleared the bumper, I lowered the vehicle down and removed the ramps. That ways I could lower the hoist so the top of the garage door wasn't a factor.

5. Power steering could stay on. A/C compressor probably not. I removed everything because I didn't know how I would put on the straps so I wanted to leave my options open to try to get the straps on their and not be interfered with accessories. There weren't many large bolts that could be used as I had an engine leveler with 4 chains but no available bolts on the corners to attach to.
6. Height of vehicle? It was up on ramps that I need to measure but estimate the wheels were 12" off the ground. Tires were on and the vehicle has stock suspension so no lifts however the wheels were stock 17" they have 235 tires. I can't put it back on the ramps and take the measurements however without the engine in it then the shocks won't be loaded so it'll sit a little higher. But since my point of documenting this is to give hope to those who want to remove the eng/trans together then it's important they know exactly how I did it.

7. On the left is a 2005 XL that will get the eng I removed. The transmission in it should be OK but I haven't driven it so this transplant is eng only. The vehicle I pulled it from has no title and will be sent to the salvage yard after I pull more parts. For fun, I think I will try to lift the body off and see how that goes but I don't have a lift so I'd have to fabricate some sort of joist to set it on. I parked them so that the donor vehicle can be rolled out and then towed away. I spent a lot of time trying to decide how they should be placed since once they are up on jack stands then they won't be easy to move. I forgot about the engine crane... it was in the rear of the garage so I had to take the legs off it to squeeze it between the 2 vehicles in order to get it to the front of the garage. Lesson learned on that one!

8. 100% me. I'm 48 and in decent shape so I didn't mind getting up and down up and down up and down from under the car when I would need another tool or re-position things, etc. I think my only complaint was my neck as being under the car put a strain on having to hold it up. The rear wheels were on the ground so there wasn't much clearance. Good thing I don't have claustrophobia as I couldn't roll over. A helper would have been nice for handing me tools when under the car but I always work alone so I have to think things through and be ready with extra jack stands or jacks to move things. Everything is flat so moving the engine while it was dangling wasn't hard. It helps the weather has been nice so I enjoyed being out there but if it were 20F then I wouldn't be doing it. This is only for fun and if things got frustrating I'd put it down for a few days.

I need to gather my thoughts and make a more condensed how-to post because I think this is a good way to go. Dealing with the transmission bolts while on your back under the car and then having to use a special transmission jack and having it possible tip over on you did not seem fun. I'll take my chances to strip it down and pull them out together and work away from the car where it's safe. Even if I only needed just the engine I think I would still pull them both. Let me say again this is a 2WD so it's definitely easier. My though process will likely change when I tackle the 4WD XL and have to deal with the front differential.

I didn't touch the suspension or steering. Taking the front fenders off and inner fenders was nice to be able to get to the exhaust manifold bolts but it's not critical. Take the front bumper cover off is highly recommended so you don't mess it up by leaning on it while accessing the engine. Plus it's a great place to put tools and parts or to kneel on when reaching towards the back part of the engine.

So this post was almost as long as some of yours! More to come with details tomorrow but keep the questions coming because I want everyone to know what I did. Since I'll be doing the same on a 4WD soon it'll be a perfect comparison. I also take great care when doing this so I'm not hurrying and usually end up breaking stuff. I HATE causing collateral damage. I'm just trying to take parts from a $250 truck and put into a $500 truck and hope to come up with something that's reliable.

The transmission I pulled it junk. It won't shift out of second so I don't know what I'll do with it except I have another XL 4WD that has a bad transmission. It's also a $500 truck so not worth investing much but I'll take it's transmission and see what's wrong and likely do a rebuild on it and use any parts I can't from this trans I just pulled.

I'll fill in some more details later. Next steps will be to ready it for salvage like pulling out wiring and any usable small parts. I'd love to get ride of body parts that are good. Interior is not good but there will be a lot of parts that'll go with it to the junk yard.
 

W4UWC

Original poster
Member
Nov 11, 2019
46
Nicholasville, KY
Seriously? Compared to just swapping the damaged cylinder head? ...Damn!
I probably would have taken a gamble on possibly getting the cylinder block bolts out (without breaking them) first. That's just me though.

I know. I will still try to take that cylinder head off. Nothing to lose since I have a running engine with good compression to replace it with. So I think I'll do that and see what happens. The other factor in the decision is that several of the intake manifold bolts broke off into the cyl head. One is the rear-most bolt which would be so hard to drill out with the head installed in the car. That plus the broken valve spring made me think the cylinder head work it would need is not worth it considering I have an engine. before I pull that engine I'll try to repair it in the car
 
  • Like
Reactions: mrrsm

Mooseman

Moderator
Dec 4, 2011
25,351
Ottawa, ON
From past experiences here, head jobs, while doable, are very difficult on this engine, not even mentioning the broken head bolts. First I've heard of broken intake bolts. Sounds like a previous tech just torqued them down too much as they are not TTY.

Your decision was a sound one, also given the possible piston damage from the potentially dropped valve, that engine just sounded iffy. Just be careful with that replacement engine that you say has sludge because when I replaced mine, it too had some sludge and it eventually wound up with issues with the CPAS, cam phaser (x2) and timing chain tensioner. I think that because I was using top shelf synth oil, some of this crud worked its way loose over time and jammed up the works. I saw the inside of that engine way too many times.
 
  • Like
Reactions: W4UWC and mrrsm

mrrsm

Lifetime VIP Donor
Supporting Donor
Member
Oct 22, 2015
7,741
Tampa Bay Area
And while contemplating that roomy, empty Engine Compartment on your Parting-Out Truck... If you could take a Set of Images covering the 270 Degrees of how the interior(s) of the Firewall and Top Down Views of the Steering Linkage and Power Steering hardware all look... those will prove VERY Helpful in time for THAT particular Hardware R&R too.

Anything and Everything that can be seen and photo-documented in that space will be VERY Much Appreciated to a LOT of us. If I were doing this job... I'd seriously consider replacing the PS Unit with a Re-Manned one from Detroit Axle and include doing the Pressure and Return Hoses and Lines as well. When the time comes to repeat this Amazing Feat... You'll never have an EZR Time of doing that Preemptive Repair on your 4X4 XL ;>)
 
Last edited:

W4UWC

Original poster
Member
Nov 11, 2019
46
Nicholasville, KY
And while contemplating that roomy, empty Engine Compartment on your Parting-Out Truck... If you could take a Set of Images covering the 270 Degrees of how the interior(s) of the Firewall and Top Down Views of the Steering Linkage and Power Steering hardware all look... those will prove VERY Helpful in time for THAT particular Hardware R&R too.

Anything and Everything that can be seen and photo-documented in that space will be VERY Much Appreciated to a LOT of us. If I were doing this job... I'd seriously consider replacing the PS Unit with a Re-Manned one from Detroit Axle and include doing the Pressure and Return Hoses and Lines as well. When the time comes to repeat this Amazing Feat... You'll never have an EZR Time of doing that Preemptive Repair on your 4X4 XL ;>)
I can take all the pictures anyone may want of the 2 WD donor vehicle. However I have no plans for it to ever go on the road since it has no title. Therefore it’s purpose is only for parts and then to go to the big graveyard in the sky.
I am currently removing all the wiring harnes

Back to the point of height required to pull the combination out. The vehicle doesn’t have to be any higher than what it would normally would for an oil change. I use Ramps and the wheel is about 7” off the ground. I believe I previously estimated about 12”. I never had any concerns that require raising the vehicle more than that. As I said before I actually had to lower the vehicle to give me clearance for the crane to clear the garage door since the work was being done right at the door threshold.

I know having been through struggles with transmissions under the vehicle that it is no fun. You need a special transmission jack plus lots of physical effort to move it into place then not to mention accessing all of the transmission to engine bolts. Removing the engine and transmission together avoid that. Granted if you’re only replacing the transmission there’s a lot more work that Hass to happen to get the engine out.

I saw another post about a hybrid method of raising the front half of the body off the frame when pulling the engine. The purpose was to help gain access to the top transmission bolts. I did have to get the 3 foot extension out to take off the bracket for the metal cooling line that runs on top of the transmission So I had to go through the same effort to get to that fastener as you would if you were taking the transmission out with engine in the car. I still am thinking I’d like to try to separate the frame and body to check out that method. I doubt that I could lift the body high enough with my engine hoist and subsequently supported somehow (sawhorses?) to roll the frame from under the body. I thought it be fun to try just to get the experience. The donor vehicle is rust free so I doubt that the body bolts would give me any trouble.
 

Attachments

  • E76D9417-EEDF-4BFB-BA70-EF60CA6C9891.jpeg
    E76D9417-EEDF-4BFB-BA70-EF60CA6C9891.jpeg
    553.3 KB · Views: 9

W4UWC

Original poster
Member
Nov 11, 2019
46
Nicholasville, KY
From past experiences here, head jobs, while doable, are very difficult on this engine, not even mentioning the broken head bolts. First I've heard of broken intake bolts. Sounds like a previous tech just torqued them down too much as they are not TTY.

Your decision was a sound one, also given the possible piston damage from the potentially dropped valve, that engine just sounded iffy. Just be careful with that replacement engine that you say has sludge because when I replaced mine, it too had some sludge and it eventually wound up with issues with the CPAS, cam phaser (x2) and timing chain tensioner. I think that because I was using top shelf synth oil, some of this crud worked its way loose over time and jammed up the works. I saw the inside of that engine way too many times.
I agree completely and realize the risk I’m taking by using the engine. I least have a little bit of history with it knowing that it runs, doesn’t overheat, and has good compression. So that’s better than a lot of engines that can be bought sight unseen online or from a junkyard. My plan is to get as much up with a shop vac from the top. I’ll take off the oil pan and probably soak it with kerosene or something to clean it out. I know I can’t soak the whole engine but I think if I can get most of the crud out of the top then it’ll be OK.One other concern I found about this engine is it has three broken exhaust manifold bolts that don’t look fun to get out of the head.

i’ve thought about taking the frame and kind of using it as a rolling engine stand. Keep in mind this is all just for fun and I’m not trying to sell the vehicle or fix it expecting many years of future use. I’ll be happy if it just gets down the driveway under its own power. But if I can clean up this donor engine of the sludge it may be interesting to drop back in the frame and run it for several hours and do the sea foam and oil changes and see where that gets me. If everything looks good and that would give me more confidence it’s worth the energy to put that engine into my nicer envoy XL If it’s just the frame then you have so much better access around the engine to fix things during the run in. Anyway just a wild idea but it would be very nice to do some extended runs with it after I try to clean it internally to avoid the problems you noted.
 

mrrsm

Lifetime VIP Donor
Supporting Donor
Member
Oct 22, 2015
7,741
Tampa Bay Area
Great clarifications. Forgive me trying to get the added images about the Power Steering Rack R&R. Its just that so many people have had to struggle with doing THAT job... and when performing what YOU just accomplished... getting it done right then seemed like a Golden Opportunity.

Thanks for clarifying 'The Angle of Incidence' at minimum necessary for any Lifting Height Restrictions. Others with common overhead obstructions like your situation will benefit from knowing how you set things up.

I was just thinking...
Would you have been able to avoid the the hassle of having to deal with removing the Two Top Transmission Bolts holding the Aluminum Heater Pipe to the Back Top of the Motor...if that line was removed at the Firewall Quick Disconnect Fitting(s) to BOTH sides of the Coolant Inlet and Outlet Pipe(s) ?

Also... I completely concur with @Mooseman about giving ANY Donor Engine a Good Going Over. It is an absolute BREEZE to work on this Engine once you've separated the Transmission and Mount the Motor on the Stand. IIWY ...I'd invest in installing a New Timing Chain, Tensioner and Chain Guide Kit.

If you check out Kevin Nadeau's (5) Part Envoy "Low Oil Pressure" Crankcase and Timing Chain and Tensioner R&R on Youtube... you'll see what should NEVER be overlooked for Fixes necessary to be done BEFORE bolting the Engine-Trans Combo into your XL.

In particular... FORGET SEAFOAM... The only two Solvents capable of dissolving Carbon and Gas Blow-By Gummy Lacquer deposits EVERYWHERE inside of your Engine are Berryman's B-12 and ACDelco Top Engine Cleaning Solvent. Watch how Kevin manages to passively dissolve ALL of the Blockage in his Oil Pick Up Tube that caused Low Oil Pressure in that (5) Part Series by soaking that Tube Screen End in a Gallon Can of the Berryman's Solvent:


Here is the Link to the Other (4) YT Segments:

 
Last edited:

Mooseman

Moderator
Dec 4, 2011
25,351
Ottawa, ON
In the end, he didn't solve his oil pressure issues and I suspect his bypass valve in the oil pump (not the oil filter housing) is stuck upen due to the previous gunk. Don't do like him and at least replace that. I'd also do an extended flush short term and then use a quart of tranny fluid (replacing one quart of oil) long term to clean it out as much as possible. You have it out of the truck. Might as well go the full mile and completely disassemble it and clean/replace as much as possible.
 
  • Like
Reactions: mrrsm

W4UWC

Original poster
Member
Nov 11, 2019
46
Nicholasville, KY
A few updates. Not much related to the engine and trans other than a few pics of the sludge. I did strip a few brackets off the transmission and take the torque converter bolts out so the trans is ready to be seperated. However without an engine stand I'll need to fabricate something to keep it steady. Plus I need to remove the oil pan to inspect and de-sludge it.

I pulled the dash out today. Definitely leaves it with a minimalist look! I was surprised that only one harness runs from the dash and through the firewall and to the battery. I would have thought there would be some bulkhead connector but it's just one big harness. I have the rear fuse box out. I wasn't able to get the underside harness out yet but all I need are to un-snap some of the wiring holders.

This truck is rust free and has been a pleasure to take apart. I can only think of 2 broken bolts and those were the 2 grounds on the frame. I separated the heater disconnect when I pulled it out. Everything else has been smooth and easy.

The dash was easy. I took the plastic cover off first then the metal frame and HVAC. I'd guess the plastic weighs 15 lbs and the frame is about 30-40. I'm salvaging the actuators and fan and everything else that unbolts easily. I had to find a 5.5 mm socket for the screws that bite into plastic.

Lastly here is a look at the 2005 XL that hopefully will receive some of these parts one day. I'm lucky I have lots of room and I like to be neat about storing things but taking a car apart really takes up a lot of space so parts tend to get put about everywhere!
 

Attachments

  • IMG_E9206[1].JPG
    IMG_E9206[1].JPG
    451.1 KB · Views: 22
  • IMG_9205.JPG
    IMG_9205.JPG
    509.3 KB · Views: 22
  • IMG_E9201.JPG
    IMG_E9201.JPG
    713.3 KB · Views: 23
  • IMG_E9200.JPG
    IMG_E9200.JPG
    523.4 KB · Views: 21
  • IMG_E9199.JPG
    IMG_E9199.JPG
    649.8 KB · Views: 20
  • IMG_E9198.JPG
    IMG_E9198.JPG
    461.7 KB · Views: 21
  • IMG_E9196.JPG
    IMG_E9196.JPG
    488.7 KB · Views: 21
  • IMG_E9203.JPG
    IMG_E9203.JPG
    357.7 KB · Views: 21

W4UWC

Original poster
Member
Nov 11, 2019
46
Nicholasville, KY
From past experiences here, head jobs, while doable, are very difficult on this engine, not even mentioning the broken head bolts. First I've heard of broken intake bolts. Sounds like a previous tech just torqued them down too much as they are not TTY.

Your decision was a sound one, also given the possible piston damage from the potentially dropped valve, that engine just sounded iffy. Just be careful with that replacement engine that you say has sludge because when I replaced mine, it too had some sludge and it eventually wound up with issues with the CPAS, cam phaser (x2) and timing chain tensioner. I think that because I was using top shelf synth oil, some of this crud worked its way loose over time and jammed up the works. I saw the inside of that engine way too many times.

Mooseman... I wanted to come back to this comment since I've remembered it as I have been working on the Envoy. I got it running which was the main goal. I did my best to clean out the sludge - mechanically - by scraping and wiping. As you said, it's likely that some chunks got dislodged. The mesh pickup was pretty clean. I hooked up a mechanical gauge and oil pressure is good except when hot and it was dipping down to near 0. Simultaneously the gauge light came on saying low oil pressure so the oil pressure switch works. I don't have much history with this car but I don't recall this problem before the tear down. So I'm guessing your prediction maybe true that while I cleaned up most of the sludge that I may have created a more terminal situation. the oil pressure rebounds some with RPM but no way would I be comfortable using the engine like this.

One of the reasons I stripped the car down is to have a test bed to try out things. With no Air conditioning or hood or fenders then it's so much easier to do things. So I'm not sure what I'll do next... maybe try the quart of trans fluid in and let it idle and see what happens. I would like to see the oil pickup now and see if that is the restriction or if the sludge moved into some other passage. Or if the engine is just worn out and bearing clearances are too much or the oil pump is done.

Any recommendations?

Here's some current pics... wood blocks for emergency brakes. No power to the seat so it's way in the back so kind of hard to fully reach the pedals.

I also tore down the valve body to get some experience with transmissions. Surprisingly nothing leaks. I deleted the A/C compressor and idler pulley and used the shorter belt "K060705 DAYTONA SERPENTINE BELT 5060705 4060705 705K6 6PK1790 K60705"
 

Attachments

  • IMG_9857[1].JPG
    IMG_9857[1].JPG
    590.7 KB · Views: 22
  • IMG_9845[1].JPG
    IMG_9845[1].JPG
    543.4 KB · Views: 23
  • IMG_E9860[1].JPG
    IMG_E9860[1].JPG
    438.5 KB · Views: 23
  • IMG_9800[1].JPG
    IMG_9800[1].JPG
    441.4 KB · Views: 23

Mooseman

Moderator
Dec 4, 2011
25,351
Ottawa, ON
I'd say there's something with the oil pump, its pressure regulator or the pickup seal to the pump. But since you had the pickup off (or did you?) and used a new seal, and the pump itself is a simple mechanism, I'd say the pressure regulator/bypass is at fault. Maybe when cold and oil thicker, it compensates for it.
 
  • Like
Reactions: Reprise

Reprise

Lifetime VIP Donor
Supporting Donor
Member
Jul 22, 2015
2,724
Maybe I missed this from an earlier post, but... What the hell happened to the roof / A-pillar ???
(On edit: nevermind. I see now that he has a donor truck)
 
Last edited:

W4UWC

Original poster
Member
Nov 11, 2019
46
Nicholasville, KY
Maybe I missed this from an earlier post, but... What the hell happened to the roof / A-pillar ???
(On edit: nevermind. I see now that he has a donor truck)

It's just a fun project. The concept was that this truck that has no title will serve as a parts car. I though that by taking the body off it would be a good test bed for playing with the engine. Not dealing with that stupid AC metal line and fenders sure makes working on the engine so much more fun. Transmission work is a breeze without a body! This will never be on the road so I can test parts and then pull parts from it as-needed for the other Envoys
 
  • Like
Reactions: mrrsm

W4UWC

Original poster
Member
Nov 11, 2019
46
Nicholasville, KY
Maybe I missed this from an earlier post, but... What the hell happened to the roof / A-pillar ???
(On edit: nevermind. I see now that he has a donor truck)
I'd say there's something with the oil pump, its pressure regulator or the pickup seal to the pump. But since you had the pickup off (or did you?) and used a new seal, and the pump itself is a simple mechanism, I'd say the pressure regulator/bypass is at fault. Maybe when cold and oil thicker, it compensates for it.
Yes. I cleaned it out. Oil pan wasn’t too bad. The sludge on the cylinder head was caked On so no doubt some of that came loose when I vacuumed the big stuff. The pickup screen wasn’t bad either but was spotless when I put it back in.
I did not do anything else such as a new o-ring. Just permeatex sealant on the cover

The pressure is behaving like a tired engine. I may try a different pump since this is a project. The goal was to see if this engine is a candidate for a 2005 Envoy that has a broken exhaust valve spring that I’m not sure is worth the expense to take off the head and repair.

If I have the pan off again I need to plastigage the crank to see what’s really going on

here’s the pickup and a few others. I lowered the engine onto the pan since I knew I’d mess up the silicone bead try to fumble around and push it up and hold it while trying to get the bolts in. Worked very well. Albeit time consuming
 

Attachments

  • 12128143-CAE0-46A4-9D3A-6403373B0103.jpeg
    12128143-CAE0-46A4-9D3A-6403373B0103.jpeg
    483.4 KB · Views: 15
  • 87AC04C8-063D-4327-8A79-A4AF2D9BA6A6.jpeg
    87AC04C8-063D-4327-8A79-A4AF2D9BA6A6.jpeg
    654.8 KB · Views: 15
  • C9100489-CAA8-4EE3-8971-4BFDE88C2A40.jpeg
    C9100489-CAA8-4EE3-8971-4BFDE88C2A40.jpeg
    770.3 KB · Views: 15
  • 1004CA15-0ABB-4F1E-A5AA-0BECA34C59CF.jpeg
    1004CA15-0ABB-4F1E-A5AA-0BECA34C59CF.jpeg
    590.4 KB · Views: 14

mrrsm

Lifetime VIP Donor
Supporting Donor
Member
Oct 22, 2015
7,741
Tampa Bay Area
I'd Murder the World to get my hands on an "Engine -Transmission Test Bed" like yours (WITH the space to store it) ...but it still looks like having one of THESE as well would come in very handy for you right about now:


Maverick6587

Member
Dec 16, 2018
730
Sterling Heights, Michigan
Just an amazing test vehicle setup! Thanks for posting everything. I agree with MRRSM on the engine stand suggestion. Being able to stand up while working on an engine makes life a lot easier. I have the 1,000 LB HF engine stand and it is very sturdy. I put a fully dressed and wet 5.3 L on the stand and it seemed to handle it just fine.
 

W4UWC

Original poster
Member
Nov 11, 2019
46
Nicholasville, KY
Just an amazing test vehicle setup! Thanks for posting everything. I agree with MRRSM on the engine stand suggestion. Being able to stand up while working on an engine makes life a lot easier. I have the 1,000 LB HF engine stand and it is very sturdy. I put a fully dressed and wet 5.3 L on the stand and it seemed to handle it just fine.
Agree 100%. Out of curiosity what holes do you use for the 4.2 to attach to a stand? A trip to Harbor Freight will be in order before the next major work.

It sure is nice to work on the car without that dreaded AC line along with deleted A/C compressor. I'm thinking about adding a hinge to the floor pan so I can tilt it up to get to the transmission. Of course seat, shifter, and e-brake come off. It's just an idea but thought it would be fun. I have the rear 1/3 of the body left so I may cut out the floor pan on it and bolt it down.

I need to get rid of some stuff like the doors and tailgate which are all free of rust. It sucks the metal on this car is so clean compared to my other Envoys. Unfortunately the interior was trash but no more bad smells now I have an open-air convertible!
 
  • Like
Reactions: Mooseman and Beacon

Maverick6587

Member
Dec 16, 2018
730
Sterling Heights, Michigan
I haven't mounted a 4.2 yet, but if you're talking about mounting it to the engine stand, I would use the bolt points that the transmission connects to the engine.

Below is a video for assistance. At about 2:40 he shows you how to mount the engine to the engine stand bracket. Just make sure you measure the distance that the bolts have to go through the bracket to make sure they will actually be able to go into the engine block. More accurately... Measure the transmission bolts thread length.

Then measure the total length that the bolt will need to go through the engine stand bracket and add those together. That's how long your bolts need to be to mount the engine to the engine stand. Don't get bolts longer than that distance though, because they won't tighten up to the stand. You could go about a 1/4 shorter if you wanted to.

@W4UWC How did you get the 12 frame to body bolts off? I was trying to remove mine to lift the body off and they just spin and I couldn't find the top end to see if it was a welded nut or one that could be spinning. I only tried the two in the rear and gave up.


W4UWC

Original poster
Member
Nov 11, 2019
46
Nicholasville, KY
My frame had no rust and they came out with ease. Not a concern at all. I could run them out with my fingers after knocking them loose. There is a nut on each but it's movable like it's in a slot. But it won't move when you tighten the bolt. If that breaks free when you loosen the bolt then about all you can do is cut off the head of the bolt because there is no way to get to that nut until the body is off.

I didn't know they had value as a guy asked to buy them. He'd been to junk yards and of course it's very hard to lift a body up in a yard and I guess aftermarket replacements are expensive. He was very happy to get them after I showed they were clean. I sold all of them and then realized I needed something to hold down my junk body so I made ones out of wood. I also used the dense compressed foam that was in the driver's footwell and cut it to size for the others. This car will never be on the road and probably won't go more than 20 mph so I just wanted something to hold down the cab. I went to Lowe's for the bolts. Here are some pics.

As for the engine stand. I get a bit nervous about fasteners in the aluminum and then letting engine sit cantilevered out on a stand. This is the 4.2. My struggle when lifting the engine was finding the best places to hold it. Obviously the higher the better but there aren't many solid bolts to use so I used a strap around the exh manifold and the engine mount. My concern about the manifold was that 3 of the fasteners on the rear that hold the manifold to the head were off so I wasn't comfortable putting too much of a load in that area. While this is a junk car I still treated everything with caution as if I'd use every part again so I didn't make a habit of cutting harness and such to make it quick and easy. That's why I spent a long time lifting the engine to make sure it was safe. I'm used to good old V8's. Maybe if I removed the flywheel then there are more mounting holes there. I actually used the hold the in flywheel to 1. Hold it when I loosened the crankshaft bolt and 2. support the rear of the engine when the transmission was off.

Let me know if you would like to know anything else. I want to document as much as possible now things are about complete. Often we see posts that dead-end when the poster vanishes.
 

Attachments

  • IMG_E9924[1].JPG
    IMG_E9924[1].JPG
    395.5 KB · Views: 11
  • IMG_E9925[1].JPG
    IMG_E9925[1].JPG
    352.9 KB · Views: 12
  • IMG_9500[1].JPG
    IMG_9500[1].JPG
    672.1 KB · Views: 12
  • Like
Reactions: Beacon

Maverick6587

Member
Dec 16, 2018
730
Sterling Heights, Michigan
Yeah, those replacements end up costing over $100 to replace all 12 of them.

Your last pic in post 13. Are you keeping the frame as is? In that your frame is going to be your "engine run stand"? That would be pretty awesome to be able to just bolt your engine and trans together and just easily throw it back into the frame and actually be able to drive for testing, even at/under 20mph.
 

mrrsm

Lifetime VIP Donor
Supporting Donor
Member
Oct 22, 2015
7,741
Tampa Bay Area
FWIW... Among many other available Public GM Repair Photo Albums I've memorialized with thousands of images showing the Dis-Assembly and Rebuilding, Parts & Part Numbers, etc. along with clear views showing most aspects of the GM Atlas 4.2L LL8 Engine... are THESE.

43435269981_79ee6a1f4d_c.jpg43387319912_5c1c13fd1d_c.jpg41627421560_a1720b05a0_c.jpg43435270311_74e59d58e2_c.jpg43435259251_4c0529b173_c.jpg

These images confirm that the Harbor Freight Engine Stands described above have all of the necessary Support Plate Bolt Up Points with Adjustable Brackets (Arms) fitted through the Slotted Rotating Mounting Plate that can reach every one of the necessary Engine Block-To-Bell Housing Bolt Holes.

This arrangement provides excellent balance and support...even on a Fully Assembled (VERY Top Heavy) Motor. There is also enough room in between to allow the removal and installation of the Flex-Plate.

Please use ONLY 10.9 Hardness (Grade 8 Strength) M10 x 1.5MM x 50MM Engine Stand Flange Hex Head FLT (Full Length Thread ) Bolts in this support application. It is VERY Important to adjust these Arms to the Slotted Plate positions accurately on ALL Points B4 Tightening any of the Fasteners Down to the GM OEM Factory Recommended Bell House to Engine Block Torque Spec limited at ONLY 35 Foot Pounds.

Then you can use "Railroad Engine Bolt Torque" after that to tighten down the Large Bolts-Washers-Nuts holding the aligned Arms to the Slotted Plate. Here is a link to the Album these Images came from:


Whenever inverting or re-positioning this Engine while on The Stand... Do so VERY SLOWLY while using a Long Breaker Bar slipped through the Large Handle Hole adjacent the Multiple Choice Lock-Pin Holes in the Rotating Steel Tube. If supplied, TIGHTEN DOWN THE THREADED LOCKING HEX BOLT FASTENER in all Positions.

The Regular Hoist Turn Handle provided with the Harbor Freight Engine Stand will be WAY TOO SHORT and the Top Heavy Weight of the Atlas Engine WILL overcome it as being 'too small' to supply enough Mechanical Advantage almost as soon as you start to Rotate the Engine... SO BE VERY CAREFUL or this Motor CAN get away from you!
 
Last edited:

W4UWC

Original poster
Member
Nov 11, 2019
46
Nicholasville, KY
Yeah, those replacements end up costing over $100 to replace all 12 of them.

Your last pic in post 13. Are you keeping the frame as is? In that your frame is going to be your "engine run stand"? That would be pretty awesome to be able to just bolt your engine and trans together and just easily throw it back into the frame and actually be able to drive for testing, even at/under 20mph.

The frame is now built into a movable buggy. I cut the body into thirds so that I could bolt the front clip on so that I'd have something to mount the brakes and steering wheel to. The middle is just the floor pan so I could bolt a seat. The aft section is open so when I need to remove the driveshaft I just go right to it!

It's too bad the electrical harness doesn't have a big connector at the firewall to all you to separate it there and then disconnect the steering shaft then that front clip could lift off. I won't be going back into it often but it sure makes things easy. In this case I'm testing out an engine that I want to be sure is 100% good before it goes into another Envoy. I don't want to find any problems with it after it's fully hooked up in that vehicle. The downside is I can't take the buggy out for long rides to test out overdrive at 70 mph but I can run it and check pressure and temps to get a good feel if it's a good engine. Sometimes it looks better with headlights and door. Safety first!

The one thing I didn't fully think through is protection. It will be inside but with no windshield or dash then it can't sit outside in the rain. I may put the hood and fenders on so it'll have some protection if left out but the harnesses would get soaked unless I put it under a tarp which I may do if I need garage space.

Here's a look at it as of today.
 

Attachments

  • IMG_9889[1].JPG
    IMG_9889[1].JPG
    695.5 KB · Views: 14
  • IMG_9945[1].JPG
    IMG_9945[1].JPG
    699.1 KB · Views: 14

Maverick6587

Member
Dec 16, 2018
730
Sterling Heights, Michigan
Here I thought I had it all with a rolling frame. You have inspired me to put a front end on it now!

My initial thoughts for speed are... Build the front end light, possibly fiberglass and make it one piece that clips on the front end. Just like either a funny car or a race car front end.

Just using the front end like you currently have setup. That back stays bare. Easy to remove and put back on for road testing.

639e56400c0428a7fb9d80aed59b11cf.jpgDSC04478.jpg
 

W4UWC

Original poster
Member
Nov 11, 2019
46
Nicholasville, KY
FWIW... Among many other available Public GM Repair Photo Albums I've memorialized with thousands of image showing the Dis-Assembly and Rebuilding, Parts & Part Numbers, etc. along with clear views showing most aspects of the GM Atlas 4.2L LL8 Engine... are THESE.

View attachment 93269View attachment 93270View attachment 93271View attachment 93272View attachment 93273

These images confirm that the Harbor Freight Engine Stands described above have all of the necessary Support Plate Bolt Up Points with Adjustable Brackets (Arms) fitted through the Slotted Rotating Mounting Plate that can reach every one of the necessary Engine Block-To-Bell Housing Bolt Holes.

This arrangement provides excellent balance and support...even on a Fully Assembled (VERY Top Heavy) Motor. There is also enough room in between to allow the removal and installation of the Flex-Plate.

Please use ONLY 10.9 Hardness (Grade 8 Strength) M10 x 1.5MM x 50MM Engine Stand Flange Hex Head FLT (Full Length Thread ) Bolts in this support application. It is VERY Important to adjust these Arms to the Slotted Plate positions accurately on ALL Points B4 Tightening any of the Fasteners Down to the GM OEM Factory Recommended Bell House to Engine Block Torque Spec limited at ONLY 35 Foot Pounds.

Then you can use "Railroad Engine Bolt Torque" after that to tighten down the Large Bolts-Washers-Nuts holding the aligned Arms to the Slotted Plate. Here is a link to the Album these Images came from:


Whenever inverting or re-positioning this Engine while on The Stand... Do so VERY SLOWLY while using a Long Breaker Bar slipped through the Large Handle Hole adjacent the Multiple Choice Lock-Pin Holes in the Rotating Steel Tube. If supplied, TIGHTEN DOWN THE THREADED LOCKING HEX BOLT FASTENER in all Positions.

The Regular Hoist Turn Handle provided with the Harbor Freight Engine Stand will be WAY TOO SHORT and the Top Heavy Weight of the Atlas Engine WILL overcome it as being 'too small' to supply enough Mechanical Advantage almost as soon as you start to Rotate the Engine... SO BE CAREFUL or this Motor CAN get away from you!

That is great to know. Thanks for sharing. Pics like that are wonderful and often imbedded in various posts but can be hard to find when you want to see them again.

I have many Harbor Freight coupons so I need to pick one up pretty soon as I have a 4.2L from an 05 that'll need to come out and using center blocks to support it isn't good. It's secure but sucks for accessing the bottom side.
 
  • Like
Reactions: mrrsm

W4UWC

Original poster
Member
Nov 11, 2019
46
Nicholasville, KY
Here I thought I had it all with a rolling frame. You have inspired me to put a front end on it now!

My initial thoughts for speed are... Build the front end light, possibly fiberglass and make it one piece that clips on the front end. Just like either a funny car or a race car front end.

Just using the front end like you currently have setup. That back stays bare. Easy to remove and put back on for road testing.

View attachment 93285View attachment 93286
Does your vintage truck have a Trailvoy frame? I've seen some comments about using a 2WD frame for a hot rod but didn't do much research. I thought when I'm done with my project it would serve well if someone wanted to build a body for it. Or for a group of high school kids to learn about basic car operations without a bunch of air conditioning and body panels in the way.
 
  • Like
Reactions: Beacon

Maverick6587

Member
Dec 16, 2018
730
Sterling Heights, Michigan
Those aren't min vehicles... They're just ideas for what I had in mind for setting up a quick way to remove and add back the front end. To be able to quickly install and remove the engine.

That's a great idea for helping kids learn!
 

W4UWC

Original poster
Member
Nov 11, 2019
46
Nicholasville, KY
Yeah, those replacements end up costing over $100 to replace all 12 of them.

Your last pic in post 13. Are you keeping the frame as is? In that your frame is going to be your "engine run stand"? That would be pretty awesome to be able to just bolt your engine and trans together and just easily throw it back into the frame and actually be able to drive for testing, even at/under 20mph.

I was putting on transmission cooler lines and adjusting the neutral park switch and thinking how much of a joy that was working on it without a body!
I didn't think rust free frames existed for these.

I have 2 other Envoys and I know what rust looks like on those. That's another reason to hang onto this frame
I didn't think rust free frames existed for these.

I have 2 other Envoys and I know what rust looks like on those. One is from Michigan and a cross bar is almost rusted off. That's another reason to hang onto this frame. Even the tailgate is totally free in the usual spot at the bottom near the handle and outer edges. I have the doors and tailgate for sale since I don't need them. I may hang onto the fenders and hood just to cover the engine if it ever has to sit outside

I had 2 bolts that broke... both were the grounds on the driver side frame. Everything else came out no problem, even the exhaust fasteners.
 

Attachments

  • IMG_E9950[1].JPG
    IMG_E9950[1].JPG
    792.1 KB · Views: 3
  • Like
Reactions: Beacon

W4UWC

Original poster
Member
Nov 11, 2019
46
Nicholasville, KY
FWIW... Among many other available Public GM Repair Photo Albums I've memorialized with thousands of images showing the Dis-Assembly and Rebuilding, Parts & Part Numbers, etc. along with clear views showing most aspects of the GM Atlas 4.2L LL8 Engine... are THESE.

View attachment 93269View attachment 93270View attachment 93271View attachment 93272View attachment 93273

These images confirm that the Harbor Freight Engine Stands described above have all of the necessary Support Plate Bolt Up Points with Adjustable Brackets (Arms) fitted through the Slotted Rotating Mounting Plate that can reach every one of the necessary Engine Block-To-Bell Housing Bolt Holes.

This arrangement provides excellent balance and support...even on a Fully Assembled (VERY Top Heavy) Motor. There is also enough room in between to allow the removal and installation of the Flex-Plate.

Please use ONLY 10.9 Hardness (Grade 8 Strength) M10 x 1.5MM x 50MM Engine Stand Flange Hex Head FLT (Full Length Thread ) Bolts in this support application. It is VERY Important to adjust these Arms to the Slotted Plate positions accurately on ALL Points B4 Tightening any of the Fasteners Down to the GM OEM Factory Recommended Bell House to Engine Block Torque Spec limited at ONLY 35 Foot Pounds.

Then you can use "Railroad Engine Bolt Torque" after that to tighten down the Large Bolts-Washers-Nuts holding the aligned Arms to the Slotted Plate. Here is a link to the Album these Images came from:


Whenever inverting or re-positioning this Engine while on The Stand... Do so VERY SLOWLY while using a Long Breaker Bar slipped through the Large Handle Hole adjacent the Multiple Choice Lock-Pin Holes in the Rotating Steel Tube. If supplied, TIGHTEN DOWN THE THREADED LOCKING HEX BOLT FASTENER in all Positions.

The Regular Hoist Turn Handle provided with the Harbor Freight Engine Stand will be WAY TOO SHORT and the Top Heavy Weight of the Atlas Engine WILL overcome it as being 'too small' to supply enough Mechanical Advantage almost as soon as you start to Rotate the Engine... SO BE VERY CAREFUL or this Motor CAN get away from you!
Just picked up a 1000 lb stand at HF!
 
  • Like
Reactions: Beacon and mrrsm

W4UWC

Original poster
Member
Nov 11, 2019
46
Nicholasville, KY
Update... I got an engine out of a 2005 Trailblazer to replace the one from my 05 Envoy that had the broken exhaust valve. The "movable test stand" aka buggy has been running good (except for low oil pressure when hot covered in another topic) so that engine will come out so I can test the Trailblazer engine. It looks pretty good but it sure would be nice to hear it run and check oil pressure and water temps before putting it into the "nice" Envoy and hooking up A/C etc then finding out there's a problem. The cab lifted up and I rotated it to clear the engine then set it down on the floor to save room in the garage. I left as much on it as possible so mating it back to the chassis will be easy. I'll have full access to the engine will will make the swap enjoyable.

The Harbor Freight stand seems to be working good. Rotating it wasn't difficult. I was afraid it would fall over when gravity pulled the top end down. I did use a large lever arm as suggested.
 

Attachments

  • FGCY8766.JPG
    FGCY8766.JPG
    601.1 KB · Views: 11
  • IMG_E0096.JPG
    IMG_E0096.JPG
    644.5 KB · Views: 12
  • IMG_E0100.JPG
    IMG_E0100.JPG
    583.6 KB · Views: 11
  • IMG_E0101.JPG
    IMG_E0101.JPG
    549.2 KB · Views: 11

mrrsm

Lifetime VIP Donor
Supporting Donor
Member
Oct 22, 2015
7,741
Tampa Bay Area
I envy your thoughtful, strategic "Look Down Shoot Down" approach to this entire Project. These activities should be "THE Model" to follow whenever performing any Engine Swap. Now that the Trailblazer Donor Motor is Mounted on the Engine Stand... depending upon how deeply you intend to go into the Engine for "Prophylactic Repairs"... Here are some things to consider with the potential of adding over 100,000 Miles of endurance to your Donor Motor... BUT with the understanding that I am NOT suggesting that you MUST actually do ANY or ALL of these tasks... but they can serve to relieve doubts and concerns post-assembly and when other performance issues after the Initial Start comes to pass:

(1) Photo Record EVERYTHING you work on for Before & After Engine Assembly references. You will NOT regret having this Image Library at hand to refer to later on.

(2) Hearken well to the advice from @Mooseman in Post #6 concerning the Weak Links in the Chain of the Camshaft Phaser, The Timing Chain Set, The Timing Chain Intake and Crankshaft Sprockets & Chain Guides being presently worn out. Most importantly, by replacing the Timing over-extended Timing Chain Tensioner while the Motor is Stand-Mounted.

(3) Look that motor over with extra care when considering everything that can either be replaced or installed without incurring too much additional expense BEFORE the Engine is dropped into the "Mobile Tee-Blazer-Test-Bed". These are things like BOTH the Front Timing Cover Crankshaft Oil seal AND the Rear PTFE Large Diameter Rear Crankshaft Oil Seal. For another example... replacing the Old, Questionable Engine Flex-Plate with an inexpensive one... the Brand New GM OEM one Part # 12576272 is a good idea when the Motor is so accessible:

TBENVOYFLEXPLATE1.jpgTBENVOYFLEXPLATE2.jpgTBENVOYFLEXPLATE3.jpg

(4) If you decide to Investigate, Plasti-Gage and/or Replace all of the Crankshaft Mains Bearings, please remember that you have to remove the entire Crankshaft Brace-Bracket which demands removing and discarding all of the TTY Crankshaft Mains Cap Screws (Bolts) and replacing them with Bolt Set from GM (Felpro has the Updated TTY Head Bolt Set).

This is a Link to one of the aforementioned "Flickr-Bucket" Image Albums I've collected and protected specific to the views of New OEM Parts, Unique TTY Fasteners, Boxes and Packaging and their OEM Part Number Labels. Please seek additional advice from other very experienced Members ( @m.mcmillen and @Mooseman ) concerning any variations from these specific images and data when compared with your 2005 Series GM Atlas 4.2L Engine:

 
Last edited:
  • Like
Reactions: m.mcmillen

W4UWC

Original poster
Member
Nov 11, 2019
46
Nicholasville, KY
Thanks for the reply. I'll give more information as I get closer to testing the "new" engine from a 2005 Trailblazer. So far it looks to be in good shape. One broken exh manifold bolt into the cylinder head plus one snapped stud on the exhaust flange. I really need better drill bits because I hate drill exhaust fasteners with crappy old bits.

Here are some pics of my engine test vehicle where I can pull the dash off for easy access to the engine. The dash or front clip fits well where the cabin used to be so I don't have to store it as it takes up a lot of floor space. Lot easier than lifting the entire body so I'm glad I cut it up since the car was never going back on the road again. The new one is 05 engine so I'll use the 04 fuel rail. I'll also use the intake, throttle body, coils, plugs, sensors, and most everything else from the 04 since I know they work. I'm added the mechanical oil gauge to see if the oil pressure is OK. The plug was TOUGH to get out on this one. I was almost sure the 8 mm allen wrench was going to round the plug. I heated it and used PB blaster and it snapped loose. I also got some CRC freeze that I'm looking forward to trying.

The Harbor Freight engine stand holds the 4.2 nicely plus a 15 lb cat.
 

Attachments

  • 60540097515__270EAE2A-C1AF-4664-8B1A-3336A79F09F1.fullsizerender.JPG
    60540097515__270EAE2A-C1AF-4664-8B1A-3336A79F09F1.fullsizerender.JPG
    601.1 KB · Views: 9
  • IMG_0095.JPEG
    IMG_0095.JPEG
    513.9 KB · Views: 9
  • IMG_0096.JPEG
    IMG_0096.JPEG
    644.5 KB · Views: 9
  • IMG_0097.JPEG
    IMG_0097.JPEG
    558.8 KB · Views: 9
  • IMG_0100.JPEG
    IMG_0100.JPEG
    583.6 KB · Views: 9

mrrsm

Lifetime VIP Donor
Supporting Donor
Member
Oct 22, 2015
7,741
Tampa Bay Area
As for the Broken Off Piece of the Intake Manifold Trapped Fastener, you might want to try to use a Pick and a Thin, Flat Blade Screw Driver to gradually coax that segment out of the Intake side of the Engine Head. Since it no longer has any Direct Torque up to or beyond 89 Inch Pounds of fastening or retention force, it might just back right out with no need for the use of a Reverse Drill Bit.
 

W4UWC

Original poster
Member
Nov 11, 2019
46
Nicholasville, KY
As for the Broken Off Piece of the Intake Manifold Trapped Fastener, you might want to try to use a Pick and a Thin, Flat Blade Screw Driver to gradually coax that segment out of the Intake side of the Engine Head. Since it no longer has any Direct Torque up to or beyond 89 Inch Pounds of fastening or retention force, it might just back right out with no need for the use of a Reverse Drill Bit.
Most of the bolts snapped off recessed into the cyl head so no vice grips or hitting it at an angle to rotate it will get it out.
 

mrrsm

Lifetime VIP Donor
Supporting Donor
Member
Oct 22, 2015
7,741
Tampa Bay Area
I misunderstood that you were referring to the Exhaust Manifold Bolts. From a lot of personal experience with these problems… these Three Tools are indispensable for Sunken Broken Studs and Bolts Removal. The most important part is to get the initial Dead Center Punch Located PERFECTLY on the Bolt Face before starting with small drills and working up to the larger bits.

Note:

The GM Atlas 4.2L Engine Head with the GM OEM Exhaust Manifold uses the M8 X 1.25 X 25MM 10.9 Dimension Exhaust Manifold Flange Bolts. If you install a New Dorman Exhaust manifold… you’ll need the longer M8 X 1.25 X 30MM 10.9 Flange Bolts because the Dorman Cast Iron Flanges are 5MM Thicker.

(1) Neiko 02638A 5" Automatic Center Hole Punch | Adjustable Impact

https://www.amazon.com/dp/B008DXYOLC/?tag=gmtnation-20

(2) This is THE Best Cobalt Drill Bit Set I have EVER owned*** Alternatively, getting the HSS Titanium Nitride Bits set $23.00 for 29 Drill Bits… is a “STEEL”:

Warrior HSS Titanium Drill Bit Set:

https://www.amazon.com/dp/B00KYV7Z1W/?tag=gmtnation-20

(3) An array of Spiral Flute Style EZ Out Broken Bolt Extraction Tool Sets (an assortment available on Amazon):

https://www.amazon.com/s?k=broken+bolts+ez+out+set&ref=nb_sb_noss&tag=elightbars-20

*** I purchased the Warrior COBALT Drill Bit Set for around $60.00, but now they seem unavailable at any price. Other similar Pure Cobalt Bit Sets are still available:

43387080292_2d21979854_c.jpg43434993011_0f07736fb1_c.jpg43434978391_1be40e762e_c.jpg
 
Last edited:

W4UWC

Original poster
Member
Nov 11, 2019
46
Nicholasville, KY
A few updates. Put the engine from the 05 Trailblazer into the 04 Envoy test bed. Runs like a champ! 80 psi at start-up and 20 psi at hot idle. No leaks. No overheating... it won't go above 180F but with no hood and an exposed heater core acting as a radiator then I can understand why it doesn't build much heat (at idle) I can't drive it much so it's hard to say anything about power but I just want to vet it out before sticking into the 05 Envoy and hooking everything up.

First time I've used the pressure gauge on the transmission. 30 psi in P and forward gears. 90 psi in reverser. This tranny is bad as it slips and 3rd and 4th aren't usable but from what I can tell the pressure it too low anyway. Transmission work is needed on another vehicle so I'll be sharing those 4L60 experiences soon as I've never been into one beyond the valve body.

The front clip is getting easier to take off and on with practice. Having the engine exposed makes hooking up all the grounds so much easier. I had a pile of coils provided from previous owners who threw coils at their misfires and when they gave up they gave me the coils with the vehicle. I tested 12 and 10 are good so I've got a stash of coils to last a long time! Also checked out a throttle body that someone appears to have used silicone on to mate to the intake. After a very thorough cleaning it performs find. It's nice to have spare parts.

Next... I will keep testing this engine and looking for leaks then pull it and prep it to go into the 05 Envoy. It's the nicest one I have so I want the engine that goes into it to be the best. The last engine I tested had low pressure at hot idle so I want to take the oil pump/front cover off another engine and put it on that engine to see what happens. This test buggy allows for ease to do this work. Now that we all are quarantined then we have plenty of time for stuff like this!

Regarding the exh manifold bolts... one broke on the Trailblazer engine and no easy-out or reverse drill bit would take it out. It was stuck in there so I drilled it out and tapped it. Although I didn't drill perfectly straight but it's still got some holding power. Better than nothing.
 

Attachments

  • FGCY8766.JPG
    FGCY8766.JPG
    601.1 KB · Views: 10
  • IMG_0147.JPG
    IMG_0147.JPG
    507.4 KB · Views: 10
  • IMG_0148.JPG
    IMG_0148.JPG
    445.6 KB · Views: 10
  • IMG_0149.JPG
    IMG_0149.JPG
    422.2 KB · Views: 9

Forum Statistics

Threads
23,335
Posts
638,024
Members
18,538
Latest member
Mynamesjeff

Members Online