Hi all I’m new here and have a quick question. I want to change my lower control arm tomorrow along with the inner and outer tie rod ends, anyway I’m assuming I have to take the axel off and the inner tie rod on the other side I took off with a pipe wrench (which I know isn’t perfect but it worked lol) anyway I was wondering if anyone knew what the size socket I need to take the bolt off for the axel and what size the bolts where (the big ones) that hold the lower control arm on? I just want to make sure I have what I need before I rip it all apart and go ah sh$& I need______! Btw I’m replacing the whole arm not pressing new bushings in. Thanks for all the help
You are using an out of date browser. It may not display this or other websites correctly.
You should upgrade or use an alternative browser.
You should upgrade or use an alternative browser.
NEED HELP Removal of lower control arm help, just need bolt sizes
- Thread starter WeaponX
- Start date
- Jul 22, 2015
- 2,724
Lower control arm bolt size
I am changing out my lower control arms and was hoping someone could tell me size of the high torque bolts that connect the arm to the frame. I want to make sure that I have the correct size in a heavy duty socket that will stand up to the torque. Thank you
21mm. Make sure you torque them to spec. Also at the link (which was found via Google, using keywords: lower control arm bolts trailblazer )
One thing not mentioned...if you scribe the outline of the position of the existing LCAs before removing, it'll make it that much easier to put the new ones in a somewhat correct position (you'll need an alignment afterward, in any case)
Oh, and welcome!
Thank you for the reply. I don’t have a torque wrench and I have changed everything in the suspension (trust me I mean everything from upper control arms to ball joints to links etc) and I’ve never torqued anything. What is the worst case from not doing so? Is 21mm the size or the nut for the axel outside the rotor? Thank you for your time
P.S. as far as the alignment I planned on doing a backyard one myself until I can get it professionally done next weekend
Mooseman
Moderator
The axle hub nut is 35mm. 36mm will also work. You will need a torque wrench, especially for the axle nut (103 ft/lbs) so as to ensure proper retention. The lower control arm bolts need a ton of torque. This should help:


16vcabman
Member
Why are you removing the axles to do lower control arms? I have never done this before. You drop the ball joint and shock mount at a arm. Then unbolt bracket from A-ARMS. Pull A-ARMS out and then bracket.
Mooseman
Moderator
You have to undo the axle nut to have enough clearance to get the ball joint stud to clear the lower knuckle. Same as replacing the lower ball joint.
Now see when I replaced the lower ball joint I didn’t remove it nor did I use a ball joint press for top or bottom ball joints (so much easier and quicker with a metal bar with a hollow middle and a mallet and just pounding them in and out, all four done this way), anyway I’ve never done a lower control arm and the YouTube videos I did see all referenced Taking it off.
I didn’t get to it today but will and will post if I needed to remove it or not, I am going to try first not too
I didn’t get to it today but will and will post if I needed to remove it or not, I am going to try first not too
littleblazer
Member
- Jul 6, 2014
- 9,272
Be sure to not break your bolt off in the frame nut like I did... that was fun. If it doesn't go, heat it. Trust me, the retention nut doesn't exist...
Thanks I hope it doesn’t break off. I put this off till this Saturday better weather but I forgot to ask, I’m changing the inner and putter tie rod ends, on the other side I got lucks and a small pipe wrench removed the inner tie rod end but Incase my luck doesn’t continue (which it never does) what tool is used to remove the inner tie rod end? Really thanks guys for all the help I really appreciate it all
- Jul 22, 2015
- 2,724
The pipe wrench is what most ppl use on those, I think. Use thread locker on those, too. And you'll likely need to put heat on the existing ones to break the factory red locker on those nuts. A couple of minutes w/ a propane torch is enough.
Finally, you can rent ball joint kits, etc., for free at major parts chains. Having the right tools doesn't then require 'luck', either in the R&R of those parts, or in hoping they're not compromised & give way, putting you, family, and others at risk. Just a thought.
Finally, you can rent ball joint kits, etc., for free at major parts chains. Having the right tools doesn't then require 'luck', either in the R&R of those parts, or in hoping they're not compromised & give way, putting you, family, and others at risk. Just a thought.
Maverick6587
Member
Please go rent a torque wrench from an auto parts store. At least for the axle nut and your lug nuts. Too tight on either and you can burn out your wheel bearing.Thank you for the reply. I don’t have a torque wrench and I have changed everything in the suspension (trust me I mean everything from upper control arms to ball joints to links etc) and I’ve never torqued anything. What is the worst case from not doing so? Is 21mm the size or the nut for the axel outside the rotor? Thank you for your time
littleblazer
Member
- Jul 6, 2014
- 9,272
The axle nut sets no preload on the hub assembly... it goes through the center race. I suppose you could deform it by overtightening it but that would show other problems as well. 2wd trucks use the same hub with no axle... so it shouldn't kill the bearing.Please go rent a torque wrench from an auto parts store. At least for the axle nut and your lug nuts. Too tight on either and you can burn out your wheel bearing.
The ball joints both upper and lower have been replaced and the kits as nothing more than a PITA a couple good hits and they popped right out and went in with ease.
I have an impact gun for the lugs and I can’t see how I could possibly tighten the axel bolt enough to destroy the bearings (which I think are bad and my next project) but I could be wrong.
I plan on getting a torque wrench this weekend and going over all the bolts I’ve done in the past just to be safe.
I know a lot but I need to learn a lot so I’m grateful for all the help from you guys, thank you
Well, even with heat that front bracket bolt broke off on me. Any suggestions how to get this broken bolt out?Be sure to not break your bolt off in the frame nut like I did... that was fun. If it doesn't go, heat it. Trust me, the retention nut doesn't exist...
littleblazer
Member
- Jul 6, 2014
- 9,272
Hammer on the broken stud to pop the retention nut through the frame. I used vise grips and map gas after it was out to remove what was left of the stud and reuse the nut.Well, even with heat that front bracket bolt broke off on me. Any suggestions how to get this broken bolt out?
littleblazer
Member
- Jul 6, 2014
- 9,272

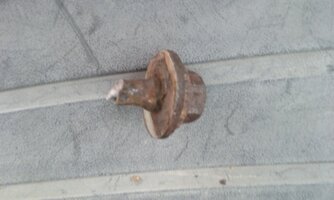
Ok, am I understanding that there's also a nut in the frame? Or is the thread on the frame? I plan on getting a new bolt from the junkyard. Can't get the bracket out because it's getting hung up on the remaining part of the bolt. Thought about removing the sway/stabilizer bar and mount to access the top of the bolt. This is what my bolt looks like (below). I'm a female with basic skills, so I appreciate any suggestions .Hammer on the broken stud to pop the retention nut through the frame. I used vise grips and map gas after it was out to remove what was left of the stud and reuse the nut.
Attachments
Last edited:
Mooseman
Moderator
The nut is welded to the frame. If you can access it from the top, best is to heat it red with a torch and turn the remains of the bolt out, if it's accessible from the top. Alternatively, again if it's in an accessible spot on top, punch it out and use a regular nut. The front ones are accessible like that for sure, not sure about the rear ones though.
littleblazer
Member
- Jul 6, 2014
- 9,272
So laying under the car looking up at the frame rail and bracket you can see the sheared part of the bolt. What I did was take a punch or chisel... what ever let's you get a good blow on the snapped part of the bolt, and use a big ass hammer to drive it out. It should go pretty easy. You can fish the bolt through the frame rail then and either replace the nut with a regular one or try and save it by using vise grips like I had done. I attached a crude drawing to illustrate. I used a chisel that was slightly smaller than the alignment notch.Ok, am I understanding that there's also a nut in the frame? Or is the thread on the frame? I plan on getting a new bolt from the junkyard. Can't get the bracket out because it's getting hung up on the remaining part of the bolt. Thought about removing the sway/stabilizer bar and mount to access the top of the bolt. This is what my bolt looks like (below). I'm a female with basic skills, so I appreciate any suggestions .
Trust me... it's not welded... it's some oddball press in taper thing. Mine popped out with a few blows of a hammer. Unless you're referring to the rear. That to me looks like the front though. Idk.The nut is welded to the frame. If you can access it from the top, best is to heat it red with a torch and turn the remains of the bolt out, if it's accessible from the top. Alternatively, again if it's in an accessible spot on top, punch it out and use a regular nut. The front ones are accessible like that for sure, not sure about the rear ones though.

I got lucky I guess not one of the bolts broke, no heat needed and they all on both sides came out pretty easy so I’m assuming sometime before I got someone was working on them since they were so easy to remove.
As far as getting it out I’d drill threw it if all other options fails because at the end you might have to retired to bolt hole
As far as getting it out I’d drill threw it if all other options fails because at the end you might have to retired to bolt hole
Congratulations on your success. But because these Badly Rusted Fasteners can often be snapped off so easily during this R&R and are so difficult to replace... FWIW... If you have not as yet re-installed them... Others would probably appreciate knowing what the Dimensions of the Bolts are that you've successfully removed and what they look like. Armed with that accurately recorded data... those Bolts can then be obtained here:
 www.uboltit.com
Overall Lengths
Partial Thread Lengths
Un-threaded Shank Lengths between the undersides of Bolt Faces to the start of the Thread Lines
Metric Markings on the Top Face of the Bolts
Metric Dimensions for Pitch and Thread Count... ex: M10 X 1.50 X 75MM Course Thread vs. having Fine Threads @1.25, etc.
While this VOP (Video Original Poster) has produced a Great Series about how to perform Major Front Suspension Repairs via a Complete Suspension Swap... He shows precisely Where and what Fasteners for the LCAB (Lower Control Arm Bracket) are involved at 5:40 into Video #4 of his Multi-Part Suspension Repair series:
U-Bolts, Eye Bolts, & Fastening Hardware Manufacturer & Supplier | U-Bolt-It, Inc.
At U-Bolt-It, we custom manufacture bolts and fasteners made to meet all your requirements and in all materials from stainless steel and exotic materials.
www.uboltit.com
Overall Lengths
Partial Thread Lengths
Un-threaded Shank Lengths between the undersides of Bolt Faces to the start of the Thread Lines
Metric Markings on the Top Face of the Bolts
Metric Dimensions for Pitch and Thread Count... ex: M10 X 1.50 X 75MM Course Thread vs. having Fine Threads @1.25, etc.
While this VOP (Video Original Poster) has produced a Great Series about how to perform Major Front Suspension Repairs via a Complete Suspension Swap... He shows precisely Where and what Fasteners for the LCAB (Lower Control Arm Bracket) are involved at 5:40 into Video #4 of his Multi-Part Suspension Repair series:
Last edited:
littleblazer
Member
- Jul 6, 2014
- 9,272
They're all the same for the lower bracket.Thanks for the suggestions guys! Gonna be working on it more over the weekend. Fingers crossed this goes easily! This was a lot more labor than I thought it was going to be. Anyone know if the back 2 bolts are the same size as the front?
GM (LCAB) Lower Control Arm Bracket Bolt Part Number 1151857
11518576
M16 x 2 x 70

Image Credit Courtesy @Eric04 's Post #4 at this Link:
 gmtnation.com
From @seanpooh via this Link:
https://gmtnation.com/forums/threads/lower-control-arm-bolt-size.15628/
Tighten the Front Lower Control Arm Bracket Mounting Bolt to 265 N·m (195 Ft Lbs).
Tighten the Rear Lower Control Arm Bracket Mounting Bolts to 240 N·m (177 Ft Lbs). Install the lower control arm to the lower control arm bracket.
Install the lower control arm to lower control arm bracket mounting bolts.
Important:
Ensure that the lower control arm is parallel to the lower control arm bracket during the installation and tightening of the lower control arm mounting bolts and nuts. This will ensure correct alignment of the lower control arm bushings.
Install the Lower Control Arm to Lower Control Arm Bracket Mounting Nuts.
Tighten the nuts to 130 N·m (96 lb ft).
11518576
M16 x 2 x 70
Image Credit Courtesy @Eric04 's Post #4 at this Link:
Help with GM Bolt Part Number
I recently replaced most of the front end components on my 2004 Trailblazer with 146 K. Upper control arm bushings, upper ball joints, both lower control arm brackets, etc. The job was extremely tough, but I'm glad it's done because the rubber in the upper control arms bushings was completely...
From @seanpooh via this Link:
https://gmtnation.com/forums/threads/lower-control-arm-bolt-size.15628/
Tighten the Front Lower Control Arm Bracket Mounting Bolt to 265 N·m (195 Ft Lbs).
Tighten the Rear Lower Control Arm Bracket Mounting Bolts to 240 N·m (177 Ft Lbs). Install the lower control arm to the lower control arm bracket.
Install the lower control arm to lower control arm bracket mounting bolts.
Important:
Ensure that the lower control arm is parallel to the lower control arm bracket during the installation and tightening of the lower control arm mounting bolts and nuts. This will ensure correct alignment of the lower control arm bushings.
Install the Lower Control Arm to Lower Control Arm Bracket Mounting Nuts.
Tighten the nuts to 130 N·m (96 lb ft).
Last edited:
Thank you all for the help! Finally got the bolt out and completed the job! I couldn't have done it without the help!
gmcman
Member
- Dec 12, 2011
- 4,681
I replaced my lower control arm brackets not too long ago, and torqued to spec.
That day I dropped it off for the alignment and reminded them of the torque values of those bolts.
First time I got on the brakes kinda hard they ended up doing another alignment... ...as the bracket went backwards due to insufficient bolt torque.
Even after that 2nd alignment, I brought my torque wrench to triple check before I drove it.
That day I dropped it off for the alignment and reminded them of the torque values of those bolts.
First time I got on the brakes kinda hard they ended up doing another alignment...
...as the bracket went backwards due to insufficient bolt torque.Even after that 2nd alignment, I brought my torque wrench to triple check before I drove it.
seanpooh
Member
- Jan 24, 2012
- 461
I've been where you were at gmcman when I didn't do my own alignments. Places such as belle tire and others will just set the toe and let you go.
Yes they have the reference websites to tell them if caster and camber is adjustable along with torque specs. But as most shops are, guys are getting paid flat rate or commission. Not much time is going to be spent on details.
Yes they have the reference websites to tell them if caster and camber is adjustable along with torque specs. But as most shops are, guys are getting paid flat rate or commission. Not much time is going to be spent on details.
JarredBrink
Member
Hi guys, so same dread thing happened to me: the front lower control arm bracket to frame bolt nut broke loose from the frame. Now I cant remove the bolt as the nut keeps turning when turn the bolt. Does anyone know what size this nut is? I'm hoping to try to get a socket on top of it to keep it in place while I finish loosen the bolt, but I don't know the size. Already tried a pair of vice grips but they don't hold the nut.
Correct. This design does not preload or load the bearing at all. It's like many ford 4wd trucks too.The axle nut sets no preload on the hub assembly... it goes through the center race. I suppose you could deform it by overtightening it but that would show other problems as well. 2wd trucks use the same hub with no axle... so it shouldn't kill the bearing.
All you are doing is tightening the splined shaft of the cv shaft with the nut and squeezing a solid metal tube or sleeve in the hub assembly. So unless you strip it off, crack the nut, snap off the shaft....it won't make much difference. You don't want it to get loose though or it will click and pop.
THIS is UNLIKE most GM FWD cars and minivans as they do load the bearing and too loose they click and prob not good on bearing and too tight...the bearing life suffers...BUT with the average replacement low quality hub life being about 10-20 months.....how can you really tell anymore?????
While we're on it....what is the easiest way to do these arms? I did a driver's side last year and it was a bear.
Did it on the ground with jack and stands but getting it twisted and getting shaft into hole or whatever it was I can barely remember was a pain.
I ended up using a 6 foot spud bar to pry it.
Did it on the ground with jack and stands but getting it twisted and getting shaft into hole or whatever it was I can barely remember was a pain.
I ended up using a 6 foot spud bar to pry it.
Mooseman
Moderator
Mine was so seized and the top side nut was inaccessible so I wound up cutting it off with the torches. All I can suggest is try different sockets or wrenches.
littleblazer
Member
- Jul 6, 2014
- 9,272
Aaronb
Member
How do you get the nut to stay in the frame after reinstall??Should look something like this when done...
View attachment 88504
Aaronb
Member
Did you figure out this problem I am having it right now myselfHi guys, so same dread thing happened to me: the front lower control arm bracket to frame bolt nut broke loose from the frame. Now I cant remove the bolt as the nut keeps turning when turn the bolt. Does anyone know what size this nut is? I'm hoping to try to get a socket on top of it to keep it in place while I finish loosen the bolt, but I don't know the size. Already tried a pair of vice grips but they don't hold the nut.
6716
Member
- Jul 24, 2012
- 836
I think at that point it's kinda like any other nut, it just isn't secured to the frame any more. So I would put the bolt through and get the nut on the threads.How do you get the nut to stay in the frame after reinstall??
littleblazer
Member
- Jul 6, 2014
- 9,272
That's what I did.I think at that point it's kinda like any other nut, it just isn't secured to the frame any more. So I would put the bolt through and get the nut on the threads.
Aaronb
Member
Mooseman
Moderator
I wonder if they make U-nuts that big (also known as speed nuts)? Tried searching for M16 or 5/8" U-nuts and came up empty. I don't think there's a slot or an open side so I don't think that would work neither. They look like this:
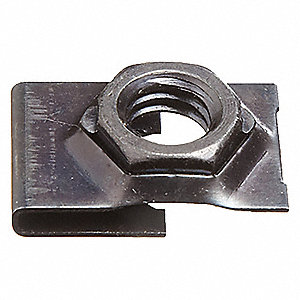
Might have to cut a window in the frame so you can put an open end wrench on the nut. I can't think of anything else at this point.
Might have to cut a window in the frame so you can put an open end wrench on the nut. I can't think of anything else at this point.