Members projector retrofits

NateDG

Member
Oct 30, 2014
216
Normal, Illinois
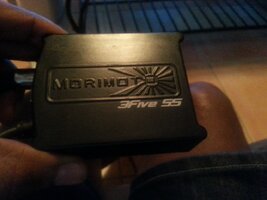
Are these Morimoto SS ballasts their first version from years ago? Never heard of or seen SS used with their ballasts.
The guy I'm buying this setup from said everything was bought / built new in January of '14. I sure hope they don't fail on me cuz I don't know if the warranty from TRS will transfer to me. The guy I'm buying them from said J.B. at BFC said that it would but I can't be fully sure of that. I'm also concerned cuz someone said something about the cold causing issues. Well here in central Illinois, it gets colder than a well diggers behind.
 
Last edited:
  • Like
Reactions: dmanns67

Blckshdw

Moderator
Nov 20, 2011
10,747
Tampa Bay Area, FL
Are these Morimoto SS ballasts their first version from years ago? Never heard of or seen SS used with their ballasts.

built new in January of '14.

I think I got mine from their Black Friday sale in 2013, when I got everything for my quad setup. I'm guessing, unless they are gonna replace them with the new XB35/55 ballasts, the warranty is no longer valid.

20160116_205950.jpg
 
  • Like
Reactions: dmanns67

Blckshdw

Moderator
Nov 20, 2011
10,747
Tampa Bay Area, FL
Ballast warranty is 2 years on Morimoto units, 1 year on OEM units.
 

NateDG

Member
Oct 30, 2014
216
Normal, Illinois
Well I emailed both TRS and BFC today and was told by BFC that none of their warranties offered to the original buyer can transfer to a subsequent buyer, like what I've done. That's not a surprise nor is it unexpected. Regarding the recall of the SS ballasts, BFC said I need to get in touch with TRS because they're good at being lenient with their warranties. I messaged with Dave @ TRS who said they would gladly replace all 4 ballasts with the XB series assuming they get the pics showing the serial and cut cables. The only caveat is that in order to honor it at this point, the original buyer would have to send the pics, but I could get the replacements drop shopped directly to me. This means I have to get BFC to agree to get involved. I can take the pics, send them to BFC, but they are who actually have to initiate the replacement. I've reached back out to them to see if they're willing to do this (if even for compensation for someone's time to send a couple emails back n forth) and as of yet, I haven't heard anything back. This isn't like, asking for more than any reasonable human would ask for, is it? I just don't want those ballasts crapping out on my family vehicle at a really bad time (which is always my luck)... Thoughts?
 

Blckshdw

Moderator
Nov 20, 2011
10,747
Tampa Bay Area, FL
This isn't like, asking for more than any reasonable human would ask for, is it? I just don't want those ballasts crapping out on my family vehicle at a really bad time (which is always my luck)... Thoughts?

Well, warranty honored or not, if you're driving along with the family, and more than 2 of the ballasts die on you in a short time frame, you're still gonna be without their usage until new ones can be shipped out. Just a matter of if you have to pay for them or not. And I'm thinking since you have to have a 3rd party involved to save that $220, that's gonna add to your downtime.

So it comes down to which is top priority, minimizing downtime or cost?

Edit: That's pretty cool that they'll still honor the warranty outside of their stated terms. If one of my other ones craps out, then I may try them. Right now the odd ball out is on my test bench.
 

NateDG

Member
Oct 30, 2014
216
Normal, Illinois
Well, warranty honored or not, if you're driving along with the family, and more than 2 of the ballasts die on you in a short time frame, you're still gonna be without their usage until new ones can be shipped out. Just a matter of if you have to pay for them or not. And I'm thinking since you have to have a 3rd party involved to save that $220, that's gonna add to your downtime.

So it comes down to which is top priority, minimizing downtime or cost?

Edit: That's pretty cool that they'll still honor the warranty outside of their stated terms. If one of my other ones craps out, then I may try them. Right now the odd ball out is on my test bench.
I haven't actually installed any of this yet, I'm waiting to see how this all comes out in the wash prior to risking anything happening.
 

dmanns67

Member
Apr 3, 2013
32,979
Ohio
That's strange that they told you the original buyer had to initiate the process. Maybe since this is an older issue with a large recall :undecided: I had a retrofitter do my headlights and when I had a bulb go through an extreme color shift, grounding wire break on another bulb, and a ballast that stopped working, I contacted TRS directly and they sent me out a replacement. No questions asked.

Have you already purchased the retro'ed headlights and have them in your possession?
 

NateDG

Member
Oct 30, 2014
216
Normal, Illinois
That's strange that they told you the original buyer had to initiate the process. Maybe since this is an older issue with a large recall :undecided: I had a retrofitter do my headlights and when I had a bulb go through an extreme color shift, grounding wire break on another bulb, and a ballast that stopped working, I contacted TRS directly and they sent me out a replacement. No questions asked.

Have you already purchased the retro'ed headlights and have them in your possession?
I've purchased them and should have had them today except for the lovely winter storm we had mucked up the UPS operations at the main hub in Louisville. They'll be here tomorrow.
As far as BFC having to initiate the warranty replacement, JB got back to me and is glad to do it. I just gotta send them the pics of the cut cords and they'll pass them on to TRS. Getting all 4 ballasts replaced with the XB line for the cost of shipping. I'm really impressed with how cool both BFC and TRS are being to a secondary buyer of this build.

EDIT: I meant to ask this earlier but this build is using a 9006 splitter for a quad low and high beam output; I've done the diode mod for 6-hi so should I undo that for this setup? I've already preemptively done the cap mod for DRL so this is the last thing I'm unclear about.
 

dmanns67

Member
Apr 3, 2013
32,979
Ohio
I've purchased them and should have had them today except for the lovely winter storm we had mucked up the UPS operations at the main hub in Louisville. They'll be here tomorrow.
As far as BFC having to initiate the warranty replacement, JB got back to me and is glad to do it. I just gotta send them the pics of the cut cords and they'll pass them on to TRS. Getting all 4 ballasts replaced with the XB line for the cost of shipping. I'm really impressed with how cool both BFC and TRS are being to a secondary buyer of this build.

EDIT: I meant to ask this earlier but this build is using a 9006 splitter for a quad low and high beam output; I've done the diode mod for 6-hi so should I undo that for this setup? I've already preemptively done the cap mod for DRL so this is the last thing I'm unclear about.

That's great news. I am glad BFC is cooperating. TRS has always been awesome with their customer service. I have been using them since 2012. That even better that you are getting the XB line instead of the 3Five line. The wife has the XB35 ballasts on her F150 and those ballasts seem to warm up the HID bulb much quicker than my 3Five ballasts.

Great start on the cap mod, that's a must. Leave the 6-hi diode mod alone, you are good there. I have the same setup.

The reason for the 9006 splitter is to hook one end to the hi beam input socket. From there you will have two male ends open on the splitter. One of the male ends on the splitter will hook into the plug for the bi-xenon solenoid. That way when you turn your high beams, it will send power to the solenoid for the cutoff shield causing the shield to move forward and create a hi beam.

With the other male end on the splitter, you can use that to install a bulb in your high beams. I have Cree LED headlights for my hi beams. Its a bit over kill, but I like the extra light.

Without having the diode mod hooked up, when you turn on your hi beams, the solenoid would move the cutoff shield forward inside the projector, but the low beam HID would turn off. Basically, it would function as stock headlights do without the diode mod.
 
  • Like
Reactions: NateDG

NateDG

Member
Oct 30, 2014
216
Normal, Illinois
That's great news. I am glad BFC is cooperating. TRS has always been awesome with their customer service. I have been using them since 2012. That even better that you are getting the XB line instead of the 3Five line. The wife has the XB35 ballasts on her F150 and those ballasts seem to warm up the HID bulb much quicker than my 3Five ballasts.

Great start on the cap mod, that's a must. Leave the 6-hi diode mod alone, you are good there. I have the same setup.

The reason for the 9006 splitter is to hook one end to the hi beam input socket. From there you will have two male ends open on the splitter. One of the male ends on the splitter will hook into the plug for the bi-xenon solenoid. That way when you turn your high beams, it will send power to the solenoid for the cutoff shield causing the shield to move forward and create a hi beam.

With the other male end on the splitter, you can use that to install a bulb in your high beams. I have Cree LED headlights for my hi beams. Its a bit over kill, but I like the extra light.

Without having the diode mod hooked up, when you turn on your hi beams, the solenoid would move the cutoff shield forward inside the projector, but the low beam HID would turn off. Basically, it would function as stock headlights do without the diode mod.
I'm a little confused then because on the BFC website where it showcases their work, in the post talking about the very setup I bought, it says a "true quad hi beam AND low beam". I took that to mean that something in the way they wired something means all 4 lights on for low beam, then flip to hi beam and all 4 cutoff shields move forward for quad hi beam also. *scratches head*
 

Blckshdw

Moderator
Nov 20, 2011
10,747
Tampa Bay Area, FL
You will have 2 relay harnesses powering your 4 ballasts, which are then connected to the bulbs. The high beam splitters turn the one 9005 connector into 2, since you'll have 2 projectors in each headlight, which means 2 high beam solenoids will need to be triggered. Make more sense?
 
  • Like
Reactions: NateDG and dmanns67

dmanns67

Member
Apr 3, 2013
32,979
Ohio
My bad. Forgot your setup is quad bi-xenon projectors. Sorry if I confused you. Carlton is the quad projector master.

I get the 9005 high beam splitter setup for the cutoff shield solenoids, but in order to run both HIDs in each headlight for the low beams, will you need a splitter on the 9006 plug as well?
 

NateDG

Member
Oct 30, 2014
216
Normal, Illinois
My bad. Forgot your setup is quad bi-xenon projectors. Sorry if I confused you. Carlton is the quad projector master.

I get the 9005 high beam splitter setup for the cutoff shield solenoids, but in order to run both HIDs in each headlight for the low beams, will you need a splitter on the 9006 plug as well?
This is the description from when the build was originally posted on eBay...
 

Blckshdw

Moderator
Nov 20, 2011
10,747
Tampa Bay Area, FL
Carlton is the quad projector master.

Meaning, I probably made every mistake possible, so I can certainly tell you what NOT to do!! :laugh:

you need a splitter on the 9006 plug as well?

:yes: This is true, from the description posted (2nd to last line item) it appears either there's a splitter pre-installed (that's the route I took with mine), or they modded the two 9006 connectors into a single one. The latter would be an inconvenience if you decided at a later time to change to just a dual low beam setup.
 
  • Like
Reactions: dmanns67 and NateDG

NateDG

Member
Oct 30, 2014
216
Normal, Illinois
Meaning, I probably made every mistake possible, so I can certainly tell you what NOT to do!! :laugh:


:yes: This is true, from the description posted (2nd to last line item) it appears either there's a splitter pre-installed (that's the route I took with mine), or they modded the two 9006 connectors into a single one. The latter would be an inconvenience if you decided at a later time to change to just a dual low beam setup.
So knowing this info, should I still keep in place the 6-hi diode mod?
 

Blckshdw

Moderator
Nov 20, 2011
10,747
Tampa Bay Area, FL
Yes, for the same explanation that @dmanns67 laid out. Triggering the high beams, without the diode mod, would only flip the high beam shields in the projectors, but the ballasts would shut off. Useless. The 6 hi mod will keep the lights on, while the shield drops, and give you your high beam functionality. :thumbsup:
 
  • Like
Reactions: dmanns67 and NateDG

NateDG

Member
Oct 30, 2014
216
Normal, Illinois
So I got the package today. The DS headlight is busted. The projector housings are broken loose and just flopping around. The low beam shroud is busted free of its mooring as well. Filed a UPS damage claim but who knows how that will turn out being as this is a custom item and other than what I actually paid, a true price tag can't be put on the damages or repair costs. I also talked to BFC and he said it sounds like a few hundred bucks to repair. That was also before I sent him the pictures and the short video I took.
It seems to me that the projectors are both mounted to the reflector bowl and then that as a whole unit was mounted inside the housing. The projectors move together and one won't move while holding the other still. That says to me it should be a relatively easy fix and as long as I get that whole "unit" mounted back where it originally was, I shouldn't have to mess with alignment or anything like that.
These are aftermarket headlights so they didn't have the permaseal but BFC did apparently use a "double butyl seal" as listed in the build specs. I'm thinking I have no choice but to attempt this repair on my own so are there any volunteers to hold my hand through it??? Haha...

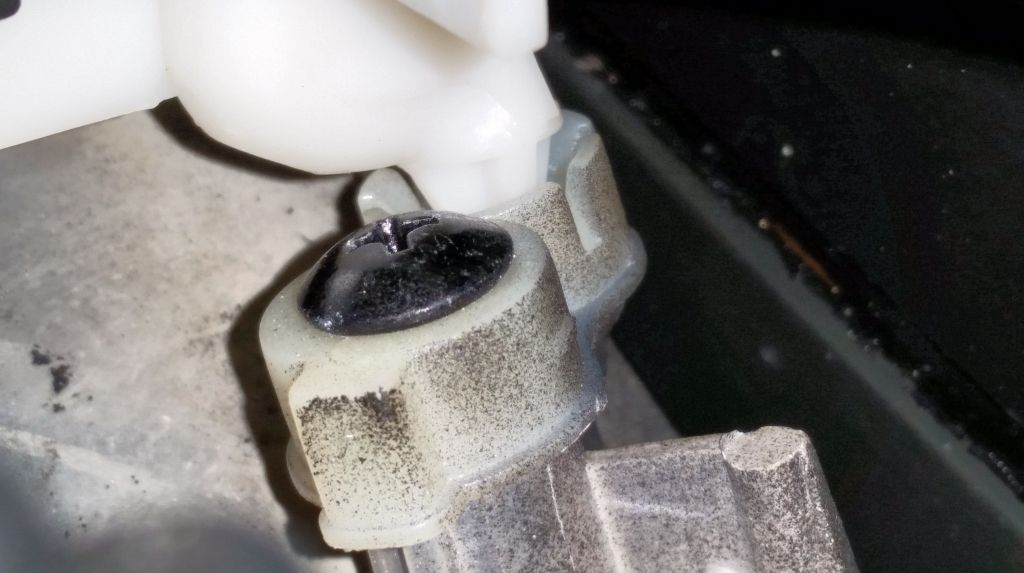
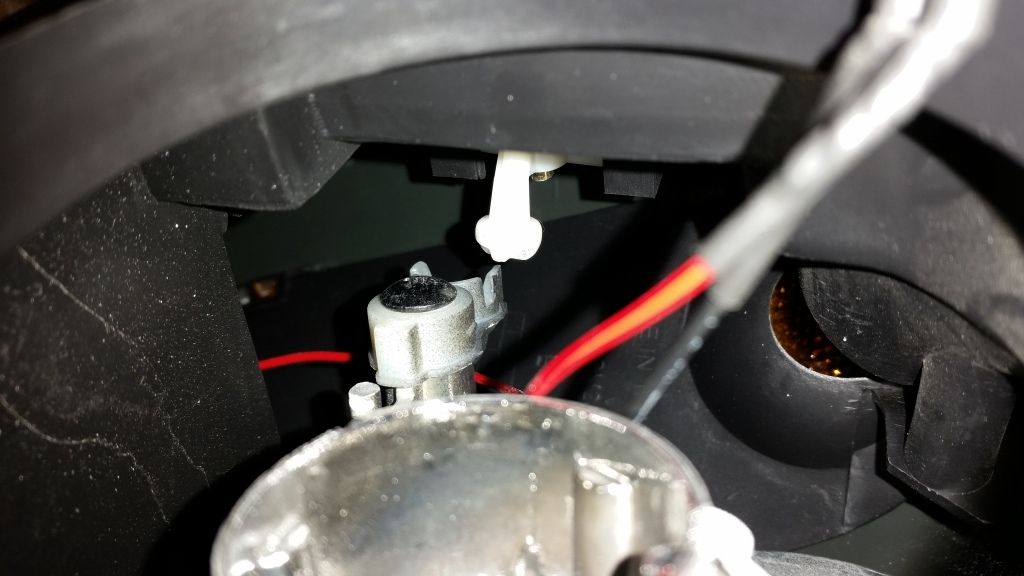
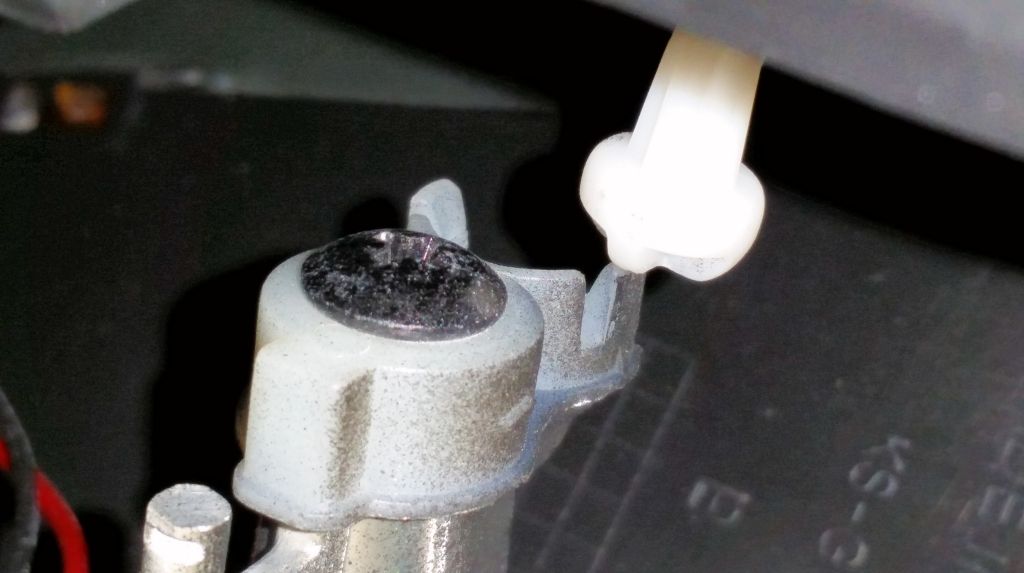
EDIT: I did a little digging and it seems like this is the culprit. Might be a simple fix after all. The first pic is the side where the projectors wobble. The second pic is that same area in the other housing. Seems they incorporated all available adjustment screws and one just broke. Idk. Doesn't fix the shroud which is definitely detached, but that's small fish for right now.


Last edited:

dmanns67

Member
Apr 3, 2013
32,979
Ohio
Damn man, that sucks. I see the same issue mentioned by many other retrofitters that mail headlights to customers. Apparently UPS will only pay for what the claimed value of the item was listed at when shipped. Hopefully BFC had insurance on the package.

The "double butyl" should not be an issue, except causing more work to remove it. I am assuming BFC lined the groove where the headlight housing and lens meet with butyl then also applied a layer of butyl over top of the headlight housing and lens where they meet. Double protection.

I would definitely try to repair myself before spending a few hundred bucks for BFC to repair them. Could also risk being damaged by UPS again after the repair. I have seen your other work, so you should be able to handle this with no problems. After the repair, I would install the headlights on the vehicle before sealing the headlight lens back on just to double check the alignment cutoff of all four projectors. I would hate to seal the lens back on and find out that your cutoff lines are not level.
 
  • Like
Reactions: NateDG and Blckshdw

Blckshdw

Moderator
Nov 20, 2011
10,747
Tampa Bay Area, FL
Nate, that first pic makes it look like the ball joint just popped loose from the socket on the back of the reflector bowl. Is there any actual breakage, or did it just pop loose? If it just popped off, then a fix will be easy. If the mount actually broke, that's a whole other can of worms.

I can't tell if there's anything broken in the 2nd pic.
 

NateDG

Member
Oct 30, 2014
216
Normal, Illinois
Nate, that first pic makes it look like the ball joint just popped loose from the socket on the back of the reflector bowl. Is there any actual breakage, or did it just pop loose? If it just popped off, then a fix will be easy. If the mount actually broke, that's a whole other can of worms.

I can't tell if there's anything broken in the 2nd pic.
The second pic is of the "good" side. It's definitely a ball n joint socket. The ball being on the back side of the housing and joining the adjustment screw. The socket is on the reflector bowl side and half of it is broke. I'm assuming the heat made the plastic brittle and when the box got kicked /thrown/punched into the back of a UPS truck, it finally just gave. Let me see if I can get some more descriptive photos.
 

Blckshdw

Moderator
Nov 20, 2011
10,747
Tampa Bay Area, FL
The second pic is of the "good" side. It's definitely a ball n joint socket. The ball being on the back side of the housing and joining the adjustment screw. The socket is on the reflector bowl side and half of it is broke. I'm assuming the heat made the plastic brittle and when the box got kicked /thrown/punched into the back of a UPS truck, it finally just gave. Let me see if I can get some more descriptive photos.

Ahh, that sucks man. I don't think temperature had anything to do with it, more likely the increased weight of the projectors in the reflector bowl, plus getting jostled around during shipping. When I had my quads, the passenger side reflector bowl broke loose as well. But it was the ball of the stationary mount broke loose from the stem.

In your case, the fix will still be pretty easy, just time consuming. What I suggest is try to find a GMT360/370/305 in a junk yard, and grab one of the headlights. Doesn't have to be in good condition. Get it home, tear into it, and salvage one of the ball joint sockets to use in your retro. :thumbsup:
 

NateDG

Member
Oct 30, 2014
216
Normal, Illinois
Ahh, that sucks man. I don't think temperature had anything to do with it, more likely the increased weight of the projectors in the reflector bowl, plus getting jostled around during shipping. When I had my quads, the passenger side reflector bowl broke loose as well. But it was the ball of the stationary mount broke loose from the stem.

In your case, the fix will still be pretty easy, just time consuming. What I suggest is try to find a GMT360/370/305 in a junk yard, and grab one of the headlights. Doesn't have to be in good condition. Get it home, tear into it, and salvage one of the ball joint sockets to use in your retro. :thumbsup:
Finally got photo bucket to start cooperating again...
Here's the PS good joint

Here's the DS broken one...

And closer...

Can you think of a way to snake around the projector to get that shroud repositioned and a way to snake in a couple small bits of steel stik? I've never done a bake/open and I *really* don't wanna learn on these.
 

Blckshdw

Moderator
Nov 20, 2011
10,747
Tampa Bay Area, FL
I've never done a bake/open and I *really* don't wanna learn on these.

I don't think you have much of a choice here, which is why BFC wanted so much to fix them. To reach the shroud, you have to get around the projectors and reflector bowl, and there is very little space in that regard.

Then you'd have to figure out a way to grip and hold the shroud, without scratching it. So a metal coat hanger is out. You also won't have any way to make adjustments to it, if it rotates slightly, or one side slips on easier than the other.

I wouldn't advise using a semi-permanent adhesive where you have a mobile joint. As previously mentioned, the headlights may not be perfectly aligned with each other in the first place, so if you tried to adjust them, the slight twist on the ball joint could be enough to crack it and pop loose again.

The best advice for the baking method is low (temp) and slow (more time). I did mine at 220 degrees for about 25 minutes, and the lenses pulled right off. Just pull them slowly, as the butyl will be stringy and sticky like bubble gum. You'll want to break the strings with your hands, to prevent it from getting on the reflector bowls, and other parts.
 
  • Like
Reactions: NateDG and dmanns67

NateDG

Member
Oct 30, 2014
216
Normal, Illinois
I don't think you have much of a choice here,

The best advice for the baking method is low (temp) and slow (more time). I did mine at 220 degrees for about 25 minutes, and the lenses pulled right off. Just pull them slowly, as the butyl will be stringy and sticky like bubble gum. You'll want to break the strings with your hands, to prevent it from getting on the reflector bowls, and other parts.
I don't have to worry about the small gauge wires that are strung around in there for the shield motor melting or anything? I should prolly take both bulbs out, yes? The D2S had a threaded cap holding the bulb but the MH1 obviously has the retaining clip and it seems that it's been glued in place. I can cut it off of course but if I don't have to mess with it, I won't.

On what do I place the headlight in the oven? What orientation? Anything over it? Tin foil tent like a turkey? Where should I start prying first? Ugh... I'm sooooooo damn nervous about it haha
 

Blckshdw

Moderator
Nov 20, 2011
10,747
Tampa Bay Area, FL
lol, have a shot of liquor to calm your nerves man, it's not quite that serious. In the grand scheme of things, this is a relatively low temperature. If you were applying a heat source directly to the components, then yeah that would be problematic. But instead, you're heating the air, and then the heat transfers evenly. The thing to realize is, you're not trying to heat the headlight itself (or the components) but the butyl that's holding the face to the base. And from there, all you need to do is soften it, so it 'gives', not necessarily melting it.

I laid mine face down on a piece of cardboard, since that wouldn't scratch the lenses, and allowed me to use the vertical adjustment shaft as a sort of handle. Any orientation would be fine, as long as no plastic touches any metal surfaces inside the oven. I started prying on the corners that would be next to the grille. I had a plastic trim removal tool with a wide, flat edge to wedge in there, give a twisting motion to get it to start separating. Once it started to break free, it was just a matter of getting your fingers in, and lift it like your hood. It's a lot easier than you think.
 
  • Like
Reactions: dmanns67 and NateDG

NateDG

Member
Oct 30, 2014
216
Normal, Illinois
I apologize for asking so many questions but I was just thinking about something else. As far as the alignment of both projectors with each other, shouldn't that be already set and not really able to be tinkered with? Both projectors are mounted to the reflector bowl and only it, if the reflector bowl is what's loose and not the actual projectors, shouldn't it just be a matter of fixing that one ball joint and then turning the adjuster screws until it's back in tune with the other side etc?
 

Blckshdw

Moderator
Nov 20, 2011
10,747
Tampa Bay Area, FL
No need to apologize, all your questions have been good ones. When I made that comment, I meant the driver's side light might not be at the same height as the passenger side one, so the adjustment screw would need to be tweaked. You are correct, the low beam bucket projector and the high beam bucket projector should be aligned with each other. So yes, just fixing the ball joint, and making sure the height matches on each side should be all you need to do.

Afterthought on the baking part, I used mechanics gloves when taking the first one out of the oven, cuz I anticipated the housing would be too hot. In reality, I ended up taking them off, after I realized I could handle the headlights bare handed. They were quite warm to the touch, obviously, but not to the point I couldn't hold them firmly. :twocents:
 
  • Like
Reactions: dmanns67 and NateDG

NateDG

Member
Oct 30, 2014
216
Normal, Illinois
No need to apologize, all your questions have been good ones. When I made that comment, I meant the driver's side light might not be at the same height as the passenger side one, so the adjustment screw would need to be tweaked. You are correct, the low beam bucket projector and the high beam bucket projector should be aligned with each other. So yes, just fixing the ball joint, and making sure the height matches on each side should be all you need to do.

Afterthought on the baking part, I used mechanics gloves when taking the first one out of the oven, cuz I anticipated the housing would be too hot. In reality, I ended up taking them off, after I realized I could handle the headlights bare handed. They were quite warm to the touch, obviously, but not to the point I couldn't hold them firmly. :twocents:
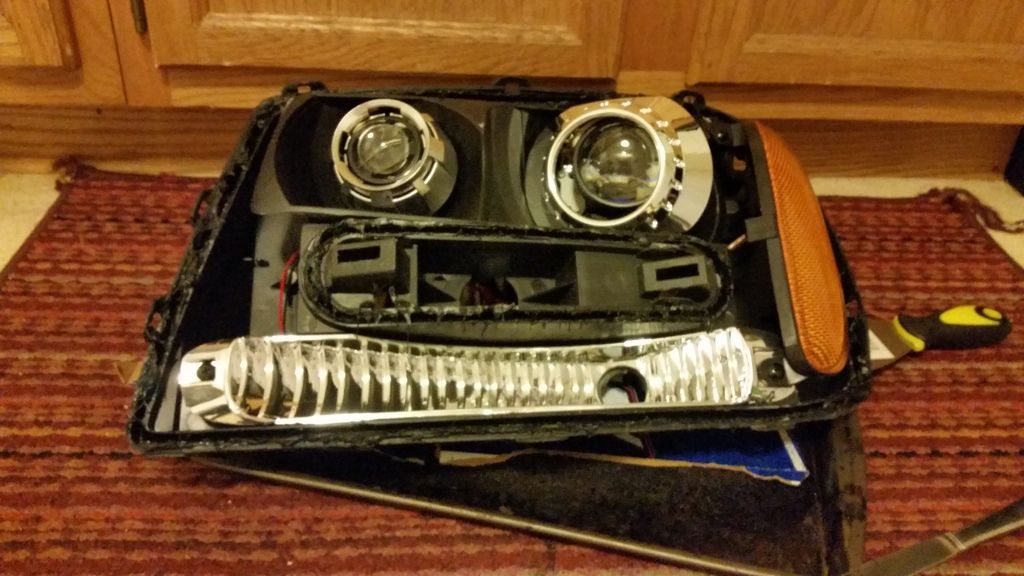
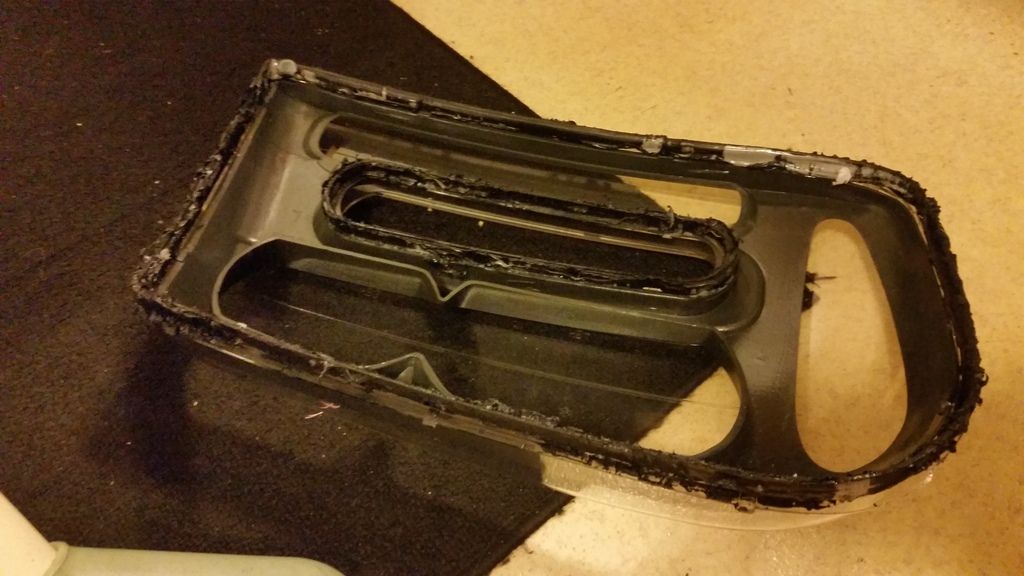
Holy crap I did it...


Yayyyy
 
Last edited:

Blckshdw

Moderator
Nov 20, 2011
10,747
Tampa Bay Area, FL
Since BFC put butyl on the outside as well as the inside, you should have more than enough stuck to the rim of the lens as well as still in the channels to seal them back up without needing to add more. I'm actually sealing mine up now, pre-bake. I was able to press the lenses on somewhat, but not enough to get the little clips to engage.

I don't have strong enough clamps either, so what I'm doing is using a pair of vice grips, since there's a lip on the base, as well as the lens, to press the lens further into the channel and engage the clips. I'll probably bake mine tomorrow.

I noticed the gap around mine isn't uniform (it's aftermarket after all) and even though the lens is seated, I'll probably run a thin bead of silicone around it and then trim it when it's cured. Same technique they used on yours, but with butyl instead.
 
  • Like
Reactions: NateDG

NateDG

Member
Oct 30, 2014
216
Normal, Illinois
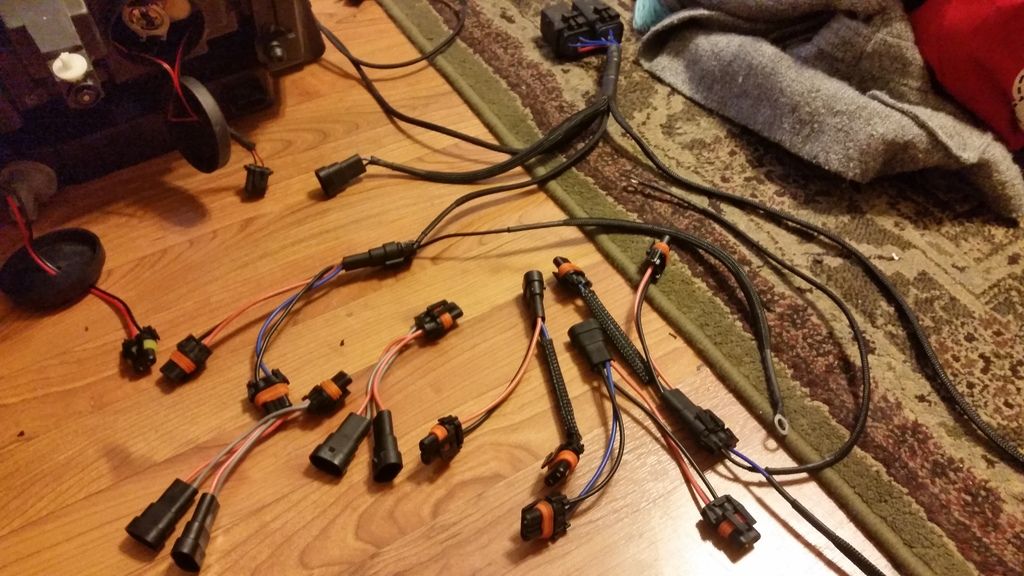
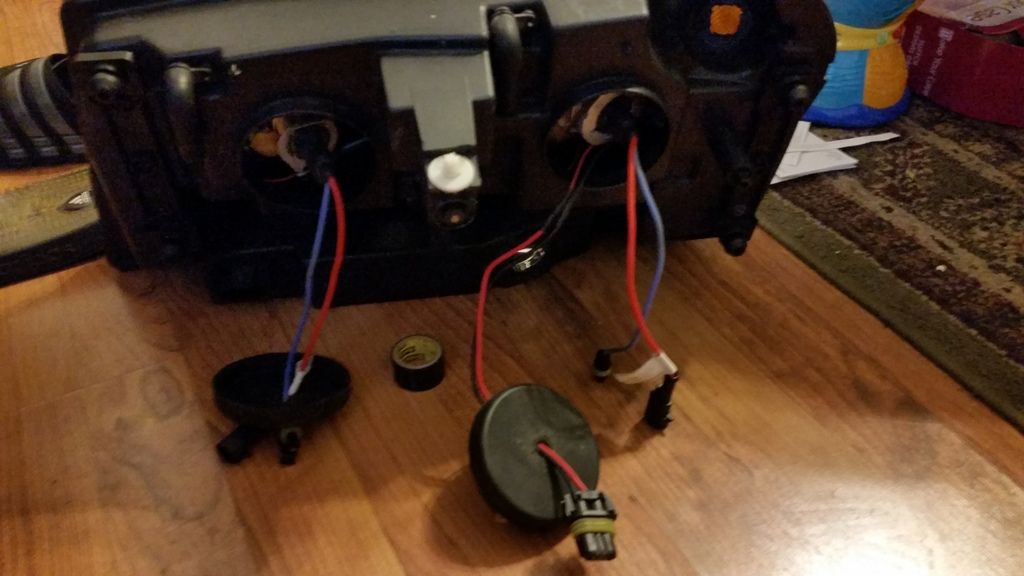
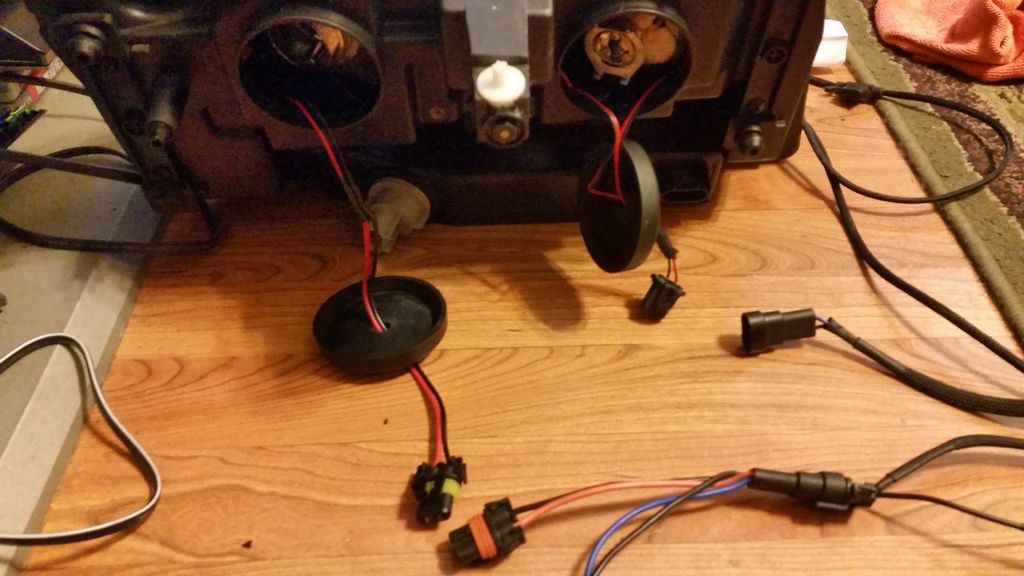
Now I'm sitting here looking at this going "dafuq do I do?" I think I see where the ballasts would hook up etc, but the wiring coming out for the shield motors has me scratching my head... Any thoughts?

EDIT: the first pic is everything, all the splitters etc.


DAlastDON

Member
Apr 6, 2014
5,550
Kentucky
Yea, I'm hoping Blckshdw sees it. He'll understand it right away, I'm sure. Heh.

LOL that is the exact reason im not blind guessing and telling this connects to that. I think i got the concept down but have not connected one with two projectors first hand.
 

littleblazer

Member
Jul 6, 2014
9,267
I think it is relay harness to splitter, one into each ballast. Same thing for the other side. Then... y splitter on high beam plug into both plugs on the projector for the cutoff shield and highbeams. Repeat on other side and then just hook the bulbs to the ballasts. Unless the projectors are going to be turned on and off seperate in each housing. In which case I have no clue....
 
  • Like
Reactions: Blckshdw

Blckshdw

Moderator
Nov 20, 2011
10,747
Tampa Bay Area, FL
Now I'm sitting here looking at this going "dafuq do I do?"

Yeah, the first time hooking everything up, will be a little intimidating, kinda like trying to decipher a wiring diagram for the first time. I think @littleblazer nailed it, kinda hard to see if your relay harness is just for a normal pair, which would require splitters on each end, or if each of the relays is for a pair of connections on it's own.
 

NateDG

Member
Oct 30, 2014
216
Normal, Illinois
Yeah, the first time hooking everything up, will be a little intimidating, kinda like trying to decipher a wiring diagram for the first time. I think @littleblazer nailed it, kinda hard to see if your relay harness is just for a normal pair, which would require splitters on each end, or if each of the relays is for a pair of connections on it's own.
I have (4) F to MM splitters, each end of the relay wires require a splitter to power 2 ballasts each. Where I'm confused is the (2) male plugs coming from the DS housing, presumably one for the cutoff and the other is the input from the relay. The PS light only has the one male plug coming out, for what I don't know. It almost seems like I'm missing a splitter or something.

EDIT: and then I reached into the pocket of the huge winter coat I'm wearing and found the 2 other splitters I need... Ugh *facepalm*
EDIT 2: I for whatever reason still cannot get this wired correctly. Please help haha. It shouldn't be this difficult. I have splitters with mesh covering diodes and I just don't know what goes where.
 
Last edited:

Blckshdw

Moderator
Nov 20, 2011
10,747
Tampa Bay Area, FL
The low beam plug from the DS headlight activates the relay harness. The low beam plug in the PS headlight is not used, so leave it tucked inside the housing. The high beam plugs in each headlight go into a splitter, then the 2 ends get connected to the cutoff shields on each of the projectors.
 

Forum Statistics

Threads
23,681
Posts
641,980
Members
19,139
Latest member
Bolt2031

Members Online