JayArr's 4l60E Rebuild Thread

JayArr

Original poster
Member
Sep 24, 2018
504
Mission BC Canada
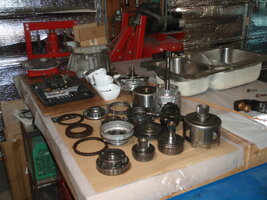
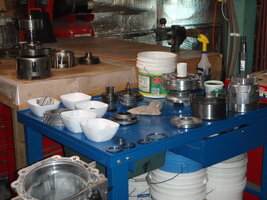
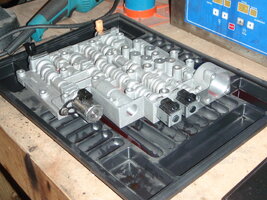
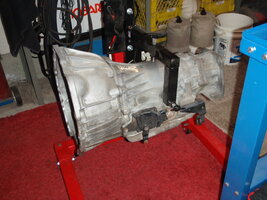
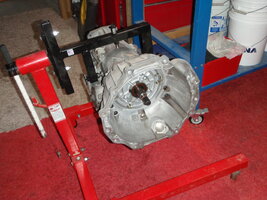
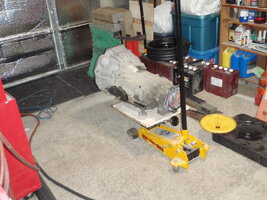
I finished disassembly this weekend including all the clutch packs. The casting is soaking in the parts washing tank and I've laid out all the parts on the bench.

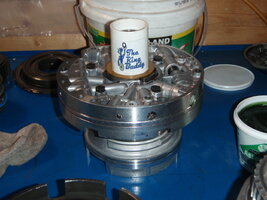
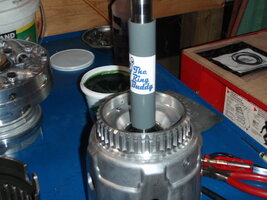
Next step is to remove all the bushings. Brad (youtube) uses a bit in a pneumatic chisel, I'll have to figure out if I can buy that or if it's a custom grind.

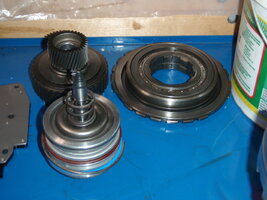
I'll also order the initial rebuild kit this week, one of the clutches was pretty burnt so I'll order the kit that includes new steels. I'll also replace the bonded pistons and a few other components.

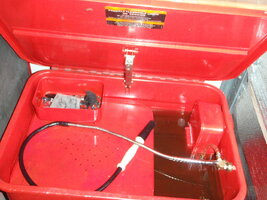
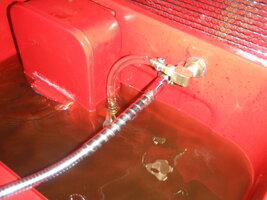
Looking at my parts washer I realize it's not good enough to clean the internal parts, it's pretty dirty. I'm running the current solvent through one of those sand bags to clean it up and I think it's time to do the "external oil filter" mod to the tank so that it stays clean.

JayArr
 

Attachments

  • PB210003.JPG
    PB210003.JPG
    596.3 KB · Views: 9
  • Like
Reactions: Mooseman

mntegra01

Member
Mar 26, 2018
86
Virginia
Nice thorough work! I am looking forward to the first drive for you!

I rebuilt my 2wd TB trans at 181K because of a broken rotor in the pump. I put it all back together and had to replace the internal wiring harness. I spent about $1500 in parts (OEM converter) I feel like it is worth it knowing its all been through. I could have gotten a GM reman for about the same price with a warranty, but I learned a lot and enjoyed the process.
 

JayArr

Original poster
Member
Sep 24, 2018
504
Mission BC Canada
I'll certainly be into this for more than a reman would have cost me once you add the tools and the parts but I have this notion that I'd like to do transmission overhauling as a side gig in my retirement.

They aren't really that complicated or hard to dismantle and overhaul and yet there aren't that many people doing them.

If I rebuilt one transmission a month that would be a good source of extra $$ for tools or travel or cigars or scotch or ...
 

JayArr

Original poster
Member
Sep 24, 2018
504
Mission BC Canada
Had some progress this weekend but not a lot. I spent a fair amount of my garage time retrofitting my parts washer. I watched a bunch of YouTube videos and got some ideas. First I put it on a furniture dolly so it's on wheels now and easy to move around the garage. I finished cleaning the solvent by filtering it thorugh sand bags until it was clear again. Then I added some fresh stuff to top it up. I bought one of those parts washer brushes that hook up to the gooseneck and wash and rinse at the same time and I added hardware to filter the output of the pump through an oil filter mounted on the side. This should give me a workable washing station to clean all the parts.

The transmission cases were covered in road grime/sand/oil etc and at first I was trying to use a small wire brush but it wasn't working too well. Then I got a better idea. I pulled the case out of the tank and put it back on the bench on an old towel and went at all of the exterior areas with a needle scaler. This worked great, it quickly got all the road grime off and it penetrated into the corners and crevices. When you put the casting back in the tank the parts brush has an easy time removeing the last of the gunk and the aluminum comes out quite clean.

I removed all of the bushings from the steel parts, I tried a chisel bit in an air hammer but it chattered and I was afraid I would damage something so I switched to a brass drift and got them all out that way. Then I thought about using the drift on the bushings in aluminum but didn't know if it would dent/damage aluminum so I ordered a blind bearing/bushing removal kit from Amazon and I'll wait for it to arrive to pull the last four bushings.

I'm going to try to order my rebuild kit and parts this week so that if there is a free day between Christmas and New Years I can get out to the garage and start re-assembling. Weekends between now and the 25th are booking up fast so there may not be a lot of transmission time in the next month.

JayArr
 

Attachments

  • PB270001.JPG
    PB270001.JPG
    515.1 KB · Views: 10
  • PB270002.JPG
    PB270002.JPG
    627.1 KB · Views: 10
  • PB270003.JPG
    PB270003.JPG
    369.5 KB · Views: 10
  • PB270004.JPG
    PB270004.JPG
    546.6 KB · Views: 11
  • Like
Reactions: Mooseman and Matt

JayArr

Original poster
Member
Sep 24, 2018
504
Mission BC Canada
Well this got delayed... again. I spent the last bunch of weekends fixing equipment in the woodshop and then building a custom cabinet with a drawer to go under the new dryer.

So now back to automotive. I was able to use the blind bushing removal tool along with my press to get the last four bushings out, including the one in the rear of the aluminum case.

I also built an engine stand and mounted my transmission jig to it to hold the case for reassembly.

I'll order the Deluxe rebuild kit tomorrow along with some Sonnax end plugs, a plate repair kit, some valves etc. Spring is coming and I want the transmission changed before camping season starts.
 

JayArr

Original poster
Member
Sep 24, 2018
504
Mission BC Canada
Parts are on order:

Transtar Deluxe 74008EDF kit
74418E TCC solenoid - because I broke the other one somehow :-(
Sonnax end plug kit - with small o-rings to prevent leakage past the end plug.
new set of 3-4 clutch boost springs
New valve body plate - ball hammered it too badly to repair.

All in from a local auto parts store that treats me really well: $1006.23 Cdn ($738USD)

The kit is the best one they have, it includes the bushings, wide band, frictions, steels, pistons and all the gaskets, teflons, o-rings and seals.
 

59840Surfer

Member
Apr 19, 2020
85
Montana
Did you also get the hardened drum? The GM version isn't quite as good as 3rd party though --- just sayin' .....

Get the hardened drum. Really.
 

JayArr

Original poster
Member
Sep 24, 2018
504
Mission BC Canada
I've already got the GM hardened drum. Part# 24229853. It is the third generation with the heat treatments and the hardening.

It's in beautiful shape, no damage to the teeth, no cracks. I'm just going to put it back in.

By the third generation GM had figured out what they had done wrong and corrected it. It appears that although the later drums can still fail the percentage fell to a virtual zero by 2005.

No need to replace a good part with a better part if it's going to cost me hundreds of dollars and give me nothing in return.
 

59840Surfer

Member
Apr 19, 2020
85
Montana
It saddens me when people don't get a decent discount. That drum was - er ---maybe $47.00 at my rebuild - and that's here in High Pockets Montana where there is no competition for decent prices.

I'm glad you already got a Gen-III drum --- congrats.
 

59840Surfer

Member
Apr 19, 2020
85
Montana
PS --- if you are tempted to also use the "Corvette Servo" in your unit --- it is OK for me if I chirp tires on every 1-2 / 3-4 shift --- but you may not like it ... your call.

One thing I did specify was a 4.3L torque convertor, built tough with a Kevlar clutch and brass or Torringtons where they fit. I love the holeshot it gives me and yet it still has TCC.
 

JayArr

Original poster
Member
Sep 24, 2018
504
Mission BC Canada
It's also a Canadian thing. We're at about 72 cents on your dollar and then the sellers always want an arm and a leg to ship it international to Canada. Add to that the ass raping UPS and Fedex do to us when the parcel arrives with "brokerage" charges. What looks like $50-$75 to you can easily turn out to be $200 plus by the time it hits my door.

No tire chirping, I'm building this to tow.
 

59840Surfer

Member
Apr 19, 2020
85
Montana
It won't chirp with the extra weight --- it'll make a good non-slipping shift though.
 

59840Surfer

Member
Apr 19, 2020
85
Montana
I never ever had a minimum wage job --- never. I was in business pretty much the day I graduated JC and went to one shop for 13 years and then built my own businesses -- 2 trans shops, a brake/front end/differential shop and an general repair.
All had a side gig as a Remington Tire dealer --- it was all good ... and now I'm retired.
 

JayArr

Original poster
Member
Sep 24, 2018
504
Mission BC Canada
Well I got my 'kit" but was immediately disappointed. Even though I ordered the most expensive "Deluxe Super kit" ($733Cdn) it only came with five of the 12 bushings required. It contained a teflon coated bushing for the pump body, a pair for the input sun gear, the rear case bushing and one for the extended housing - which I don't even need because I'm 4WD.

When I asked my parts person to query this "King - O - Matic" (Canadian distributor of Transtar kits) replied that they only supply the ones that wear out.

Can anyone who has bought this kit, 74008EDF, tell me if they got a full set of bushings? If all the kits are like this I'll temper my disappointment.

For this trans job I've made a second order for the missing bushings. (additional $43Cdn)

Also in the kit:

Transtec seal kit
Exedy clutches
Borg Warner band (not wide)
Generic bonded pistons
Generic steels
Generic filter

Not a great kit IMHO, so I'd advise Canadian members to find a way to get a better kit from the states. This one seems overpriced and has too many generic looking substitutes. I won't be reordering from King - O - Matic.
 
  • Sad
Reactions: Mooseman

59840Surfer

Member
Apr 19, 2020
85
Montana
Looks like you got a common parts kit - yes they contain basically the parts that typically need to be replaced with some improvements.

It's not much more than a "P&R Kit" - paper and rubber and perhaps a few hard parts.

I suggest you got hosed by your parts purveyor.
 

JayArr

Original poster
Member
Sep 24, 2018
504
Mission BC Canada
Ah well, live and learn. I did get steels and pistons but not of name brand quality. I got a band but not a wide one.

I've been surfing the transmissionpartsdistributors.com website and it looks like I'll be better off for transmission #2 to buy just the master kit with steels and friction but no pistons. Then I can add Fed Mogul pistons, a Red Eagle band, and a full bushing kit.
 

JayArr

Original poster
Member
Sep 24, 2018
504
Mission BC Canada
Hi All

Lots of progress. The valve body is all reassembled with the new Sonnax TCC sleeve.

I've replaced all of the bushings. I had to order in the ones not included in the kit and had some trouble with the forward reaction shaft one. King - O - Matic seems to be unorganized to me. They had the wrong bushings in the wrong bin and everytime i sent it back they just sent another that was also wrong. Not to intelligent. I won't be buying anything else from them, it's just too much work to deal with them.

I've reassembled the pump and installed all of the teflon rings. I used the "Ring Buddy" tool from Transmission Jobber. It's less expensive than the pro models but it got the job done without having to slice the rings to get them on.

I also cleaned and reassembled the sprags and the servo.

I think with some luck and work I can get the rest of this assembled next weekend.
 

Attachments

  • P6120009.JPG
    P6120009.JPG
    532.9 KB · Views: 8
  • P6120010.JPG
    P6120010.JPG
    430.5 KB · Views: 8
  • P6120011.JPG
    P6120011.JPG
    427.3 KB · Views: 8
  • P6120012.JPG
    P6120012.JPG
    434.6 KB · Views: 8
  • P6120013.JPG
    P6120013.JPG
    651.3 KB · Views: 8

JayArr

Original poster
Member
Sep 24, 2018
504
Mission BC Canada
So I'm assembling away here and I'm noticing that I'm going to have "parts leftover"

Nothing I've taken apart, just that the rebuild kits are for so many different variations that there are going to be o-rings, teflons, etc that weren't for my configuration of 4L60E that will still be on the bench when I'm done.

I usually double check that I haven't missed anything by not having any parts left when I'm done and I can't do that here.

I thought that I would be able to somehow find an itemized list of what is in each pouch I got and then I could do process of elimination on things I never needed to make sure there is nothing I forgot. Trouble is I can't find a contents list.

Example:

SUBKIT SK 4L60E 1993-UP
71003238

This kit has all kinds of o-rings, and seals in it and I've got a whole mess of them I can't identify.

SEALING RING KIT 4L60E 1993-UP
71005986

This kit had all the teflons in it and I've got three leftover, I suspect they are for the 'Corvette" servo that I don't have but it would be good to be sure.

QUESTION: Does anyone have, or have you ever seen, an itemized list of what's in a transmission rebuild kit so I can be sure that everything left on my bench at the end was not needed?

I would hate to spend next Saturday re&reing this transmission to find out I missed an o-ring.
 

JayArr

Original poster
Member
Sep 24, 2018
504
Mission BC Canada
I'm almost all back together, just need to put the valvebody on. The gears, clutches and pump are all back in the case.

Pl;ease look at the attached photo. It is a group of parts I can't figure out. They may be for earlier models and not needed on a 2004.

I think either E or F is for the end of the input shaft but they are really close in size and either would fit. Does anyone know which color goes on the end of the input shaft?

The rest are sort of mysteries, expecially that cone screen filter H. and I don't remember A or B at all.

all help appreciated.
 

Attachments

  • P6250001.JPG
    P6250001.JPG
    283.6 KB · Views: 6
Sep 17, 2018
30
Iowa
p.s. the orange seal for the input shaft is for the 300mm input shafts (used on the i6 and late v8 stuff)
The green is the 245mm input shafts which have a shorter and smaller splined shaft.

So, you should use the orange
 

JayArr

Original poster
Member
Sep 24, 2018
504
Mission BC Canada
Fantastic! Thanks again MaroonMonsterLS1!

With all that sorted out I have "no extra parts" - from this subkit - which is a good thing!
 
Last edited:

JayArr

Original poster
Member
Sep 24, 2018
504
Mission BC Canada
OK, can we do this one more time?

The picture contains all the parts I have left from the big bag that had the paper gaskets in it.

I'm pretty sure A is because I replaced the two shift solenoids.

I think B is because I replaced the PWM solenoid.

Either C or D is likely for the connectors on the outside of the case that the lines plug into. I don't know how well it shows but C are black and D are brown.

E and F are mysteries, F is sort of orange if that helps.

No clue on what G is for, speed sensor for a 2WD?
 

Attachments

  • P6260001.JPG
    P6260001.JPG
    286.7 KB · Views: 3
Sep 17, 2018
30
Iowa
A-yes
B-yes
C-Looks like pump bolt o rings
D-quick connect cooler line o rings
E-298mm input converter clutch seal OR TCC solenoid snout o ring--hard to judge size
F-Speed Sensor? o ring potentially. Hard to judge the size. 06+ models got a speed sensor in the stator and it's sealed with an O ring
G-Accumulator housing gasket for Hummer models

C/E/F I'm not 100% sure on just from photos but those are my most likely assumptions
 

JayArr

Original poster
Member
Sep 24, 2018
504
Mission BC Canada
Thanks Maroon, that helps.

The pump bolt o-rings were in a bag of their own and are all accounted for. Any other bolts get o-rings?

I already replaced the TCC solenoid snout ring when I changed the nylon screen filter. What is a '298mm input converter clutch'. This o-ring is the same size as the smaller of the two in B.
 
Sep 17, 2018
30
Iowa
There are 7 variations for 4l60e input shafts...and a 8th if you want to add in 700r4 shaft that can be retro-fit into a 4l60e if someone wanted to...or if they did so on accident

A=245mm shaft-small spline
B=245mm shaft-small spline-non ISS with shifted sealing rings for an ISS stator (05-06)
C=245mm shaft-small spline- ISS reluctor spline (06+)
D=298mm 30 spline shaft (small "nipple" on the end of shaft for TCC)
E=298mm 27 spline small spline (small "nipple" on the end of shaft for TCC)
F=300mm shaft non ISS
G=300mm transition year non ISS with shifted sealing rings for an ISS stator (05-06)
H=300mm ISS reluctor spline (06+)

The O ring in question would fit D and E shafts

06 was the transition year where the stators in the pump had feed hole locations moved to make room for an Input Shaft Speed sensor (ISS sensor)

So you will find some LATE 05 through 06 stuff that has sealing rings with moved locations versus all earlier shafts. But they are hard to ID because they won't have the input shaft speed sensor 15 tooth reluctor on them to easily tell them apart.

Using the wrong shaft causes cross leaks and a transmission that doesn't work right.

I know I got off on a tangent there...sorry about that...just felt it was good info to share
 
  • Like
Reactions: TJBaker57

JayArr

Original poster
Member
Sep 24, 2018
504
Mission BC Canada
All good info Maroon!

Here's a pic of my input shaft, I believe it's 'F' so the that o-ring is extra.

Just puzzled by the two 'C' rings.
 

Attachments

  • P6270002.JPG
    P6270002.JPG
    503 KB · Views: 4

JayArr

Original poster
Member
Sep 24, 2018
504
Mission BC Canada
All done!

No spare parts and I think I even figured out where those two 'C' o-rings go. They go on the quick connect fittings on the outside of the thread that goes into the case. The factory uses some kind of yellow goo to seal them but if you pull them and want to re-use them you put o-rings on them so they seal when they go back in.

Pics attached.

We'll do a re&re next weekend with a little luck.
 

Attachments

  • P7020003.JPG
    P7020003.JPG
    574.9 KB · Views: 3
  • P7020002.JPG
    P7020002.JPG
    517.6 KB · Views: 4
  • P7020001.JPG
    P7020001.JPG
    527.7 KB · Views: 4

JayArr

Original poster
Member
Sep 24, 2018
504
Mission BC Canada
My torque converter came in this week. I bought it from Rock Auto but it is rebuilt by TC Automotive which is the big rebuilding outfit in the USA.

I live close to the border so i had it shipped to my USA address, the price was $165Cdn for the TC and $199Cdn for the core and $35Cdn for shipping.

Compare this to the local parts depot that is supplied by King Canada at $433Cdn, trade a core at the counter and no shipping.

I was allowed to take my old TC across the border to return it by simply filling out a one page form, it was easy because the part was made in the USA, there were no dutys or taxes and the customs agents were helpful.

I opened the box from RA swapped the TCs and sent my old unit back in the same box, it cost almost $100CDN for return shipping so that ate into the savings but overall I still only paid $165+35+100=$300Cdn which is a savings of $133 over King Canada.
 

JayArr

Original poster
Member
Sep 24, 2018
504
Mission BC Canada
The big question for Saturday is "how fast can I swap a transmission"

I've done it before on this vehicle and in recent years. I don't expect any seized or rusted bolts because they were all put back on with neverseize last time. I own all the jacks, stands and cribbing and remember how to get it up 24" so the trans can roll out while still on the jack and I've got miles of extensions to get at the top bell housing bolts without knuckle busting or working from the engine bay.

It will be nice if I can pull the old transmission by noon and get the new one in by dark.
 

JayArr

Original poster
Member
Sep 24, 2018
504
Mission BC Canada
Well that didn't exactly go as planned. I spent 13 hours yesterday (minus meal breaks) and all I achieved is the removal of the tranny. I'm hoping it doesn't take all day today to put the other one in.

Getting the car up on the stands to a height of 24" was simple I already had huge jackstands and it's just a two stage process of getting it up onto the stands and then using the cribbing to lift it another 6".
 

Attachments

  • P7150007.JPG
    P7150007.JPG
    773.7 KB · Views: 5
  • P7150008.JPG
    P7150008.JPG
    868.5 KB · Views: 5

JayArr

Original poster
Member
Sep 24, 2018
504
Mission BC Canada
The last time I did this I think I just grabbed the transmission with the transfer case attached and wrestled it out. This time I wanted to take them separately so I ended up having to build some custom tall jack stands. One to hole the tail while I removed the cross member and another to hold the pan while I removed the transfer case.

I'm guessing this chewed up a couple of hours of the day.

In the third picture you can see the center jack stand holding the tail up after I pulled the cross member.
 

Attachments

  • P7150009.JPG
    P7150009.JPG
    601.1 KB · Views: 9
  • P7150011.JPG
    P7150011.JPG
    558.7 KB · Views: 9
  • P7150010.JPG
    P7150010.JPG
    491.2 KB · Views: 8

JayArr

Original poster
Member
Sep 24, 2018
504
Mission BC Canada
So then I pulled the drive shafts and disconnected the wiring from the transfer case and supported the transmission under the pan. I hooked the bracket I built onto the transfer case and used the transmission jack to remove it. It worked really well, the case stayed in it's position and will be easy to replace.
 

Attachments

  • P7150012.JPG
    P7150012.JPG
    563.5 KB · Views: 12
  • P7150013.JPG
    P7150013.JPG
    404 KB · Views: 14
  • P7150014.JPG
    P7150014.JPG
    477.9 KB · Views: 10
  • P7150015.JPG
    P7150015.JPG
    689.1 KB · Views: 10
  • P7150016.JPG
    P7150016.JPG
    405.9 KB · Views: 11

JayArr

Original poster
Member
Sep 24, 2018
504
Mission BC Canada
So next I had the problem of 'how do I remove the jackstand under the transmission and replace it with the transmission jack'?

I welded up a jig that lays across the frame where the crossmember was with a single bolt hole that goes through the transmission flange where the bottom stud from the tansfer case went. This held the transmission in place when I pulled the jackstand out and I was then clear to roll the transmission jack in and locate it under the pan for removal

Again, this little detour probably cost me an hour.
 

Attachments

  • P7160001.JPG
    P7160001.JPG
    474.2 KB · Views: 5
  • Like
Reactions: Mooseman

JayArr

Original poster
Member
Sep 24, 2018
504
Mission BC Canada
From there it was pretty simple, wiring, cooler lines, shift linkage etc and the transmission came right off. I got it down as low as the jack would go and then put the cribbing under one side of the car and lifted just one side until there wa clearance for the bell housing and it rolled right out.

One other jig I spent time on is the board you see under the transmission. It's got a hole drilled in the center so that it is bolted to the jack but more importantly it has a large hole bored out to accomodate the drain plug. Without this the trans would not have sat flat on the trans jack and may have bee unstable. (another 1/2 hour)
 

Attachments

  • P7150017.JPG
    P7150017.JPG
    670.7 KB · Views: 5

JayArr

Original poster
Member
Sep 24, 2018
504
Mission BC Canada
So, subtract 3 1/2 hours building jigs, and a couple of meal breaks and some 'thinking time' and I pulled this in 6 hours.

Not what I was expecting but not a disappointment either. It'll be faster next time.

I'd like to get to a point where I can re&re it in one long day.

I've got a bit more fabrication to do this morning. I'd like the new jackstands to have a height adjustment. Nothing large, just an inch either side of the pin hole. this way one jack stand could lift the trans to allow the other to be removed.

My hack is to weld a plate on the bottom of the 2x2 tube and put a bottle jack inside the jackstand, this will allow me to adjust the height slightly.

I'm heading out to the garage now, wish me luck.
 

Attachments

  • P7160002.JPG
    P7160002.JPG
    695.1 KB · Views: 6

JayArr

Original poster
Member
Sep 24, 2018
504
Mission BC Canada
I finished this last night around 9:30PM, another long day.

I've only done a quick 10 minute test drive but R,1,2,3 all work. I'll have to take it out on the highway to check 4 and the lockup.

Man was she thirsty - I put 12 litres into it! New torque converter didn't help.

I had a transmission jack failure that dropped the transfer case in the driveway but it wasn't "up" so no damage. The grub screw holding a lock nut failed and the nut spun off the threaded rod that 'tilts' the jack. That took an hour to fix and reset but other than that it went smoothly. I didn't really get started until noon and if subtract breaks and the jack repair it was about 7 hours.

The bracket for the transfer case was a resounding success, I jacked the case up clocked it a little bit with the jack and it slid right on, no lifting, no ratchet straps. Easy peasy.

I'm always looking for efficiencies and I found that with the bottle jack improvement I made to the trans-pan jack I didn't need the tail jack at all on reassembly. Maybe I'll try to come up with an attachment/extension for the floor jack so I can get the car up to 28" without the cribbing but that may be more work than it saves.

Total time in driveway 13 hours, I know I can do better next time.
 
Last edited:

JayArr

Original poster
Member
Sep 24, 2018
504
Mission BC Canada
So far so good. We've been driving it around town and there are no codes and no problems. It shifts so smoothly I can't feel it. I can hear the revs change and I can see the tach move but the seat of my pants doesn't register a 'shift'. I suppose that's what if felt like when it was new.

I've got a longer drive to do today so I should be able to get it into fourth gear and maybe locked up in OD. I've also got plans to go camping this weekend so it'll get a chance to haul the trailer around and see if that's a problem.

The big test will be our vacation in August, we're heading out of Vancouver, crossing the Rockies and driving all the way up to Yellowknife NWT hauling the trailer.

If all goes well when I return I'll rebuild the core I just pulled and then put the trans that's in the Envoy for sale. I thought I'd list it and allow a buyer to drive the Envoy around to see that it works and when I've got a confirmed buyer I'll do the swap again.
 
  • Like
Reactions: Mooseman

JayArr

Original poster
Member
Sep 24, 2018
504
Mission BC Canada
We took the trailer out this weekend, not too far, about an hours drive from here but it gave me an opportunity to climb up and down some steep mountain hills (11% grade) and do some gravel roads etc.

Everything seemed to work just fine, we went up the hills in low gears no problem and I got an opportunity to come down a steep hill in 2nd and the over-run clutch works and keeps me locked to the engine. The shift points were a little concerning. I drive in 3 when towing so I only get two shifts 1-2 and 2-3. Does the addition of the heavy trailer make the computer move the shift points?

I was getting the shift from 2-3 at 3500-4000RPM and not until I was at 80KM/hr (50MPH).

Is that high? Should I still be in 2nd all the way to highway cruising speed?

Is that a sign of a problem?

The trailer is close to 5000lbs so it's at the very top limit of what I should be towing with this vehicle. Maybe 2nd all the way up is what it's supposed to do at this load.

EDIT: Do I need to reset the PCM or tell it to "re-learn" the new transmission ?
 
Last edited:

Forum Statistics

Threads
23,273
Posts
637,498
Members
18,472
Latest member
MissCrutcher

Members Online

No members online now.