JayArr's 4l60E Rebuild Thread

JayArr

Original poster
Member
Sep 24, 2018
504
Mission BC Canada
Hi All

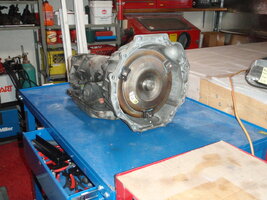
My winter project is to rebuild my 4L60E and install it in the spring before camping season starts. I haul a 5000lb trailer around and I live in the mountains so I need a strong transmission to make it home.

The original transmission failed 30 miles from home after a 7500 mile road trip and I nursed it into the driveway in 2nd. We climbed 7 or 8 mountain passes in the last two days and it waited until we were down the last one and on the coast before it started slipping. I couldn't have been more grateful.

I've swapped that transmission for a low mileage unit from the wrecker and it's been performing fine. We did three weeks in the mountains this year without a single problem. But I want to rebuild the original (I kept it when I swapped them out).

The plan is to rebuild the core I have and then swap it into the Envoy. Then I'll rebuild the unit that came out and sell it to try to recoup some of the $$ I spent on tools. Then maybe find a few more to rebuild just for cash to try to come out even.

The 4L60E is so ubiquitous I should probably own a few more vehicles that use it so any skills I learn here will be useful on future vehicles. The tools are expensive but I've never made a car payment in my life so I can afford to spend some money each month on tools.

I'm looking for help and advice from those with knowledge and I'm hoping to post details and solutions for others to learn from as I go along.
 

JayArr

Original poster
Member
Sep 24, 2018
504
Mission BC Canada
Tools:

Here is what I've collected so far. I've been spending a little each month to gather a collection.

Torx T50+ bit
Shift Lever seal installer/remover T-1001
Snap Ring Pliers G409P
Pump Alignment band clamp
Teflon Seal installer kit for pump stator and input shaft - Ring Buddy
Transmission case holder - this is an adapter that holds the transmission for reassembly and bolts to an engine stand. eBay
Lip Seal installer
Sonnax TCC reamer and valve replacement kits.
Spring compression tools (2)
Bushing removal/driver kit
Knippex snap ring pliers set
Sonnax Vacuum test stand VACTEST-01K


To Buy

Picks
Brushes for drill
Bushing removal bit for air chisel
valve body tray
Scotch Brite pads
Trans prep lube

If anyone has any other specialty tool that I need please LMK, I want this to go smoothly and would be disappointed if I had to stop because I'm missing a tool.
 

JayArr

Original poster
Member
Sep 24, 2018
504
Mission BC Canada
Parts:

Here are the parts I plan on installing. I haven't purchased anything yet.

Torque Converter
Hardened Sunshell
5 pin planetary gears (Cadillac)
Dual cage sprags?
Corvette servo
Wide band
Aluminum accumualtor pistons
Z pack clutches
All new bushings, seals, solenoids and wiring harness
 

JayArr

Original poster
Member
Sep 24, 2018
504
Mission BC Canada
References:

I have the GM 4L60E Hydra-Matic Technicians guide that explains in great detail all of the functions of the transmission. I'll be reading this a few times before I start.

I've also watched a YouTube series by a guy called Brad's Transmissions who tears down and rebuilds a 4L60E from an Envoy. He's pretty good and I understand him so I'm following a lot of his advice. This is where I got my tool list.

I've got the paper manual for the car that should have all the specs in it.

I've watched a bunch of other you-tubes as well so I'm learning all the time. I'm happy to take suggestions on videos to watch or books to read.
 

Mooseman

Moderator
Dec 4, 2011
25,341
Ottawa, ON
Nice project. From your parts list, I assume you're beefing it up to, or higher than, 4L70E specs? It's usually mated to the 6.0L in both the full size and the TBSS. With those specs behind the 4.2L, it should last forever.
 

JayArr

Original poster
Member
Sep 24, 2018
504
Mission BC Canada
I don't need performance like a race car but durability will be the issue. I want a transmission that will tow a 5000 pound trailer up a 6500 foot pass without any problems. :smile:

I figured I'd spend a little more on any part that needs to be replaced anyway but try to avoid expensive "performance parts"

I don't plan to order any parts until the full teardown is complete and I've had a chance to examine what's in there and the condition it's in.

I would also like to avoid buying a "kit" I'd prefer to order the parts all separately.
 
  • Like
Reactions: coolride

Mooseman

Moderator
Dec 4, 2011
25,341
Ottawa, ON
I don't know much but I do know the sunshell is one of the weak points, which you will be addressing. I'm pretty sure that's what failed in my 02 TB. Made an awful racket. The others are the TCC valve (as you are well aware) and the 3-4 clutch packs caused by a worn piston seal.
 

JayArr

Original poster
Member
Sep 24, 2018
504
Mission BC Canada
I've run into a snag on the Sonnax Vacuum test tool. I ordered and paid for it but it was back ordered for over a month and I finally got a refund on it.

It seems to be out of stock almost everywhere so now I'm wondering if anyone else makes a similar tool/jig. It's a pretty basic little thing but not worth my time to build from scratch if I can find it all assembled for $200-$300.

If anyone can point me to an alternate vendor please LMK.
 

Attachments

  • VACTEST-01K.jpg
    VACTEST-01K.jpg
    50.2 KB · Views: 12

Reprise

Lifetime VIP Donor
Supporting Donor
Member
Jul 22, 2015
2,724
(I see that requires a vacuum pump, so we'll assume you've got that.)

As I look at that, I've got a mental picture of a gauge with a tee fitting underneath that pretty blue plastic, coupled to the two regulator knobs.

I know you're in Canada, so maybe Princess Auto might have something like this...

You can see it has a plastic tee in the accessory bundle. From there, you just need the air valves and some tubing & fittings. Gotta be available for significantly less than $250 USD, I would think? Especially if you don't want to wait for the Sonnax rig.

As far as the used channel, I see one on eBay for about $200; pickings are few.

'Eagerly' awaiting to see you start posting regular updates to this thread, as so few of us truly understand the inner workings of these things... 🙏
 
  • Like
Reactions: Mooseman

JayArr

Original poster
Member
Sep 24, 2018
504
Mission BC Canada
Thanks Reprise.

I am so busy with work right now I just wanted to drop the cash and have it arrive but since that doesn't look like it will happen I guess I'll have to build it from scratch.

I already have the vac pump on my AC cart, I'll find a way to utilize it. Now I need to find plastic and silicone and brass Ts, and valves etc etc.

It's a littel more complicated than it looks, you adjust one valve for a high PSI value (25psi) with no leakage and you adjust the other valve for a low psi value (5psi)through a 0.035" orifice. Then when you test a valve in the transmission you hope for 25psi and the closer it gets to 5psi the more worn the bore is.

 
  • Like
Reactions: Mooseman

JayArr

Original poster
Member
Sep 24, 2018
504
Mission BC Canada
I found a great thread on LSTech forum about DIYing the Sonnax vac test jig...


It's got a few different builds, a parts list for Amazon and Home Depot if you want to just order and a lot of discussion on what to check, test and repair inside the valve body and pump.
 

JayArr

Original poster
Member
Sep 24, 2018
504
Mission BC Canada
After looking all over for someone who actually had the Sonnax test jig in stock (at a reasonable cost) I gave up and started buying parts from Amazon and eBay. I'll post up as the stuff arrives and I assemble the tool.
 

59840Surfer

Member
Apr 19, 2020
85
Montana
I don't need performance like a race car but durability will be the issue. I want a transmission that will tow a 5000 pound trailer up a 6500 foot pass without any problems. :smile:

I figured I'd spend a little more on any part that needs to be replaced anyway but try to avoid expensive "performance parts"

I don't plan to order any parts until the full teardown is complete and I've had a chance to examine what's in there and the condition it's in.

I would also like to avoid buying a "kit" I'd prefer to order the parts all separately.
I haven't read any further, but don't forget to get a Transgo H-2 kit with the PWM DELETE.

The biggest heat maker is the converter and especially the PWM-TCC lock up ... which never gets to 100% locked, nor released.

You will experiencea totally different transmission and it will improve mileage, performance and seriously lower operating temperature.

You're doing good with the 3 inch 2-4 band and you might reconsider adding the Corvette servo ... you will vastly increase the band surface area and the 1-2 shift is gonna be ... er .... improved enough unless you like to chirp the tires all the time ........ (PS ---> that's kinda hard on our transfer cases, if you're in 4WD when it hits that hard).

Be sure to use DeX 6.
 

Mooseman

Moderator
Dec 4, 2011
25,341
Ottawa, ON
I haven't read any further, but don't forget to get a Transgo H-2 kit with the PWM DELETE.
Oh you just opened a can of worms there buddy!

:popcorn:
 

59840Surfer

Member
Apr 19, 2020
85
Montana
Not really. I don't care how people mistreat their transmissions ... you can't make me mad slapping me in the face with money.
 

JayArr

Original poster
Member
Sep 24, 2018
504
Mission BC Canada
I've already purchased the Sonnax reamer and the kit to rebore/sleeve the PWM.

I looked at a couple of the "delete" kits but they try to solve the problem by eliminating the whole TCC PWM function. I'm not sure about the Transgo kit you recommend but some of these kits try to mask the fact that you have a leaky bore by increasing the fluid pressure from Regulated Apply Pressure to Line pressure so there is enough pressure to leak past the piston while still being able to activate the TCC. You end up sending full line pressure into the TCC solenoid - it wasn't designed for that.

The concept of the TCC PWM is a good one, being able to lock at 25%, 50% or 100% is superior to just an on-off solenoid like the old transmissions of the 80s-90s. It's smoother and combined with a decent PCM to control it, it works very well. You don't hear complaints about it when it's new.

The mistake that the GM engineers made with the TCC PWM is that they put a hard aluminum piston into a soft aluminum valve body. IMO The solution isn't to delete the whole PWM circuit, it's to ream it out and put a hard aluminum insert into the valve body so the valve doesn't wear it out anymore. You end up with a more durable seal and you're not bleeding your pressure off so your 3/4 clutch pack doesn't burn up.

I think of all the kits Sonnax is the best solution, unfortunately it requires buying an expensive reaming tool so a lot of people can't afford it and they buy the 'delete' kits.

To each his own but for my personal transmission I'm keeping the PWM function.

I will take another look at whether I need the Corvette servo with the 3" band. This isn't for chirping tires, it's for hauling a trailer so maybe I can save some $$ on that, thanks for the suggestion!
 
Last edited:
  • Like
Reactions: Gunner

Reprise

Lifetime VIP Donor
Supporting Donor
Member
Jul 22, 2015
2,724
Oh you just opened a can of worms there buddy!

:popcorn:
Pass the popcorn. :popcorn: I knew exactly what you meant, as we know JayArr is TeamSonnax > TeamTransGo. :laugh:

I have the TransGo TCC valve in my Voy, but in hindsight, if I were doing it over again, I might go with the Sonnax version, myself (requires the reamer, though).

Since JayArr brought up the Vette servo, and towing... I got it with my kit, and it's installed... but my mech advised that it was kind of overkill, for my application (towing, like him). If I were doing it again... I'd leave it out, tbh.
 
  • Like
Reactions: Mooseman and JayArr

Mooseman

Moderator
Dec 4, 2011
25,341
Ottawa, ON
Pass the popcorn. :popcorn: I knew exactly what you meant, as we know JayArr is TeamSonnax > TeamTransGo.
I was actually referring to him being pro PWM and against deleting it. I'm actually for deleting it. Even in my Caprice's 6L80e, it's a failure point in the torque converter itself, not the valve body, that can grenade the whole tranny. And it's been rearing its ugly head with wonky shifts and weird lockup before I put it in storage. I'm really looking forward to dropping the tranny to replace it :frown:
 

JayArr

Original poster
Member
Sep 24, 2018
504
Mission BC Canada
If you want to delete the PWM I would suggest that you pick a delete kit that allows the 'Regulator Apply/Isolator valve' combination to produce the proper pressure for the 'Regulated Apply Line'. That way the pressure applied to the TCC solenoid is correct which means the apply pressure to the TCC is correct for full engagement of the TCC lockup.

One of the kits I looked at put a larger spring between the isolator piston and the regulator piston to keep the TCC pressure from having any effect, another removed the isolator piston entirely and put an oversized spring in to hold the regulator piston open 100% of the time. In both cases the regulated valve is defeated and full Line Pressure is allowed to flow past it to the TCC solenoid. This is sort of like pounding in finishing nails with a sledge hammer.

It should be possible to put a spring in the 'Regulator Apply/Isolator valve' that will allow it to produce the same 'Regulated Apply Line' pressure that would be produced with TCC at 100%, this would make the TCC lockup occur without sending too much line pressure to the solenoid or the TC.

Another solution would be to remove the TCC PWM solenoid valve altogether and get some sort of sealed plug for that location. Doing this would apply AFL pressure to the end of the isolator valve in the same way as 100% TCC duty cycle would and the resulting pressures down the line would all be correct, just no longer adjustable by the PCM.

Unfortunately both of these solutions would rely on the bore of the valve not leaking. If you are doing preemptive work and you just want to get rid of the PWM before it causes a problem then great, it's pretty easy while the bore is still intact and not leaky. However, if the bore is already worn out the only correct way to fix it is to sleeve it. Some of the kits don't fix the leak, they just raise the pressure so that you don't get the P1870 code anymore.

The line pressure that is bleeding off at the worn out valve is the same line pressure that is trying to hold your 3/4 clutch engaged. As the line pressure drops due to the leak the 3/4 clutch is released a little and starts to slip.

It's like you have a pinhole in your gas line between the tank and the FI rail, the solution is NOT to put in a larger fuel pump so that it can supply both the fuel rail and the leak, the solution is to stop the leak.
 

Reprise

Lifetime VIP Donor
Supporting Donor
Member
Jul 22, 2015
2,724
I was actually referring to him being pro PWM and against deleting it. I'm actually for deleting it.
Yep -- we're describing the same thing, in different ways. And I agree on deleting vs. keeping, although after reading others' thoughts on each solution (not just JayArr's), I think Sonnax has the better engineering, in this case (and some others).

As another case in point... 'A21 Bravo' has a set of videos for 'bulletproofing' a 4L80 that he was using in a 6.0 twin-turbo setup -- turns out that one of the TransGo 'fixes' shouldn't have been implemented, in his application, at least, and he wound up rebuilding the trans, as a result. Although, IIRC, he didn't (have to) put a Sonnax component in; just removed / omitted the TransGo fix, going forward.

That said... I'd use another TransGo kit, in the future... but I'd just do the best research I could, beforehand.

Anyway... enough on that. :: hands JayArr his thread back :: :biggrin:
 
  • Like
Reactions: Mooseman

59840Surfer

Member
Apr 19, 2020
85
Montana
I'm driving that Transgo PWM delete with Gil Younger's company SK-H-2 kit in a rebuild. Over the years I've always had a lot of loyalty to Gil Younger (deceased now) but he always had the right stuff as far as I was --- and am --- concerned.

I'm loving the 4L60 now - it works when I'm towing my wood --- many times over 10K lbs and over hills and highways at 60 MPH or so.

It is firm and you can feel the TCC lockup, but I knew what I wanted going in.

For the record ---> I have a TM700R4 with a lot of the same stuff -- albeit much earlier designed - but it is a slave K5 that works it's brains out all year long hauling, towing, winching, log and stump jumping and freeway driving with or without the load.

They both hit L/U firmly and I know it's working 'cause the 700R is hitting over 100K miles on it and although the TB is running just over 1K miles so far - well --- I like it.

But --- yeah ---- with the 3 inch band, the Corvette 2/4 piston kit is kinda overkill.

The BIG thing is the temps of the unit are so much lower now with the kit.

Without all that slipping, the heat generated is gone --- low enough now that I do not need an external cooler.

For that one point --- I go PWM-Delete.
<Oh yeah --- the fuel mileage came up about 3 or 4 MPG that I can compute so far>.​
 

JayArr

Original poster
Member
Sep 24, 2018
504
Mission BC Canada
Hey Surfer, can you give more detail on the kit you used? I tried googling

"SK-H-2" transgo

and couldn't find a kit for a 4L60E. Are you sure that's the part number?

I've already got a transmission cooler mounted to take care of the heat, It became plain the first summer that the little cooler mounted in the rad was insufficient for towing. I installed the kit from PCM of NC. I don't reccomend it because it was overpriced and poorly engineered as far as brackets and instructions. The actual cooler was alright and I made it fit but for others I suggest you just buy the cooler and some hose for half the price, you're going to have to make your own brackets to get it to fit right anyway.
 
  • Like
Reactions: Mooseman

JayArr

Original poster
Member
Sep 24, 2018
504
Mission BC Canada
Just an update on where I'm at with this...

I've got all of the tools except the Sonax Vac Test tool. I tried to buy one but they are out of stock everywhere. I ended up ordering all the parts required to build one from scratch and am waiting for Amazon to deliver the last couple of fittings so I can assemble and calibrate it. I'm trying to get organized enough that I can take the tranny apart one weekend, order all my parts and put it back together within a week or two. The last thing I want is a disassembled transmission sitting open to the garage for weeks and weeks.

It's only January and the long term plan is to rebuild the unit in the garage and then swap it out as soon as it's warm enough in the spring. I've done this swap once and have all the tools and some experience so I'm hoping this next swap can be done in one long Saturday.
 

JayArr

Original poster
Member
Sep 24, 2018
504
Mission BC Canada
Well, I didn't get the vac-test tool assembled but I got something better. I got my instrument cluster repaired (stepper and lamps) and I got my garage insulated!

My wife found kits on Amazon that attach foil lined bubble wrap to the garage doors for extra insulation (they already had sheets of foam in them). Then I went out to the local Home Depot and bought a load of foam board insulation and spent Sunday insulating the whole outer wall. It was clad on the outside with cedar siding but there were knotholes and cracks all over and the seams between the siding boards leaked so the garage was always cold and drafty even with the propane heater.

It took all day because everything against the wall had to be moved the opening measured and a piece of foam board was cut to friction fit into the opening. You can see the pink boards in between the 2x4s in the pictures.

It's nice and toasty now, I can turn the propane heater down low and work in a sweatshirt. This will make rebuilding the transmission a lot more enjoyable.
 

Attachments

  • P1240004.JPG
    P1240004.JPG
    567.3 KB · Views: 22
  • P1240001.JPG
    P1240001.JPG
    610.3 KB · Views: 22
  • P1240002.JPG
    P1240002.JPG
    477.4 KB · Views: 22

JayArr

Original poster
Member
Sep 24, 2018
504
Mission BC Canada
Hi All

I'm back at it!

My apologies on being absent, I had to remortgage the house before the rates went up and then I was out buying some land to build the retirement hose (and shop) on. There was also a bathroom remodel of sorts jammed in there..

I spent some time yesterday and got the Vac tool built. This is based on the Sonnax one that I wasn't able to buy. I added a three way valve to make it easier to calibrate on the fly without having to disconnect from the test plate. If you turn the knob to the left it connects to a 35 thou hole for "pump adjust" to 5inhg, put it in the center position and it is 'off' so you can adjust the 'bleed adjust' for 25inhg. Turn the knob right to connect to the test plate for operation.

The trans is on the disassembly table, I hope to get the bell housing and pump out today.
 

Attachments

  • P7310001.JPG
    P7310001.JPG
    449.9 KB · Views: 14
  • P7310002.JPG
    P7310002.JPG
    624.2 KB · Views: 11
  • P7310003.JPG
    P7310003.JPG
    524.9 KB · Views: 11

Gunner

Member
Jan 23, 2019
19
Minnesota
Hi All

I'm back at it!

My apologies on being absent, I had to remortgage the house before the rates went up and then I was out buying some land to build the retirement hose (and shop) on. There was also a bathroom remodel of sorts jammed in there..

I spent some time yesterday and got the Vac tool built. This is based on the Sonnax one that I wasn't able to buy. I added a three way valve to make it easier to calibrate on the fly without having to disconnect from the test plate. If you turn the knob to the left it connects to a 35 thou hole for "pump adjust" to 5inhg, put it in the center position and it is 'off' so you can adjust the 'bleed adjust' for 25inhg. Turn the knob right to connect to the test plate for operation.

The trans is on the disassembly table, I hope to get the bell housing and pump out today.
Glad to see you back at it. Please continue with your clear updates!
 

JayArr

Original poster
Member
Sep 24, 2018
504
Mission BC Canada
OK, I had a pretty good few hours on it today.

The pan was full of sludge, no doubt this one was burned. One ball bearing was impacted into the metal plate which is typical of P1870 code transmissions and the holes are all deformed so I'll order a new plate. This makes me think the valve body will need to be checked very thoroughly. The band was worn down to the rivets so the input drum is toast, it's badly scored.

I've got porcelain pistons in two of the accumulators but they look good, no cracks or signs of damage so I have to decide if i want to put them back in or buy billet pistons to replace them. I'm following Brad Wilde on youtube and he says it's just a preference, as long as they aren't cracked. So I may keep that money in my pocket.

Amazingly the Sun Shell is in perfect condition, the gears are tight as new and there is no sign of cracking or stress. I'll take a good look under the microscope but this one may go back in.

I haven't opened any of the clutch packs yet, I think I want to stop and make sure all the pistons are OK in the valve body and pump and then I'll do all the clutch packs as a second phase.

More to come!
 

Attachments

  • P8010001.JPG
    P8010001.JPG
    674.6 KB · Views: 20
  • P8010002.JPG
    P8010002.JPG
    499 KB · Views: 19
  • Like
Reactions: Reprise

Reprise

Lifetime VIP Donor
Supporting Donor
Member
Jul 22, 2015
2,724
Subscribing. And I'm on board with leaving the accumulators as-is. They go in the valve body, so if something happens later on, at least you wouldn't have to rip out the entire unit to fix it later.

Not sure what year your core is from, but later in the 4L60's life, GM did beef up the sunshell a bit (which ran contrary to them cheapening things up, such as those accum pistons)

If you replace the separator plate with OEM, maybe spring for the Torlon checkballs. They're cheap.
 

JayArr

Original poster
Member
Sep 24, 2018
504
Mission BC Canada
OK, done. Torlon balls are ordered.

This is really starting to add up!

I'll bet I'm somewhere in the neighborhood of $1500-$2000 by the time I'm done this first transmission. That's including all the specialized tools, parts and kits.

Let's hope I can rebuild the second one for less than $500 to even it out a bit.
 
  • Like
Reactions: Mooseman

JayArr

Original poster
Member
Sep 24, 2018
504
Mission BC Canada
OK, Torlon balls - Check!

I was disappointed to find out that my shaft seal remover for the shift rod is too short. Apparently there are two tools, a short one for transmissions that don't have the electronic pack over the shaft and longer ones for those that do.

Pay attention and buy the long one if you have a later model 4L60E.

I ordered some more tools from Amazon this week, some honing blocks to dress the valve body, a set of little picks to remove o-rings and I snagged a valve body organizing tray. These are no longer made but I found someone with NOS and snagged one to keep things all organized.

I noticed something a little disturbing on the input drum, there are score marks in the teeth where the low/reverse clutch pack engages with it. Take a look at the picture.

Anyone know what causes this? I've watched dozens of you tube videos of 4L60E rebuilds and never seen this in any of them.

This transmission did haul a 5000 lb trailer back and forth across the country and I spent a fair bit of time in the mountains going downhill in 2nd or first. Is this wear from downshifts under load?

The clutch pack itself looks OK, I'll replace the part but if it indicates some valve somewhere else is leaking I'd like to find out and correct it before I put this all back together.

EDIT: I checked out the tech manual for the 4l60E and the clutch that engages those teeth is only for reverse - not low/reverse - so I'm going to conclude that the wear is from shifting into reverse with the car still rolling forward.

There is a post over on the LStech site from a guy with a similar wear pattern on his drum and the pros at the transmission shop told him not to worry about it, it's a common amount of wear and doesn't require replacement of the input drum.
Good news, that's $$ I can spend somewhere else.
 

Attachments

  • P8260002.JPG
    P8260002.JPG
    370.2 KB · Views: 17
  • P8260001.JPG
    P8260001.JPG
    498.4 KB · Views: 17
Last edited:
  • Like
Reactions: Mooseman

JayArr

Original poster
Member
Sep 24, 2018
504
Mission BC Canada
My tool orders came in but Amazon was a big disappointment this week. The shaft seal remover I ordered was completely rusted inside the plastic bag, maybe it got wet on a boat on it's way here from China? I also ordered two different sharpening stones to lap/level the surface of the valve body. It's something Brad does in his video to even things out, remove any small burrs etc. Anyway - Amazon sent two of the same instead of one of each so one went back. Does anyone else have this much trouble with Amazon? They just can't seem to get an order right for me without some hangup.

I'm hoping to get the valve body all tested today and maybe even do the reaming and install the Sonnax kits.
 

Attachments

  • P9030001.JPG
    P9030001.JPG
    387 KB · Views: 10
  • Wow
Reactions: Mooseman

Mooseman

Moderator
Dec 4, 2011
25,341
Ottawa, ON
Ordinarily, no but my biggest problem has always been delivery to the wrong house. My house address is on one street but actually points to the other. And we also have a house nearby with a similar street name with the same house number and postal code so they sometimes wind up there. And this despite I put in the delivery instructions about the house pointing to another street. After a few lost packages, I think they put a special notation to this address as they have been pretty good since.

As far as product quality or condition, never really had any issues except when something had poor performance, like a wireless BBQ thermometer. I've even had good luck with Amazon Warehouse return specials.
 
Sep 17, 2018
30
Iowa
Hey Everyone
That Vacuum Test tool thread was mine from LS1tech :smile:
I'm pretty active in the transmission section of LS1tech and I'm trying to be more active on this forum, especially the drivetrain section.
If you have any questions or concerns, I'd be happy to help. Especially with the 4l60e family of units.
I've built LOTS of these for customers over the years and am happy to share info.
p.s. I'm not here to sell anything. I'm not looking to rebuild for forum members. Just looking to help out here like I do on LS1tech.
Cheers!
 

JayArr

Original poster
Member
Sep 24, 2018
504
Mission BC Canada
A big thank you MMLS1, your design was an inspiration but I then added a couple of mods to it to make my life a little easier.

I've really got to get back to this project now that summer is over and outdoor work is done for the year. Maybe I can get this trans built for the spring. The one in the Envoy is starting to act up so I know I can't delay this forever.
 

JayArr

Original poster
Member
Sep 24, 2018
504
Mission BC Canada
Well I finally got enough of my Honey Do list completed to spend some time in the garage. (the kitchen remodel looks great - new quaertz countertops and new stainless gas range)

I set up the vac tester and calibrated it for 5 and 25 and then went to work based on the diagram from Sonnax. You can see that I wrote the readings directly onto the digram.

Mostly 15's-17s with a few in the 20's. The one low reading is where we would all expect it - The TCC Regulator Valve! It reads "8".

Not to worry, I have the reamer and the Sonnax kit and I'll install the sleeve kit this weekend. I just need a cutting fluid for aluminum.
 

Attachments

  • PA240008.JPG
    PA240008.JPG
    653.2 KB · Views: 15
  • PA240007.JPG
    PA240007.JPG
    548.7 KB · Views: 15

JayArr

Original poster
Member
Sep 24, 2018
504
Mission BC Canada
I reamed it out today and installed the kit. It was a resounding success!

I hand reamed it (no drill!) with ordinary cutting fluid, until it bottomed out then I cleaned it all very thoroughly and installed the new sleeve/pistons and spring.

The place where I measured only 8 psi before went up to 23! The place where I was reading 16.5 went up to 22. That's better than I hoped for.

Now I'll clean and set the valve body aside and continue on with dis-assembly. I also have a DIY plan to try to clean up the reverse input clutch housing (2/4 band). Mine has some scoring but it's still flat so I'm going to try to clean it up with bands of sandpaper and some scotch brite pads. The You Tube guy I watch (Brad's transmissions) puts it in a lathe, which I don't have but he only uses the lath to spin it and dress it with bands of sandpaper so I'm going to try something.

I'll let you know how it works out...
 

JayArr

Original poster
Member
Sep 24, 2018
504
Mission BC Canada
OK, this worked. I'm batting 1000 this weekend.

Take a look at the pics, the drum was mildly worn but still flat so I bought a long loop of 80 grit and a long loop of 150 grit sandpaper at the tool store, I'm guessing these are for some large woodworking sander. I cut the loop and sliced them down the center to make two of each.

I don't have a lathe but I do have an old Coats tire balancer with a nice big motor. The trouble was the shaft was much smaller than the two bushings in the drum. The solution was to make reducer rings out of Maple in the wood shop. I cut the center hole with a forstner bit and the outside ring with a hole saw. I made them oversize to begin with and then sanded them down. They aren't perfect, you can see that the center hole isn't 'centered' but they were only for alignment and I'm only sanding so a little wobble made no difference.

I mounted the drum, used the 80 grit to bring the surface down to a flat even state then 150 grit then scotch brite to finish. There is one tiny score line visible but I'm sure this is good enough. I figure that saved me a couple of hundred and I have the ability to do it again and again.
 

Attachments

  • PB060024.JPG
    PB060024.JPG
    408.3 KB · Views: 13
  • PB060020.JPG
    PB060020.JPG
    543.4 KB · Views: 12
  • PB060021.JPG
    PB060021.JPG
    410.9 KB · Views: 11
  • PB060022.JPG
    PB060022.JPG
    385.5 KB · Views: 12
  • PB060023.JPG
    PB060023.JPG
    322.5 KB · Views: 13

Forum Statistics

Threads
23,325
Posts
637,947
Members
18,531
Latest member
jvest

Members Online