How to remove I6 intake manifold and valve cover

Mooseman

Moderator
Moderator
Joined
Dec 4, 2011
Posts
26,961
Location
Ottawa, ON
This is the first of several articles during my work to replace the timing chain and tensioner. I thought it better to separate into articles for those that are looking for specific instructions.

How to remove the I6 intake manifold and valve cover.

Difficulty (out of 5): 3.5
Tools required: Assortment of wrenches, ratchets, extensions, screw drivers. Socket sizes: 7mm, 8mm, 10mm, 13mm, 14mm, 15mm.
Time required (removal and install): 4 to 6 hours

  1. To relieve pressure from the fuel system, start the engine and while is running, pull the fuel pump relay and let the engine stall. Turn off the ignition.
  2. Disconnect the battery
  3. Disconnect and remove the PCM
  4. Remove the air filter housing, air filter duct and resonator to the throttle body
  5. Disconnect and remove the throttle body from the intake manifold
  6. Disconnect the MAP sensor on top of the intake manifold
  7. If you have an extended truck, disconnect the vacuum hose snaking to the front of the intake manifold and move out of the way
  8. Disconnect the CPAS, O2 sensor and camshaft position sensor.
  9. Disconnect all 6 ignition coils
  10. Remove the bolt holding the dipstick and A/C hard line on passenger side of the engine (the A/C line does not have to be disconnected or the system emptied).
  11. Remove the bolt holding the A/C hard line to the front engine lift bracket on front driver side of engine
  12. Remove the engine lift bracket.
    You should be at this point:
    20140918_153726 (Large).jpg

  13. Remove the retaining clips from the fuel lines and using a special tool, disconnect the fuel lines. Place rags under the lines to absorb spillage
  14. Remove the fuel line retaining plate just below where the PCM is located. There is a single bolt holding it to the block.
  15. Disconnect the brake booster vacuum hose
  16. Remove the bolts holding the intake manifold. There are 10 of them. They will stay in the manifold. If the manifold doesn't move freely without resistance, you may have missed one. Do not force anything.
    So you should be at this point now:
    20140918_164428 (Large).jpg
  17. Remove all 6 ignition coils.
  18. Move the hard A/C line to in front of the engine towards the fan
  19. Unclip the top wiring harness from the top of the valve cover. There are two "Christmas tree" retainers holding that black plastic wiring thing to the valve cover. Pry it up. The retainers may break. Move the wiring harness to the front of the engine, like the A/C line
  20. loosen all the bolts on the valve cover. They stay in the valve cover, same as the intake manifold
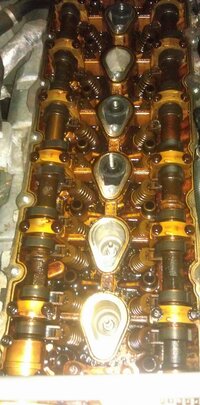
  21. Lift the valve cover off. It should come off easily with only a little bit of sticking from the gaskets.You should be at this point with the camshafts and timing chain and sprockets exposed.
20140918_170804 (Large).jpg

Installation is the reverse. Just use new gaskets throughout. You can replace the camshaft phaser at this point using special tools to prevent the chain from falling into the engine. Those instructions are in the manuals.
 
this is good!
a question though. I'm just taking the intake manifold off to replace gaskets. I have all the bolts loose and the manifold is moving but doesn't quite come all the way out. Only thing I can think of is that there is a wiring harness that runs more or less along the bottom of the intake that may be holding it from moving. I see a bracket for it but can't see/feel how it comes off. did you have to remove this when you pulled your intake?
 
Check to make sure all the bolts are completely unbolted. You might have one that still has a thread or two still holding. There is only the one "triangular" fuel line bracket, two nuts on the same bottom studs as the PCM, and a single bolt on the block that's kinda tricky to get at. Then there is the brake booster hose right in the middle to pull off. Other than those, it should just fall right off the head. There is no harness unless there is a difference between 2002 and 2006. I know I had to undo my fuel lines and move them and the fuel pressure test port out of the way.
 
how did you get the bracket out i am in the middle of removing the manifold and i cant get the bracket off that the pcm harness wires connect to.
 
There is another bolt below that holds that bracket to the block. Slide your hand under that bracket down and you will eventually find that bolt.
 
Mooseman said:
There is another bolt below that holds that bracket to the block. Slide your hand under that bracket down and you will eventually find that bolt.
I got the bolt off and wow was that a bitch to do.

Either way now I need to take off the fuel line and remove the bolts

Do you remember which fuel line disconnect you used?
 
Well I have to finish tomorrow I will see if the disconnect tool I have from auto zone works
 
I have and used a set like this:
146786d1344305169-rubber-fuel-hoses-main-fuel-lines-engine-bay-c-fuel-disconnect-tool-hy-2039-.jpg
 
Do you remember which size you used?
 
Sorry, I just picked one that fit and used it.
 
OK well I can't get fuel line off it is a 3/8 disconnect.

How hard was it to get the line off,
 
You really have to shove the disconnect all the way to the stopper to release the spring. If it's all the way in, it should let go with some twisting and persuasion.

This video should help:

https://www.youtube.com/watch?v=DvngvwOy2ns
 
OK well I got it off I actually got the line off right after I posted, for any one else use the silver fuel line disconnect tool from auto zone it is the one that says for gm vehicles it works perfect. Just press in and pull the line.

Also the whole removal and gasket replacement wasn't to hard, it drove good so all went well thanks for the write up.

Also in case you were wondering I had to remove it because I dropped a clip from the tb into the intake lol
 
Glad it worked out. And guess what I might have to do? Take the valve cover off AGAIN! This time, the cam phaser is giving me a code. I must have damaged it while installing it. It's giving me a P1345 and I didn't even have it before changing the timing chain and tensioner. The phaser is about 2 years old having changed it for the exact same code and issue. Only reason I would fix it is to sell it.
 
I would say maybe it's a sensor not adjusted for the new timing chain but you had the battery off so I guess you would have to change it then, that sucks [emoji47]

I might take mines off just to do it and to clean the whole oiled up intake manifold, and intake ports also I need to clean the valve cover pcv port

do you have to scrape any gasket off on the valve cover?
 
No scraping, same type as the intake manifold. BTW, I had already done a CASE relearn twice, swapped sensors, nada. I might try changing the CPAS but I didn't touch it during the timing chain job. I think I might have farked the phaser while unbolting it and it moved pretty easy in my hand.
 
If I do do this is there anything I should look out for? Also can the phaser be replaced or cleaned while only removing the valve cover?
 
Just realized it says the size on the fuel line retainer also how dose the cams look compared to yours
 

Attachments

  • uploadfromtaptalk1417534377834.jpg
    uploadfromtaptalk1417534377834.jpg
    131.5 KB · Views: 48
  • uploadfromtaptalk1417534546408.jpg
    uploadfromtaptalk1417534546408.jpg
    154.7 KB · Views: 53
OK I guess. I can't really tell in the picture. If you don't see any pitting or damage or there was no noise prior, it's good. No sludge neither is a good thing.
 
  • Like
Reactions: Gerbil21
A related and helpful Video covering the R&R of the Intake Manifold portion of this Job:

 
I just had the intake off.

Q: Any tips on tightening the intake manifold bolts? (new gaskets)

I followed the manual. I started in the middle and worked my way out and torqued them to 10nm.

Should I just leave it at that or does anyone know from experience anything different I should do before I can't get to those bolts?

Notes

I also pulled the left headlight so I could pull the battery tray (there's holes behind the headlight to run an extension through to get those bottom bolts on the tray) and I pulled the alternator out.

Getting to pretty much everything is way easier with that stuff out of the way.

You can also remove those 3 inch ECM mount studs sticking out of the manifold so they are out of the way too. They have a 4mm hex head. Pull the MAP sensor out while your at it. That extra inch of clearance will help a lot.

Between 15 and 16 you need to pull off the lower PCV hose. Mine had a clamp on the bottom but I was able to remove it without touching the clamp.

I see a few people asked about the fuel line disconnect tools so I'm adding a picture of a set like mine. I prefer this design to those little round ones. As mentioned, you shove it all the way in, remove the line, then remove the tool.

Capture.JPG
 
Last edited:
  • Like
Reactions: Mooseman

Forum Statistics

Threads
24,080
Posts
646,544
Members
20,277
Latest member
EValdez307

Members Online