Gerbil21's - 05 Envoy Build

Gerbil21

Original poster
Member
May 28, 2014
839
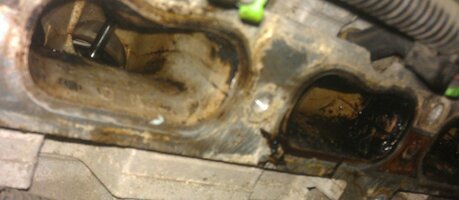
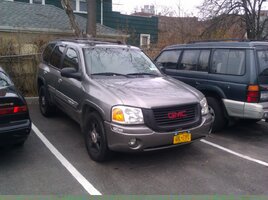
I would of been posting about my 06 Saab 5.3 but I ended up getting a 99 blazer real cheap with 74k and it was pretty Much brand new, after a few months in the middle of the winter I realized we had a small coolant leak from the intake manifold on the coolant crossover and long story short I took it to the mechanic against my usual policy of diy and the head gasket blew. So then I was on the look for its newer form the GMT360's and found this 05 Envoy that had almost all options except g80, side curtain air bags, and nav.

Either way I wanted to make shure this truck lasted a while so the first thing we did was flush all the fluids
IMAG2733.jpg

So I've done:
>Front & rear diff fluid
>Transfer case fluid
>Transmission Fluid flush, filter and both shift solenoids
>Engine oil (with 10w-30 by accident lol)
Power steering pump & fluid
>Air filter
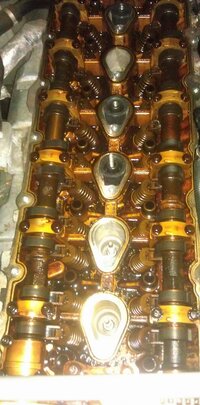
>Spark plugs (acdelco 41-103) & coil boots
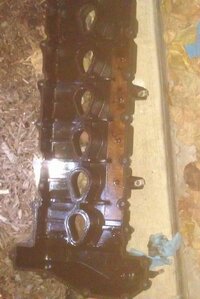
>Coolant and t stat
>Upstream O2 sensor
>All fluids were top brand synthetics
>replaced tire carrier
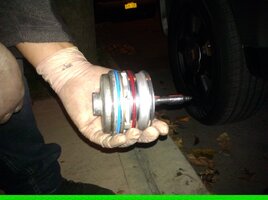
>cleaned front axle disconnect and replaced front actuator (now 4x4 works yay! :biggrin: )

Modifications:
>Replaced rear air springs with >Tahoe z71 springs
>Tahoe z71 Shocks
>Quad tail lights
>Quad headlights
>Plasti dipped rims, whole grille, mirror covers, and lower door trim >one led in the running lights lol

uploadfromtaptalk1412268492410.jpg
 

Gerbil21

Original poster
Member
May 28, 2014
839
Reserved for pictures

IMAG0245.jpg
IMAG0244.jpg
IMAG0260.jpg
IMAG0261.jpg
 
  • Like
Reactions: Mounce and dmanns67

triz

Member
Apr 22, 2013
746
I had not seen your plate to I scrolled down, but from that first photo I was saying that looks like NYC. Nice ride.
 

Gerbil21

Original poster
Member
May 28, 2014
839
triz said:
I had not seen your plate to I scrolled down, but from that first photo I was saying that looks like NYC. Nice ride.
Thanks and yea I'm right here at NYC [emoji1]
 

Mark20

Member
Dec 6, 2011
1,630
What part of Queens? I grew up near Francis Lewis and Hillside.

Looking good. Have to do just about all you did for my 100K that's getting ever closer.
 

Gerbil21

Original poster
Member
May 28, 2014
839
Mark20 said:
What part of Queens? I grew up near Francis Lewis and Hillside.

Looking good. Have to do just about all you did for my 100K that's getting ever closer.
I live in richmond hill nice to see another person from queens. all the work done wasn't that hard actually

There is a how to on flushing trans. On the OS, I'll try to find it and post it you just need some clear tubing and a bucket then just start the car and let it pump out then drop pan and change filter (the filter seal didn't come out but I reused it)

The diff's are easy diff fluid just smells bad also holding a giant 1/2" torque wrench made it so much harder but I guess you can do without one also make shure you do a crisscross pattern and flip the gasket on the rear diff

I didn't do brakes but it not that hard its just bleeding them but more

Power steering was easy too just take off hoses, drain, put on pressure (metal) line, fill and point rubber hose into bucket while turning wheel

Engine oil is straight toward (brake clean on a shop towel makes it easy to remove filter)

Coolant wasn't hard either just pull bottom hose from rad and drain then replace t stat (if you are) then fill and burp

All fluids I bought from advance auto online with store pick up using code TRT30 for 30% off breaking the orders into a few different ones make better use of the code

I also used amazon for the trans filter, seal, shocks, coolant burper (lisle tool), and diff seal, t stat etc...
 

Gerbil21

Original poster
Member
May 28, 2014
839
i just found these original pics
00000161.jpg


00000165.jpg


00000441.jpg
 

Gerbil21

Original poster
Member
May 28, 2014
839
Just finalized the shift kit with the corvette servo
 

Attachments

  • uploadfromtaptalk1415828285412.jpg
    uploadfromtaptalk1415828285412.jpg
    281.8 KB · Views: 55
  • Like
Reactions: Capote

Gerbil21

Original poster
Member
May 28, 2014
839
All the parts removed when taking off the intake manifold and valve cover
 

Attachments

  • uploadfromtaptalk1417528778831.jpg
    uploadfromtaptalk1417528778831.jpg
    317.8 KB · Views: 49
  • Like
Reactions: Capote

Gerbil21

Original poster
Member
May 28, 2014
839
It looks so diffrent
 

Attachments

  • uploadfromtaptalk1417529253662.jpg
    uploadfromtaptalk1417529253662.jpg
    330.3 KB · Views: 51
  • Like
Reactions: Capote

Gerbil21

Original poster
Member
May 28, 2014
839
Nasty gummed up intake ports
 

Attachments

  • uploadfromtaptalk1417529351465.jpg
    uploadfromtaptalk1417529351465.jpg
    235.3 KB · Views: 46
  • uploadfromtaptalk1417529392233.jpg
    uploadfromtaptalk1417529392233.jpg
    111 KB · Views: 46
  • uploadfromtaptalk1417529407672.JPG
    uploadfromtaptalk1417529407672.JPG
    205.9 KB · Views: 44

Gerbil21

Original poster
Member
May 28, 2014
839
Much better
 

Attachments

  • uploadfromtaptalk1417529486971.JPG
    uploadfromtaptalk1417529486971.JPG
    88.3 KB · Views: 39

Gerbil21

Original poster
Member
May 28, 2014
839
And the covers off, it was pretty clean no sludge or dirt except for a bit of dirt in the corners
 

Attachments

  • uploadfromtaptalk1417529661947.jpg
    uploadfromtaptalk1417529661947.jpg
    163.1 KB · Views: 36

Gerbil21

Original poster
Member
May 28, 2014
839
Notice the boots still in there, I now realized I must of had put rtv instead of dielectric grease on them last time I pulled the plugs [emoji26] this is why you should never do anything with no sleep
 

Attachments

  • uploadfromtaptalk1417529930586.jpg
    uploadfromtaptalk1417529930586.jpg
    154.7 KB · Views: 40

Gerbil21

Original poster
Member
May 28, 2014
839
Here she is now everything's working great except for the tree that's growing out of it [emoji3]
 

Attachments

  • uploadfromtaptalk1417530234461.jpg
    uploadfromtaptalk1417530234461.jpg
    342.3 KB · Views: 53
  • Like
Reactions: yohshua

Gerbil21

Original poster
Member
May 28, 2014
839
Finally got the resonator off it was broken at the end and on the side also found out it was a aftermarket replacement a walker quiet-flow so I may have to remove the muffler too

uploadfromtaptalk1428931181226.JPG
 

Gerbil21

Original poster
Member
May 28, 2014
839
uploadfromtaptalk1428931284333.JPG
 
  • Like
Reactions: yohshua

Gerbil21

Original poster
Member
May 28, 2014
839
uploadfromtaptalk1428931322489.JPG
 
  • Like
Reactions: yohshua

Gerbil21

Original poster
Member
May 28, 2014
839
Look here for all pictures here but full size and better quality, and some extra pictures:
https://www.dropbox.com/sh/7aqb35lfceruzqu/AAAwmpWJ-y3AxXSNxnDV76_Ua?dl=0


These are from yesterday when i got the engine

2015-04-27 12.39.47.jpg
2015-04-27 12.39.56.jpg
2015-04-27 12.40.00.jpg
2015-04-27 12.40.15.jpg

found out when you drop an engine it likes to eat dirt lol
2015-04-28 10.00.13.jpg

also got the cam actuator out, it was seized in there so bad i had to hit it out from the other side with a 1/2" extension and a mallet
2015-04-28 09.59.40.jpg
2015-04-28 09.59.44.jpg
2015-04-28 09.59.48.jpg
 
  • Like
Reactions: Mounce and dmanns67

Gerbil21

Original poster
Member
May 28, 2014
839
did some more work on it and pulled most of all the parts off

Got the oil pan off
2015-04-28 10.19.48.jpg
2015-04-28 10.20.11.jpg
2015-04-28 10.21.16.jpg

Pretty nasty
2015-04-28 10.20.18.jpg

Next, Out came the Pistons. 3 & 4 were super easy since they come up together
2015-04-28 10.56.05.jpg
2015-04-28 10.57.35.jpg
2015-04-28 10.58.31.jpg

Half way there
2015-04-28 11.01.19.jpg

the bearings got some good wear on them since it had coolant in the oil
2015-04-28 10.58.01.jpg
2015-04-28 10.58.09.jpg
 
  • Like
Reactions: Mounce and dmanns67

Gerbil21

Original poster
Member
May 28, 2014
839
More bearings, also got all the pistons out and snapped 2 crankshaft girdle bolts
2015-04-28 10.59.11.jpg2015-04-28 11.03.13.jpg2015-04-28 11.03.35.jpg2015-04-28 11.03.46.jpg2015-04-28 11.28.25.jpg2015-04-28 11.29.25.jpg2015-04-28 11.29.37.jpg2015-04-28 11.29.54.jpg
 
  • Like
Reactions: Mounce and dmanns67

Gerbil21

Original poster
Member
May 28, 2014
839
Last bolt out of 14 holding the girdle had to get rounded [emoji35]

Can you see the difference lol dam torque to yield bolts.

uploadfromtaptalk1430404995885.JPG
 

redmaro42

Member
Sep 25, 2014
70
what's the story behind the engine from your brother, are you building it up to swap into your envoy?
 

Gerbil21

Original poster
Member
May 28, 2014
839
redmaro42 said:
what's the story behind the engine from your brother, are you building it up to swap into your envoy?
It has 133k never overheated or gave any signs and one day it started missing on cylinder #3 pulled the plug and it was wet along with liquid in the cylinder. It was still winter so we decided to bring it to a shop which came out to $1650 iirc.

They said it was a blown head gasket on #3 and low compression on #4 aswell. They also said the leak down test showed bad valves on the two cylinders.

Also yes were going to build it up with a 07 head (since 08+ have a different cam sensor iirc) and swap it into the envoy whenever it let's go. If we have it ready soon we may swap it in while my engine is still good since we have transmission problems so we may just remove both and get a new engine and transmission at the same time.
 
  • Like
Reactions: SnowBlazer

Gerbil21

Original poster
Member
May 28, 2014
839
Just a pic from last night when i got the girdle off. I'll take more pics when I get home of the bolts and crank bearings. Now I need to get a puller and get the crank and water pump pulley off, then the rear main seal and out comes the crank. [emoji3] then I'll start looking at the head and get some more pics

uploadfromtaptalk1430409374371.JPG
 

Gerbil21

Original poster
Member
May 28, 2014
839
Painted the trims and bumper step pad, it looks good
DSC_0286.JPGDSC_0290.JPGDSC_0291.JPG
 

Gerbil21

Original poster
Member
May 28, 2014
839
Plastic welded the door switches clip tabs, it worked perfectly and is really strong

and then I did this [emoji50] [emoji38] uploadfromtaptalk1431218254843.JPG
 
  • Like
Reactions: Mounce

Gerbil21

Original poster
Member
May 28, 2014
839
Another pic of plastic welding

uploadfromtaptalk1431400161712.JPG
 
  • Like
Reactions: Mounce

Gerbil21

Original poster
Member
May 28, 2014
839
Painted the grille with bumper and trim spray paint over the plasti dip and it looks good.

uploadfromtaptalk1431400244300.JPG
 
  • Like
Reactions: Mounce

Gerbil21

Original poster
Member
May 28, 2014
839
Front and rear rotors and rear pads

These are the bigger ext rotors, can't wait to install when the rest of the parts come in.

Got front and rear sway bar links & bushings, caliper brackets, front pads, and a fog light bulb coming in the mail


uploadfromtaptalk1431976478097.JPG
 
  • Like
Reactions: Sib and Mounce

Gerbil21

Original poster
Member
May 28, 2014
839
Dammit backing plates

uploadfromtaptalk1432071385220.JPG
 

Gerbil21

Original poster
Member
May 28, 2014
839
yea these pads definitely needed a replacement.
DSC_0413.JPG

and the swaybar links too, also not trying to talk bad about gm engineers but could they not make a better design a stupid allen key to hold the bolt and then when that gets full of rust and dirt and then gets stripped out then you have to cut the boot and hold the inside with a vice grip :hissyfit: which still dosent work too great it took me all of yesteday to replace both rear sway bar links. i should of had gotten a sawzall :mad:
DSC_0415.JPG

all the leftover boxes it was so nice when parts were coming in :smile:
DSC_0422.JPG
 

Gerbil21

Original poster
Member
May 28, 2014
839
yea these pads definitely needed a replacement.
View attachment 68002

and the swaybar links too, also not trying to talk bad about gm engineers but could they not make a better design a stupid allen key to hold the bolt and then when that gets full of rust and dirt and then gets stripped out then you have to cut the boot and hold the inside with a vice grip :hissyfit: which still dosent work too great it took me all of yesteday to replace both rear sway bar links. i should of had gotten a sawzall :mad:
View attachment 68003

all the leftover boxes it was so nice when parts were coming in :smile:
View attachment 68004
 

Gerbil21

Original poster
Member
May 28, 2014
839
Well as of yesterday I had just finished all my work and let me just say, oem sway bar links SUCK!

If your planning on replacing them make sure you have a good small and big vice grip you will need to hold the inside very tight after you cut off the boots. After you get them Held you can get the nut off with a impact (this is where wobble extentions really help)

Also finished with the v8/ext/ss brake upgrade and got to say they look huge compared to stock, and they fitted very nicely. The only thing I got stuck on was the slide pin boots, they are a rubber boot that is permanently connected to a metal insert that goes into the caliper bracket, you'll have to tap on the edge with a screwdriver and a hammer until it lifts then pry up. Then use loctite on the outer Ridge when reassembling since it's held in with that from the factory.
 

Gerbil21

Original poster
Member
May 28, 2014
839
uploadfromtaptalk1432465838387.jpeguploadfromtaptalk1432465847321.jpeguploadfromtaptalk1432465857731.jpeg
 

Gerbil21

Original poster
Member
May 28, 2014
839
uploadfromtaptalk1432465934918.JPG
 
  • Like
Reactions: Sib

Gerbil21

Original poster
Member
May 28, 2014
839
uploadfromtaptalk1432465984584.JPGuploadfromtaptalk1432466028781.jpeg
 

Gerbil21

Original poster
Member
May 28, 2014
839
uploadfromtaptalk1432466070258.jpeguploadfromtaptalk1432466087352.jpeg
 
  • Like
Reactions: triz and Sib

Forum Statistics

Threads
23,330
Posts
638,003
Members
18,536
Latest member
Brianhvac

Members Online