Hey Gang - this is my first post on the new site. I've learned a lot on the old site and thought I would share my experience with the spare tire hoist, winch and cable that is used on Envoys and I'm assuming Trailblazers.
NOTE: This fix will only work if you have your spare tire already off of the truck.
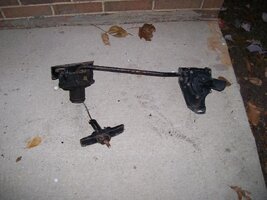
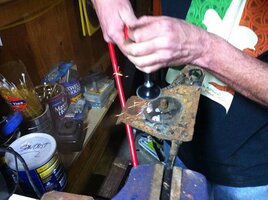
Step 1: With the spare tire off, crawl under the back-end of the vehicle and unbolt the entire spare tire hoist assembly (the pic below is a new one for reference only). There are only 3 bolts and it's best if you hit them with PB Blaster in advance. There is only one bolt on the side that attaches to the frame support and a notch in the frame where the unit rests, so you may have to hit it with a hammer to release. The top of the pulley unit is plastic and will more than likely have a crack in it - probably on the edge, so be careful when removing.
View attachment 20006
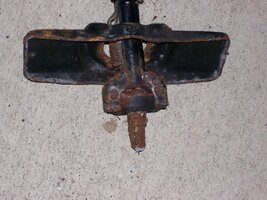
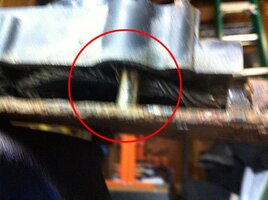
Step 2: Now that you have the entire assembly off of the vehicle, lock it into a vice upside down (see pic). The top plastic housing is held in place by 5 or 6 rivets (sorry, I forgot to count how many when I removed). With the unit upside down and secure, grind down the end of the rivets so that they are flush with the back of the assembly.
View attachment 20007
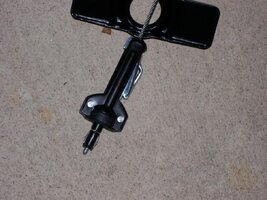
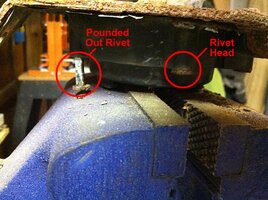
Step 3: Once you have all of the rivet heads ground down flush, use a punch and a hammer to hammer them out. I moved the pulley unit in the vice so that the pulley shaft was being held instead of the cable tube. This will give the unit support while you are punching out those old rivets. You may have to move the unit around to get to all the rivets and it's probably best to have a friend holding the opposite end or have it supported in some fashion.
View attachment 20011
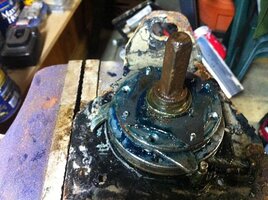
Step 4: Now that all the rivets have been removed, carefully flip the entire unit over and remove the plastic housing. There is a post that is inside the assembly and that appears to be what my cable got caught up on (see pic).
View attachment 20008
Step 5: With the plastic housing off, I suggest that you take a picture of the insides and/or remove the 3 or 4 plates and make notes of how it is put together. You're going to have to try and pull that cable free and there is a possibility that then you do all those parts will go flying. Again, a friend helping you at this point would be good. Have one person hold down the metal plates on the pulley and have the other person pull the opposite end of the cable. What you're trying to do is release the tangled up cable.
View attachment 20009
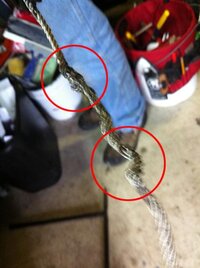
Step 6: With the cable pulled out of the pulley, try to straighten out as much as possible since you will more than likely have knots in the cable (see pic). I used lineman's pliers to slowly crimp the cable straight. You're not going to get the cable perfect, but you want to work the kinks and knots out.
View attachment 20010
Step 7: WIth the cable as straight as you can get it, put the plastic housing back on and use bolts and nuts to replace the rivets that you hammered out. DO NOT TRY WINDING THE CABLE UP UNTIL YOU HAVE THE UNIT BACK ON THE VEHICLE.
Step 8: Attach the entire unit back on the vehicle in the reverse order that you removed.
Step 9: Now that everything is attached and untangled, put the spare tire back on the truck using the crank just like you normally would.
NOTE: When my buddy and I were working on this, we figured out that the reason this happened and is probably happening to so many other people, is that the wheel is being put on wrong. When cranking the spare tire back up under the vehicle, MAKE SURE YOU HAVE THE OUTSIDE OF THE WHEEL FACING DOWN. If you do it in reverse, the distance is different and you will bunch up the cable inside the assembly again.
I know that this solution may not work for everyone, but we got this fixed in under 40 minutes. Beats having to pay $125 for a new one.
Peace... out.
NOTE: This fix will only work if you have your spare tire already off of the truck.
Step 1: With the spare tire off, crawl under the back-end of the vehicle and unbolt the entire spare tire hoist assembly (the pic below is a new one for reference only). There are only 3 bolts and it's best if you hit them with PB Blaster in advance. There is only one bolt on the side that attaches to the frame support and a notch in the frame where the unit rests, so you may have to hit it with a hammer to release. The top of the pulley unit is plastic and will more than likely have a crack in it - probably on the edge, so be careful when removing.
View attachment 20006
Step 2: Now that you have the entire assembly off of the vehicle, lock it into a vice upside down (see pic). The top plastic housing is held in place by 5 or 6 rivets (sorry, I forgot to count how many when I removed). With the unit upside down and secure, grind down the end of the rivets so that they are flush with the back of the assembly.
View attachment 20007
Step 3: Once you have all of the rivet heads ground down flush, use a punch and a hammer to hammer them out. I moved the pulley unit in the vice so that the pulley shaft was being held instead of the cable tube. This will give the unit support while you are punching out those old rivets. You may have to move the unit around to get to all the rivets and it's probably best to have a friend holding the opposite end or have it supported in some fashion.
View attachment 20011
Step 4: Now that all the rivets have been removed, carefully flip the entire unit over and remove the plastic housing. There is a post that is inside the assembly and that appears to be what my cable got caught up on (see pic).
View attachment 20008
Step 5: With the plastic housing off, I suggest that you take a picture of the insides and/or remove the 3 or 4 plates and make notes of how it is put together. You're going to have to try and pull that cable free and there is a possibility that then you do all those parts will go flying. Again, a friend helping you at this point would be good. Have one person hold down the metal plates on the pulley and have the other person pull the opposite end of the cable. What you're trying to do is release the tangled up cable.
View attachment 20009
Step 6: With the cable pulled out of the pulley, try to straighten out as much as possible since you will more than likely have knots in the cable (see pic). I used lineman's pliers to slowly crimp the cable straight. You're not going to get the cable perfect, but you want to work the kinks and knots out.
View attachment 20010
Step 7: WIth the cable as straight as you can get it, put the plastic housing back on and use bolts and nuts to replace the rivets that you hammered out. DO NOT TRY WINDING THE CABLE UP UNTIL YOU HAVE THE UNIT BACK ON THE VEHICLE.
Step 8: Attach the entire unit back on the vehicle in the reverse order that you removed.
Step 9: Now that everything is attached and untangled, put the spare tire back on the truck using the crank just like you normally would.
NOTE: When my buddy and I were working on this, we figured out that the reason this happened and is probably happening to so many other people, is that the wheel is being put on wrong. When cranking the spare tire back up under the vehicle, MAKE SURE YOU HAVE THE OUTSIDE OF THE WHEEL FACING DOWN. If you do it in reverse, the distance is different and you will bunch up the cable inside the assembly again.
I know that this solution may not work for everyone, but we got this fixed in under 40 minutes. Beats having to pay $125 for a new one.
Peace... out.

 Welcome
 . For us in pretty much anywhere non-desert, we have issues with rust and the secondary latch jams on a regular basis, especially when you need it most
 Kuwait is just where I work and yes, here there are no rust issues at all.....only the fear of tires or some other part succumbing to the heat