You are using an out of date browser. It may not display this or other websites correctly.
You should upgrade or use an alternative browser.
You should upgrade or use an alternative browser.
Cam chain tensioner replacement
- Thread starter gmcman
- Start date
Unfortunately, No...
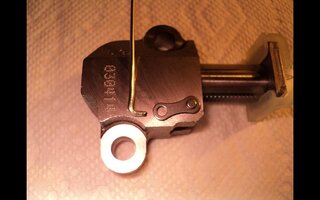
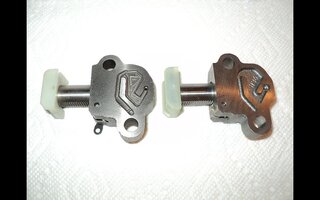
...and the Prime Culprit is the (TCT) Timing Chain Tensioner...itself. The Tensioner has TWO Mechanisms to ensure that there is adequate pressure against the underside of the Timing Chain Guide as it removes the Slack on the Timing Chain during all RPM Ranges of Operation:

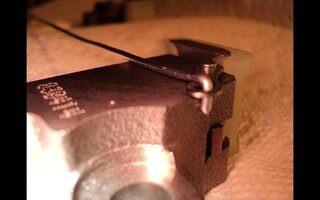
(1) The (TCT) is fitted with a "toothy" Ratchet Bar on its underside that locks the (TCT) as far forward as possible while the Timing Chain Tensioner, Sprockets and Timing Chain Guides gradually wear in... and wear down:


(2) The (TCT) also has a Very Small NON-LOCKING Release Latch that is virtually impossible to reach down inside of the narrow hollow spaces around it and effectively UNLOCK that Latch while simultaneously NOT being able to Push-Pad Plunger deeper inside of the (TCT) Body and secure it in place with a Nylon "Divot". The Tools and Tactics turn what would ordinarily be a very simple and straightforward process into The WORST "Rube Goldberg" Exercise in Futility that you can imagine:


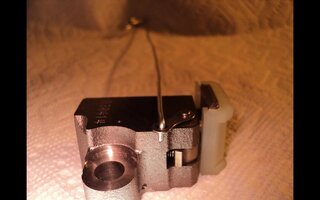
(3) The (TCT) is fed Motor Oil via a small hole centered in the front face of the Oil Gallery directly underneath a 'Reservoir" small Convex Steep Cup with a Pinhole inside that is plugged into the Oil Gallery directly underneath the machined hollow underside of the (TCT). As the Engine RPM Increases... The Oil Pressure inside of the Reservoir builds up and Pushes on the Ratcheted Plunger fitted with a Nylon "Foot-Pad". This additional Hydraulic Force allows for better tension on the chain under more dynamic rotations which tend to Throw the Chain OFF and Away from all contacts by Centrifugal Force:


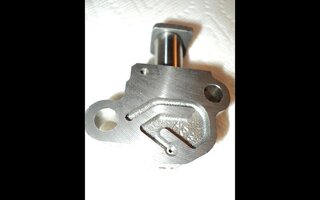
(4) The very design of the front of the GM Atlas 4200 LL8 prohibits access to the Two Fasteners holding in the (TCT) onto the hidden Engine Block with 18 Foot Pounds of Torque. This creates a situation that also requires Removing the Timing Cover-Gerotor Combo Pump... which gets even MORE difficult because the Crankcase-Oilpan uses Integrated Fasteners with the Timing Cover and so ALL of these components MUST Be Removed. That Cascade of Things needing to be R&R'd keeps going from there if the SUV sports 4 Wheel Drive. In Short ... It's a Nightmare!
...and the Prime Culprit is the (TCT) Timing Chain Tensioner...itself. The Tensioner has TWO Mechanisms to ensure that there is adequate pressure against the underside of the Timing Chain Guide as it removes the Slack on the Timing Chain during all RPM Ranges of Operation:
(1) The (TCT) is fitted with a "toothy" Ratchet Bar on its underside that locks the (TCT) as far forward as possible while the Timing Chain Tensioner, Sprockets and Timing Chain Guides gradually wear in... and wear down:
(2) The (TCT) also has a Very Small NON-LOCKING Release Latch that is virtually impossible to reach down inside of the narrow hollow spaces around it and effectively UNLOCK that Latch while simultaneously NOT being able to Push-Pad Plunger deeper inside of the (TCT) Body and secure it in place with a Nylon "Divot". The Tools and Tactics turn what would ordinarily be a very simple and straightforward process into The WORST "Rube Goldberg" Exercise in Futility that you can imagine:
(3) The (TCT) is fed Motor Oil via a small hole centered in the front face of the Oil Gallery directly underneath a 'Reservoir" small Convex Steep Cup with a Pinhole inside that is plugged into the Oil Gallery directly underneath the machined hollow underside of the (TCT). As the Engine RPM Increases... The Oil Pressure inside of the Reservoir builds up and Pushes on the Ratcheted Plunger fitted with a Nylon "Foot-Pad". This additional Hydraulic Force allows for better tension on the chain under more dynamic rotations which tend to Throw the Chain OFF and Away from all contacts by Centrifugal Force:
(4) The very design of the front of the GM Atlas 4200 LL8 prohibits access to the Two Fasteners holding in the (TCT) onto the hidden Engine Block with 18 Foot Pounds of Torque. This creates a situation that also requires Removing the Timing Cover-Gerotor Combo Pump... which gets even MORE difficult because the Crankcase-Oilpan uses Integrated Fasteners with the Timing Cover and so ALL of these components MUST Be Removed. That Cascade of Things needing to be R&R'd keeps going from there if the SUV sports 4 Wheel Drive. In Short ... It's a Nightmare!
Attachments

Last edited:
Mooseman
Moderator
Been there, done that and actually have the scar in my hand to prove it.
How to replace I6 timing chain and tensioner
It can't be done without taking the cover off.
What makes you think you need a chain tensioner?
How to replace I6 timing chain and tensioner
It can't be done without taking the cover off.
What makes you think you need a chain tensioner?

- Dec 12, 2011
- 4,656
Thanks @MRRSM , we also discussed this during my con rod bearing change that I was half way there if I wanted to change everything. I wish I had the time for that but there was no way I was able to set aside more time for everything.
Having done the pan, an R&R would be easier the 2nd time around but I agree...a nightmare.
I did see your write up, man what a chore.
I don't know if I do, but even before I changed the rod bearings, there seems to be this prominent, cam-speed tap, rap, but not a knock. If I bump the gas from idle, it stops momentarily, but doesn't get much louder as I raise the RPM's.
One theory is, the tensioner is at it's max travel, and relaxes against the stop provided by the ratchet mechanism when the oil pressure is low at idle or when the engine is off and oil pressure is 0. However when the engine is running, the adjuster could extend just slightly under oil pressure to take up slack, then relax again at idle, never fully able to reach that next stop in the mechanism. So perhaps also when I bump the throttle, the slack is taken up momentarily before the RPM stabilizes and the chain returns to being somewhat "unloaded"
It makes a slight racket during a cold start, then gets quiet until the oil warms, then at an idle it's a very light tap and I hear it more in the front of the motor and around the LH side of the front of the block, hovering around the chain cover/ front of engine.
Seems too regular of a pattern to be a water pump. The noise is not overwhelming, sometimes you have to know it's there.
Could be an exhaust leak, I've had the front bolt on #1 work itself loose a couple times, both bolts on #6 were loose recently, could have burned the gasket.
Could be another worn skirt but load doesn't seem to play a factor.
If I could change the tensioner with just the valve cover off, that's one thing, but having to pull the oil pan for that one SINGLE bolt on the pickup tube is beyond inconceivable in terms of engineering, so that changes the game plan. If I have to pull the pan again, which I do for this job, then I'm doing it once and ill change the chain cover and everything behind it.
Having done the pan, an R&R would be easier the 2nd time around but I agree...a nightmare.
What makes you think you need a chain tensioner?
I did see your write up, man what a chore.
I don't know if I do, but even before I changed the rod bearings, there seems to be this prominent, cam-speed tap, rap, but not a knock. If I bump the gas from idle, it stops momentarily, but doesn't get much louder as I raise the RPM's.
One theory is, the tensioner is at it's max travel, and relaxes against the stop provided by the ratchet mechanism when the oil pressure is low at idle or when the engine is off and oil pressure is 0. However when the engine is running, the adjuster could extend just slightly under oil pressure to take up slack, then relax again at idle, never fully able to reach that next stop in the mechanism. So perhaps also when I bump the throttle, the slack is taken up momentarily before the RPM stabilizes and the chain returns to being somewhat "unloaded"
It makes a slight racket during a cold start, then gets quiet until the oil warms, then at an idle it's a very light tap and I hear it more in the front of the motor and around the LH side of the front of the block, hovering around the chain cover/ front of engine.
Seems too regular of a pattern to be a water pump. The noise is not overwhelming, sometimes you have to know it's there.
Could be an exhaust leak, I've had the front bolt on #1 work itself loose a couple times, both bolts on #6 were loose recently, could have burned the gasket.
Could be another worn skirt but load doesn't seem to play a factor.
If I could change the tensioner with just the valve cover off, that's one thing, but having to pull the oil pan for that one SINGLE bolt on the pickup tube is beyond inconceivable in terms of engineering, so that changes the game plan. If I have to pull the pan again, which I do for this job, then I'm doing it once and ill change the chain cover and everything behind it.
Last edited:
The Parts that make up the Collapse of this "Three Ring Circus" are as follows:
(1) A Pair of Timing Chain Guides that have been worn in by the passing of the Timing Chain over them...gradually wearing DEEP GROOVES that match the Chain Links passing over them forever. This is off-set by the gradual outward ratcheting (one way out and NEVER backwards) of the (TCT) Plunger-Push Pad to compensate for the loss and thickness of the Guide Material:


(2) The Timing Chain Side-Plates, Roller Barrels and Pins as well as the Three Sprockets suffer either S-T-R-E-T-C-H-I-N-G... or direct Wear of these Metal Components that lengthens the Timing Chain like your Uncle after a Thanksgiving Dinner loosens his Garrison Belt.
(3) Once the Timing Chain Tensioner Plunger has reached its Maximum Length... Only the Hydraulic Pressure working on it at Higher RPM is capable of taking out any additional Slack from the Timing Chain. Timing Chain Slap will be more prominent during cold starts and subside slightly...but not necessarily if the Plastic inserts fitted over the Timing Chain Tensioner Shoes... have Fractured and fallen down into the Oil Pan. A Rabid Thrashing noise that can be clearly discovered by removing the Oil Cap and listening at the opening will be VERY apparent if the Timing Chain Apparatus has hit its Point Of No Return.
(4) With the Engine Timing so radically off... Timing Codes like the P1345 for the (CKP) 'Crank Position Sensor Error' will likely spell the Death Knell of the Engine without performing a Complete Replacement of ALL these components (I recommend using the Cloyes Timing Chain Kit for this R&R)
(1) A Pair of Timing Chain Guides that have been worn in by the passing of the Timing Chain over them...gradually wearing DEEP GROOVES that match the Chain Links passing over them forever. This is off-set by the gradual outward ratcheting (one way out and NEVER backwards) of the (TCT) Plunger-Push Pad to compensate for the loss and thickness of the Guide Material:
(2) The Timing Chain Side-Plates, Roller Barrels and Pins as well as the Three Sprockets suffer either S-T-R-E-T-C-H-I-N-G... or direct Wear of these Metal Components that lengthens the Timing Chain like your Uncle after a Thanksgiving Dinner loosens his Garrison Belt.
(3) Once the Timing Chain Tensioner Plunger has reached its Maximum Length... Only the Hydraulic Pressure working on it at Higher RPM is capable of taking out any additional Slack from the Timing Chain. Timing Chain Slap will be more prominent during cold starts and subside slightly...but not necessarily if the Plastic inserts fitted over the Timing Chain Tensioner Shoes... have Fractured and fallen down into the Oil Pan. A Rabid Thrashing noise that can be clearly discovered by removing the Oil Cap and listening at the opening will be VERY apparent if the Timing Chain Apparatus has hit its Point Of No Return.
(4) With the Engine Timing so radically off... Timing Codes like the P1345 for the (CKP) 'Crank Position Sensor Error' will likely spell the Death Knell of the Engine without performing a Complete Replacement of ALL these components (I recommend using the Cloyes Timing Chain Kit for this R&R)
Attachments
Last edited:
Mooseman
Moderator
Mine, the ratchet failed allowing the chain to slack at idle and slap irregularly on the chain guide and/or valve cover. As soon as the RPM was raised, it would stop as the oil pressure pushed the tensioner out. Could hear and feel it right at the top front of the cover.
All I can say is... it's a bitch of a job. If there was a way to cut a hole without introducing metal filings and shavings inside the engine, it would be much easier. Since it's aluminum, magnets can't help. Maybe a vacuum dropped down to suck them up might work.
Another possibility is the guides that have worn out.
There is MUCH Here to suggest that Your Idea for Doing This is More Than a Little Brilliant...
And I think I've figured out the way to actually make this WORK!
(1) Follow @Mooseman's Documented Procedures for the Removal of the Cam Phaser and Intake Camshaft Sprocket... BUT Pull the Timing Chain to the Center and maintain tension on the Chain with a Coat Hanger held to prevent the Lower Timing Chain from Falling off of the Crankshaft Cog-Sprocket (Set up with the #1 Cylinder Piston at Top Dead Center and with a Camshaft Holding Tool in Place):

(2) Have a Look at the"Safe Cracker's Path to Success" Evident in these Two Images that JUST manages to avoid Accidentally Drilling through the Upper Gerotor Pump Feed Tube that plugs the Timing Cover Black Sealing Grommet over the "D" Shaped Oil-Under-Pressure Inlet Port entering the Engine Block.
There is JUST enough space after Drilling out Two carefully Aligned Holes in that Case Area to work in a Deep Socket over the Two Timing Chain Tensioner Fasteners. The Holes would have to be carefully Drilled through those precise locations in the Super-Structure Webbing of the Upper, Outer Timing Cover on the Passenger Side of the Front Timing Cover in line with those Two (TCT) Bolts.:


There should be JUST enough room then to Loosen those Two Timing Chain Tensioner (TCT) Fasteners and use a Pencil Magnet to pull them both right out through the Holes in the Timing Cover while also using a 10-20 Lb Lifting Power Telescoping Neodymium Magnet to secure the (TCT) Unit from dropping and then snatch out the Old Timing Chain Tensioner by Lifting it Straight Up and Out:
Then after Replacing the Passenger Side Black Timing Chain Guide… The Brand New Tensioner (TCT) (with the Divot Holding the Ratcheting Plunger Tightly Compressed inside of the TCT Body) should be Lowered Right Back Down using the Telescoping Magnet inside of that Narrow Free Space.
After achieving a Close Alignment with the Two Bolt Holes in the Aluminum Engine Block... Re-install the Two Fasteners and Tighten them both down to 18 Foot Pounds of Torque. THEN JUST LEAVE THE (TCT) SECURITY DIVOT IN PLACE UNTIL ALL OF THE FOLLOWING WORK IS COMPLETE.
(3) This is an opportunity to R&R the Old, Worn Out Passenger Side Black Timing Chain Guide by Removing the Plastic Hex Plug Cover in the Upper Passenger Side Outer Front Engine Head, then Removing the Single Pivot Fastener and then Lift Out the Old Timing Chain Guide. Replace it with a Brand New Black Plastic-On-Aluminum Chain Guide situated in the Upper Front Passenger Side Engine Head. Re-Fasten the 15mm Special Pivot Bolt and Replace the Gray Plastic H-6 Hex Cover Plug.


Likewise the Driver’s Side White Timing Chain Guide presents with the easily surmountable problem of NOT being able to be Completely R&R'd because its Lower Fastening Bolt requires removing the Entire Front Timing Cover FIRST to gain access and remove the entire Aluminum Bracket.
However... THIS IS NOT AT ALL NECESSARY. IT IS POSSIBLE TO SIMPLY LIFT AND REMOVE THE OLD WORN, BROWN OIL STAINED INSERT (IT USED TO BE WHITE) AND THEN REPLACE IT WITH A BRAND NEW WHITE PLASTIC INSERT:


(4) After that... All that remains to do is to Re-Install the Intake Sprocket After properly aligning the Black Chain Link Over the Sprocket Timing Mark and slipping that Sprocket back onto the nose of the Overhead Intake Camshaft and loosely threading in the TTY Fastener Into the nose of the camshaft.
THIS IS VERY IMPORTANT…
(5) Once the Timing Chain and Intake Sprocket are aligned and installed to each other… slip a Large Screw Driver through one of the Holes in the Intake Camshaft Sprocket to prevent it from rotating Clockwise and allowing the Timing Chain to come LOOSE on the Driver's Side of the Engine and accidentally fall off of the Lower Crankshaft Cog.
Leave that Screw Driver in place ONLY UNTIL AFTER the Cam Phaser and Sprocket have been Aligned with a Black Chain Link mated up to the Teeth having the precise Timing Mark so the Sprocket can get re-inserted onto the nose of the Exhaust Camshaft. Remember that the word “DELPHI” on the Body of the Cam Phaser should appear Level with the Upper Front Edge of the Engine Head as well. After loosely installing the Cam Phaser TTY Bolt Fastener into the Threaded Nose of the Exhaust Camshaft... Don’t Forget To Remove the Screw Driver!
(6) Once the Two Sprocket TTY Fasteners have been Installed, Tightened and Torqued along with the necessary Additional Torque Angle applied with everything regarding Timing Marks and Black Timing Chain Links matching PERFECTLY, Dislodge and Remove the (TCT) Holding DIVOT from the Locking Latch of the Timing Chain Tensioner using Needle Nosed Pliers passing through the Newly Drilled Out Hole in the Front Timing Cover.
This will release the Ratcheting Plunger Pad against the Semi-Circular Aluminum Foot Pad under the Black Timing Chain Guide that will extend outwards for just short distance from the (TCT) Plunger while pressing against and tightening up the Timing Chain like it was a Brand New Engine.
Immediately afterwards, very carefully rotate the Engine Clockwise for (14) Fourteen Rotations to eventually return the Two Intake and Exhaust Camshaft Sprocket Timing Marks where they align once again with the matching Black Links back to their proper positions. If this works out as described, without any sensation of the Motor Locking Up due to any Valve Train Misalignment… You will have completely succeeded in Snugging Up the Timing Chain prior to its First Post Repair Start Up.
(7) It only remains to Prepare some High Temperature JB-Weld to carefully close up the Newly Drilled-Out Timing Chain Tensioner R&R Bolt Holes in the Front Timing Cover to prevent any Oil Leaks from occurring there in the Future.
And I think I've figured out the way to actually make this WORK!
(1) Follow @Mooseman's Documented Procedures for the Removal of the Cam Phaser and Intake Camshaft Sprocket... BUT Pull the Timing Chain to the Center and maintain tension on the Chain with a Coat Hanger held to prevent the Lower Timing Chain from Falling off of the Crankshaft Cog-Sprocket (Set up with the #1 Cylinder Piston at Top Dead Center and with a Camshaft Holding Tool in Place):
(2) Have a Look at the"Safe Cracker's Path to Success" Evident in these Two Images that JUST manages to avoid Accidentally Drilling through the Upper Gerotor Pump Feed Tube that plugs the Timing Cover Black Sealing Grommet over the "D" Shaped Oil-Under-Pressure Inlet Port entering the Engine Block.
There is JUST enough space after Drilling out Two carefully Aligned Holes in that Case Area to work in a Deep Socket over the Two Timing Chain Tensioner Fasteners. The Holes would have to be carefully Drilled through those precise locations in the Super-Structure Webbing of the Upper, Outer Timing Cover on the Passenger Side of the Front Timing Cover in line with those Two (TCT) Bolts.:
There should be JUST enough room then to Loosen those Two Timing Chain Tensioner (TCT) Fasteners and use a Pencil Magnet to pull them both right out through the Holes in the Timing Cover while also using a 10-20 Lb Lifting Power Telescoping Neodymium Magnet to secure the (TCT) Unit from dropping and then snatch out the Old Timing Chain Tensioner by Lifting it Straight Up and Out:
Then after Replacing the Passenger Side Black Timing Chain Guide… The Brand New Tensioner (TCT) (with the Divot Holding the Ratcheting Plunger Tightly Compressed inside of the TCT Body) should be Lowered Right Back Down using the Telescoping Magnet inside of that Narrow Free Space.
After achieving a Close Alignment with the Two Bolt Holes in the Aluminum Engine Block... Re-install the Two Fasteners and Tighten them both down to 18 Foot Pounds of Torque. THEN JUST LEAVE THE (TCT) SECURITY DIVOT IN PLACE UNTIL ALL OF THE FOLLOWING WORK IS COMPLETE.
(3) This is an opportunity to R&R the Old, Worn Out Passenger Side Black Timing Chain Guide by Removing the Plastic Hex Plug Cover in the Upper Passenger Side Outer Front Engine Head, then Removing the Single Pivot Fastener and then Lift Out the Old Timing Chain Guide. Replace it with a Brand New Black Plastic-On-Aluminum Chain Guide situated in the Upper Front Passenger Side Engine Head. Re-Fasten the 15mm Special Pivot Bolt and Replace the Gray Plastic H-6 Hex Cover Plug.
Likewise the Driver’s Side White Timing Chain Guide presents with the easily surmountable problem of NOT being able to be Completely R&R'd because its Lower Fastening Bolt requires removing the Entire Front Timing Cover FIRST to gain access and remove the entire Aluminum Bracket.
However... THIS IS NOT AT ALL NECESSARY. IT IS POSSIBLE TO SIMPLY LIFT AND REMOVE THE OLD WORN, BROWN OIL STAINED INSERT (IT USED TO BE WHITE) AND THEN REPLACE IT WITH A BRAND NEW WHITE PLASTIC INSERT:
(4) After that... All that remains to do is to Re-Install the Intake Sprocket After properly aligning the Black Chain Link Over the Sprocket Timing Mark and slipping that Sprocket back onto the nose of the Overhead Intake Camshaft and loosely threading in the TTY Fastener Into the nose of the camshaft.
THIS IS VERY IMPORTANT…
(5) Once the Timing Chain and Intake Sprocket are aligned and installed to each other… slip a Large Screw Driver through one of the Holes in the Intake Camshaft Sprocket to prevent it from rotating Clockwise and allowing the Timing Chain to come LOOSE on the Driver's Side of the Engine and accidentally fall off of the Lower Crankshaft Cog.
Leave that Screw Driver in place ONLY UNTIL AFTER the Cam Phaser and Sprocket have been Aligned with a Black Chain Link mated up to the Teeth having the precise Timing Mark so the Sprocket can get re-inserted onto the nose of the Exhaust Camshaft. Remember that the word “DELPHI” on the Body of the Cam Phaser should appear Level with the Upper Front Edge of the Engine Head as well. After loosely installing the Cam Phaser TTY Bolt Fastener into the Threaded Nose of the Exhaust Camshaft... Don’t Forget To Remove the Screw Driver!
(6) Once the Two Sprocket TTY Fasteners have been Installed, Tightened and Torqued along with the necessary Additional Torque Angle applied with everything regarding Timing Marks and Black Timing Chain Links matching PERFECTLY, Dislodge and Remove the (TCT) Holding DIVOT from the Locking Latch of the Timing Chain Tensioner using Needle Nosed Pliers passing through the Newly Drilled Out Hole in the Front Timing Cover.
This will release the Ratcheting Plunger Pad against the Semi-Circular Aluminum Foot Pad under the Black Timing Chain Guide that will extend outwards for just short distance from the (TCT) Plunger while pressing against and tightening up the Timing Chain like it was a Brand New Engine.
Immediately afterwards, very carefully rotate the Engine Clockwise for (14) Fourteen Rotations to eventually return the Two Intake and Exhaust Camshaft Sprocket Timing Marks where they align once again with the matching Black Links back to their proper positions. If this works out as described, without any sensation of the Motor Locking Up due to any Valve Train Misalignment… You will have completely succeeded in Snugging Up the Timing Chain prior to its First Post Repair Start Up.
(7) It only remains to Prepare some High Temperature JB-Weld to carefully close up the Newly Drilled-Out Timing Chain Tensioner R&R Bolt Holes in the Front Timing Cover to prevent any Oil Leaks from occurring there in the Future.
I'm designing a "Timing Cover Drill-Out Template" from Clear Lexan and afterwards, transferring it over to a 1/2" X 8" X 8" Aluminum Plate in order to perfect the Template Fastener Hold Down and Timing Chain Tensioner Fastener Drill Out Locations accurately for performing this work on the Front Timing Cover.
Once the Design is perfected and finalized , I'll make a "To Scale" Scale Digital Image of the Template that can be used by anyone enterprising enough to try out @Mooseman's Very Clever idea behind this "Timing Chain Tensioner R&R Toil Saving Device" for Replacing the Timing Chain Tensioner WITHOUT having to Remove the Front Timing Chain Cover.
I will actually be Testing the Use of the This Device on a Used Front Timing Cover mounted on an Engine Block and performing the Drill Out Procedure myself to ensure that everything I've Documented here really is possible to perform. I'll Post the "Step By Step" Images along the way to confirm that these Procedures are both Straightforward and Repeatable.
Last edited:
Mooseman
Moderator
There is still the issue of aluminum drill shavings falling inside the engine cavity. This sounds more complicated than pulling the pan.
You should know me well enough by now to remember that Whenever I'm Challenged... My Courage ALWAYS Rises to the Occasion, especially as things become more and more Difficult.
Problems like these tend to "Concentrate the Mind" and I can be very creative with solutions along the way. Based upon quite a few accumulated experiences with Projects like THIS one... In the end, I generally prove to be quite successful:
The area immediate to that Aluminum Cover Plate is fairly thin and since I can capture every last bit of whatever Drill Out Detritus manages to drop down after penetrating through the Thin Aluminum Shell, I'll know exactly where any Debris will fall down inside of the partially dis-assembled engine inside of the narrow Hollow Gap around the (TCT) should those Aluminum Fragments manage to make it past my "Defenses". But I doubt that any will.
Ordinarily, in situations like this ...Smearing Cup Grease within the Flutes and Inside of the Cups of the Drill Bit-Hole Saws to capture and hold the small Aluminum Chips works very well in preventing Foreign Metallic drill-outs from getting loose and contaminating the Internal Work Field:


I can also apply that Grease in and around, above and below that (TCT) location to capture whatever remaining Aluminum Drill Out Dross gets through. Later on, after removing the Old (TCT) I'll be able to wipe everything clean from around that opened up area well before installing the New (TCT). I'll be applying this Technique in both ways.
The Trick here will be to insert the Drill Bit-Hole Saw through the Guide Template and Drill Out the Two (TCT) Access Holes Very Slowly and Methodically. It will be important stop frequently enough to clean out the Drilled Holes in the Timing Cover Casement and clean out the Drill Bit Flutes of the Captured Metal Contamination.
Then I'll re-apply more Grease while proceeding with the work. Perhaps, as a Professional Machinist, @cornchip is willing to chime in here and make a few more suggestions I've not thought of that will always be appreciated when coming from him.
@Mooseman ...This Thinking of Yours has Breathed Life into an EXTRAORDINARILY VALUABLE Solution... IF I can only get it to Work. So I'm willing to spend the Time, the Effort and the Few Dollars necessary here (see the attached images) in order to exhaust all of the possibilities presented by Your Idea to the fullest.
Along the way, I'll take every possible issue that needs consideration well in hand and Photo Document the entire results when solved. If it won't work... I ALWAYS Tell The Truth about any such Mechanical Exploits... So You'll be the Very First to Know.
So this approach deserves a Complete Exploration before condemning what could become a Valuable Time Saving - Cost Saving Life-Saver for Vortec 4200 Engines needing a Near Complete Timing Chain "Tightening" inside of so many tired GMT360 SUVs.
The Owners of these Machines would be Much Happier Members and Visiting Folks if only they could all sidestep this otherwise "Nightmare Engine Repair" and get their vehicles Up and Running again.
With all of that said... The attached images show our "Timing Cover Test Bed" Subject that I just ordered after the Seller accepted my Offer over on eBay. When it arrives, I'll clean this thing up to look Brand Spanking New before Bolting it up to the LL8 Motor presently mounted on an Engine Stand and then continue with making the necessary "Proof of Concept" preparations. Stay Tuned as things proceed...


PS...
If anyone following this thread is interested in getting a Used GM 4.2L Timing Cover... The Vendor that sold me this one has another still available. He wants $50.00 for it... Offer him $35.00 to $40.00 for it... He'll accept Your Offer... :>)

Problems like these tend to "Concentrate the Mind" and I can be very creative with solutions along the way. Based upon quite a few accumulated experiences with Projects like THIS one... In the end, I generally prove to be quite successful:
The area immediate to that Aluminum Cover Plate is fairly thin and since I can capture every last bit of whatever Drill Out Detritus manages to drop down after penetrating through the Thin Aluminum Shell, I'll know exactly where any Debris will fall down inside of the partially dis-assembled engine inside of the narrow Hollow Gap around the (TCT) should those Aluminum Fragments manage to make it past my "Defenses". But I doubt that any will.
Ordinarily, in situations like this ...Smearing Cup Grease within the Flutes and Inside of the Cups of the Drill Bit-Hole Saws to capture and hold the small Aluminum Chips works very well in preventing Foreign Metallic drill-outs from getting loose and contaminating the Internal Work Field:
I can also apply that Grease in and around, above and below that (TCT) location to capture whatever remaining Aluminum Drill Out Dross gets through. Later on, after removing the Old (TCT) I'll be able to wipe everything clean from around that opened up area well before installing the New (TCT). I'll be applying this Technique in both ways.
The Trick here will be to insert the Drill Bit-Hole Saw through the Guide Template and Drill Out the Two (TCT) Access Holes Very Slowly and Methodically. It will be important stop frequently enough to clean out the Drilled Holes in the Timing Cover Casement and clean out the Drill Bit Flutes of the Captured Metal Contamination.
Then I'll re-apply more Grease while proceeding with the work. Perhaps, as a Professional Machinist, @cornchip is willing to chime in here and make a few more suggestions I've not thought of that will always be appreciated when coming from him.
@Mooseman ...This Thinking of Yours has Breathed Life into an EXTRAORDINARILY VALUABLE Solution... IF I can only get it to Work. So I'm willing to spend the Time, the Effort and the Few Dollars necessary here (see the attached images) in order to exhaust all of the possibilities presented by Your Idea to the fullest.
Along the way, I'll take every possible issue that needs consideration well in hand and Photo Document the entire results when solved. If it won't work... I ALWAYS Tell The Truth about any such Mechanical Exploits... So You'll be the Very First to Know.
So this approach deserves a Complete Exploration before condemning what could become a Valuable Time Saving - Cost Saving Life-Saver for Vortec 4200 Engines needing a Near Complete Timing Chain "Tightening" inside of so many tired GMT360 SUVs.
The Owners of these Machines would be Much Happier Members and Visiting Folks if only they could all sidestep this otherwise "Nightmare Engine Repair" and get their vehicles Up and Running again.
With all of that said... The attached images show our "Timing Cover Test Bed" Subject that I just ordered after the Seller accepted my Offer over on eBay. When it arrives, I'll clean this thing up to look Brand Spanking New before Bolting it up to the LL8 Motor presently mounted on an Engine Stand and then continue with making the necessary "Proof of Concept" preparations. Stay Tuned as things proceed...
PS...
If anyone following this thread is interested in getting a Used GM 4.2L Timing Cover... The Vendor that sold me this one has another still available. He wants $50.00 for it... Offer him $35.00 to $40.00 for it... He'll accept Your Offer... :>)
2002 - 2008 GM 2.8L 3.5L 4.2L L6 OE Timing Cover | eBay
TITLE: 2002 - 2008 GM 2.8L 3.5L 4.2L L6 OE Timing Cover.
rover.ebay.com
Last edited:
- Dec 12, 2011
- 4,656
@MRRSM Thank you for all your involvement in this, great write-up on your endeavor. I may get an inspection camera in there this week and see what I can find.
@Mooseman I don't have a great deal of racket going on, but hard to say what it might be. There's no doubt I have a little bit of piston slap at times, it's just that small additional amount of rhythmic noise that's hard to pinpoint. I thought it could also be a cam phaser since it's at cam speed, but sounds a bit lower in the front that where the phaser would be.
All this thinking is more of a preventative measure, the sound hasn't changed much in the last 20K miles when it does make itself known. Also doesn't rule out a burned exhaust gasket.
Mooseman
Moderator
You must mean the tensioner or the guides since the phaser is right on the cam.
If it's rythmic, I would venture say it's not the tensioner. Mine was very irregular.
If it's rythmic, I would venture say it's not the tensioner. Mine was very irregular.
- Dec 12, 2011
- 4,656
You must mean the tensioner or the guides since the phaser is right on the cam.
Actually I was also curious to the phaser, I just don't know what a worn phaser would sound like. Only guessing since it's on the cam and this noise is at cam speed. Would a worn phaser have enough play to make a noise at a certain point in it's rotation?
Mooseman
Moderator
I've had two of those fail on me throwing a cam timing code. They just don't change the timing when commanded. No noise.
For the sake of the possible future need of these critical components… God Forbid:
Not OEM here... BUT ...This is The BEST Budget Deal Going for being able to get EVERYTHING necessary for this R&R (except for the absence of the Intake Sprocket and Harmonic Balancer TTY Bolts):


ACDelco Part# 12598504 OEM Timing Chain Tensioner:
https://www.amazon.com/dp/B004AFEHYQ/?tag=gmtnation-20


Cloyes Part# 9-0195S Complete GM Vortec 4200 Timing Chain Set Kit:
https://www.amazon.com/dp/B0031GS5BG/?tag=gmtnation-20


Not OEM here... BUT ...This is The BEST Budget Deal Going for being able to get EVERYTHING necessary for this R&R (except for the absence of the Intake Sprocket and Harmonic Balancer TTY Bolts):
Electronics, Cars, Fashion, Collectibles & More | eBay
Buy & sell electronics, cars, clothes, collectibles & more on eBay, the world's online marketplace. Top brands, low prices & free shipping on many items.
rover.ebay.com
ACDelco Part# 12598504 OEM Timing Chain Tensioner:
https://www.amazon.com/dp/B004AFEHYQ/?tag=gmtnation-20
Cloyes Part# 9-0195S Complete GM Vortec 4200 Timing Chain Set Kit:
https://www.amazon.com/dp/B0031GS5BG/?tag=gmtnation-20
Last edited:
After you perform the requisite Five Star "Required Reading" at THIS Link to absorb all of @Mooseman 's Epic Thread Information:
 gmtnation.com
Come right back here for what has GOT to be THE Most Complete On Topic Video ever conceived for the enormous task of Timing Chain Replacement for the GM 4.2L LL8 Engines in the GMT360 Series of SUVs... while the Engine is STILL mounted inside of the Vehicle.
From Start to Finish... Over a Two Hours + Period... the VOP (Video Original Poster) is a Professional Mechanic taking us underneath and above a "Rust Belt 4WD Trailblazer" in and through each and every step towards simply gaining access to and finally replacing the Timing Chain Set for this Grungy LL8 Motor.
Because there are just SO MANY Individual Mechanical Jobs this Video would be useful for us all in the future... I'd recommend going directly to YouTube and Downloading-Saving this amazing Visual Documentation as a 'Reel Keeper'.
You will NOT regret being able to see ALL of the Jobs the VOP has to endure ...just to be able to Change the Timing Chain Set on this Rusty, Crusty SUV Motor:
How to replace I6 timing chain and tensioner
This is the last of several articles during my work to replace the timing chain and tensioner. How to replace the I6 timing chain and tensioner. Difficulty (out of 5): 8 (I'm not kidding) Tools required: Assortment of wrenches, ratchets, extensions, screw drivers. Socket sizes: 7mm, 8mm...
Come right back here for what has GOT to be THE Most Complete On Topic Video ever conceived for the enormous task of Timing Chain Replacement for the GM 4.2L LL8 Engines in the GMT360 Series of SUVs... while the Engine is STILL mounted inside of the Vehicle.
From Start to Finish... Over a Two Hours + Period... the VOP (Video Original Poster) is a Professional Mechanic taking us underneath and above a "Rust Belt 4WD Trailblazer" in and through each and every step towards simply gaining access to and finally replacing the Timing Chain Set for this Grungy LL8 Motor.
Because there are just SO MANY Individual Mechanical Jobs this Video would be useful for us all in the future... I'd recommend going directly to YouTube and Downloading-Saving this amazing Visual Documentation as a 'Reel Keeper'.
You will NOT regret being able to see ALL of the Jobs the VOP has to endure ...just to be able to Change the Timing Chain Set on this Rusty, Crusty SUV Motor:
Mooseman
Moderator