2011 Terrain codes; P228D, P0089, P0016, P0017

NoDak Ninja

Original poster
Member
Aug 7, 2013
76
Thanks to you guys, I found that bolt...and no one can get it to me any faster than Monday or Tuesday. It's my own damn fault for not ordering parts until yesterday. Also, I thought Rock Auto didn't have it because I couldn't find it by searching for "______ bolt", but when I type in the part #, boom, there it is. If I had ordered it last night with everything else, it would be here tomorrow.

:explode:

Anybody want to buy a mostly assembled 2011 Terrain?
 
  • Like
Reactions: Eric04

Eric04

Member
Dec 3, 2014
392
West Michigan
Sure, I'd love another project! Actually, no. Lol.

I've recently been in a similar battle with a vehicle. Between the holidays and unforeseen extras added to the original job I spent more time with a partially disassembled vehicle than I care for. Sometimes the best you can do is rebuild as far as your parts will let you then grab a beer. Really with this job you'll want to check everything thrice anyway so stoppages, while annoying, might be beneficial.
 
  • Like
Reactions: NoDak Ninja

NoDak Ninja

Original poster
Member
Aug 7, 2013
76
Yeah, you are right. And really, I'll be able to get a large amount of it done without the bolt. That can be towards the tail end of the reinstall.

EDIT: Well, things are looking up! I finally pulled my head out of...the fog, and called the local GM dealer. They have 6 in stock.
 
Last edited:
  • Like
Reactions: m.mcmillen

NoDak Ninja

Original poster
Member
Aug 7, 2013
76
Got the bolt off. Took off the timing cover, grabbed a flashlight and started inspecting the chain/guides:

With crank key at 12 the timing marks on phasers are at 10 (exhaust) and 2 (intake). And, unless Cloyes is an OEM, I was right about all the paint pen marks; the previous owner already did this...

%^&$%! Now what? :whiteflag:
 

mrrsm

Lifetime VIP Donor
Supporting Donor
Member
Oct 22, 2015
8,275
Tampa Bay Area
I'm not sure what you expected to see with those Alignment Marks being located in their proper and correct positions. THAT is where you WANT them to be. The only question now is whether or not you find ANY of the myriad Timing Chain Guides either Broken, Damaged or Missing or any of the Two Timing Chain Tensioners inoperative... and you can detect ANY Chain Slack. The P0016 and P0017 Trouble Codes collectively DO NOT LIE.

Somewhere along those Chain Lines ...there MUST either be enough Slack or it has some Damage to the Timing Chain Guides sufficient to give credence to what the PCM is detecting and interpreting as a FUBARed Camshaft - Crankshaft Timing Correlation, with all of their respective positions being "SLOOW" (SLightly Out Of Whack). Much of what needs evaluation at this point will only come from your use of a Very Bright Flashlight and a very close re-inspection of all that "Gear" along the Engine Front.

Just because the Timing Marks are All Aligned... Does NOT mean that the Crankshaft to Camshaft relationships are correct... if the Primary Timing Chain is Over-Stretched, Worn Down...or the Guides are Broken or Missing.

Double Check that your Ecotec Motor has the #1 Cylinder positioned at Top Dead center and that it is NOT 180 Degrees Out.. Do a Quick Review of the Cloyes Video where it points out this procedure...which should DEFINITELY be re-checked.

Do NOT be concerned that you have removed the Crankshaft Bolt. If you need to rotate the engine numerous times again to achieve the #1 Cylinder TDC condition with the Woodruff Key located at 12 O'Clock High and the Camshaft Timing Chain Marks situated at 10 O'Clock and 2 O'Clock ... Just Re-Install the USED OEM Crank Bolt. Then ... without trying to Torque it down... Slowly Rotate the Engine Clockwise allowing some time for the Cylinder Compression to Bleed Off. (NEVER Counter-Clockwise) until the correct alignments described in the Video are achieved.

Have you removed the Timing Chain Cover AND the Valve Cover and tried to see if there is any Slack in the Primary Chain...? Or if the Engine is suffering from any Missing or Damaged Timing Chain Guides? Please remember that your present 100 K + Mileage is in line with the Wear & Tear Time frame that the GM 2.4L Ecotec Timing Chain Problems usually begin to surface. One last notion here... How do you know if the Timing Chain Set R&R performed by someone else was using Quality Components? Remember... Portions of the Timing Chain can be TIGHT in some sections and yet Very Loose in other positions along its Length.

The other possibility is that the presence of the Cloyes Replacement Primary Time Chain Tensioner... Does NOT necessarily mean that the Secondary Timing Chain Tensioner and Updated Gears and Chains were ALSO replaced by someone else at the same time... if it was even done at all.

If you have not as yet decided to Photo-Document your work and post images of ALL that can be seen with the Valve and Timing Covers removed... Now would be a good time to do so. Without the chance to actually see what you can see and perhaps look more closely with more pairs of eyes... we can only guess at what you are trying to describe. Take a closer look... Snap some focused images and post them back here and... Let's ALL See ...What The Hell is Going On.
 
Last edited:

NoDak Ninja

Original poster
Member
Aug 7, 2013
76
I expected them to not be at 10 and 2 when the crank was at TDC.

Again; removed timing cover. Crank key at TDC phasers are at 10 and 2. There are Cloyes parts in there, says so right on the guides. Chain is tight.

I have been photo documenting everything up to this point. It's very difficult to get a pic of the chains, but I'll try again.

EDIT: I rotated it around again. At one point there was slack in the chain in between the phasers. I'm trying to get pictures linked. Could it be that the chains and guides are fine but the phasers are bad? I can't tell if they are original or aftermarket.
 
Last edited:

mrrsm

Lifetime VIP Donor
Supporting Donor
Member
Oct 22, 2015
8,275
Tampa Bay Area
Please read Post #45 a Second Time as I have made some better qualifying remarks that will explain things much more precisely. if you followed the Cloyes advice to ensure that the 10 O'clock Position has EXT Marked under the Diamond Alignment Cut Out and the 2 O'clock Position has INT Marked under the Diamond Cut Out AND the Woodruff Key Slot on the Crankshaft Cog is sitting at 12 O'Clock High... then the #1 Cylinder is at Top Dead Center.

As regarding the Photos you have been collecting... if you cannot quickly and efficiently Post the most significant present dilemma ones here as attachments... then drop a link into your next Posting from either your Photo-Bucket or Flickr Accounts and we'll get the chance to view them Off-GMTN (Which is never as good as having them included as attachments to Threads here at GMTN).
 

NoDak Ninja

Original poster
Member
Aug 7, 2013
76
OK. I re-read it and I better understand now. And as I rotate it through it's cycles a few times, there is definitely slack. First between the phasers, and then the chain snaps tight between them and then that slack moves down to the crank sprocket.

When I saw the Cloyes guides, I figured I must be on the wrong track, but who knows, maybe the guy before replaced only guides and not the chain. I guess I'll just keep proceeding as planned.
 

mrrsm

Lifetime VIP Donor
Supporting Donor
Member
Oct 22, 2015
8,275
Tampa Bay Area
There You Go... Slow, Deep Breaths... Take Your Time... and be Patient as Hell...

"Softy... Softly.... Catchee Monkey..." Peter Lorre as "Mr. Moto"

Hmmm... I was just thinking about your observation with the Chain going Slack and then Snapping tight as it passed around the Variable Valve Timing Intake and Exhaust Camshaft Phasers. So there is also a very real chance that either One or Both Camshaft Phasers have failed. If so... these would be another two locations where such a failure in these components could also easily trigger those P0016 and P0017 Timing Correlation Codes.

Keep an Open Mind ...and if needs be... we'll have to investigate How to Test them to confirm that either one or both as being the cause of this problem. There is no sense in replacing things that are not broken ...unless like me... You decide that You want to apply an abundance of caution and proceed with the Complete Timing Chain and Sprocket Set R&R. If either One or Both Phasers are T*TS UP... they will have to be R&Rd.
 
Last edited:

NoDak Ninja

Original poster
Member
Aug 7, 2013
76
For what it's worth, here is the album with my pics in it. There's very little room for the camera, so they aren't the best.

The last pic is the most telling. You can see the slack between the phasers.
 

mrrsm

Lifetime VIP Donor
Supporting Donor
Member
Oct 22, 2015
8,275
Tampa Bay Area
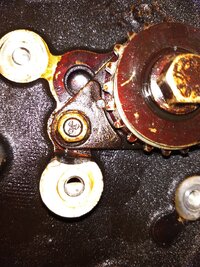
You Nailed it, Brother... No Doubt About it... and now for a bit of 'Cleaning Advice' Before you take one step further towards performing this R&R... THAT motor has SERIOUSLY FUBARed, Baked On, Gunked Up and Carboned Up surfaces apparently allowed by the PO (Prior Owner) who failed to either Change the Motor Oil and Oil Filter on a Regular 3,000 Mile Schedule... or by going CHEAP and using Inexpensive Organic Motor Oil instead of a Full Synthetic like Mobil 1 5W-30 Motor Oil. At this point... Going "The Full Monty" would be my chosen path for replacing everything Mechanical and Plastic-Nylon ...BUT Both Phasers ...unless that becomes necessary, too.

This job should start by performing a THOROUGH Cleaning of the Aluminum Block Surfaces AFTER careful, organized disassembly of first the Primary and then the Secondary Timing Set(s) and then using something like Berryman's Chem-Dip Carb Cleaner or Berrryman's B12 to Spray and Soak down and Scrub with a Plastic Brush (Non-Shedding) all over the front of that "4 Cylinder Toilet" and De-Gum & De-GOO that engine... Ugghh... It give me "The Willies" to see an Engine in such a filthy condition.... clarifying of course that this is NO Bad Reflection upon YOU as 'The After Owner'.

THOSE Photos really are 'The BOMB' for allowing your GMTN Brethren the chance to see what you have been dealing with...Up Close and Personal.... So... Keep Up The Great Work!
 
Last edited:

NoDak Ninja

Original poster
Member
Aug 7, 2013
76
I’m pretty sure that Cloyes in an OEM supplier for GM. I’ve taken a few apart and they’ve all said Cloyes on the chain.

Glad to see you’ve found a problem and can move forward.

Edit: I just did a quick search and found this https://www.pm-review.com/cloyes-gear-products-awarded-gm-supplier-quality-excellence-award/

It would appear that Cloyes does, or did, supply parts for GM.

Ahhh! I just assumed they were aftermarket only! Well, that changes things. This probably hasn't been done before, then.
 

NoDak Ninja

Original poster
Member
Aug 7, 2013
76
@MRRSM That funny look to the intake phaser was due to the flash. In person they both have the exact same "patina" to them. But I added a few more pics of the top of the engine to the album I linked above, just in case you guys see something I don't.

Regarding the phasers; I did get replacements, but if I could send them back that would be great. Do you think there is any way to test them? I will do some googling.
 

mrrsm

Lifetime VIP Donor
Supporting Donor
Member
Oct 22, 2015
8,275
Tampa Bay Area
If they are New ...and if right now... You have them Both in your Hot Little Hands.... Clutch them to your Bosom... and Install them at the right time in the R&R Sequence. Judging from the look of their Old OEM Ones' exterior condition... GOK (God Only Knows) what might be lurking inside of those Two Phasers . So rather than "Testing" either one... I would bury them together in an Unmarked Grave at Midnight when The Full Moon is On The Rise... and place the "Sign of The Mechanic's "X" over them... Then... Run Like Hell...

Do yourself a Great Favor... and put The New Ones in while you have the chance to do so... and give yourself the Peace of Mind in knowing that the Old Ones will NOT come Back from The Dead... Only to Bite you with the need to, "Re-Open their Coffin..." and replace them if they Fail to Function Properly Upon Start-Up. :>)

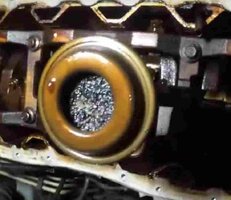
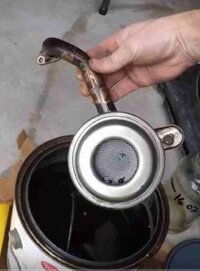
One other observation... The more I Look at your Photos and see just how much of that Old Mung has managed to actually cling to all of the Vertical Surfaces of the front of the Motor... the More Concern I have that your Oil Pick Up Tube Screen is probably LOADED to the Point of Risking near-future a Clogged Up Oil Blockage.

While you are presently engaged in this R&R... You should consider pouring in enough of that Berryman's Chem-Dip Serious Solvent sufficient enough in Quantity to submerge the Pick-Up Tube Ball & Screen End to sit in there long enough to chemically (no- scrubbing required) and dissolve out all of that Built Up Crap... BUT NOT have the Oil Level so High Up as to reach and make direct contact with your PTFE (Teflon) Front and Rear Oil Seals.

A few days of soaking in that stuff will do the trick... without the need to R&R the Engine Oil Pan. Just make certain that after you have finished your Repair Work... Before you Start Up that Engine... thoroughly Drain the Crankcase... Change out The Old Oil Filter and and perform an Engine Flush using a Cheap Oil Filter followed by pouring in some Inexpensive Organic Motor Oil into your Crankcase. BUT... Be Sure to Exchange (1) Quart of that Oil for (1) Quart of either a Commercial Engine Flush... or instead use (1) Quart of Transmission Fluid.

Once the Engine Fires up AT IDLE ONLY... and you have determined that the Timing Set is finely operational with No Gasket leaks... just allow the Engine to IDLE ONLY for around 5-10 Minutes, without Raising or Lowering the Engine RPM. Afterwards... Shut down the Motor and while it is still Warm, Drain the Used Flush-Out Oil and Used Flush-Out Oil Filter and Install a Fresh Mobil1 Oil Filter and pour in the correct Quantity of Mobil1 5W-30 Motor Oil. Restart the Engine AT IDLE ONLY...and confirm that your Oil Pressure is Nominal and that the Engine is Purring Like a Kitten. Time for a Test Drive... and hopefully... You'll enjoy another 100,000 of Smooth Power & Performance. :>)
 
Last edited:

NoDak Ninja

Original poster
Member
Aug 7, 2013
76
Yeah, shortly after my previous post, I said, "The heck with it. They are here, they have that new part smell, let's use 'em!"

I do kind of regret not also getting the actuators. At least they are easy to get at should mine prove faulty. The good news is there is very little "gunk" on the screens, so fingers crossed.

New issue: Holding the balanced shaft sprockets while breaking the bolt loose. There's a 5/16" hole in the block to push a pin into that is supposed to catch a tooth and stop it from turning. However, they seem to be just a little too far away, because you can spin the sprocket and it just forces the pin out of the way.

It's way past Beer:30, so I'm done for the day, but I'll be thinking about and tinkering with some sort of homemade tool to accomplish this...and cleaning parts.
 

mrrsm

Lifetime VIP Donor
Supporting Donor
Member
Oct 22, 2015
8,275
Tampa Bay Area
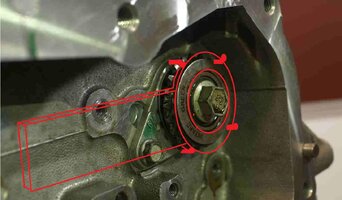
Autozone sells a "Sprocket Chain Wrench" (probably made by The Lisle Tool People) that can be wrapped around those two Small Cogs and manually restrained and secured while using a Ratchet & Socket to unwind those Cog Fasteners. If not.. and you have a LARGE Set of Vise-Grips... If you are NOT keeping the Old Balance Shaft Sprockets, just grab the Outside orbit of the Sprocket Teeth from the side and hang on while unwinding the two Cog Fasteners.

Failing that solution... you can always Grab One of the Old Camshaft Balancer Timing Chains... throw a 'bight' of that Chain around the Cog Teeth ...and secure it firmly with Pair of Vise-Grips ...and unwind the Fastener. :>)

Fish around in your Tool Box(es) and see if you can locate a Pin Punch-Drift that approximates that Hole Size in the Face of the Engine Block because you WILL need to do this again for the Two New Balance Cogs. By the way... you have not completely described WHICH of the Cloyes Kits you purchased by their Kit Model-Part Numbers... So we have no idea what you bought or how complete the sets are that you decided to purchase.
 
Last edited:

NoDak Ninja

Original poster
Member
Aug 7, 2013
76
Oh sorry; Timing set and Balance Shaft set. Everything but the cam phasers. Those are Standard brand.

I did try both a 5/16" punch and a drill bit. The hold is just a metric tish to far away from the sprocket. I like the sprocket wrench idea. I don't have an auto parts store open tomorrow, but like you said, the old chain and a vice grips will probably do the trick.

I'm going to give your previous comment about cleaning the gunk out of engine some better attention tomorrow. For the final few minutes of "business" tonight I am giving my seldom used parts washer some attention so it can do it's bit tomorrow...and having a beer or two...:tequila:
 

mrrsm

Lifetime VIP Donor
Supporting Donor
Member
Oct 22, 2015
8,275
Tampa Bay Area
...or find a Bolt with a Good Sized Hex Head that has a Shank size that will slip snugly into the "Cog Hollows" and then use a Grinding Wheel to shape the 5/16" Insert Support End of that Bolt for securing it to the Engine Block.
 
Last edited:

NoDak Ninja

Original poster
Member
Aug 7, 2013
76
...or find a Bolt with a Good Sized Hex Head that will slip snugly into the "Cog Hollows" and then use a Grinding Wheel to shape the 5/16" Insert End of that Bolt for securing it to the Engine Block.

This is what I was thinking about doing. If It doesn't work, then the old chain and a vise grips or two is Plan B
 
  • Like
Reactions: mrrsm

NoDak Ninja

Original poster
Member
Aug 7, 2013
76
Chain and vise grip is just not working. The chain keeps slipping through the jaws of the vise grips. And yes, it is tight a hell...can barely get it closed.

I hate to lose another day, but I'm thinking I'll make a sprocket locking tool at work tomorrow. My plan is to make something similar to the flywheel tool posted early. I'm thinking I can remove the bolt that I assume is holding the balance shaft in and bolt my tool there. Any issues with using that bolt hole?

I'm gonna try and attach a pic so you can see what I'm talking about.
 

Attachments

  • IMG_20190120_140409117.jpg
    IMG_20190120_140409117.jpg
    921.6 KB · Views: 8

mrrsm

Lifetime VIP Donor
Supporting Donor
Member
Oct 22, 2015
8,275
Tampa Bay Area
To speed things along...Here are two options to consider:

(1) Use some 0.041" Stainless Steel Safety Wire to TIE THE OPPOSING CHAIN SEGMENTS TOGETHER AROUND THE COG(S) ...and then use the Vise-Grips to Hang On to the Rig.
41THOUSAFETYWIRE.jpg

(2) This is an Idea I was kicking around last night that involves using 1/4" X 3" X 10" Flat Stock Plate Steel shaped and cut to fit over the Center Bolt holding the Cog to the Balance Rod and make (4) Pin Bolt Holes that will align with (4) "Cog Hollows" between the Cog Teeth by Drilling Out and Tapped through the margins of the Plate.

Then thread in the (4) Short Bolts, Cut off to the proper lengths to fit snugly down into the the Cog Teeth and hold both of those Cogs still while unwinding that Flange Bolt. This Tool would work very well for the Removal AND the Installation of the Two Flange Bolts holding on the Cog Sprockets.

REMEMBER... You'll have to account for the Outside Diameter of the SOCKET when sizing the Interior Hole around the Center of this Tool... Otherwise, you may NOT be able to get a decent enough purchase and hold over that Center Bolt Head with your Socket & Ratchet Combo.:

You can use one of the New Cloyes Balance Cog Sprockets for creating a Pattern-Template to get accurate measurements for making this Tool. I've often scanned these components on a Flat Bed Scanner, then Printed out a copy of the "To Scale" Image... and finally... Taped it down over the Steel Plate to get VERY Close Tolerances for the accurate hole drilling needed for such things using a Spring Loaded Pin-Punch to ensure where to place the Drill Bit. :>)

02BRAVADATOOL1.jpg
 
Last edited:
  • Like
Reactions: NoDak Ninja

mrrsm

Lifetime VIP Donor
Supporting Donor
Member
Oct 22, 2015
8,275
Tampa Bay Area
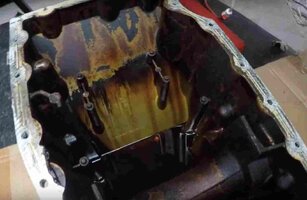
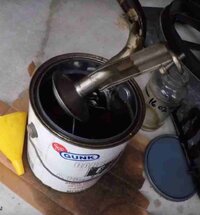
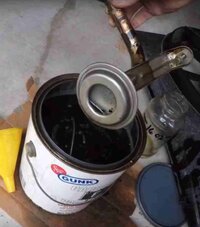
I think that a great amount of emphasis about the importance of using a PASSIVE CHEMICAL SOLVENT CLEANING OF THE OIL PICK UP TUBE AND LOWER CRANK-CASE-OIL-PAN deserves to be shown...pictorially...so you can better understand the consequences of what will happen if so much Carbon and Ash Residue Buildup inside of your Ecotec Engine ...FLAKES OFF THE ENGINE BLOCK AND COMPONENTS AND GETS SUCKED UP INTO THE OIL PICK-UP TUBE SCREEN.

These images are edited Screen Snaps from some Youtube Videos of @Kevin Nadeau 's Excellent (5) Part R&R Series of his FUBARed Oil Pan and Oil Pick-Up Tube ...WHICH HE BELIEVED WAS NECESSARY TO PERFORM ... AFTER HIS OIL PICK UP TUBE WAS COMPLETELY CLOGGED AND BLOCKED ...AND THEN HIS ENGINE OIL PRESSURE WENT PRACTICALLY DOWN TO "0":

What seems quite unfortunate to me now is that ...upon reflection... He probably could have accomplished all of the work he describes in his Five Part Series... by simply Draining the Motor Oil from his Crank-Case-Oil-Pan...and then filling it up with around 2 or 3 Gallons of GUNK Carburetor Cleaner. Then after allowing the Motor to sit for a Day or so...Passively Soaking into and Removing all of that Brown-Black Carbon-GAS-GUM Mung until it dissolved the entire Mess... Right Down to Bare Metal.

After that, it would have been a simple matter of removing the Oil Drain Plug and allowing all of the Mess to thoroughly Bleed out of the Engine... followed by performing a Proper Engine Flush Procedure and installing a Mobil1 Oil Filter and Mobil1 5W-30 Motor Oil. Hind Sight always being 20-20.... Then NONE of the Complicated, Mechanical Repair Shenanigans Kevin had to do would have been necessary!

After observing the Color and Condition of Kevin's Munged Up Oil Pan and Oil Pick Up Tube ...and comparing how much WORSE that stuff looks on the Vertical Wall at the Front of your own Engine... Perhaps You should think about this reality being present in your Lower Crankcase and stuck to your Oil Pick Up Tube. You can try Test Cleaning the front of the Engine up... Perhaps using the GUNK Carburetor Cleaning Product Kevin used instead of the Berryman's stuff... and then watch how all of that Brown, Caked On Crap... just dissolves away.

You can Bet Good Money Against Bad that the Prime Reason that your fairly Youthful Engine has SO MUCH CARBON BUILD-UP in the Bottom End and Elsewhere, is because all of the Compression Rings on the Pistons of your 4 Cylinder Engine are probably GAS-Gummed Up and STUCK FAST inside of the Piston Grooves... causing a Hellatious Amount of Combustion Blow-BY. THAT Problem can be solved by using ACDelco's Top Engine Cleaner (TEC)... but that Topic is very well discussed and covered in Other Threads :

FUBAROILPAN1.jpegFUBAROILPAN2.jpegFUBAROILPAN4.jpgFUBAROILPICKUPTUBE1.jpgFUBAROILPICKUPTUBE2.jpgFUBAROILPICKUPTUBE3.jpgFUBAROILPICKUPTUBE5.jpgFUBAROILPICKUPTUBE8.jpgFUBAROILPICKUPTUBE6.jpgFUBAROILPICKUPTUBE7.jpg
 
Last edited:

NoDak Ninja

Original poster
Member
Aug 7, 2013
76
Quick update: Finally got the last of the old parts off on Monday. Spending some time cleaning before re-assembly this weekend.

Also FYI: I suppose it's pretty obvious, but I asked for and received a handle change. Mainly because I don't own an '02 Bravada any more!
 

mrrsm

Lifetime VIP Donor
Supporting Donor
Member
Oct 22, 2015
8,275
Tampa Bay Area
FWIW... This might seem like a blatant attempt on my part to appeal to your Mechanical Intellectual Vanity; However, IF you decide to take Many Staged Images of your Progressive Re-Assembly... You will probably nail down your presence here as being THE FIRST Member at GMT Nation to Image Document The Complete Timing Chain R&R Repair of the Ecotec Engine. There is NO Doubt that in the future... Many others will appreciate this extra effort on your part... to Help and Encourage them towards following in your footsteps. :>)
 
  • Like
Reactions: NoDak Ninja

NoDak Ninja

Original poster
Member
Aug 7, 2013
76
Hmmm...I'm not going to be going fast, so I will have time to stage and snap pics as I go. The bad part is the fender is so close to the front of the engine that getting good pics is difficult. But I'll do the best I can. Maybe I can supplement the write-up with stock images from a pulled engine, or line drawings. Now I wish I had taken better pics of the disassembly, but I can make it work, I think.

Great idea, MRRSM! I accept your challenge!
 
  • Like
Reactions: mrrsm

NoDak Ninja

Original poster
Member
Aug 7, 2013
76
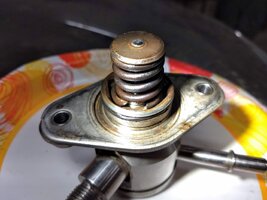
So, guess what else will cause an engine to throw the codes I got...

A busted fuel pump.
 

Attachments

  • IMG_20190127_222922549.jpg
    IMG_20190127_222922549.jpg
    343.2 KB · Views: 11
  • Like
Reactions: Mooseman

mrrsm

Lifetime VIP Donor
Supporting Donor
Member
Oct 22, 2015
8,275
Tampa Bay Area
Have you dropped the Fuel Tank to remove the Fuel Pump ...as well as removing that Fuel Pump Regulator from the Fuel Rail? The Loose Timing Chain and indicative Noises under the Front Cover versus this latest Broken Pressure Spring Discovery are isolated events; one from another. So I'm Just a little curious as to what prompted you to look at the Fuel System for problems before the other Timing Chain Set work has been completed.
 

NoDak Ninja

Original poster
Member
Aug 7, 2013
76
@MRRSM; like @m.mcmillen said, that's the high pressure pump. I was cleaning the spring a little before puting it back in and a piece of it fell out. This whole time I've had the nagging question in my head: "why did this pop up so suddenly?" This fuel pump spring breaking explains that.

I'm just frustrated I didn't see this sooner. I would have drove it out of the garage last night if not for this. Now I have to wait 2-5 more days for a pump to get here.
 

mrrsm

Lifetime VIP Donor
Supporting Donor
Member
Oct 22, 2015
8,275
Tampa Bay Area
I'm pinioned so hard to the LL8 Engine Design and the late Model Fuel Delivery System that it never occurred to me that GM would resort to using a Mechanical Style Fuel Pump. Fascinating! And Thank You @m.mcmillen for correcting and edifying me. It is curious that the Steel Spring exhibits so much pock-marking ...as possible and logical point of failure for Electric Induction Heated Steel Coils being exposed to either the Blow-By Gases and moisture settling on them after the Engine cools down... or perhaps caused by some of the Gas-Ethanol-Water leeching past the pressure plunger and getting onto the Spring. In any case... those hollowed out cavities in the Coils would definitely be locations that could invite crack propagation. :>)
 
Last edited:

Eric04

Member
Dec 3, 2014
392
West Michigan
@MRRSM; like @m.mcmillen said, that's the high pressure pump. I was cleaning the spring a little before puting it back in and a piece of it fell out. This whole time I've had the nagging question in my head: "why did this pop up so suddenly?" This fuel pump spring breaking explains that.

I'm just frustrated I didn't see this sooner. I would have drove it out of the garage last night if not for this. Now I have to wait 2-5 more days for a pump to get here.

Not to spend more of your money, but it's advised to replace the fuel feed line when replacing the high pressure pump. Many sites will list the GM number 12608374 pipe with the pump but not all of them do. The design apparently doesn't lend itself to reuse. Maybe something to consider to avoid another wait if you don't have a new one coming already.
 

NoDak Ninja

Original poster
Member
Aug 7, 2013
76
Rock Auto did have a note saying to order it with the AC Delco pump (which I bought). The note wasn't there with the other brands of pumps.

I have a real hard time coming up with any reason why that line would fail. It is stainless steel with SS compression-type fittings on either end. Considering they will have been compressed a grand total of two times in it's life when I finally get this back together...I just don't see why they recommend it...other than more $$$

I appreciate the heads-up Eric. And I hope like heck I'm not back here in X months saying I should have listened. But I just can't see it being necessary. Especially for about $45 shipped.
 
  • Like
Reactions: Eric04

mrrsm

Lifetime VIP Donor
Supporting Donor
Member
Oct 22, 2015
8,275
Tampa Bay Area
Generally... The two "Modes of Failure" for Stainless Steel involved in high temperature and high pressure environments are:

(1) Inter-Granular Fatigue of Wrought Stainless Steel....which shows up as a "Woody" Fracture.

(2) Inter-Dendritic Fatigue of the Stainless Weld Metal... which shows up as a "Lightning Strike" Fracture.

Because so much of this High Pressure apparatus must either be hidden ...or just plain hard to get to and may also present as a Fire Hazard... Changing out the Feed Line as a matter of course following any repair that offers total access and applying an abundance of caution... makes very good sense.

There is no doubt that the Carbon Steel Spring in that HP Pump suffered from its own metal fatigue ...probably induced by its High Cyclic Rate and External Damage from Rust or Corrosion inviting a Spiral Fracture. I would suggest examining the Eccentric Lobe on the Camshaft... if that is where the Secondary High Pressure Fuel Pump gets its "Drive" from... for any Lobe Damage.
 
Last edited:

NoDak Ninja

Original poster
Member
Aug 7, 2013
76
Fuel pump finally showed up. The engine is back together and...has a rough idle. But it runs smooth above idle and is throwing no codes. Any thoughts?

EDIT: The original four codes are still showing as permanent codes, but not pending or current. I'm not sure exactly what that means...or how to clear them.
 
Last edited:

NoDak Ninja

Original poster
Member
Aug 7, 2013
76
Drove it to work this morning. Hard starting; had to "feather" the gas pedal to get it to start. Runs great as long as you have your foot on the gas, even a little. At rest it would idle rough. No CEL all the way into work, though.

When I got to work I shut it off for a couple minutes and started it up again. It started very hard. For a minute I wasn't sure if I was going to get it going again. Finally started up with a CEL. I noticed the only permanent code now is the P0017. That code is pending and stored as well as one new one; P0506 (Idle Speed Control System RPM Lower Than Expected)

P0506 Possible causes:
Dirty throttle body
Electric throttle control actuator misadjusted or damaged
Faulty Electric throttle control actuator
Intake air leak


I did clean the TB butterfly before reassembly. I was very careful to not move the butterfly. I suppose I moved it a very small mount, but I not a lot. I first used Zep HD Citrus Cleaner and a nylon bristle brush. I used carb cleaner to rinse off the loosened grime.

If I did bump the butterfly too far, is there a chance it will work it's way out of it? I vaguely remember reading something to that effect in a thread...somewhere. I guess It could be an intake leak, but I did put on brand new gaskets and torqued the bolts to spec.

I went out on break and started it again. Fired up on second try. Idle is stil rough, but I cleared the codes and they didn't come back after idling for about 15 minutes.
 

m.mcmillen

Member
Apr 29, 2016
556
Wisconsin
Do you have a scan tool of any sort? That should take care of clearing out all if the codes. Since you changed chains and all, you need to do a CASE relearn. Hopefully that will take care of a lot of the problem. You will need a high end scan tool to do the CASE relearn. Most shops should have something that can do this for you. It does not have to be a Tech 2.

As far as the throttle body goes, it won’t hurt it if you move the plate as long as it is unplugged. The problem most run into is moving it with the key in the run position. That will mess it up. I would recommend taking it all the way off and cleaning it really good.

I don’t know for sure on your model but some of the newer GM vehicles have a throttle relearn that has to be done.
 

Forum Statistics

Threads
23,732
Posts
642,729
Members
19,274
Latest member
Marshy

Members Online