You are using an out of date browser. It may not display this or other websites correctly.
You should upgrade or use an alternative browser.
You should upgrade or use an alternative browser.
Window Switch LEDs
- Thread starter DMD_TB
- Start date
DMD_TB
Member
- Joined
- Dec 4, 2011
- Posts
- 75
TrailBlazn420
Member
- Joined
- Dec 4, 2011
- Posts
- 141
DMD_TB said:take it he's the man with the answers? lol
He is the man, but you're going to need some other things to help you figure out what resistors to use. Like resistance calculators. The resistors you need will depend entirely on what LEDs you buy (and how many you use), 5mm seem to be the most popular for the dash application. I hope you enjoy using a soldering iron, because that is about to become your best friend.

DMD_TB
Member
- Joined
- Dec 4, 2011
- Posts
- 75
TrailBlazn420 said:He is the man, but you're going to need some other things to help you figure out what resistors to use. Like resistance calculators. The resistors you need will depend entirely on what LEDs you buy (and how many you use), 5mm seem to be the most popular for the dash application. I hope you enjoy using a soldering iron, because that is about to become your best friend.
ha i actually dont mind bc my other job is a cell phone technician, i guess i will wait a little longer to see if he pops up, i was planing on replacing all the stock bulbs with the same amount of LEDs or would i need more per socket?

Regulator
Member
- Joined
- Nov 20, 2011
- Posts
- 2,496
DMD_TB said:ok, so i am wanting to go ahead and switch out all lights inside (i.e. window switches, dash cluster and other controls) with LEDs anyone know of a wright up on them or what LEDs i should get and what resistors i would need?
thanks
Dilan
 It would be nice if we had a bit of a how to for doing the LED conversion!
DMD_TB
Member
- Joined
- Dec 4, 2011
- Posts
- 75
Regulator said:
at the least maybe a materials list, something just to get a person started
Boricua SS
Member
I did the conversion in my SS and I used 3mm leds with 470 ohm resistors (blue color leds)...as far as materials.. there really isn't many. Jus your soldering iron, solder, some solderin resin and the tools to pry out your panels.. some of it was a pain.. but well worth it in the end.. the one thing you will run into is hotspots.. meaning, leds are a more precise light output compared to your factory lights that shine out 180 degrees.. so in one spot, it will look super bright.. and one spot will be a little bit duller.. the way to fix that is add more more leds in series or parallel.. like for the passanger window switch.. there is one bulb in there... but I put 2 in my window switch to make it as bright as factory but just blue...
To get a wider dispersion out of round-nosed LEDs, just take a sander or grinder to them. The round edge is just a molded-in lens. Get rid of the lens and make a flat face and it shines widely. Polish it with fine sandpaper or a Dremel tiny buffing wheel and compound and it will get brighter, and still have a wide angle.
STLtrailbSS
Member
- Joined
- Dec 4, 2011
- Posts
- 1,617
Bingo Rodie got it. Diffusing the leds by purposely sanding and marring them will eliminate the spotlight nonsense that's probably a top tip for your project Im working on a music cube for a friend and I diffused mine the difference is ridiculous
DMD_TB
Member
- Joined
- Dec 4, 2011
- Posts
- 75
Boricua SS said:I did the conversion in my SS and I used 3mm leds with 470 ohm resistors (blue color leds)...as far as materials.. there really isn't many. Jus your soldering iron, solder, some solderin resin and the tools to pry out your panels.. some of it was a pain.. but well worth it in the end.. the one thing you will run into is hotspots.. meaning, leds are a more precise light output compared to your factory lights that shine out 180 degrees.. so in one spot, it will look super bright.. and one spot will be a little bit duller.. the way to fix that is add more more leds in series or parallel.. like for the passanger window switch.. there is one bulb in there... but I put 2 in my window switch to make it as bright as factory but just blue...
i found some LEDs that say to have a 45* or 30* angle, would one be better then the other or since i will be sanding them down it wont matter? i have been looking at "super bright leds . com"
the roadie said:To get a wider dispersion out of round-nosed LEDs, just take a sander or grinder to them. The round edge is just a molded-in lens. Get rid of the lens and make a flat face and it shines widely. Polish it with fine sandpaper or a Dremel tiny buffing wheel and compound and it will get brighter, and still have a wide angle.
how far could one sand them down?
STLtrailbSS said:Bingo Rodie got it. Diffusing the leds by purposely sanding and marring them will eliminate the spotlight nonsense that's probably a top tip for your project Im working on a music cube for a friend and I diffused mine the difference is ridiculous
could you post a pic at all?
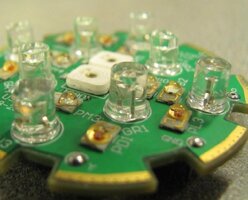
If you're sanding them down to get 150-160 degree dispersion, it doesn't matter. You just sand them down until the round part is gone. Here's a pic. This was an engineering project where I was making essentially a LED flashlight. Except it was only 3" long, and in that distance, I had to eliminate the hot spots from 20 or so LEDs of eight different frequencies from IR through visible to UV, and guarantee uniformity across a 1.5" diameter circle to within 1%. And not lose a lot in intensity because it was a very tightly constrained environmental area and I couldn't push the LEDs too hard or have too many of them for power reasons. So the typical opal (milky) glass diffusers were out. The white LEDs in the center are the IR units. Wide angle already. The small surface mount ones are visible frequencies and very efficient ones from LumiLEDs, and were also wide angle. The 5mm plastic LEDs with the flat fronts were the ones I had to modify because LumiLEDs didn't make them in those exact frequencies I needed.
There were still hot spots and non-uniformities in the field intensity, but two layers of a holographic diffuser material flattened that right up at the cost of only 20% of the intensity, where opal glass would have absorbed 95% of the light.
That's a small peek into what I do for a day job. I could tell you what the LED illuminator was for, but then, as the saying goes, I'd have to kill you. View attachment 17129
There were still hot spots and non-uniformities in the field intensity, but two layers of a holographic diffuser material flattened that right up at the cost of only 20% of the intensity, where opal glass would have absorbed 95% of the light.
That's a small peek into what I do for a day job. I could tell you what the LED illuminator was for, but then, as the saying goes, I'd have to kill you.
View attachment 17129Attachments
DMD_TB
Member
- Joined
- Dec 4, 2011
- Posts
- 75
the roadie said:If you're sanding them down to get 150-160 degree dispersion, it doesn't matter. You just sand them down until the round part is gone. Here's a pic. This was an engineering project where I was making essentially a LED flashlight. Except it was only 3" long, and in that distance, I had to eliminate the hot spots from 20 or so LEDs of eight different frequencies from IR through visible to UV, and guarantee uniformity across a 1.5" diameter circle to within 1%. And not lose a lot in intensity because it was a very tightly constrained environmental area and I couldn't push the LEDs too hard or have too many of them for power reasons. So the typical opal (milky) glass diffusers were out. The white LEDs in the center are the IR units. Wide angle already. The small surface mount ones are visible frequencies and very efficient ones from LumiLEDs, and were also wide angle. The 5mm plastic LEDs with the flat fronts were the ones I had to modify because LumiLEDs didn't make them in those exact frequencies I needed.
There were still hot spots and non-uniformities in the field intensity, but two layers of a holographic diffuser material flattened that right up at the cost of only 20% of the intensity, where opal glass would have absorbed 95% of the light.
That's a small peek into what I do for a day job. I could tell you what the LED illuminator was for, but then, as the saying goes, I'd have to kill you.
bahahahahah

thanks so much Roadie, i went and picked up LEDs and Resistors just a little bit ago, may get to it on Thursday if i dont get stuck at the station, i will keep this thread going with my progress, i bought white and red.....not sure what ones to use on the window buttons
 (they will be done first, waiting to do cluster till i get my new overlay and needles)
Me007gold said:paging blckshadow
DMD_TB said:take it he's the man with the answers? lol
I thought I felt my ears burning a lil bit at work this morning.

DMD_TB said:ha i actually dont mind bc my other job is a cell phone technician, i guess i will wait a little longer to see if he pops up, i was planing on replacing all the stock bulbs with the same amount of LEDs or would i need more per socket?
I ended up doing one bulb per button (in the doors) Since the LEDs don't emit light laterally very well, you won't get the same kind of light output as having an LED under the translucent part of the buttons.

Regulator said:
Since I'm taking the last 2 weeks of Dec off, I was planning to do some write ups on this stuff. As for the smoothing of the tops of LEDs, they sell flat top ones, which I've been using in my recent mods.

Boricua SS
Member
Blckshdw said:Since I'm taking the last 2 weeks of Dec off, I was planning to do some write ups on this stuff. As for the smoothing of the tops of LEDs, they sell flat top ones, which I've been using in my recent mods.
And I'll be waiting for those
 .. all I have left to do is my gauge cluster and I don't know the polarities (hopefully you'll incorporate that in your write ups lol.. so since the beaSSt is parked for the winter.. this is the perfect time to finish it up.. I'm just waiting to take the lazy way out and read your writeups
 That was the plan, mainly because I have both clusters, and I need to check the one for my cruise control, since it hasn't worked since I did the upgrade months ago. So either I got the polarity backwards, or the LED is damaged.  Besides, if I'm busy writing stuff up, I won't be busy buying more mods online!
Besides, if I'm busy writing stuff up, I won't be busy buying more mods online! Boricua SS
Member
Thats the excuse I'm using too since the beaSSt is parked and I already have the led's left over from before lol... the polarity thing is what's really holding me back.. that and the fear of breaking my HVAC levers  opps did that come out .. but I wuld like for those to be my "winter" projects as they say
opps did that come out .. but I wuld like for those to be my "winter" projects as they saySEKOLAx216
Member
Boricua SS said:Thats the excuse I'm using too since the beaSSt is parked and I already have the led's left over from before lol... the polarity thing is what's really holding me back.. that and the fear of breaking my HVAC levers
We can do a thread with mine. Since we haven't done it yet. Plus i have all those digital gauges
")
Boricua SS
Member
SEKOLAx216 said:We can do a thread with mine. Since we haven't done it yet. Plus i have all those digital gauges
Regular led's, I'm game.. but those digital gauges... yea I'm lost there lol.. but really lookin forward to seeing them installed..
DMD_TB
Member
- Joined
- Dec 4, 2011
- Posts
- 75
Sparky said:I've been slowly, carefully working my HVAC levers. Passenger side one comes off fine, driver side one is still stuck pretty good.
do you jst pry them off or just wiggle them a little up and down till they come off?
Sparky
Member
- Joined
- Dec 4, 2011
- Posts
- 12,927
DMD_TB said:do you jst pry them off or just wiggle them a little up and down till they come off?
I wiggled them up and down, basically to let the metal edges "saw" the inside of the plastic levers a bit to loosen them up. I haven't put much focus on it however since I'm not getting in there any time soon. Just when I think about it I wiggle it. The driver side hasn't quite let go yet.
ChevyTBLover
Member
- Joined
- Nov 21, 2011
- Posts
- 116
A little experience from my end, when calculating your needs, you need to use your supply voltage as whatever your car runs at, which I use 14.4. Now on eBay they'll give you free resistors, usually 470 1/4 watt. Depending on if your designing towards an LED array or a single LED, you need to pick the right resistor. If your going with a resistor per LED and use a 470ohm 1/4 watt supplied resistor with a white LED with the forward voltage at 3.3V at 20mA, the resistor is going to be too small and wont be able to handle the current, eventually heat up, and fail over a very short amount of time.
Little experiment: Apply 12 volts and place the back of your finger on the 470ohm 1/4watt resistor with one white 5mm and you will feel the heat in about 25 seconds. Now turn the car on, @ 14.4 you will feel that resistor in roughly 7 seconds.
Always use the peak voltage as your supplied voltage. If going with one resistor per LED your going to need at least 1/2watt even if you use 470ohm (its bigger but will be able disperse enough current without failing prematurely) Technically you should use 560ohm 1/2watt.
LED arrays are a different story.
Like I said, that's just what I learned throughout the 5 years so far of dealing with LEDs.
Black_tb said:wish there was a easy way of doing this
I'm gonna put some stuff together next week while I'm on vacation, that will hopefully make the process easier to understand. I haven't been doing LEDs as long as Tyler (only about 8 months), and when I first started, I learned a couple things the hard way. But once I figured out what I wanted, and how to get there, things got 100x easier.
bluenvoyerob
Member
- Joined
- Jan 7, 2013
- Posts
- 7
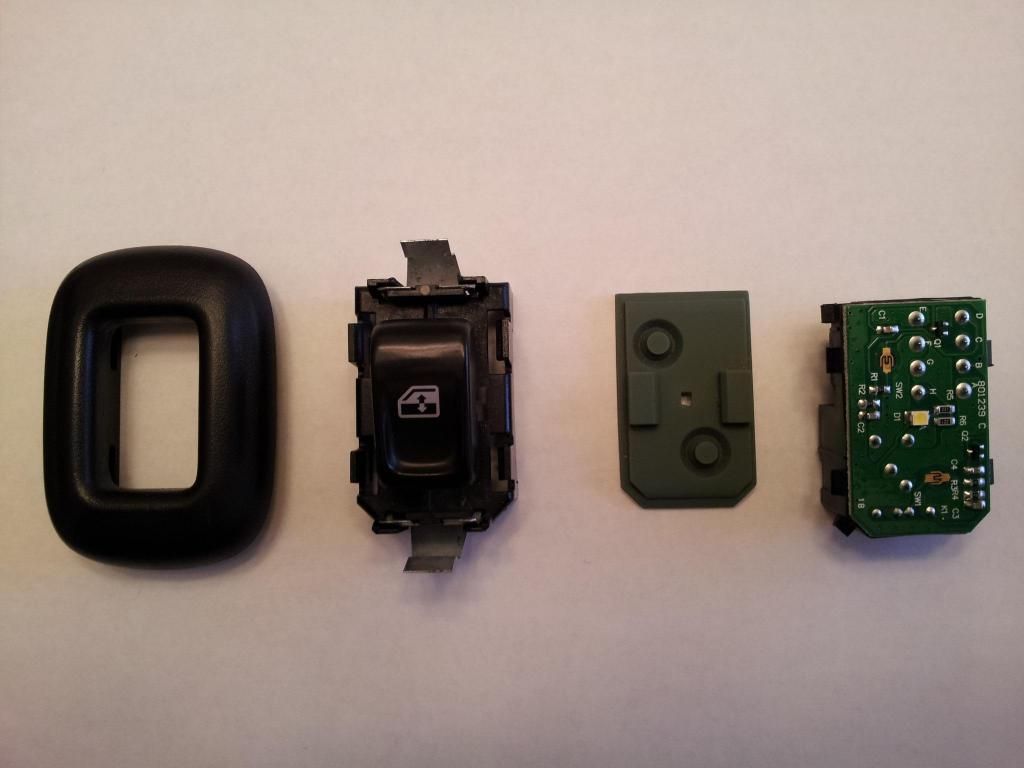
Well I hadn't seen any mention of modding the rear window switches to LED anywhere on here, so I decided to investigate. I was surprised to find a SMD white LED already soldered in from the factory! I still thought the switch looked dull and greenish-grey to me...so I modified it a little. I cut a square chunk out of the greenish rubber pad to allow the LED to shine through. I tried to take a "before" picture but the switch was barely visible on camera. The "after" shot though turned out pretty nice! See below... (Sorry for the sideways pictures, photobucket has issues with photo rotation  )
)

)
