You are using an out of date browser. It may not display this or other websites correctly.
You should upgrade or use an alternative browser.
You should upgrade or use an alternative browser.
will a 02 ls trans work on an 02 ext?
- Thread starter moneypit
- Start date
Mooseman
Moderator
C-ya
Member
- Aug 24, 2012
- 1,098
Is your EXT also an LS V8?
Does the bellhousing swap on these like you could do with the old TH trannys?
Mooseman
Moderator
Mooseman
Moderator
hey ya'll  ok got the replacement tranny, drained the converter & pan, got a filter kit, tc input seal, dipstick tube seal, fluid & a Tcase to adapter gasket & getting Tcase adapter to trans seal. anything else? pan was clean & will drain Tcase. Gonna go at it any day now. used trans has 104k ours has 181k with a hel* of a lot of new parts on it.
 ok got the replacement tranny, drained the converter & pan, got a filter kit, tc input seal, dipstick tube seal, fluid & a Tcase to adapter gasket & getting Tcase adapter to trans seal. anything else? pan was clean & will drain Tcase. Gonna go at it any day now. used trans has 104k ours has 181k with a hel* of a lot of new parts on it.
Mooseman
Moderator
Nope, just the flex plate. As Mooseman stated, you might as well put in a new seal since you're dropping the tranny.but doesnt the pan need removal for such an operation?
Mooseman
Moderator
after searching here, now I dont know if I should replace the 1-2 & 3-4 accumulators & forward piston as well as the vette servo? I have a transstar close by? I got the replacement trans on an engine stand now...
Why not? Haven't heard anything negative about doing them. I would have done the Vette servo but my cat was in the way. I did everything else and am happy except for a little to hard 1-2 shift. I think it can be adjusted with one of the holes being drilled out or left alone.
"...Anything Else....?"
Yes. Just a suggestion that after you pull the original transmission and before you install the new one...and while you have easier access to the Transmission Cooler "IN --> OUT" Metal feed lines... You should Reverse Flush it while you can still get to it. You might get your hands on something like this modified thing (available for around $30-$45 on eBay-- sold as an "AC Flush Kit") in the photos below (...of course without all of the "Jarvik Heart Pump" apparatus I used here on my first design try at building "The FrankInjector Machine" for cleaning EFIs)... and use some S/S Hose Clamps and two decent lengths of 3/8" Fuel Line to attach the Output of the Aluminum Cylinder filled with Transmission Flush to the OUTFLOW LEADING TO THE -> TRANSMISSION Line ( use about 6 bottles in a row) and then attach the other length of 3/8" Hose to the RETURN FLOW <--- THE TRANSMISSION Line to drain away the old fluid.
THIS is an even more convenient design (stands-rests on its end) on ebay:

http://www.ebay.com/itm/R134-R12-R2...914445?hash=item3abf7f9c0d:g:-X4AAOSwvg9XUk3y
Get a 5 Gallon Bucket with a lid and drill two holes in it... One for the junk fluid to enter the lid /bucket via the 3/8" Hose fitted and fed into another length of Clear Acrylic or Clear PVC Hose so you can actually SEE what the Hell is coming out of the Cooler as initially a Black Stream that will progressively get cleaner and clearer; turning into a sort of transparent Orange Colour when the flush portion of this job is complete. Drill out the second hole in the corner of the Plastic Lid of your Catch Bucket to let out all of the in coming displaced pressurized air... Otherwise... the lid will pop off and scare the Hell out of you!
Your Shop Air Compressor will serve nicely to act as the force needed to drive the Flushing Fluid out of the Aluminum Cylinder...BACKWARDS through the lines and then 'OUT THE IN--->' Line and into the Catch Bucket. Start out by VERY SLOWLY metering in the air into the cylinder... and listen very carefully as the flushing fluid travels backwards.... rumbles and sputters and burps as it meets an awful obstruction deep inside the cooler itself... the pressure should be built up GRADUALLY... so you don't over-pressurize the fluid and risk damaging the lines and innards of the Cooler while trying to push out all of the "Black Mung" that has collected inside along with tiny pieces of crap from the Old Transmission to plug the damned thing up.
Finally... it will let go explosively and then a Black Stream of Old Fluid and Crap will pass through with relaxed force inside of your Catch Bucket ...which will jump around from its arriving fluid under pressure. Put a weight on the bucket before you begin and Duct Tape the Acrylic Hose onto-into the lid... or it will eject itself and spray disgusting Old Tranny Fluid all over the place.
"Wash...Rinse...Repeat" until the contents of all six (6) of the Orange Coloured Transmission Flushing Fluid containers streams into the Catch Bucket and then stop after the Aluminum Cylinder is empty. Next... fill the cylinder up with Fresh OEM Dexron Transmission Fluid... and flush out the Transmission Flush until nothing but Pure, Red, Clean Transparent, Translucent Automatic Transmission fluid is exiting into the Catch Bucket. You should stop before the Aluminum Cylinder completely empties out to avoid having any air in the fluid stream. After the initial "Mung Plug" passes into the Catch Bucket... you can of course increase the air pressure to around 15-20 PSI... just to have enough pressure available to force out the remaining Flush.
https://en.wikipedia.org/wiki/DEXRON
Now cap both of the Metal Lines in readiness for their insertion into the New Transmission... (I recommend that you get some Brand New Line Spring Clips so that when the lines slide in and "Snap-In" they won't pop back out). And so... from this point on... once the replacement transmission is installed... none of the Damaging Metal and Disc Pack Contamination will "poison" the new one. No doubt, you will wind up disposing of this disgusting waste fluid in a responsible manner... but NOT before you have a chance to run a Neodymium Magnet on a string around the bottom of the bucket to see if anything "ferrous" was left behind.
Remember that when you are putting in the New A/T Fluid into the Fill Port NOT to use the entire recommended amount of fluid usually necessary as when starting with an un-primed Transmission Cooler and Lines. Fill it with about two less quarts so later on after the engine and transmission warm up and you check for leaks using a big piece of cardboard under the engine/trans area... you can take a short, local Test Drive and then "inch up" onto the proper filling level when you get back in your driveway and check the "Level...on Level Ground" Don't forget to do one, last "Leak Look" using the cardboard technique ...so if the Transmission leaks after you get a good nights sleep... you will be able to "spot" the problems in the morning!
-=Hope This Helps=-
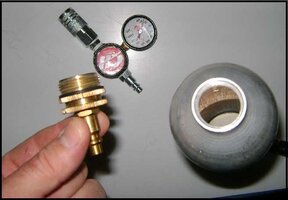
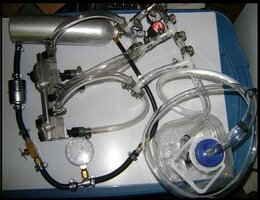
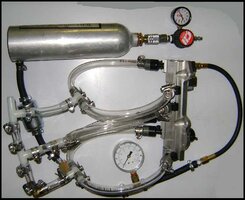
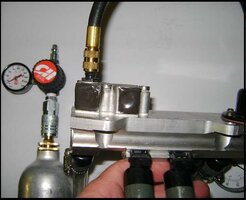
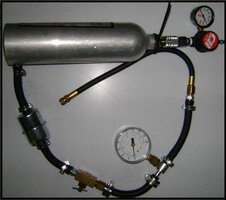
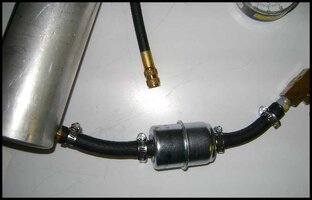
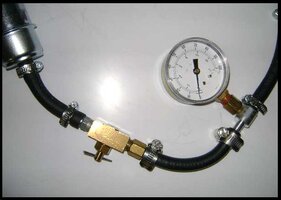
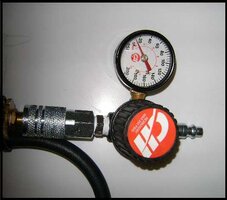
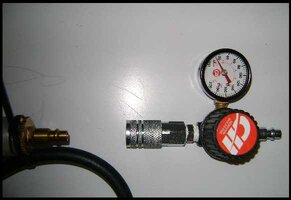
Yes. Just a suggestion that after you pull the original transmission and before you install the new one...and while you have easier access to the Transmission Cooler "IN --> OUT" Metal feed lines... You should Reverse Flush it while you can still get to it. You might get your hands on something like this modified thing (available for around $30-$45 on eBay-- sold as an "AC Flush Kit") in the photos below (...of course without all of the "Jarvik Heart Pump" apparatus I used here on my first design try at building "The FrankInjector Machine" for cleaning EFIs)... and use some S/S Hose Clamps and two decent lengths of 3/8" Fuel Line to attach the Output of the Aluminum Cylinder filled with Transmission Flush to the OUTFLOW LEADING TO THE -> TRANSMISSION Line ( use about 6 bottles in a row) and then attach the other length of 3/8" Hose to the RETURN FLOW <--- THE TRANSMISSION Line to drain away the old fluid.
THIS is an even more convenient design (stands-rests on its end) on ebay:

http://www.ebay.com/itm/R134-R12-R2...914445?hash=item3abf7f9c0d:g:-X4AAOSwvg9XUk3y
Get a 5 Gallon Bucket with a lid and drill two holes in it... One for the junk fluid to enter the lid /bucket via the 3/8" Hose fitted and fed into another length of Clear Acrylic or Clear PVC Hose so you can actually SEE what the Hell is coming out of the Cooler as initially a Black Stream that will progressively get cleaner and clearer; turning into a sort of transparent Orange Colour when the flush portion of this job is complete. Drill out the second hole in the corner of the Plastic Lid of your Catch Bucket to let out all of the in coming displaced pressurized air... Otherwise... the lid will pop off and scare the Hell out of you!
Your Shop Air Compressor will serve nicely to act as the force needed to drive the Flushing Fluid out of the Aluminum Cylinder...BACKWARDS through the lines and then 'OUT THE IN--->' Line and into the Catch Bucket. Start out by VERY SLOWLY metering in the air into the cylinder... and listen very carefully as the flushing fluid travels backwards.... rumbles and sputters and burps as it meets an awful obstruction deep inside the cooler itself... the pressure should be built up GRADUALLY... so you don't over-pressurize the fluid and risk damaging the lines and innards of the Cooler while trying to push out all of the "Black Mung" that has collected inside along with tiny pieces of crap from the Old Transmission to plug the damned thing up.
Finally... it will let go explosively and then a Black Stream of Old Fluid and Crap will pass through with relaxed force inside of your Catch Bucket ...which will jump around from its arriving fluid under pressure. Put a weight on the bucket before you begin and Duct Tape the Acrylic Hose onto-into the lid... or it will eject itself and spray disgusting Old Tranny Fluid all over the place.
"Wash...Rinse...Repeat" until the contents of all six (6) of the Orange Coloured Transmission Flushing Fluid containers streams into the Catch Bucket and then stop after the Aluminum Cylinder is empty. Next... fill the cylinder up with Fresh OEM Dexron Transmission Fluid... and flush out the Transmission Flush until nothing but Pure, Red, Clean Transparent, Translucent Automatic Transmission fluid is exiting into the Catch Bucket. You should stop before the Aluminum Cylinder completely empties out to avoid having any air in the fluid stream. After the initial "Mung Plug" passes into the Catch Bucket... you can of course increase the air pressure to around 15-20 PSI... just to have enough pressure available to force out the remaining Flush.
https://en.wikipedia.org/wiki/DEXRON
Now cap both of the Metal Lines in readiness for their insertion into the New Transmission... (I recommend that you get some Brand New Line Spring Clips so that when the lines slide in and "Snap-In" they won't pop back out). And so... from this point on... once the replacement transmission is installed... none of the Damaging Metal and Disc Pack Contamination will "poison" the new one. No doubt, you will wind up disposing of this disgusting waste fluid in a responsible manner... but NOT before you have a chance to run a Neodymium Magnet on a string around the bottom of the bucket to see if anything "ferrous" was left behind.
Remember that when you are putting in the New A/T Fluid into the Fill Port NOT to use the entire recommended amount of fluid usually necessary as when starting with an un-primed Transmission Cooler and Lines. Fill it with about two less quarts so later on after the engine and transmission warm up and you check for leaks using a big piece of cardboard under the engine/trans area... you can take a short, local Test Drive and then "inch up" onto the proper filling level when you get back in your driveway and check the "Level...on Level Ground" Don't forget to do one, last "Leak Look" using the cardboard technique ...so if the Transmission leaks after you get a good nights sleep... you will be able to "spot" the problems in the morning!
-=Hope This Helps=-


Last edited:
anyone have any pics of the rear of motor?? If I can pop one in I will!
This video can be very useful if downloaded with the ant.com addon for Firefox and saved for review using VLC (Videolan). Then you can look over the entire set-up and get a great "Worm's Eye View" . By Freeze Framing and doing screen-prints... you will have a decent reference to review.
Before you remove the Special Bolts holding on the Flexplate... Lightly Tap the outer edges of it with either a Plastic Mallet or a Dead Blow Hammer and listen for it to "Ring like a Bell"... if instead it sounds dull to you... make a careful inspection for cracks in the Flex-Plate radiating from around the Bolt Holes and for signs of an Octagon shaped Crack Line. If you see ANY cracks at all... Now will be great time to replace the inexpensive old Flex-Plate with a Brand New one from either gmpartsdirect or Rockauto ...right along with the OEM Quality Felpro Rear Crankshaft Seal.
If the Flex-Plate is still "sound"... mark the position of its relationship and the "Spacer Ring" if present to the Rear Crankshaft Flange Hollow Centre with a Magic Marker before you begin unbolting it as well as making a note on it "This Face UP". Clean off all of the Old Lok-Tite very well from the Eight (8) Flex-Plate Bolts and follow the OEM Manual religiously when tightening them up in the correct pattern..in the proper stages of torque ...and with the correct amount of additional Degrees of Angle to secure it back on AFTER the R&R of the Rear Engine Seal. Make certain to clean the outer diameter of the end of the crankshaft as well as the inner seat of the engine block with Lacquer Thinner or Acetone to remove all of the old Oil Lacquer Build Up before installing the huge Rear Seal. Using High Temp Lok-Tite is a good idea for these Fasteners, as this is not a trivial repair location:
Last edited:

