Trailblazer fuel pump R&R...without dropping the tank

jsheahawk

Original poster
Member
Jan 16, 2013
533
Kansas City
Everywhere I looked online said that you couldn't cut a hole in the floorboard of your SWB Trailblazer to change the fuel pump. Challenge accepted!

You're going to need a couple air tools:
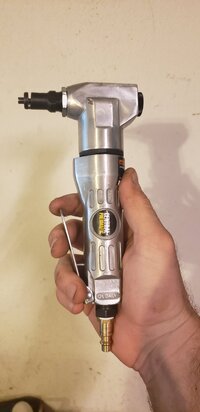
- pneumatic nibbler
20190916_181446.jpg

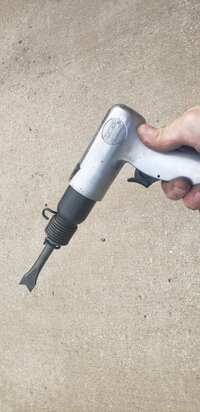
- pneumatic hammer
20190916_175146.jpg

First, you'll need access to the floorboard. You need to remove the rear driver's side seat. It's just two nuts. Move the seat forward, take off the two bolts, and pull out the seat. Then you remove the trim from the bottom of the rear driver's side door jamb and the B pillar trim. Move the front driver's seat up all the way to give yourself a little more room. Move the carpet by making a couple inconspicuous cuts. Be careful of the wire loom that runs right over the fuel pump.

I drilled a 3/4" hole where I knew the pump was so I could figure out exactly where I needed to cut. The fuel pump is right between the two studs that hold the the seat down. Once you figure out where it is, use the nibbler to cut as big a hole as you can over the fuel pump. I used a socket to hold the wire loom up out of the way. There is a weld front-ward that will be your northern boundary. The raised area where the seat mounts will be the western, eastern, and southern boundaries. Rotate the head of the nibbler if you need to. Once you have a rectangle-ish shape cut out, you'll likely see this:
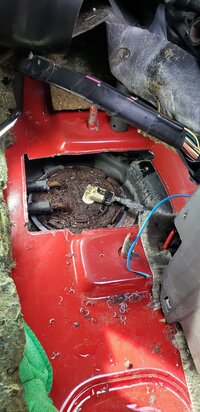
20190916_160733.jpg

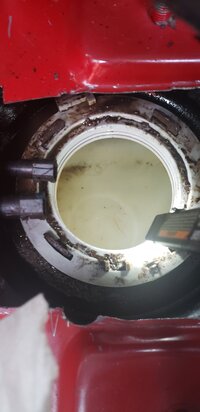
Pull relay 41 under the hood and crank the engine to depressurize your fuel system. Curse, swear, and eventually remove the fuel lines from the fuel pump "simply" pinching the clip and pulling the hose off. Rust gets stuck between the clip and the line, so I ended up wiggling them until the lines broke off; that made removing the lines from the fittings a bit easier. My AC Delco fuel pump didn't come with the plastic clips, so save your old ones. Use that pneumatic hammer we talked about earlier, and knock the retaining ring off. I think this job would have been impossible without it because of the space constraints. The specialized tool to take off the ring may have worked, but I cut a hole in the floorboard of my TB. You think I buy specialized tools??? NOTE: Before and after removing the ring, I vacuumed off all of the rust and crescent-shaped pieces of metal. Using the hammer will knock a lot of rust off. You don't want that in your tank.
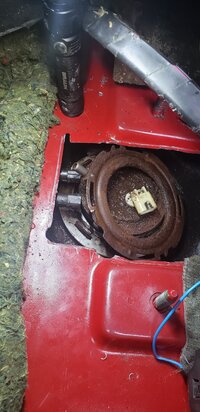
20190916_175336.jpg

I was a bit worried about being able to pull the pump out of the tank, but with the ring removed, the pump pulled out easily.
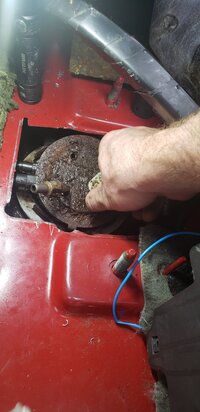
20190916_175402.jpg

Pretty clean!

20190916_175552.jpg

Install your new pump and lock ring. I wouldn't reuse that old, rusty ring. Again, the pneumatic hammer was a necessity. Reconnect the fuel lines and electrical connector. Start your truck to see if gasoline is spewing out like before. It's not. Success!
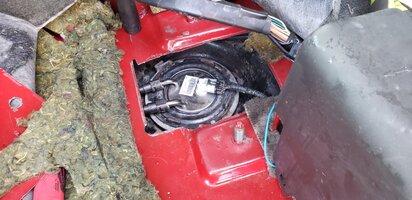
20190919_175747.jpg

Paint the edges of the floorboard that you cut so it doesn't rust, then use a nibbler to cut some sheet metal of similar thickness to a little bigger than the hole. Paint it, don't wait for it to dry completely (because who doesn't like paint covered fingers?), put a bead of RTV around the hole, and pop a few rivets in. Self-tappers would work as well, but just make sure they're short.
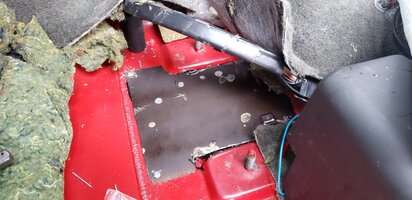
20190921_093041.jpg

Replace the padding and carpet. I used some sticky tape to stick the carpet together where I cut. Reinstall the trim pieces and rear seat, and you're done!

Thumb your nose at the internet who said it couldn't be done.

Let the "you're gunna die" comments begin.
 
Last edited:

Blckshdw

Moderator
Nov 20, 2011
10,665
Tampa Bay Area, FL
Nice job, as long as the seal between the new sheet metal holds, and nothing was damaged from making the cuts, you should be in good shape. About how long did this take you, start to finish?
 
  • Like
Reactions: mrrsm

mrrsm

Lifetime VIP Donor
Supporting Donor
Member
Oct 22, 2015
7,642
Tampa Bay Area
The "Nose" you Thumb at the Internet will be incapable of detecting Carbon Monoxide from any Inhaled Leaking Engine Exhaust that can get pulled in through openings in the sub-flooring of the SUV. CO also forms from any vaporizing Fresh Fuel as well, as it will also decay into a large quantity of CO that can also get sucked in and around that Panel as the entering air passing over that conspicuosly centered Fuel Pump and Seal will evaporate any Fuel it encounters and allow it to enter the lower rear cabin if that New Opening becomes..."Less than Solid State".

Once inside the Rear Cabin, the circulating Odorless Carbon Monoxide can insidiously render the occupants very "sleepy" ...causing the Driver to lose alertness or concentration and invite unintended events at speed on the roads and highways. This will occur in the presence of sufficient quantities far less than you might imagine ...and in sufficent concentrations, it can eventually suffocate the Occupants... God forbid... Children on Long Road Trips or a Baby napping in a Car Carrier.

Since the clever work you've accomplished is a Done Deal now... In lieu of using Silicone... the better material for Sealing Off the Plate AND the Rivet Holes would be High Temperature JB-Weld... and before the Rivets are used... it is better applied as a layer in between the Body of the SUV and the Replacement Metal Panel FIRST.. .and then covered over as a second application near the Plate Margins and Rivet Holes.

It makes sense not to let any Hubris creep into performing 'creative work' that CAN be done... but in hindsight, others ... Like your Insurance Company... may Question the Wisdom as to whether or not it SHOULD have been done. Any "Failures of Imagination" can invite unforeseen consequences and so they must be well considered before attempting any such modifications, as serious concerns are present involving REAL Safety Issues presently absent from this repair calculus ...such as:

"What will happen in the case of a T-Bone Driver's Side On Crash ...where any crumpled lower frame and body sections might easily separate those Rivets and pop off that Panel Like a Bottle Cap?"

"Will the Floor Board under the Left Rear Passengers Seat FLEX under the weight of someone riding in the Back Seat enough to Loosen the Rivets of the Mild Plate Steel Patch...and cause it to break loose?"


Even if there wasn't any Fire involved ... such an accident would still present the inside of the SUV with the Ready Source of Liquid Fuel positioned Directly into the Rear Floorboard... any spilled fuel, smoke and vapors underneath a wrecked vehicle would naturally be drawn into and upwards through any such hole in the floorboard areas. I investigated so many accidents where the Driver and occupants were unfortunately injured and/or trapped or pinned inside of such vehicles... and their faces were filled with looks of fear and desperation worrying about being removed from further danger as soon as possible...such as surviving a Car Accident and the risk of dying inside of a Burning SUV afterwards.

Look over your own Repair Images again... But THIS time...observe all of the Fuel Soak present atop and around the compromised, rusted out Mild Steel Fuel Pump ...and realize that in time... The NEW Pump will look like that sooner or later. Sooner perhaps in climes where Road Salt, Brown Muddy Snow Slush and poor conditions cause IT to Rust Out in this identical fashion... and then take the necessary additional steps to make damned sure that "The Hole in The Floor" will continue to remain ...Completely Sealed.
 
Last edited:

Reprise

Lifetime VIP Donor
Supporting Donor
Member
Jul 22, 2015
2,724
Well, I liked it, even if I own a LWB.

The only thing I might have added would be to depressurize your fuel lines by pulling the pump relay, before starting out. Did you get a big spray of gas when you pulled the fuel lines?
 
  • Like
Reactions: Mooseman

Maverick6587

Member
Dec 16, 2018
730
Sterling Heights, Michigan
Not all heros wear capes! Very nice job!

Agree with MRRSM, that you should reseal it a little better. I would get a bigger sheet of metal, rivet it, and then use some fuel resistant caulking/sealant.
 
  • Like
Reactions: mrrsm

cornchip

Member
Jan 6, 2013
637
Urethane or expoxy based seam sealer/panel bond would be kick ass for this repair.
 
Last edited:
  • Like
Reactions: mrrsm

jsheahawk

Original poster
Member
Jan 16, 2013
533
Kansas City
Well, I liked it, even if I own a LWB.

The only thing I might have added would be to depressurize your fuel lines by pulling the pump relay, before starting out. Did you get a big spray of gas when you pulled the fuel lines?
Ah, I did pull relay 41 and crank the engine. I didn't include that. Edited! That said...I think mine was self-depressurizing.

Not all heros wear capes! Very nice job!

Agree with MRRSM, that you should reseal it a little better. I would get a bigger sheet of metal, rivet it, and then use some fuel resistant caulking/sealant.
It wouldn't hurt to go back over it with some RTV over the seam.
 

Mooseman

Moderator
Dec 4, 2011
25,262
Ottawa, ON
Added to Tech Discussion FAQ.
 
  • Like
Reactions: xavierny25

littleblazer

Member
Jul 6, 2014
9,265
Interesting.
 

Sparky

Member
Dec 4, 2011
12,927
Better sealed than the bubble envelope that was sitting atop the hole over the pump in my Camaro from the previous owner 🤔
 

Mektek

Member
May 2, 2017
656
FL
I was thinking of going to the PYP and trying this on one of their TBs. Now you've saved me the trouble:ok:
I didn't want to cut up the carpet in the passenger footwell area so I did it the hard way.
Congratulations on being the first to successfully accomplish this task!
 

jsheahawk

Original poster
Member
Jan 16, 2013
533
Kansas City
Better sealed than the bubble envelope that was sitting atop the hole over the pump in my Camaro from the previous owner 🤔
But how aren't you dead!?!?!?!?

I was thinking of going to the PYP and trying this on one of their TBs. Now you've saved me the trouble:ok:
I didn't want to cut up the carpet in the passenger footwell area so I did it the hard way.
Congratulations on being the first to successfully accomplish this task!
Thanks! I was considering going the cautious route, but then I remembered that my TB is seventeen years old, paid off, and it was already hemorrhaging fuel. *shrug* What's the worst that could happen?

Tangentially: I'm not a Reddit aficionado by any means, but I have found the best thing ever. You can waste hours looking at the What Could Go Wrong sub-Reddit.
 
  • Haha
Reactions: Blckshdw

Mooseman

Moderator
Dec 4, 2011
25,262
Ottawa, ON
While cutting the floor, the leaked and pooling gas is ignited by a spark. The one thing that just came to mind.
 

Mektek

Member
May 2, 2017
656
FL
This has done on many other vehicles, On cars it's usually behind the back seat so whatever you do is covered. You have to be more careful if you have leaking fuel, but if it's just a dead pump there's little risk.
Jsheahawk came up with the safest method possible for the leaking fuel worst case.
But keep a fire extiguiser or garden hose handy in any case.

Every vehicle should be made with a nice gasketed door over the pump so no one should have to do this. But that would save us time and money so most manufacturers won't do it..:crazy:
 
  • Like
Reactions: Gunner

jsheahawk

Original poster
Member
Jan 16, 2013
533
Kansas City
While cutting the floor, the leaked and pooling gas is ignited by a spark. The one thing that just came to mind.
I imagined that happening. I had a fire extinguisher sitting nearby, I used a nibbler, and the peek-a-boo hole that I drilled was going double as my fire extinguishing hole.

Jsheahawk came up with the safest method possible for the leaking fuel worst case.
But keep a fire extiguiser or garden hose handy in any case.

Every vehicle should be made with a nice gasketed door over the pump so no one should have to do this. But that would save us time and money so most manufacturers won't do it..:crazy:
Thanks man, there was, and I totally agree!
 

NJTB

Member
Aug 27, 2012
612
Flemington, NJ
When I did my fuel pump, the lines were rusted to the pump and I had to buy 2 new ones. Now I'm wondering if those lines could be slipped in between the tank and the body.
 

Mooseman

Moderator
Dec 4, 2011
25,262
Ottawa, ON
Another suggestion, do this hole before it's needed or before there is any leaking gas.

When I replaced the pump on the Saab (the old fashioned way) because it had rusted and was leaking, I painted the top on the new one with Por15. Painted everything except where the lines go on and seal (basically up to the lip).
 
  • Like
Reactions: mrrsm and Matt

catnippe

Member
May 4, 2022
2
Arkansas river valley
Anybody know what year model he had? I just cut a hole in my '07 and it wasn't there. 🥺🤦‍♂️ And does anyone know where it would be on mine?
I've had it for five days so far and am trying to fix all of the issues. I have mud and gravel to lay on like a true "Shade Tree Mechanic", so I REALLY don't want to have to drop the fuel tank.
 

Mooseman

Moderator
Dec 4, 2011
25,262
Ottawa, ON
Don't know year but he did say it was a SWB TB. They should all be the same. I don't think the position of the fuel pump was changed over the years except for LWB, which you don't have.
 

Mektek

Member
May 2, 2017
656
FL
I seem to recall that in the later model years they used a larger tank - even in the swb. So the pump may be in a different place. It should be possible to look down the hole with a flashlight and see where the lines go to the pump.
You'll need to cut the hole in a different place.
 
Nov 21, 2021
80
Sanford, Maine
I seem to recall that in the later model years they used a larger tank - even in the swb. So the pump may be in a different place. It should be possible to look down the hole with a flashlight and see where the lines go to the pump.
You'll need to cut the hole in a different place.
What year did you do this on?

Everywhere I looked online said that you couldn't cut a hole in the floorboard of your SWB Trailblazer to change the fuel pump. Challenge accepted!

You're going to need a couple air tools:
- pneumatic nibbler
View attachment 90949

- pneumatic hammer
View attachment 90950

First, you'll need access to the floorboard. You need to remove the rear driver's side seat. It's just two nuts. Move the seat forward, take off the two bolts, and pull out the seat. Then you remove the trim from the bottom of the rear driver's side door jamb and the B pillar trim. Move the front driver's seat up all the way to give yourself a little more room. Move the carpet by making a couple inconspicuous cuts. Be careful of the wire loom that runs right over the fuel pump.

I drilled a 3/4" hole where I knew the pump was so I could figure out exactly where I needed to cut. The fuel pump is right between the two studs that hold the the seat down. Once you figure out where it is, use the nibbler to cut as big a hole as you can over the fuel pump. I used a socket to hold the wire loom up out of the way. There is a weld front-ward that will be your northern boundary. The raised area where the seat mounts will be the western, eastern, and southern boundaries. Rotate the head of the nibbler if you need to. Once you have a rectangle-ish shape cut out, you'll likely see this:
View attachment 90951

Pull relay 41 under the hood and crank the engine to depressurize your fuel system. Curse, swear, and eventually remove the fuel lines from the fuel pump "simply" pinching the clip and pulling the hose off. Rust gets stuck between the clip and the line, so I ended up wiggling them until the lines broke off; that made removing the lines from the fittings a bit easier. My AC Delco fuel pump didn't come with the plastic clips, so save your old ones. Use that pneumatic hammer we talked about earlier, and knock the retaining ring off. I think this job would have been impossible without it because of the space constraints. The specialized tool to take off the ring may have worked, but I cut a hole in the floorboard of my TB. You think I buy specialized tools??? NOTE: Before and after removing the ring, I vacuumed off all of the rust and crescent-shaped pieces of metal. Using the hammer will knock a lot of rust off. You don't want that in your tank.

View attachment 90954

I was a bit worried about being able to pull the pump out of the tank, but with the ring removed, the pump pulled out easily.

View attachment 90957

Pretty clean!

View attachment 90953

Install your new pump and lock ring. I wouldn't reuse that old, rusty ring. Again, the pneumatic hammer was a necessity. Reconnect the fuel lines and electrical connector. Start your truck to see if gasoline is spewing out like before. It's not. Success!

View attachment 90955

Paint the edges of the floorboard that you cut so it doesn't rust, then use a nibbler to cut some sheet metal of similar thickness to a little bigger than the hole. Paint it, don't wait for it to dry completely (because who doesn't like paint covered fingers?), put a bead of RTV around the hole, and pop a few rivets in. Self-tappers would work as well, but just make sure they're short.

View attachment 90956

Replace the padding and carpet. I used some sticky tape to stick the carpet together where I cut. Reinstall the trim pieces and rear seat, and you're done!

Thumb your nose at the internet who said it couldn't be done.

Let the "you're gunna die" comments begin.

What year was this done on? Want to do the one on my 03 TB.
 
Feb 15, 2021
1
Valencia, Venezuela
Hi Catnipe, how did your fuel pump hatch modification end up? Did you have the chance to take pictures of the pump location in yours?
I also own a '07 TB and am seriously considering to add this hatch. I'll appreciate any help.
 

Forum Statistics

Threads
23,273
Posts
637,499
Members
18,472
Latest member
MissCrutcher

Members Online