- Dec 12, 2011
- 4,659
I know there are a few threads going over the replacement of the lower ball joints, I don't want to take anything away from other members' how-to's and with that being said, alot of this came from tips of said members but I think I took a different approach this time and wanted to share.
I went with the MOOG K6663 LBJ's and used the 23 piece set from Advance Auto Parts.
Before you start this process, I recommend spraying the axle nut and the top of the lower ball joints with some PB Blaster the day before and let it soak.
There will be pics from both sides but the process is the same.
First step is to loosen the axle nut and remove it until the nut is just passed the threads of the shaft, leave the tire on the ground for this.


To lessen the chance of damaging the nut, I used a piece of 2x4 to break the axle loose..it took a few good whacks.

Raise the vehicle to a good working height, prob a little more than normal and support with a jack stand, remove tire and place under frame for safety.
Remove the speed sensor clip here.

Remove the brake hose support using a 10MM wrench/socket.

Continue removing the speed sensor wire from the supports and place it aside.

At this point you want to have the steering wheel centered.
I used an adjustable rubber cargo strap, this type doesn't stretch as much as the other types, and a length of chain with two S-hooks from another cargo strap and they both fit inside the hole above the strut mount. The arrow shows where I attached the chain but I first set it to this length then set it aside for later. The chain will not allow the knuckle to fall off the LBJ if attached, the cargo strap just takes the weight off.
Route the strap and chain under the upper control arm.

I am going to leave everything attached to the steering knuckle just to avoid removing excess parts. Granted this way is heavier to move around but worked out just fine. You could also remove the caliper and bracket as a whole and the rotor to make the knuckle easier to move around but that choice is yours.
Attach the rubber cargo strap to the lower caliper bolt.

Loosen the nut below the lower ball joint until the threads are no longer visible, the nut is a 24MM but I found that a 15/16" socket fit more snug. Place a jack under the lower control arm as shown.

Take a small sledge hammer and hit the nut until it pops. Then raise the jack a few more inches after the joint stops pulling from the lower control arm.
[video=youtube_share;2iGYfSgZEUw]http://youtu.be/2iGYfSgZEUw[/video]
At this point, remove the bolt from the upper control arm.

This video shows me removing the assembly from the lower ball joint.
[video=youtube_share;aGdTzrE6NMo]http://youtu.be/aGdTzrE6NMo[/video]
After you set the assemby aside, turn the steering wheel in the direction of the side you are working on, this will pull the assembly away from the joint.
Now you need to take a chisel and knock the tabs back into the joint. I used a shorter chisel, about 6" and it works, but on the rear tab a longer chisel about 10" would have worked better. Using a shorter chisel you need to tap it at a higher angle or have someone hold the knuckle assembly away from the LCA. If you do this turn the steering wheel to gain access.
[video=youtube_share;32G1EkgDIN0]http://youtu.be/32G1EkgDIN0[/video]
I was blessed with a shiny new set, so if everything was put back in the proper location for everyone else, these are the ones you need.

The receiver cup rests under the two tabs on the lower control arm, make sure the threaded portion of the ball joint is through the hole on the bottom. Just use the threaded portion of the clamp to push it out. You will need a 1/2" breaker bar 24" in length, a longer one will work but the 24" will fit in the fender well. The press uses a 22MM socket.

You will know when it releases.
[video=youtube_share;poiq0IYmv-o]http://youtu.be/poiq0IYmv-o[/video]
Clean up the bore of the LCA and I applied a thin film of lube.


These are the two pieces to install the LBJ.

Remember, the less adapters you use, the less chance of it pressing in crooked. The left side went in good with the install cup under the LBJ, the right side kept going in crooked. For the right, I removed the boot from the LBJ and used the hole in the clamp which was large enough to not damage anything.
Before placing the LBJ in the bore, note the orientation of the boot.

Use this adapter to get it started and to drive it most of the way, you will feel resistance when the LBJ contacts the adapter about 1/8" from the top.

Ready to go.

You don't want this to happen, if so, tap it out on the edge of the LBJ and try again.

Once you drive the LBJ up to the adapter, add this ring above the LBJ to finish the install.

Install snap ring and position the zerk fitting to gain access, just don't position it directly facing the engine.

I added a dab of grease to the lower control arm.

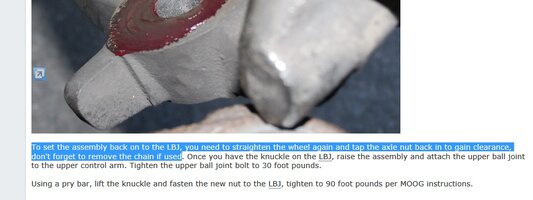
To set the assembly back on to the LBJ, you need to straighten the wheel again and tap the axle nut back in to gain clearance, don't forget to remove the chain if used. Once you have the knuckle on the LBJ, raise the assembly and attach the upper ball joint to the upper control arm. Tighten the upper ball joint bolt to 30 foot pounds.
Using a pry bar, lift the knuckle and fasten the new nut to the LBJ, tighten to 90 foot pounds per MOOG instructions.

This is where the nut stopped at 90 foot pounds.

When you tighten the lower nut to 90 foot pounds and the hole is obstructed, you must further tighten until the hole is unobstructed.

Install cotter pin.

Reattach brake support bracket, then the speed sensor wire.
Fill the LBJ with grease until you see the boot start to swell.
Reinstall wheel, tighten lugs to 100 foot pounds.
Lower vehicle and tighten axle nut to 103 foot pounds.
Stand up and stretch the back.
I went with the MOOG K6663 LBJ's and used the 23 piece set from Advance Auto Parts.
Before you start this process, I recommend spraying the axle nut and the top of the lower ball joints with some PB Blaster the day before and let it soak.
There will be pics from both sides but the process is the same.
First step is to loosen the axle nut and remove it until the nut is just passed the threads of the shaft, leave the tire on the ground for this.
To lessen the chance of damaging the nut, I used a piece of 2x4 to break the axle loose..it took a few good whacks.
Raise the vehicle to a good working height, prob a little more than normal and support with a jack stand, remove tire and place under frame for safety.
Remove the speed sensor clip here.
Remove the brake hose support using a 10MM wrench/socket.
Continue removing the speed sensor wire from the supports and place it aside.
At this point you want to have the steering wheel centered.
I used an adjustable rubber cargo strap, this type doesn't stretch as much as the other types, and a length of chain with two S-hooks from another cargo strap and they both fit inside the hole above the strut mount. The arrow shows where I attached the chain but I first set it to this length then set it aside for later. The chain will not allow the knuckle to fall off the LBJ if attached, the cargo strap just takes the weight off.
Route the strap and chain under the upper control arm.
I am going to leave everything attached to the steering knuckle just to avoid removing excess parts. Granted this way is heavier to move around but worked out just fine. You could also remove the caliper and bracket as a whole and the rotor to make the knuckle easier to move around but that choice is yours.
Attach the rubber cargo strap to the lower caliper bolt.
Loosen the nut below the lower ball joint until the threads are no longer visible, the nut is a 24MM but I found that a 15/16" socket fit more snug. Place a jack under the lower control arm as shown.
Take a small sledge hammer and hit the nut until it pops. Then raise the jack a few more inches after the joint stops pulling from the lower control arm.
[video=youtube_share;2iGYfSgZEUw]http://youtu.be/2iGYfSgZEUw[/video]
At this point, remove the bolt from the upper control arm.
This video shows me removing the assembly from the lower ball joint.
[video=youtube_share;aGdTzrE6NMo]http://youtu.be/aGdTzrE6NMo[/video]
After you set the assemby aside, turn the steering wheel in the direction of the side you are working on, this will pull the assembly away from the joint.
Now you need to take a chisel and knock the tabs back into the joint. I used a shorter chisel, about 6" and it works, but on the rear tab a longer chisel about 10" would have worked better. Using a shorter chisel you need to tap it at a higher angle or have someone hold the knuckle assembly away from the LCA. If you do this turn the steering wheel to gain access.
[video=youtube_share;32G1EkgDIN0]http://youtu.be/32G1EkgDIN0[/video]
I was blessed with a shiny new set, so if everything was put back in the proper location for everyone else, these are the ones you need.
The receiver cup rests under the two tabs on the lower control arm, make sure the threaded portion of the ball joint is through the hole on the bottom. Just use the threaded portion of the clamp to push it out. You will need a 1/2" breaker bar 24" in length, a longer one will work but the 24" will fit in the fender well. The press uses a 22MM socket.
You will know when it releases.
[video=youtube_share;poiq0IYmv-o]http://youtu.be/poiq0IYmv-o[/video]
Clean up the bore of the LCA and I applied a thin film of lube.
These are the two pieces to install the LBJ.
Remember, the less adapters you use, the less chance of it pressing in crooked. The left side went in good with the install cup under the LBJ, the right side kept going in crooked. For the right, I removed the boot from the LBJ and used the hole in the clamp which was large enough to not damage anything.
Before placing the LBJ in the bore, note the orientation of the boot.
Use this adapter to get it started and to drive it most of the way, you will feel resistance when the LBJ contacts the adapter about 1/8" from the top.
Ready to go.
You don't want this to happen, if so, tap it out on the edge of the LBJ and try again.
Once you drive the LBJ up to the adapter, add this ring above the LBJ to finish the install.
Install snap ring and position the zerk fitting to gain access, just don't position it directly facing the engine.
I added a dab of grease to the lower control arm.
To set the assembly back on to the LBJ, you need to straighten the wheel again and tap the axle nut back in to gain clearance, don't forget to remove the chain if used. Once you have the knuckle on the LBJ, raise the assembly and attach the upper ball joint to the upper control arm. Tighten the upper ball joint bolt to 30 foot pounds.
Using a pry bar, lift the knuckle and fasten the new nut to the LBJ, tighten to 90 foot pounds per MOOG instructions.
This is where the nut stopped at 90 foot pounds.
When you tighten the lower nut to 90 foot pounds and the hole is obstructed, you must further tighten until the hole is unobstructed.
Install cotter pin.
Reattach brake support bracket, then the speed sensor wire.
Fill the LBJ with grease until you see the boot start to swell.
Reinstall wheel, tighten lugs to 100 foot pounds.
Lower vehicle and tighten axle nut to 103 foot pounds.
Stand up and stretch the back.