hvac actuators and dash removal

The_Roadie

Lifetime VIP Donor
Member
Nov 19, 2011
9,957
Portland, OR
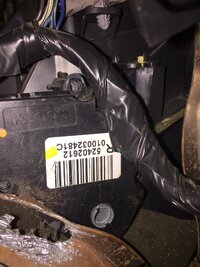
The part number may have been superseded, but any place like Rockauto or Parts4chevys.com should have the replacement number listed if you look up the one in my picture. I heard 2002 has some rogue part numbers that don't match mine. Those have been posted in various threads about actuators, but I've been too lazy to update my drawing. But you don't have a 2002.

The left section of the HVAC plenum assembly, with the driver's temp actuator on the left and the passenger temp actuator on the right, is right behind the radio. So the three actuators on the left are to the left of the radio, but to the right of the gauge cluster.
 

nospark

Member
Feb 20, 2012
28
Hazelwood MO
Well I'm doing this again. Need time machine as stated in earlier post. This time I can have defrost, or dash air/heat. Nothing on my feet. I like the diagram Roadie posted enough to print and file for future use. Thanks. I believe I need "Floor/Dash vent mode actuator" as printed in Red. If so which Blue printed part number would that be? Is there a difference as they seem to look alike? As often as we need to disconnect battery for servicing and maintenance it would be nice to keep the heat/ ac part powered sense there appears to be no permanent fix coming. Like a temporary alternate 12v power source tapped in after the rear under seat fuse, then pull fuse to isolate.:undecided: Hummm? Thanks for your help
 

The_Roadie

Lifetime VIP Donor
Member
Nov 19, 2011
9,957
Portland, OR
By a process of functional elimination you need the Airflow Mode actuator.

Many folks have considered a battery substitute gadget plugged into the accessory outlet to allow the modules to retain their memory. My preference is to find out sooner rather than later if you have a weak actuator, so you can replace it under controlled conditions rather than find out on a cold winter stormy night after running your battery down accidentally and you get a jump start - then you find you have no defrost, or heat, or whatever. Bad actuators deserve to die. :cool:
 
  • Like
Reactions: Mektek

jfkmk

Member
Mar 7, 2013
91
I just replaced the airflow mode actuator on my 06 Envoy this weekend, and can vouch for the AC-Delco part number in the Roadie's diagram. Thanks to everyone's posts on this forum, and especially the Roadie's diagram and tips, the job only took about 30 minutes. I would suggest buying the part in advance, though. I did it as a last-minute job, and paid a premium for the part at the stealership. However, considering the money I saved, I was OK with spending a couple of extra bucks for the part.

One thing you'll notice is that the new part may have the white external gear in a different position than the old one. You can simply change the position of the gear on the HVAC unit, not the actuator, and pop it right on.

Also, I've read in one of these posts to tape the screw onto the socket to get it started onto the actuator when reinstalling it. Sound advice! Worked great for me.

Hopefully the other actuators last longer. I'm not sure I'm ready to tear apart my dash to the extent the Roadie has in some of the pics he's posted!
 

cjshark

Member
Nov 29, 2013
1
My heat stopped working on my driver side. However, still works on my passenger side. I have narrowed it down to the Driver side temp actuator or also called the air temperature actuator-left. I have looked at various sites to get good step-by-step instructions on how to replace the Driver side temp actuator. I have seen one for the Mood door Actuator but not for the Driver side temp actuator. Can anyone help? I would greatly appreciate it.
Also I believe the Driver side temp actuator replacement part number is a Doorman Part# 604111 but not really sure. I usually buy my parts from Advanced Auto because they are local and I only see Tech Smart HVAC Air Inlet Door Actuator Part No. F04016, Tech Smart HVAC Air Inlet Door Actuator Part No. F04015, Tech Smart HVAC Floor Mode Door Actuator Part No. F04021, and ACDelco Air Inlet Actuator Part No. 15-73599. I am not really sure which part number it is that I need to buy to replace the Driver Side Temp Actuator. Can anyone shed some light on this?
 

meerschm

Member
Aug 26, 2012
1,079
cjshark said:
My heat stopped working on my driver side. However, still works on my passenger side. I have narrowed it down to the Driver side temp actuator or also called the air temperature actuator-left. I have looked at various sites to get good step-by-step instructions on how to replace the Driver side temp actuator. I have seen one for the Mood door Actuator but not for the Driver side temp actuator. Can anyone help? I would greatly appreciate it.
Also I believe the Driver side temp actuator replacement part number is a Doorman Part# 604111 but not really sure. I usually buy my parts from Advanced Auto because they are local and I only see Tech Smart HVAC Air Inlet Door Actuator Part No. F04016, Tech Smart HVAC Air Inlet Door Actuator Part No. F04015, Tech Smart HVAC Floor Mode Door Actuator Part No. F04021, and ACDelco Air Inlet Actuator Part No. 15-73599. I am not really sure which part number it is that I need to buy to replace the Driver Side Temp Actuator. Can anyone shed some light on this?

Look at Roadie's diagram. may be a dash in one reference or another in the middle of the number

I changed the drivers side actuator, and pulled most of the dash and console out to get to it. I took a shortcut and just lifted the main dash instead of pulling the steering column to get it all the way out.

there are some good procedures online, and the service manual helps.

basic procedure is to remove parts, try to remember where everything goes, and then put it back with a minimum of extra leftover parts.

good luck.
 

The_Roadie

Lifetime VIP Donor
Member
Nov 19, 2011
9,957
Portland, OR
I seem to remember my diagram was only good for 2003+. 2002 was a rogue year in terms of the radio head units and the HVAC actuators, and the TCCM. If my memory serves, somebody back on trailvoy discovered, or or more of the HVAC actuators even rotated backwards from the later years. The actuator would install and calibrate itself, but either the airflow mode was wrong or the temp control was reversed.

There's something odd about 2002 that made my diagram not apply.

Check out these threads back at the old site:
HVAC blend door actuator - Chevy TrailBlazer, TrailBlazer SS and GMC Envoy Forum
HVAC Mode Door actuator Update - Chevy TrailBlazer, TrailBlazer SS and GMC Envoy Forum
Another homemade HVAC mode door actuator puller tool for 2002 Trailblazers - Chevy TrailBlazer, TrailBlazer SS and GMC Envoy Forum
 

bh29621

Member
Sep 19, 2013
1
I just replaced the mode acutator in my 04 Envoy. I took out the floor duct that runs to the left side but can't remember how / where it goes back in. Does anyone have a pic of this thing installed that they would share?

Thanks in advance.

Bruce
 

Up And Down

Member
Oct 25, 2012
126
I have read these threads about weak actuators in the past and never gave it too much thought. I always just figured that if one of them went bad, I could make do by using the others. Now, reading Roadies post, I am under the impression that if a certain actuator fails, I will lose all heat and defrost. Am I understanding this correctly? This is scary wth the bad winters we have here in New England coupled with the need for me to disconnect the battery a lot of times when I do repairs on this 165k mile vehicle. Thanks for the replies.
 

Up And Down

Member
Oct 25, 2012
126
The_Roadie said:
It would have been so easy for the designers to have one actuator and accommodate them mechanically.... But noooooo.
So am I understanding correctly Roadie that if I lose 1 certain actuator I will lose both heat and defrost? Scary situation here in the Boston area during the winter if that is the case.
 

The_Roadie

Lifetime VIP Donor
Member
Nov 19, 2011
9,957
Portland, OR
There are five actuators, left and right temperature, recirculate, floor/dash vents, and defrost. Functions are separate. Statistically, for some odd reason, the airflow mode actuator (floor/dash vent selection) is responsible for about 2/3 of all failures. I'd worry about losing your blower before an actuator failure. You lose everything when the blower quits.
 

Up And Down

Member
Oct 25, 2012
126
Thanks Roadie. It's good to know that I won't be stuck in the middle of a snowstorm with no heat or defrost at all because of a bad actuator. As far as the blower motor goes, I agree completely as I have replaced it twice already.
 

TBLS

Member
Dec 29, 2013
1,075
I am having problems with my air only blowing out of defrost mode a feet mode. Plus my air will blow cold with the AC on only for a limited time (while moving down the road) once I stop moving a come to an idle my air gets warm (like the heater is on). Plus the air won't blow out when the speed is set and 1 and 5 (completely shuts off). Can someone tell me what my problems are please? I've read through here and don't see where my problem may fit and I apologize if its a repeat.

Thank you ahead of time for the advice.
 

The_Roadie

Lifetime VIP Donor
Member
Nov 19, 2011
9,957
Portland, OR
You have potentially three problems. The blower speed issue is a bad resistor pack or harness. Good article exists on changing that. The inability to get airflow out the dash vents is an airflow mode actuator failure. Also been discussed now you know the right search term. The AC getting warm could be many things, but the first thing to do is see if the AC system is actually delivering cold refrigerant when you stop moving and idle - feel the silver can called the receiver/drier on the firewall on the passenger side of the engine compartment. If it's not frosty, take the truck to a professional AC mechanic for a pressure check.
 
  • Like
Reactions: TBLS and BHAMER

TBLS

Member
Dec 29, 2013
1,075
The_Roadie said:
You have potentially three problems. The blower speed issue is a bad resistor pack or harness. Good article exists on changing that. The inability to get airflow out the dash vents is an airflow mode actuator failure. Also been discussed now you know the right search term. The AC getting warm could be many things, but the first thing to do is see if the AC system is actually delivering cold refrigerant when you stop moving and idle - feel the silver can called the receiver/drier on the firewall on the passenger side of the engine compartment. If it's not frosty, take the truck to a professional AC mechanic for a pressure check.
Thank you much appreciated.
 

JustGreg

Member
Jun 23, 2015
3
This is an old post and wondering if still supportable by the pros.
I just got a 2004 TB 4.2 that has a great engine, trans, and very good condition 'bones'. I put a lot into it so far, time and money, and am down to small stuff. One of those items is the actuator problem this platform is plagued by.
I've read posts until I'm blind and still haven't found definitive answers to 2 things.
1) Are the actuators different part numbers based on the side of the enclosure they're installed in. e.g., left/right
2) To satisfy the failure I'm experiencing; passenger vents only blowing hot, I'm unclear which actuator on the right of the HVAC plenum to order.

I admit I haven't stuffed my 6'4" 245lb ass down in there yet. I had back surgery number 4 on March 2014 that resulted in a fusion and busting on it for two weeks installing a whole new front suspension has me a 'tad' wrecked. I want to save what little I have left of it for actually getting in there and fixing it. Gathering parts beforehand is therefore critical.

FYI: I tried the B fuse pull and recal but no joy.

Thanks up front for any replies, and for the years the regulars have into building this excellent repository of information.
 
  • Like
Reactions: Sib

Sparky

Member
Dec 4, 2011
12,927
Passenger vent only blowing hot tells me it is the passenger side temp actuator. It doesn't share the same part as the driver side, it is different. It does however share the same part number as the recirculation actuator if you have the auto system (manual system uses a different one).

AC Delco 15-73597 according to the diagram I'm looking at on page 1. Looks like it is under 30 bucks from Amazon as well.
 
  • Like
Reactions: JustGreg

JustGreg

Member
Jun 23, 2015
3
Hey thanks for replying Sparky! I totally forgot to mention it's manually controlled with the vertical L/R sliders.

OK cool. I have the graphic with the part numbers so off to Amazon I go. While waiting for it I'm removing the passenger front seat to make it easier on the 'ole back. Gotta save some for the next 2 projects...thermostat (gauge 2 ticks below 210) and a new water pump.
Thanks again man!
 

JustGreg

Member
Jun 23, 2015
3
Thanks for the reply Tiggerr. That's exactly why I'm changing it. If I hadn't read a post about that I would never have decided to change it.
I love that the t-stat failsafes in open position but a lot of cats probably died because the design runs counter to most peoples experiences.
2.5-3 hours tho!...I curse you GM! I initially thought the water pump would be the hardest until I read a thousand posts.
Overall I'm having a blast working on my TB tho!
 

dmyers4321

Member
Apr 1, 2015
8
Chattanooga
Curious question, to which search function didn't answer:

When purchasing a replacement left side temp actuator, what is the "bottom cover" which some include ($138) and some do not ($34)?
is this something that can be transferred from the old one to the new, and save $100?
 

Sparky

Member
Dec 4, 2011
12,927
Not sure. Maybe they are referring to the kick panel? I just got only the actuator when I did my mode actuator (which by the way is a Dorman and only a year later started making clicking just like the old did every so often).
 
  • Like
Reactions: dmyers4321
Apr 13, 2012
4
hello everyone,
I'm having an issue now where the driver side would blow out heat the same as the passenger side then it would blow cold air after a while. and sometimes the dash vents don't seem to be blowing full strength. I've replaced the mode actuator a few years ago and had worked fine. I was wondering if it could be the control unit telling the actuators to open and close wrong.
thanks for the help
ps I used this article when I replaced the mode door actuator.
 

Amy

Member
Feb 11, 2016
15
salt lake city, utah
The heater core and AC heat exchanger are inside the plenum unit, so removing it involves plumbing and evacuation of the AC refrigerant. Easier to cut metal bracing than that.

As the old joke goes, on the car assembly line, they put the heater core on a little pedestal. Then the entire vehicle gets assembled around that seed.
I really wished I had read this thread first. I have already disassembled pretty much everything. I have one heater hose to unhook and I am having a hard time with it. Quick easy release is not so quick and easy. If there are any suggestions out there I would really love to hear them. Getting frustrated.
Amy
 

droos

Member
Jun 4, 2016
1
Beaufort, SC
For about a year my driver's side dash vents on my '04 TB have been blowing hot when the AC is on. I decided to dive in and try to fix it. I have the dash panels removed but cannot get the actuator out. The screws are out. I have been wiggling the actuator in various positions but it won't release. I can't see it but it seems like it won't release from the shaft. Any suggestions? Do I need to mangle the bracket to get clearance? Any help would be appreciated. It is June in South Carolina so it's hot and getting hotter.
 

Mooseman

Moderator
Dec 4, 2011
25,257
Ottawa, ON
It should just pull straight out. Maybe it's just stuck to the shaft. You did remove all 3 screws?
 

linneje

Member
Apr 26, 2012
404
You don't want to break that shaft. It is probably stuck to the shaft. When I did my rear I had to wiggle and shake to get it off the shaft and use a screwdriver to hold the shaft down. Hopefully you have enough access to do that. If all three screws are out, it is only to get it off the shaft now.
 

Texan

Member
Jan 14, 2014
622
@droos Welcome to the site. About two years ago, a fellow made
a homemade puller out of a chain link (U shaped with a threaded
thumb screw that he got at a Home Depot). I have no idea how to
find that thread without a lot of searching.
 

Shdwdrgn

Member
Dec 4, 2011
568
Can someone help me with the part number for the actuator that controls the floor/dash mode? Roadie's pic on the first page doesn't seem to list that one. When I turn my fans all the way up, I get a bit of air out of the top, a bit more down by my feet, and never anything at all from the front dash vents. Temperatures and defrost mode all work good, so I think that just leaves the floor/dash mode actuator, if I could just find the part number?

And someone please tell me this isn't the one that requires pulling apart the whole dash?
 

Mooseman

Moderator
Dec 4, 2011
25,257
Ottawa, ON
It's the one marked as mode actuator in the 3rd post of this thread. And no, it's on the left side and accessible.
 

Shdwdrgn

Member
Dec 4, 2011
568
Oh, you mean the very first number listed? :smile: Got it, thank you! Part ordered, now hopefully my back will stop hurting by the time it gets here (so that I can hurt it again!)
 

Mooseman

Moderator
Dec 4, 2011
25,257
Ottawa, ON
I hear ya. Fellow back pain sufferer here too. Pills and heat.
 

Shdwdrgn

Member
Dec 4, 2011
568
All right, while I'm searching for an answer maybe I'll get lucky and someone sees my post... I have the old actuator out (yes I'm sure I got the right one), but I don't see anything wrong with it. Popped it open, no problem with any of the gears. I did see mention of a 'weak' actuator possibility though, so I'm just going to put the new one in and see if it works...

One problem... how do you line up the gears? How can you even tell if they're lined up when there's no possible way to actually see them once the new actuator is in place?

[EDIT] Oh and by the way, it seems the gear in the dash wants to fall all the way in one direction. Seems like that should make it easy, but that doesn't really tell me what position the white gear should be in to put the actuator back in place.

[EDIT 2] FINISHED! I'll try and post a pic later, however there are markings on the body of the actuator that correspond to a notch in the center shaft. Because my vent was falling all the way in one direction, I had to rotate the actuator to the mark on the left of center (counter-clockwise). This was done by popping the tabs around the case so I could take the top off, then rolling the motor and worm gear off the first gear. This freed up the large outside white gear so I could rotate it in position. Then it was just a matter of fiddling with getting the gears together under the dash and lining up the actuator with the mounting holes. One system-reset later and I have full control of all the vent positions again!
 
Last edited:

OUZELFALLS

Member
Jul 7, 2016
7
Lake Zurich, IL
Take off the dash trim panels. Dremel with cut-off wheel. Die grinder with burr bit. Drill lots of little holes and twist off the parts left behind. Lots of ways. Be creative. Depends on what tools you have in stock and what you're willing to buy to add to your kit. :wootwoot:
Today, I replaced the passenger side actuator (P/N 15-73597) on my 2004 Trailblazer EXT. I drilled many holes in the bracket to get at the screw that was hidden behind the bracket. That was a lot of work to find out that the bracket was still blocking me from removing the actuator...(ugggh!) I used my buddy's Dremel but, because of the angles, could not cut thru the bracket successfully. The Dremel did at least give me notchs on both ends of the bracket. Fortunately , I have a Milwaukee Sawsall. Using a short "Diablo" metal cutting blade, it was fast work to cut out the bracket. I did have to be very careful not to go wild and destroy the section where the glove box frame is attached. It was not pretty but I now have a clear shot a the actuator if I ever have to replace it again. Here's some pictures (picture 1 shows the actuator blocked by the bracket, pic 2 shows the sections of the bracket I cut out). Kudo's to the GM engineers on their far-sightedness in making it so easy to get this part out. I guess placing a bracket to block the actuator breeds innovative ways us DYS'ers come up with to get around their engineering "nasterpieces".
 

Attachments

  • Actuator_motor.JPG
    Actuator_motor.JPG
    370.6 KB · Views: 28
  • bracket pieces.JPG
    bracket pieces.JPG
    835.4 KB · Views: 29

mrrsm

Lifetime VIP Donor
Supporting Donor
Member
Oct 22, 2015
7,639
Tampa Bay Area
Welcome to GMT Nation...

You've probably thought of this already... But using a Strong Neodymium Magnet dragged around all over the work floor spaces underneath the Dash Board and around on the Passenger Floor Board areas will help to pick up and keep much of those Rusty, Sharp Metal Cast-Off Pieces from eventually getting picked up and stuck to anyone's Bare Feet:

NEODYMIUMAGNET.jpg
 
Last edited:

OUZELFALLS

Member
Jul 7, 2016
7
Lake Zurich, IL
Today, I replaced the passenger side actuator (P/N 15-73597) on my 2004 Trailblazer EXT. I drilled many holes in the bracket to get at the screw that was hidden behind the bracket. That was a lot of work to find out that the bracket was still blocking me from removing the actuator...(ugggh!) I used my buddy's Dremel but, because of the angles, could not cut thru the bracket successfully. The Dremel did at least give me notchs on both ends of the bracket. Fortunately , I have a Milwaukee Sawsall. Using a short "Diablo" metal cutting blade, it was fast work to cut out the bracket. I did have to be very careful not to go wild and destroy the section where the glove box frame is attached. It was not pretty but I now have a clear shot a the actuator if I ever have to replace it again. Here's some pictures (picture 1 shows the actuator blocked by the bracket, pic 2 shows the sections of the bracket I cut out). Kudo's to the GM engineers on their far-sightedness in making it so easy to get this part out. I guess placing a bracket to block the actuator breeds innovative ways us DYS'ers come up with to get around their engineering "nasterpieces".
Thanks...now that I got the passenger side vents working properly, I think I got another actuator on the drivers side on the blink. The car's 14 years old, had the battery disconnected many times so I'm not surprised others are not working. I'm probably going to replace all the drivers side actuators rather than doing them piece-meal.I'm a rookie--will keep trying!
 
  • Like
Reactions: Mooseman

mrrsm

Lifetime VIP Donor
Supporting Donor
Member
Oct 22, 2015
7,639
Tampa Bay Area
Have a look at this Legacy Thread for some good visuals further down in the Thread with similar guidance and some additional Part Number vs. Location of Actuator Data that is Right On Topic:


Mektek

Member
May 2, 2017
656
FL
I can't seem to get the old accuator to come out. I've been able to remove the two screws holding it in but can't get the unit out. It seems loose but possibly the exterior gear assembly is holding it in. Anyone have this problem? I'm thinking I might be able to take the cover off the unit and release it that way. Any suggestions?
I tried wiggling it and pulling but it would not release. I had to fabricate a puller that fit around the actuator to press the shaft out. Its a plastic shaft and if you pull too hard it can crack which would be disastrous.
 

Forum Statistics

Threads
23,271
Posts
637,476
Members
18,472
Latest member
MissCrutcher

Members Online