- Dec 20, 2011
- 434
Difficulty: Medium to medium easy
Estimated time: 3 hrs? probably faster
Part numbers:
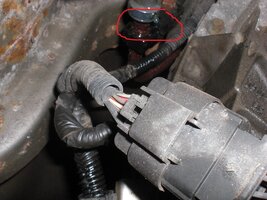
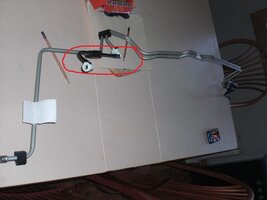
The nice thing about these lines is that they have all new clips in the female connectors. In fact there is only one clip that you need to worry about, the female one that comes from the fuel tank. Now, the area I have circled in red is different from the line I pulled out of my system, and gave me a bit of a panic moment. When I bought my part, I never actually looked at that section, I only looked at the end that plugs into the fuel rail, and the ends that plug into the fuel tank connectors. By the way, it looks to me like the regular and EXT version both use same exact part numbers. I'll go in a little more detail later on that circled in red part.
So here is the fuel line disconnect tool that I bought:
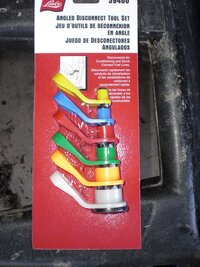
I used the blue size. You need to use it on the end that plugs up near the fuel rail:
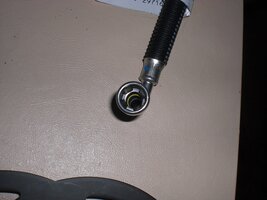
It pushes those metal clips in, then you can seperate it. There are videos on youtube that you can watch like I did if you want on exactly how to use it, it's very easy. I like how they are made of plastic, no chance of metal scraping causing a spark, never a good thing around gasoline, right?
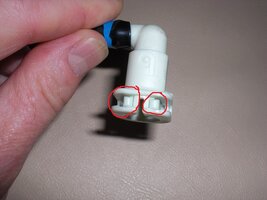
How the connector clips work. Here is a shot of the female end. Basically there is a "U" shaped clip inside the connector. What I have circled in red are the leg ends of the "U".
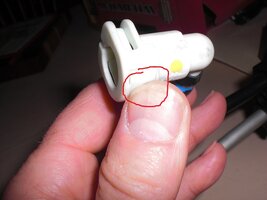
The other side of the "U", where the bend is. You push on that, and the legs spread open, allowing the male end to insert or withdraw. And yes I know this is sounding X rated, but it's really how it all works. Here I am pushing on the curved part of the U:
Here is a shot of the male end of the line:
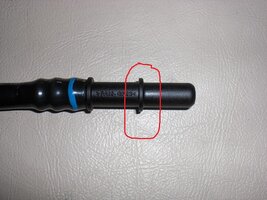
See the ridge part that I circled in red? For a properly fastened fuel line, that ridge has to be in past the "U" legs of the female clip. If it's in right, you will see a picture like i have above showing the ends of the legs.
Now, with brand new clips and connectors, you can easily do this with your fingers. With clips that have been on a vehicle over 10 years, you might need a little help. I used needle nose pliers to help push in the curvy part of the U. Also, if there is any pressure from the male ridge on on the legs of the U, you might not spread the legs at all when you push on the curve part, resulting in a broken clip. If you have spare clips it's no big deal. NAPA sells them. But they come in 3 sizes, so get the right ones! Since I have 277,000 miles on my EXT, and have changed the fuel sender and pump units a couple of times, I was used to these little devils. I've even pried the legs apart for stubborn lines, but you better have replacement clips handy if you go that route.
For best results, push in on the male connector first, then push down on the curvy part of U, then pull out the male end. Jiggling it out can help as well. It's very easy to let up on the curvy part of U without realizing it, you have to chew gum and walk at the same time here, so just remember to keep pushing hard as you work the end out. Otherwise you will break the clip!
Ok, now on to pulling out the lines, and some notes:
I put the front of my vehicle up on ramps to give me room to work with.
You should relieve the fuel pressure in the lines. Mine leaked so bad that just by turning the key off I was depressurized in 30 seconds, but I followed the procedure anyway. Pull out the fuel relay in your fuse box, here I am pointing to mine: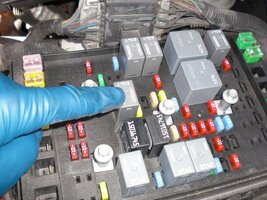
Then crank your engine a bit. (try and start, it will just crank)
Then remove the 2 nuts and 2 bolts holding on the PCM:
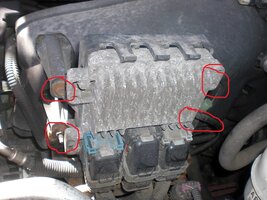
The ones on the right are hidden, but not when you work on them. Once you do that, you can slide the PCM off to give you room. I suppose you could get even more room by disconnecting the 3 connectors there as well, but I was able to do my job by just moving this thing around still connected. That purple connector in the lower section of the pic, I disconnected that one as well and moved it out of the way.
Here is a shot of the line partially out:
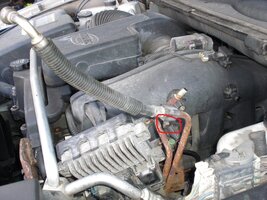
That part in red, I just pulled out with some muscle, it popped right off.
Now this next picture, showing the hose in red:
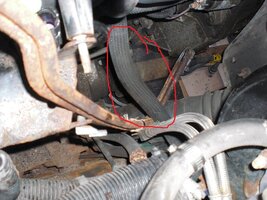
You could probably make this easier by disconnecting that as well. But it's very flexible and I just moved it around.
By the way, there is a pcv hose? rubber, that I did disconnect and moved off to the side, it's up higher and just held on with a ring clamp.
Underneath the vehicle, watch out for this part:
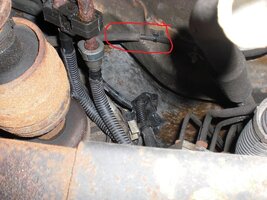
That part circled in red might be the line that connects to the parking brake, or transmission selector. Either way the fuel lines are above that, you have to thread them out so they end up below at some point, like I am showing in my picture. Now, the fuel lines have some nylon ends down here, and they are flexible, but you can still ruin them if you aren't careful. I bent my old line pulling it out, but only because I did a 90 turn with those nylon ends. If I had been more patient it would have come out nicer. But it was getting replaced so I didn't care.
Anyway, just take your time and be patient. Here is a shot of my lines basically out, they are hanging loose:
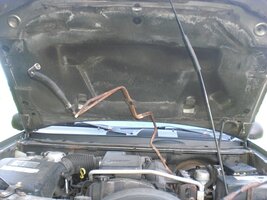
One note I remember, I turned the line 180 degrees to get it out near that point. So when the new ones go in, I flipped them around 180, put in, and then at some point flipped them back 180 to finish installing.
On installing the new lines, I covered the ends in plastic and duct tape to keep crud from going in:
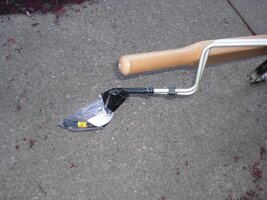
Although it was a bit of a pain getting that stuff off once installed.
Now, here is where my panic moment happened. I got the lines in the vehicle, and then when I went to connect them, I noticed I had 2 female ends to connect. WTF! There is another line you have to remove:
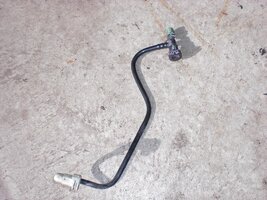
The green end you'll see near the PCM, it must be some kind of test port? When you pull this line off, the new line will connect where the white connector is. Now, this isn't really easy to get to from the top, but I was able to get to it from the bottom by reaching up with my left arm. Fortunately it's in a pretty safe spot from the elements, and I was able to squeeze and disconnect with one hand, my non dominant left arm, and I only weight about 140 lbs.
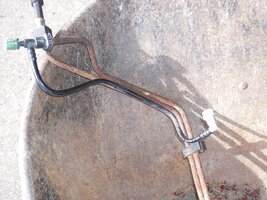
Another shot of both older sets of lines that were removed:
Estimated time: 3 hrs? probably faster
Part numbers:
So here is the fuel line disconnect tool that I bought:

I used the blue size. You need to use it on the end that plugs up near the fuel rail:

It pushes those metal clips in, then you can seperate it. There are videos on youtube that you can watch like I did if you want on exactly how to use it, it's very easy. I like how they are made of plastic, no chance of metal scraping causing a spark, never a good thing around gasoline, right?
How the connector clips work. Here is a shot of the female end. Basically there is a "U" shaped clip inside the connector. What I have circled in red are the leg ends of the "U".

The other side of the "U", where the bend is. You push on that, and the legs spread open, allowing the male end to insert or withdraw. And yes I know this is sounding X rated, but it's really how it all works. Here I am pushing on the curved part of the U:

Here is a shot of the male end of the line:

See the ridge part that I circled in red? For a properly fastened fuel line, that ridge has to be in past the "U" legs of the female clip. If it's in right, you will see a picture like i have above showing the ends of the legs.
Now, with brand new clips and connectors, you can easily do this with your fingers. With clips that have been on a vehicle over 10 years, you might need a little help. I used needle nose pliers to help push in the curvy part of the U. Also, if there is any pressure from the male ridge on on the legs of the U, you might not spread the legs at all when you push on the curve part, resulting in a broken clip. If you have spare clips it's no big deal. NAPA sells them. But they come in 3 sizes, so get the right ones! Since I have 277,000 miles on my EXT, and have changed the fuel sender and pump units a couple of times, I was used to these little devils. I've even pried the legs apart for stubborn lines, but you better have replacement clips handy if you go that route.
For best results, push in on the male connector first, then push down on the curvy part of U, then pull out the male end. Jiggling it out can help as well. It's very easy to let up on the curvy part of U without realizing it, you have to chew gum and walk at the same time here, so just remember to keep pushing hard as you work the end out. Otherwise you will break the clip!
Ok, now on to pulling out the lines, and some notes:
I put the front of my vehicle up on ramps to give me room to work with.
You should relieve the fuel pressure in the lines. Mine leaked so bad that just by turning the key off I was depressurized in 30 seconds, but I followed the procedure anyway. Pull out the fuel relay in your fuse box, here I am pointing to mine:

Then crank your engine a bit. (try and start, it will just crank)
Then remove the 2 nuts and 2 bolts holding on the PCM:

The ones on the right are hidden, but not when you work on them. Once you do that, you can slide the PCM off to give you room. I suppose you could get even more room by disconnecting the 3 connectors there as well, but I was able to do my job by just moving this thing around still connected. That purple connector in the lower section of the pic, I disconnected that one as well and moved it out of the way.
Here is a shot of the line partially out:

That part in red, I just pulled out with some muscle, it popped right off.
Now this next picture, showing the hose in red:

You could probably make this easier by disconnecting that as well. But it's very flexible and I just moved it around.
By the way, there is a pcv hose? rubber, that I did disconnect and moved off to the side, it's up higher and just held on with a ring clamp.
Underneath the vehicle, watch out for this part:

That part circled in red might be the line that connects to the parking brake, or transmission selector. Either way the fuel lines are above that, you have to thread them out so they end up below at some point, like I am showing in my picture. Now, the fuel lines have some nylon ends down here, and they are flexible, but you can still ruin them if you aren't careful. I bent my old line pulling it out, but only because I did a 90 turn with those nylon ends. If I had been more patient it would have come out nicer. But it was getting replaced so I didn't care.
Anyway, just take your time and be patient. Here is a shot of my lines basically out, they are hanging loose:

One note I remember, I turned the line 180 degrees to get it out near that point. So when the new ones go in, I flipped them around 180, put in, and then at some point flipped them back 180 to finish installing.
On installing the new lines, I covered the ends in plastic and duct tape to keep crud from going in:

Although it was a bit of a pain getting that stuff off once installed.
Now, here is where my panic moment happened. I got the lines in the vehicle, and then when I went to connect them, I noticed I had 2 female ends to connect. WTF! There is another line you have to remove:

The green end you'll see near the PCM, it must be some kind of test port? When you pull this line off, the new line will connect where the white connector is. Now, this isn't really easy to get to from the top, but I was able to get to it from the bottom by reaching up with my left arm. Fortunately it's in a pretty safe spot from the elements, and I was able to squeeze and disconnect with one hand, my non dominant left arm, and I only weight about 140 lbs.
Another shot of both older sets of lines that were removed:


