Hi everyone, this is my first post so I figured I'd make it a helpful one!
I've seen a few posts on how to do this but none that were detailed or showed step-by-step pictures.
So here's my shot at helping some people…
HOW TO REMOVE FRONT DASH VENTS ACTUATOR
Tools Needed
- flat head screwdriver, or pry tool
- ratchet (extensions will help too)
- 7mm socket
- 5.5mm socket
- flashlight
- PATIENCE
View attachment 22283
Step 1
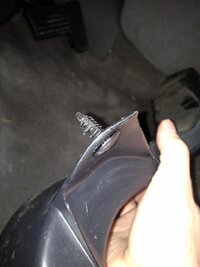
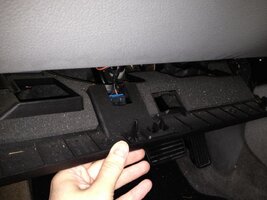
Below the steering wheel you will see a big wide panel, the knee bolster. Directly below that you will find the OBD2 connector bolted to a long black plastic panel. Remove the (2) 7mm bolts that hold the OBD2 connector in place.
View attachment 22285
Then move to the outer edges of the same panel and remove an additional (2) 7mm bolts, one on the left, the other on the right.
View attachment 22287
Carefully pry down this black panel a few inches. It is held on by a clip in the center. Feed out the OBD2 connector from behind the panel and let it hang.
View attachment 22288
On the left you will find two more sets of wire connections that are held on by clips. Remove these and let them hang as well.
View attachment 22290
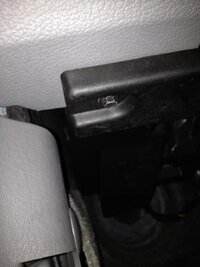
Remove the black panel completely out of the way.
View attachment 22291
Step 2
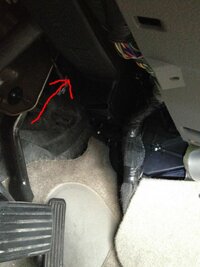
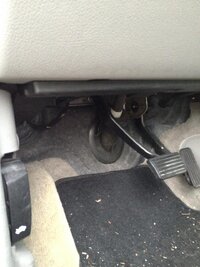
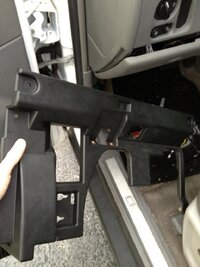
The last thing in your way is the long black plastic air duct over the pedals.
View attachment 22274
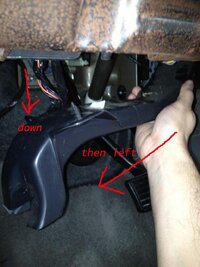
This is held in place by a panel retainer clip on the left side. Pry off the left side of the duct downwards then pull the entire thing to the left and it should just come off.
View attachment 22276
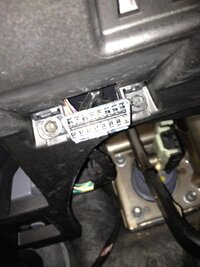
You will then see the cavity that the duct connected to on the right side.
View attachment 22277
Now comes the fun part...
Step 4
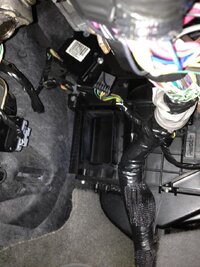
Time for a quick check. Grab your flashlight and sit on the edge of the floor on the driver’s side. Lean backwards to look up at the ceiling and lay on the floor (you may want to remove your mat). Scoot up near the pedals. (I did not have to remove the pedals, but different body and head types might need to.) Shine the flashlight up into the darkness and you’ll see two different actuators, as shown in the pictures.
View attachment 22278
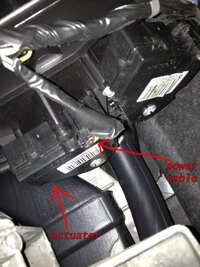
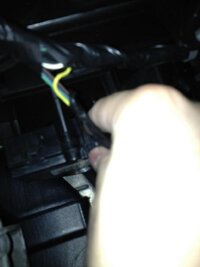
The one we want is on the left. If you are not sure then while laying down, you can turn your car on to the ACC position and let the actuators adjust while you touch them. When you feel the “clicking” along with hearing the sound, you know you have the right one. Remove the power cable (held on by clip). If you turn on the car to ACC again the clicking should be gone (if you disconnected the correct actuator).
View attachment 22279
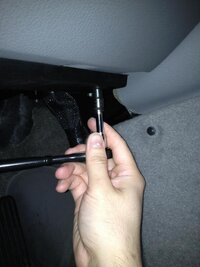
Step 5
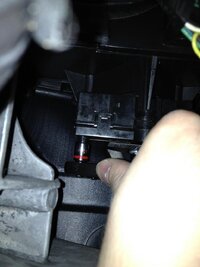
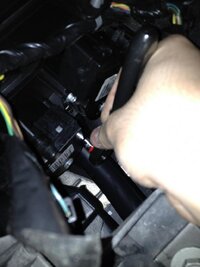
Now its time to take it out. I spent a few minutes just feeling the actuator all around . Since vision is limited it is a good idea for your hands to “know” where the bolts are. Grab your ratchet (having a small one helps A LOT) and your 5.5mm socket and feel around for the bolts. A lot of the work can only be done with one hand. PATIENCE. There are two bolts on opposite sides. One of them is really hard to get to, the other one is not too bad. This can be very frustrating but keep on feeling and trying. If you don't wear glasses it might be a good idea to either put on goggles or look away as you loosen the bolts so they don't come off and accidentally fall into your eyes.
View attachment 22281
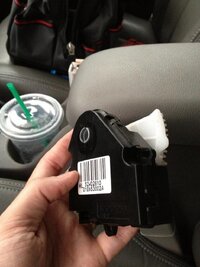
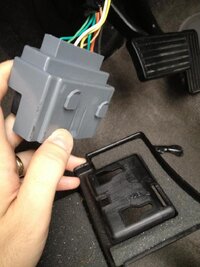
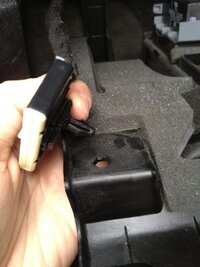
Once both bolts are removed the actuator should come right off with little effort.
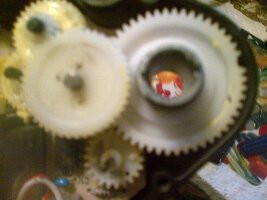
This is what the damn thing looks like:
View attachment 22282
From here you can either
- attempt to fix your actuator (if its not broken)
or
- replace it (if it is broken).
Then reverse the steps to put everything back together. The hardest part will be re-attaching the new (or fixed) actuator and getting the bolts back into place.
I hope this helps at least one person! And I hope to enjoy it here! Thanks!
I've seen a few posts on how to do this but none that were detailed or showed step-by-step pictures.
So here's my shot at helping some people…
HOW TO REMOVE FRONT DASH VENTS ACTUATOR
Tools Needed
- flat head screwdriver, or pry tool
- ratchet (extensions will help too)
- 7mm socket
- 5.5mm socket
- flashlight
- PATIENCE
View attachment 22283
Step 1
Below the steering wheel you will see a big wide panel, the knee bolster. Directly below that you will find the OBD2 connector bolted to a long black plastic panel. Remove the (2) 7mm bolts that hold the OBD2 connector in place.
View attachment 22285
Then move to the outer edges of the same panel and remove an additional (2) 7mm bolts, one on the left, the other on the right.
View attachment 22287
Carefully pry down this black panel a few inches. It is held on by a clip in the center. Feed out the OBD2 connector from behind the panel and let it hang.
View attachment 22288
On the left you will find two more sets of wire connections that are held on by clips. Remove these and let them hang as well.
View attachment 22290
Remove the black panel completely out of the way.
View attachment 22291
Step 2
The last thing in your way is the long black plastic air duct over the pedals.
View attachment 22274
This is held in place by a panel retainer clip on the left side. Pry off the left side of the duct downwards then pull the entire thing to the left and it should just come off.
View attachment 22276
You will then see the cavity that the duct connected to on the right side.
View attachment 22277
Now comes the fun part...
Step 4
Time for a quick check. Grab your flashlight and sit on the edge of the floor on the driver’s side. Lean backwards to look up at the ceiling and lay on the floor (you may want to remove your mat). Scoot up near the pedals. (I did not have to remove the pedals, but different body and head types might need to.) Shine the flashlight up into the darkness and you’ll see two different actuators, as shown in the pictures.
View attachment 22278
The one we want is on the left. If you are not sure then while laying down, you can turn your car on to the ACC position and let the actuators adjust while you touch them. When you feel the “clicking” along with hearing the sound, you know you have the right one. Remove the power cable (held on by clip). If you turn on the car to ACC again the clicking should be gone (if you disconnected the correct actuator).
View attachment 22279
Step 5
Now its time to take it out. I spent a few minutes just feeling the actuator all around
. Since vision is limited it is a good idea for your hands to “know” where the bolts are. Grab your ratchet (having a small one helps A LOT) and your 5.5mm socket and feel around for the bolts. A lot of the work can only be done with one hand. PATIENCE. There are two bolts on opposite sides. One of them is really hard to get to, the other one is not too bad. This can be very frustrating but keep on feeling and trying. If you don't wear glasses it might be a good idea to either put on goggles or look away as you loosen the bolts so they don't come off and accidentally fall into your eyes.View attachment 22281
Once both bolts are removed the actuator should come right off with little effort.
This is what the damn thing looks like:
View attachment 22282
From here you can either
- attempt to fix your actuator (if its not broken)
or
- replace it (if it is broken).
Then reverse the steps to put everything back together. The hardest part will be re-attaching the new (or fixed) actuator and getting the bolts back into place.
I hope this helps at least one person! And I hope to enjoy it here! Thanks!
Attachments
-
 IMG_1742.jpg86.4 KB · Views: 37
 -
 IMG_1757 copy.jpg77.1 KB · Views: 35
 -
 IMG_1759.jpg50.4 KB · Views: 35
 -
 IMG_1770.jpg90.4 KB · Views: 36
 -
 IMG_1750 copy.jpg94.2 KB · Views: 33
 -
 IMG_1751.jpg33.6 KB · Views: 34
 -
 IMG_1761.jpg63.9 KB · Views: 32
 -
 IMG_1766.jpg53.8 KB · Views: 34
 -
 IMG_1767.jpg80.5 KB · Views: 35
 -
 IMG_1786.jpg93.6 KB · Views: 42
 -
 IMG_1734.jpg94.9 KB · Views: 36
 -
 IMG_1738.jpg73.5 KB · Views: 37
 -
 IMG_1735.jpg66.5 KB · Views: 36
 -
 IMG_1737.jpg71.4 KB · Views: 34
 -
 IMG_1739.jpg82.5 KB · Views: 37
 -
 IMG_1772.jpg81.2 KB · Views: 34
 -
 IMG_1773.jpg84.1 KB · Views: 35
 -
 IMG_1740.jpg70 KB · Views: 39

 !!!
!!!