Summary: How to Read ABS/TCCM/PCM Codes Using a Terminal OBDii Interface
Difficulty: Easy (mechanically), but medium computer skills are required
Estimated Time: 30 minutes for first time, 10 minutes subsequent times
Tools Required: Personal computer with Windows 7 (or ability to adapt instructions for use with other operating system), Bluetooth OBDii adapter (or wired adapter again with ability to adapt instructions), wOBD software (free online)
This article will explain how to use a PC running Windows 7 with a Bluetooth OBDii adapter in order to communicate with the PCM and other modules (TCCM, ABS, and airbag). The first section outlines how to set up your computer to communicate with the vehicle and the second section outlines the specific commands involved in retrieving DTCs. This information is applicable to other computer platforms and hardwired OBDii interfaces as well, but this will require adaptation. Some members may have access to software that has the same functionality as that described here. The instructions in Section 2 below are still applicable in using this other software.
Note: This article will work for older GM models that use the J1850 VPW OBDii protocol. This information may apply to newer vehicles that use the CAN protocol, but the headers will need to be modified. I do not have a CAN vehicle and do not know the headers that would need to be used. If someone posts them I (or a mod) can add that information to the article and make this complete even for the newer models.
Setting Up Your Computer and OBDii Adapter
1. Download wOBD from OBD2 Software (this is free software). Install the application to your computer.
2. Pair your computer with your Bluetooth OBDii adapter. This process will vary depending on your computer and Bluetooth software. It will require you to have the adapter plugged in to the OBDii port in the vehicle and your computer to be in range of the adapter.
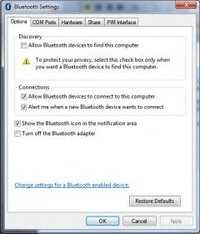
3. After pairing, go to Bluetooth settings in the control panel. The window should look something like this:
4. Click on the “COM Ports” tab, then click the “Add…” button.
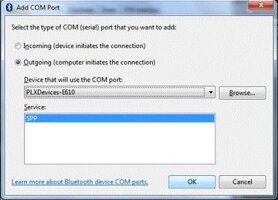
5. Choose an “Outgoing” connection, choose your Bluetooth OBDii adapter to use, then press “OK”.
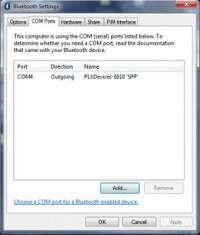
6. On the Bluetooth settings window, note the COM port assigned to your Bluetooth adapter (COM4 in the example image below).
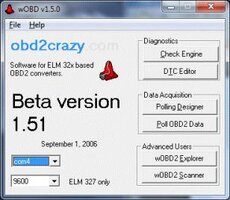
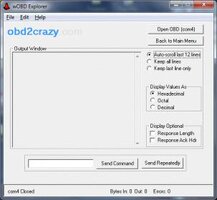
7. Open wOBD and select the COM port corresponding to your Bluetooth adapter (again, COM4 in this example).
8. Click on the “wOBD2 Explorer” button.
9. Select the options that you prefer (I prefer to keep all lines showing, which is not the default option).
10. When ready, press the “Open OBD” button. Commands will be typed into the text box near the bottom of the dialog, and are sent by pressing the “Send Command” button. Commands will be discussed below.
Communicating With Your Vehicle
1. To read DTCs, send the following commands:
2. Send one of the following commands:
2. The response should should be similar to: "6C F1 XX 59 ZZ ZZ YY", where XX is the same as the code for the module as above, ZZ ZZ represents the desired DTC, and YY can be ignored.
3. To interpret the DTC, take the first number and convert it as follows:
4. Then, add the next three numbers to complete the DTC. As an example, if the message received is “6C F1 10 59 01 72 17”, the numbers of note would be “01 72”. The 0 converts to a P0 followed by 172, which is combined to be code P0172.
5. To clear codes, send the following commands:
Response should be “6C F1 XX 54”.
Note: codes can only be cleared after they have been requested as described above. A clear command cannot be sent before requesting codes.
Difficulty: Easy (mechanically), but medium computer skills are required
Estimated Time: 30 minutes for first time, 10 minutes subsequent times
Tools Required: Personal computer with Windows 7 (or ability to adapt instructions for use with other operating system), Bluetooth OBDii adapter (or wired adapter again with ability to adapt instructions), wOBD software (free online)
This article will explain how to use a PC running Windows 7 with a Bluetooth OBDii adapter in order to communicate with the PCM and other modules (TCCM, ABS, and airbag). The first section outlines how to set up your computer to communicate with the vehicle and the second section outlines the specific commands involved in retrieving DTCs. This information is applicable to other computer platforms and hardwired OBDii interfaces as well, but this will require adaptation. Some members may have access to software that has the same functionality as that described here. The instructions in Section 2 below are still applicable in using this other software.
Note: This article will work for older GM models that use the J1850 VPW OBDii protocol. This information may apply to newer vehicles that use the CAN protocol, but the headers will need to be modified. I do not have a CAN vehicle and do not know the headers that would need to be used. If someone posts them I (or a mod) can add that information to the article and make this complete even for the newer models.
Setting Up Your Computer and OBDii Adapter
1. Download wOBD from OBD2 Software (this is free software). Install the application to your computer.
2. Pair your computer with your Bluetooth OBDii adapter. This process will vary depending on your computer and Bluetooth software. It will require you to have the adapter plugged in to the OBDii port in the vehicle and your computer to be in range of the adapter.
3. After pairing, go to Bluetooth settings in the control panel. The window should look something like this:
4. Click on the “COM Ports” tab, then click the “Add…” button.
5. Choose an “Outgoing” connection, choose your Bluetooth OBDii adapter to use, then press “OK”.
6. On the Bluetooth settings window, note the COM port assigned to your Bluetooth adapter (COM4 in the example image below).
7. Open wOBD and select the COM port corresponding to your Bluetooth adapter (again, COM4 in this example).
8. Click on the “wOBD2 Explorer” button.
9. Select the options that you prefer (I prefer to keep all lines showing, which is not the default option).
10. When ready, press the “Open OBD” button. Commands will be typed into the text box near the bottom of the dialog, and are sent by pressing the “Send Command” button. Commands will be discussed below.
Communicating With Your Vehicle
1. To read DTCs, send the following commands:
ATH1
ATSH 6C XX F1 (replace XX with 28 for ABS, 40 for the BCM, 10 for PCM 58 for air bag, or F1 for TCCM)
2. Send one of the following commands:
19 D2 FF 00 (for current and pending codes)
19 C2 FF 00 (for current codes)
19 FF FF 00 (for all codes)
2. The response should should be similar to: "6C F1 XX 59 ZZ ZZ YY", where XX is the same as the code for the module as above, ZZ ZZ represents the desired DTC, and YY can be ignored.
3. To interpret the DTC, take the first number and convert it as follows:
4. Then, add the next three numbers to complete the DTC. As an example, if the message received is “6C F1 10 59 01 72 17”, the numbers of note would be “01 72”. The 0 converts to a P0 followed by 172, which is combined to be code P0172.
5. To clear codes, send the following commands:
ATSH 6C XX F1 (replace XX with the code of the module responsible for the DTC; see codes above)
14
Response should be “6C F1 XX 54”.
Note: codes can only be cleared after they have been requested as described above. A clear command cannot be sent before requesting codes.