Engine no acceleration

JayArr

Member
Sep 24, 2018
504
Mission BC Canada
hook up your shop vac to it and see if the shop vac complains (changes tone).

It looks OK to me, mine was almost solid.

The other thing to do is backlight your camera. Dro a flashlight in one end facing the cat and look through it. If you can see the light on most of the area it's OK. Mine was about 99% blocked, you could only see light in a few pinholes.
 

Uncleenvoy

Original poster
Member
Feb 12, 2020
545
Ny
Just picked this up for 200bux at home depot..gonna make the work go so much faster now..no more crying about my missing air compressor..really good deal..the impact alone no batt is 170bux..the only thing is this impact is the 450 torque one..i wanted to get the 2767-20 FUEL model with 1400 torque but this will do for now..my cordless walmart drill just wasn't doing it for me
 

Attachments

  • 20201117_092329.jpg
    20201117_092329.jpg
    369.8 KB · Views: 2
  • Like
Reactions: BrianF

Uncleenvoy

Original poster
Member
Feb 12, 2020
545
Ny
@NJTB already got it soaking in some purple and water..gonna let it sit while i drill out those broken exhaust bolts..then pressure wash it out and reinstall
 

Attachments

  • 20201117_103059.jpg
    20201117_103059.jpg
    430.6 KB · Views: 3
  • 20201117_102736.jpg
    20201117_102736.jpg
    445.2 KB · Views: 3
  • Like
Reactions: BrianF

Uncleenvoy

Original poster
Member
Feb 12, 2020
545
Ny
Sorry got busy again this week and also had that doctors appointment..last thing i did was Wednesday which consisted of me drilling on the snapped exhaust bolt for hours..its been treacherous..even went and bought a new corded drill and still giving trouble..i was able to drill a hole through the bolt but the remnats are still in the hole..had to slice the head off with the multitool..i got this grinder bit delivered yesterday hopefully is small enough to get in there and grind out the leftover bolt..and thats just one of them..still have some business to take care of today but hopefully ill be done b4 it gets dark and get on her later
 

Uncleenvoy

Original poster
Member
Feb 12, 2020
545
Ny
Cant upload pics..sais file is too large for server..is this on my end or sumthing wrong with site?
 

gmcman

Member
Dec 12, 2011
4,656
When I upload pics, I use a screenshot of the image which is significantly smaller than the original camera file.
 

Uncleenvoy

Original poster
Member
Feb 12, 2020
545
Ny
I tried uploading some old pics from previous posts and got the same message..that bucket of purple for example.
 

Mooseman

Moderator
Dec 4, 2011
25,347
Ottawa, ON
I just tried it from my phone and it also said it was too large. That was supposed to have been fixed a long time ago. When that happens, I email the pics to myself reducing them and then post them using the computer.

And I'm also having issues with timeouts and slowness on the site.
 

JayArr

Member
Sep 24, 2018
504
Mission BC Canada
I tell this to everyone who has trouble with old snapped bolts. You need a TORCH.

I know a full Acetylene kit is expensive and out of reach for a lot of guys so consider a small MAPP/OXY setup. They use mapp gas which burns hotter than propane to begin with and then they have oxygen to make it even hotter. The kits are about $79 including the first two cylinders.

I used one for years, it was made by Bernz O Matic. The cylinders are the same size as a tall propane one and are a bit pricey and don't last very long. It's easy to use up both cylinders fighting exhaust bolts so buy a couple extras.

To save on oxygen turn the torch on Mapp gas only first and heat the body as much as you can with just the mapp then turn on the oxygen to heat it even higher. Get an old candle and when the bolt is hot press the candle against it so that it melts and the wax will flow down into the threads. It sounds wacky that wax will get in the threads and help it come out but it does, try it and see for yourself.

The first time you heat up a frozen bolt for 2 minutes with a torch and then turn it out with a pair of pliers you'll smile from ear to ear. What can take hours with a drill can take 5 minutes with a torch.
 
  • Like
Reactions: mrrsm and BrianF

Uncleenvoy

Original poster
Member
Feb 12, 2020
545
Ny
@JayArr got a model,part number or link for that setup? I actually looked up oxyacetylene kits the other night..lowes had a small portable kit for 300 and somethin iirc.. @Mooseman im experiencing lags and wierd behavior as well..thought it was my phone
 
Last edited:

mrrsm

Lifetime VIP Donor
Supporting Donor
Member
Oct 22, 2015
7,737
Tampa Bay Area
Or perhaps this Kit with (Oxygen, Mapp Gas, Propane Fuel and Brass Mini-Torch) that has the Adjustment Knobs on the Mini-Torch handle vs. having to struggle with working them on the separate Bottles:

$65.00 with FREE S&H on Amazon:


BERNZOMATICTORCHKIT.jpgBERNZOMATICTORCHKIT1.jpg
 
  • Like
Reactions: BrianF

gmcman

Member
Dec 12, 2011
4,656
Just to clarify my last post, if you take a screenshot on your cell phone of your camera image, the resulting image is in the KB, not MB, maybe 1/10 the size.
 

Uncleenvoy

Original poster
Member
Feb 12, 2020
545
Ny
Im just now getting back to work on her and after 10 seconds of use..returnville
 

Attachments

  • 20201124_111435.jpg
    20201124_111435.jpg
    432.3 KB · Views: 13
  • 20201121_085224.jpg
    20201121_085224.jpg
    539.5 KB · Views: 13
  • Sad
Reactions: Mooseman

Uncleenvoy

Original poster
Member
Feb 12, 2020
545
Ny
Good old fashioned hand file and elbow grease..i ordered that oxygen/mapp setup that @MRRSM suggested its supposed to be here tmrw so im not gonna stress myself out tackling this second bolt..i already got the tanks from lowes yesterday. hopefully it comes early enough to get some work in
 

Attachments

  • 20201124_125319.jpg
    20201124_125319.jpg
    374 KB · Views: 10
  • 20201124_125832.jpg
    20201124_125832.jpg
    405.3 KB · Views: 11
  • 20201124_152238.jpg
    20201124_152238.jpg
    182.1 KB · Views: 8

Uncleenvoy

Original poster
Member
Feb 12, 2020
545
Ny
Maybe ill put the cat and crossmember back in the meantime if it doesn't look like it will get in the way of heating that bolt
 

Uncleenvoy

Original poster
Member
Feb 12, 2020
545
Ny
These just came..gonna throw them on real quick..buyer wanted new ones 88bux for the pair rock auto..power no auto dim no turn signal
 

Attachments

  • 20201124_152350.jpg
    20201124_152350.jpg
    421.7 KB · Views: 12
  • 20201124_152336_HDR.jpg
    20201124_152336_HDR.jpg
    375.2 KB · Views: 11
  • 20201124_152520.jpg
    20201124_152520.jpg
    281.8 KB · Views: 11

mrrsm

Lifetime VIP Donor
Supporting Donor
Member
Oct 22, 2015
7,737
Tampa Bay Area
Cool Beenz... Make Damned Certain to AVOID ALLOWING THE OXYGEN LEVEL IN THE FLAME TO GET TOO HIGH.... Or it will start to Cut Through the Adjacent Cast Iron... LIKE BUTTER. Temper your approach by 
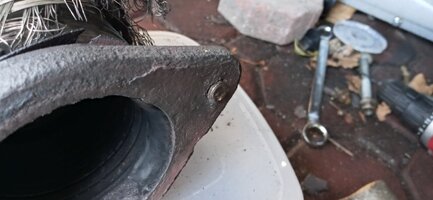
Constantly Moving the Tiny Brass Torch Nozzle around the Threaded Hole Perimeter (NOT Directly onto the BOLT). This action will bring those areas surrounding the Broken Bolt up to an Incandescent Glow in order to allow the Cast Iron to expand away from the Bolt.

BUT... IF YOU BEGIN TO SEE 'BRIGHT WHITE SPARKLERS' COMING OFF THE WORK PIECE... IMMEDIATELY BACK THE FLAME AWAY AND LOWER THE
OXYGEN LEVEL. You WILL require Welder's Glasses even for Non-Electric Welding as in this case because the Torch Brightness will still become Blinding to you while you're concentrating your Vision over the Flame Spot on the work piece. DO NOT SKIP THIS STEP!

NEVER, EVER SPRAY
BRAKE-KLEEN OR ANY SOLVENT CONTAINING POLY-TETRA-FLUORINE-ETHYLENE (TEFLON) ON ANYTHING BEING HEATED WITH A TORCH AS THESE SUBSTANCES WILL COMBUST AND CONVERT INTO PHOSGENE GAS AT AROUND 900 DEGREES FAHRENHEIT. ONE WHIFF OF THIS STUFF CAN KILL YOU!


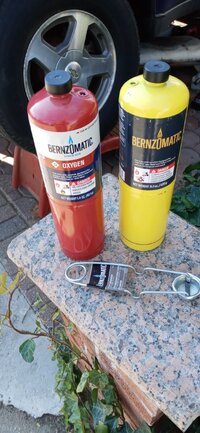
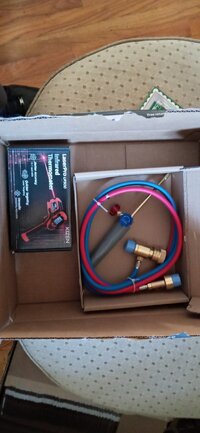
Please know that the O2 will run out fairly quickly ...the MAPP Gas? Not So Much... whenever using those Small Red OXYGEN Bottles, so prepare your Work Area, solidly secure the Work Piece and have your Tools arranged in such a way that you won't need to keep the Torch Turned ON for an unnecessary time frame while trying to find & figure things. And 
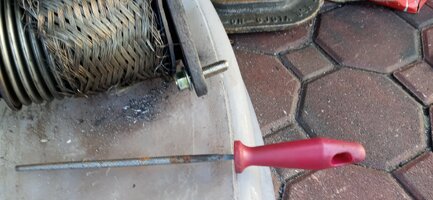
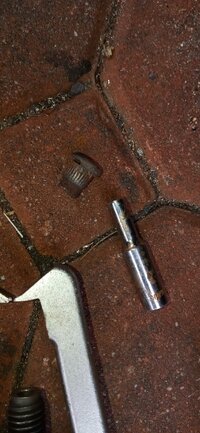
as suggested by @JayArr... Use a Fat, 'Hurricane Candle' to touch in and around the Broken Bolt Piece, as it will work its way into and around the Rust Frozen Threads.

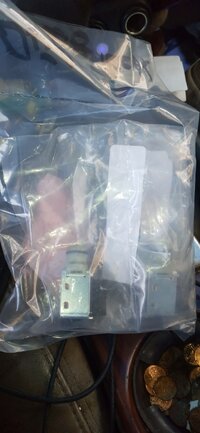
When you are done, TURN OFF THE
OXYGEN Adjuster Knob FIRST ...then do the MAPP Gas. DO NOT LEAVE THE TORCH-HOSES-FITTINGS ATTACHED TO GAS CYLINDERS. Snug up the Adjuster Knobs (Don't Over-Tighten them) and unthread the O2 Bottle FIRST and then use some Spit on your finger to glob over the Schrader Fitting on the Top of the Bottle to ensure that it is NOT Leaking. Do likewise with the MAPP Gas Brass Fitting-Hose and Store these two bottles on different shelves if you do not have a Bottle Caddy. Coil and secure the Torch and Hose Combo inside of a 2 Gallon Zip-Lok Baggie to prevent the Brass Fittings Cork Seals from getting damaged and having any dirt contamination getting all over the Kit.

Optimally... (Courtesy Duane and Company from "RealFixesRealFast"... THIS is how this work should proceed:


Don't forget to Wear Heavy Leather Work Gloves when working on removing the Bolt to avoid getting stabbed in the fingers or burned should your Grip on the Pliers-Channel Locks slip and you accidentally make contact with that 'Bag of Snakes' of Broken Flex Wires on that Work Piece.
 
Last edited:
  • Like
Reactions: BrianF

Uncleenvoy

Original poster
Member
Feb 12, 2020
545
Ny
Ok..thanks..it didnt show up today..got the "sorry your package is running late blah blah blah" when i checked..now sais friday or saturday.
 
  • Like
Reactions: mrrsm

Uncleenvoy

Original poster
Member
Feb 12, 2020
545
Ny
@MRRSM One problem I'm forseeing here after watching that vid..this here is the type of stud/bolt thats stuck in there now...gm part # 15756879.looking at that design i dont think its meant to spin inside the flange..hope the heat and wax lossen it enough to press it out..and i gotta figure out a way to keep flange from moving..that accordion type area under the "bag of snakes wires" really bends and flexes so hammer and punch wont work and i wont be able to grab and hold it with left hand while applying force with the right like i did whilst drilling out the first bolt
 

Attachments

  • s-l400.jpg
    s-l400.jpg
    12.2 KB · Views: 4

mrrsm

Lifetime VIP Donor
Supporting Donor
Member
Oct 22, 2015
7,737
Tampa Bay Area
Ordinarily... those need to be Pressed, Hammered Out or Drilled Out and replaced using the New GM OEM Studs and Brand New Nuts ...then gradually pulled tight in using a Medium Power Setting on an Impact Gun with a Parkerized, Impact Grade Socket and covered with a Lubed, Hardened Steel Washer-Nut Combo.

The Optional Solution is to Drill out the Stud and Tap the Hole to metric size of a Dorman HELP! Threaded Stud Kit that includes the Threaded Studs (BOTH Ends) and Locking Nuts (NOT Ny-Locks) necessary to re-create their presence and locations on Cast Iron Flange. You'll need to Mike the Inside Diameter of any Drilled Out positions and be very careful NOT to use a Drill Bit that is TOO BIG lest they exceed the OD-ID of the Bolt Locking Splines.

Look these over and choose only the ones that are appropriate for your GM Vehicle:


DORMANSTUDKIT.jpg

About the Need to Secure the Work Piece... Look around the Yard for some Scrap Wood and 2"X4" and get some Long Screws to wedge the remaining Flex Tube and opposite end firmly enough so you can step on one end of that rig and Pin it to the Ground. Be creative and avoid getting the wood pieces too close to the Torch Heat and start a Fire. Burnz-O-Matic makes Small Fiberglass Blankets that can be used to shield the 'wood-work' from all of that Heat.
 
Last edited:

JayArr

Member
Sep 24, 2018
504
Mission BC Canada
I just bought three stainless bolts/washers/nuts from the guy at the parts counter and they worked great. I think the press fit bolts have more to do with speeding up the assembly line than anything else. Once the car is out in the world there doesn't appear to be enough payoff for the added work required to duplicate it. (plus you're selling this car)

You can speed up the removal of the old bolt by filing or grinding the metal flange close to the hole, grind down until you have fresh shiny steel. Then aim your flame at the freshly ground patch. Rust is a poor conductor of heat so a freshly ground spot will give you maximum transfer from the flame to the work, it will also reduce the sparklies you get as rust particles heat up and launch themselves.

Also remember: the hottest part of the flame is the tip, watch some youtube is you need a refresher, pushing your flame in so that the tip of the flame disappears is just a waste of gas, it's colder in the center of the flame. just the tip of the flame should contact the metal.

Jeff
 

Uncleenvoy

Original poster
Member
Feb 12, 2020
545
Ny
Thanx for the advice..i bought these dormans from advanced thats one of them in the hole here that i got done..they should be fine.
 

Attachments

  • 11252660_rnb_03423_pri_larg.jpg
    11252660_rnb_03423_pri_larg.jpg
    15.3 KB · Views: 6
  • 20201124_125319.jpg
    20201124_125319.jpg
    374 KB · Views: 7

Uncleenvoy

Original poster
Member
Feb 12, 2020
545
Ny
Cane today..forgot i ordered this thermometer too..probably why it came late so they could ship them together..gonna go buy some sanding tips for this multitool i picked up for 40bux off Craigslist..not the fuel one but for 40bux in box never used.. cant beat that...model 2426-20.. 60 on ebay 100 @ home depot
 

Attachments

  • 20201127_093847.jpg
    20201127_093847.jpg
    248 KB · Views: 8
  • 20201127_100035_HDR.jpg
    20201127_100035_HDR.jpg
    374 KB · Views: 8

TJBaker57

Member
Aug 16, 2015
2,900
Colorado
I have one of those oscillating tools. Have found that as far as abrasive action they leave much to be desired. I have tried all manner of attachments and none have really done much. Great for plunge cutting small woodworking stuff though.
 

Uncleenvoy

Original poster
Member
Feb 12, 2020
545
Ny
@TJBaker57 yeah your correct..not much difference with the sand paper..i used the cutting edge to get a lot of what i thought was rust but turned out to be old stuck gasket material..got down to bare metal and heated it up but but still wont come out..just dont have the leverage to push it out cause i cant grab it with my hand. Just gonna drill it out like i did the other one..hopefully ive got the technique down so it wont be as hard..ill use the new multitool to cut off the head first..the old harbor freight one ive got always run out of battery..and then drill away
 

Uncleenvoy

Original poster
Member
Feb 12, 2020
545
Ny
Would you look at this..about a minute to set up and 5 seconds of drill time..and free rental from advanced..for crying out loud..smh
 

Attachments

  • 20201127_135635.jpg
    20201127_135635.jpg
    472.3 KB · Views: 11
  • 20201127_135644.jpg
    20201127_135644.jpg
    245.7 KB · Views: 11
  • Like
Reactions: BrianF and mrrsm

Uncleenvoy

Original poster
Member
Feb 12, 2020
545
Ny
Used this long 5mm socket to get the rest out..cant believe i didn't think of this earlier
 

Attachments

  • 20201127_140913.jpg
    20201127_140913.jpg
    486.3 KB · Views: 7
  • 20201127_140944.jpg
    20201127_140944.jpg
    194.7 KB · Views: 9
  • 20201127_140918.jpg
    20201127_140918.jpg
    500.2 KB · Views: 8
  • Like
Reactions: BrianF and mrrsm

Uncleenvoy

Original poster
Member
Feb 12, 2020
545
Ny
Gonna put back in the cat..heres the pre cat side after cleaning
 

Attachments

  • IMG_012.JPG
    IMG_012.JPG
    43 KB · Views: 7
  • IMG_011.JPG
    IMG_011.JPG
    44.5 KB · Views: 6
  • IMG_010.JPG
    IMG_010.JPG
    33 KB · Views: 6

Uncleenvoy

Original poster
Member
Feb 12, 2020
545
Ny
Drove up and down a few blocks a few times and by the third trip,same problem..no check engine lights but p0017 is pending..gonna go buy those shift solenoids in the morning..just gonna change both if them they're about 10 to 13 bux each i think....live data shows good 02 sensor readings...
 

Uncleenvoy

Original poster
Member
Feb 12, 2020
545
Ny
Got the shift solenoids out.did a resistance test and power test on both and they worked fine and each had 21.1 ohms..but since the problem only happens after driving a bit maybe the b one gets stuck at higher temps...headed to go pick up the new ones now..trans fluid looks really good..no burnt smell..so happy i put in that drain plug
 

Attachments

  • 20201128_080317.jpg
    20201128_080317.jpg
    374.2 KB · Views: 6
  • 20201128_085750.jpg
    20201128_085750.jpg
    538.2 KB · Views: 7
  • Like
Reactions: BrianF

TJBaker57

Member
Aug 16, 2015
2,900
Colorado
Got the shift solenoids out.did a resistance test and power test on both and they worked fine and each had 21.1 ohms..

Well that is to be expected. The P0756 code is not an electrical code. It is a performance code. That means according to the PCM the solenoids look OK from the electrical side of things but the action they are supposed to produce is not being seen so the measured gear ratios are wrong. That's when it sets this code. It expects a given gear ratio under certain conditions and it is not getting that expected gear ratio.
 

Forum Statistics

Threads
23,332
Posts
638,006
Members
18,537
Latest member
moscoreli

Members Online