Basic Questions about lights

oster200

Original poster
Member
Oct 27, 2015
47
United States
So I purchased these earlier this month http://www.amazon.com/dp/B004ZF39T0/?tag=gmtnation-20

Thing is, I realized that I probably should by HID projectors and retrofit my headlights so I don't blind oncoming traffic. So the ones I bought are supposed to fit in my 9006 headlight housing but if I get these: https://www.theretrofitsource.com/c...moto-mini-h1-7-0-projectors.html#.Vvrmakec2Uk It says that they only take H1 bulbs. The ones I got are HB4 so I would return these but are HB1 and H1 the same? I just want to change my low headlights so if I were to get the projectors from the retrofitsource they are bi-xenon, that means they are both high and low correct? I can just buy low beam HIDs and not hookup the high beam to it? By the way I'm trying to stick with the mini versions because I heard that they don't need that great deal of retrofitting. Thanks
 

dmanns67

Member
Apr 3, 2013
32,979
Ohio
H1s and HB1s are not the same bulb base. HB1 is a 9004 bulb base. You will need a H1 hid to run in the MMH1 7.0s.

Yes, bi-xenon means the projector produces a low beam and high beam function where the cutoff shield flips forward to produce a hi beam. This is done by a solenoid in the projector. If you do not want to use the high beam function of the projector, do not hook up the solenoid wires to the hi beam via a splitter.

There are no "low beam" or "high beam" HIDs, they're just HIDs.

Nothing wrong with the Morimoto Mini projectors. I am running their 6.0s in a F150 and they are great. Very easy to retro as well. Since you are buying a bi-xenon projector, I would recommend taking advantage of the high beam function as it will produce more light than your high beams with a halogen bulb.

I too have a bi-xenon projector for my low beams and I ran them for about a year without having a bulb in my high beams. The high function of a projector provides plenty of light when high beams are needed. It is very easy to hook up with a high beam splitter. You can still run a 9005 in the high beams as well as having the hi beam function of the projector.

Have you done either the cap mod or DRL killer? You will need to do one or the other due to the low beams being the DRL on our platform. Without either mod, the DRL will reduce the life of HIDs and ballasts.

Also, have you done the 4 hi or 6 hi mod yet? You will need this mod for the bi-xenon projector to function properly. As you know the low beam bulb goes out when you turn the high beams on. Without this mod, you will hear the cutoff shield flip forward, but the HIDs will turn off. If you do not plan at all to use the high beam function of the projector, then do not worry about this mod.

Not sure if you seen, but TRS sells a complete retro kit for the MMH1 7.0. Projectors, HIDs, ballasts, and relay harness. https://www.theretrofitsource.com/c...orimoto-mini-stage-3-kit-h1.html#.VvrsLOIrLIU

Dont forget to use the promo code "TRSHJ", save you 10% on your order.
 

oster200

Original poster
Member
Oct 27, 2015
47
United States
Okay cool thanks for the info!

I was planning on doing this DRL killer with the quad lights: http://www.tbssowners.com/forums/292925-post4.html

Only downside is that the kit is quite expensive. I do have another question though. Since I already have a HID kit that fits 9006 couldn't I just buy the projectors and H1 bulbs? If I understand correctly it would go 9006 -> ballasts -> H1 bulb instead of HB4 bulb? I suppose with the amount of money on the projectors and new bulb I might as well just buy that kit and return the one I got.
 

dmanns67

Member
Apr 3, 2013
32,979
Ohio
@Midnyteryder196 sells kits for DRL killer and quad lights if you are interested. Pretty reasonably priced. He does all the work, all you need to do is install.

I agree the kit is expensive. The Morimoto HID kit is $150 alone, but does come with a relay harness.

Yes, you are correct. Since you already have the Kensun HID kit, you can reuse the ballasts from that kit and just buy H1 HIDs and the projectors. That will save you a bit of cash. If you wanted to, you could just buy a set of Kensun H1s if you do not want to use Morimoto brand.

A relay harness is not necessary, but recommended to use when running HIDs.
 
  • Like
Reactions: Midnyteryder196

littleblazer

Member
Jul 6, 2014
9,267
The morimoto stuff is pretty stout. If it's out of the budget that's not a big deal. I'm not personally knowledgeable with all the brands but I know a few guys run kensun.

As for the relay harness @dmanns67 I thought our factory wiring was borderline and that made it pretty much necessary? I would personally reccomend it. It's cheap insurance for wiring harness issues.
 
  • Like
Reactions: dmanns67

dmanns67

Member
Apr 3, 2013
32,979
Ohio
The morimoto stuff is pretty stout. If it's out of the budget that's not a big deal. I'm not personally knowledgeable with all the brands but I know a few guys run kensun.

As for the relay harness @dmanns67 I thought our factory wiring was borderline and that made it pretty much necessary? I would personally reccomend it. It's cheap insurance for wiring harness issues.

I would agree in regards to the wiring being borderline, but I have ran HIDs without a harness for 3+ years without any issues. With that said, others have burnt up connectors and have had other electrical issues from not running a relay harness with HIDs.

Even if you do not get the Morimoto kit, you can still pick up a relay harness for $30. Kensun might offer a cheaper relay harness as well.

**Just checked Amazon and Kensun sells a harness for $20.
 
  • Like
Reactions: littleblazer

oster200

Original poster
Member
Oct 27, 2015
47
United States
Okay so if I just get the H1 kit from kensun will my 9006 stock connectors still fit in the ballasts? or would I get a relay harness then that connects to 9006 to the ballast kind of serving like a adapter? This is where I'm unsure of things.
 

dmanns67

Member
Apr 3, 2013
32,979
Ohio
Your 9006 connectors will fit the ballast. 9006 connectors seem to be the industry standard when it comes to PnP HID kits. Most ballasts come with the basic amp connectors which are the pig tails that plug into the pig tails coming from the HID bulb. All you would need to buy is a set of H1 HID bulbs and a 9006 relay harness.

If you are wanting to return the 9006 Kensun HID kit for the H1 HID kit, the H1 ballasts should still have the 9006 connector, but I would contact Kensun just to confirm. I know all of the Morimoto products come with 9006 connectors.

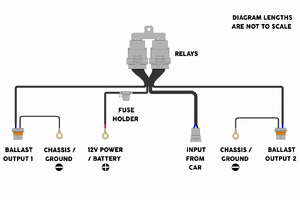
Basically the vehicle's 9006 connector will plug into the relay harness. The other two 9006 plugs on the relay harness will plug into each ballast. The harness comes with a fused 12v power source attached to the positive side of the battery and two grounds. Factory grounds are the best to use. This diagram will help explain what I am talking about.

9006Relay.png
 
Last edited:
Dec 13, 2013
1,490
Osceola,Ia
@Midnyteryder196 sells kits for DRL killer and quad lights if you are interested. Pretty reasonably priced. He does all the work, all you need to do is install.
.

Thanks dave!

I'm also selling a fog light drl kit, that converts the drl from low beams to fog lights, that is if you have factory fogs..

But anyway if you look in the articles section, you will find the write ups for all three mods, fog drl, drl disable, and the quad high beam diode mod.. If you would rather do the mods your self.
 

oster200

Original poster
Member
Oct 27, 2015
47
United States
alright so I returned the HID kit that I had and now will be buying this Kensun H1 kit.

As for a relay harness I would get one that fits my stock bulb correct, 9006? So for instance I could get this one. Then lastly I would get this retrofit HID projector. All this works together?

Is there any tips for retrofitting my headlights. When I install them do I just put them in straight then adjust the headlights like I would if halogen? Or do I put them in hand tight them line it up against a wall then adjust and tighten it after it gets lined up?

Thanks dave!

I'm also selling a fog light drl kit, that converts the drl from low beams to fog lights, that is if you have factory fogs..

But anyway if you look in the articles section, you will find the write ups for all three mods, fog drl, drl disable, and the quad high beam diode mod.. If you would rather do the mods your self.

Does your kit keep auto lights? Im not to worried about doing the DRL killer myself but thought I might as well learn more about what you offer. I just want auto lights with no drl and quad lights are optional.
 
Last edited by a moderator:
Dec 13, 2013
1,490
Osceola,Ia
Does your kit keep auto lights? Im not to worried about doing the DRL killer myself but thought I might as well learn more about what you offer. I just want auto lights with no drl and quad lights are optional.

Yes sir it does keep the auto lights, no quad beam with the relay, but quads can be accomplished with the diodes in the front fuse box.
 

dmanns67

Member
Apr 3, 2013
32,979
Ohio
alright so I returned the HID kit that I had and now will be buying this Kensun H1 kit.

As for a relay harness I would get one that fits my stock bulb correct, 9006? So for instance I could get this one. Then lastly I would get this retrofit HID projector. All this works together?

Is there any tips for retrofitting my headlights. When I install them do I just put them in straight then adjust the headlights like I would if halogen? Or do I put them in hand tight them line it up against a wall then adjust and tighten it after it gets lined up?

Everything you linked in your post looks good. You can go with a 9006 Kensun relay harness to save a few bucks. Does not have to be Morimoto.

I would highly recommend picking yourself up a new set of aftermarket headlights. One, this will allow you to bake the headlight open in the oven so you can remove the lens. You cannot bake OE headlights open due to being permasealed, you would have to cut them open. Two, it will give you time to work on the retro and not have down time on your TB. If you are spending money on a retro, you might as well start with brand new headlights IMO.

The threaded shaft on the backside of the projector will go through the hole in the reflector meant for the halogen bulb. If the hole is too tight, you will need to open the ID of the hole to fit the shaft. If you plan on using the projector's hi beam function, you will need to drill a hole in the reflector bowl to run the wires through.

As far as vertical and horizontal alignment goes, you will want to do this with the headlights installed on the vehicle. You will also want to do this with the headlight lens off. That way you can make any adjustments while on the vehicle.

@Blckshdw should have additional tips and information.
 

Blckshdw

Moderator
Nov 20, 2011
10,747
Tampa Bay Area, FL
@Blckshdw should have additional tips and information.

:coffee: lol yeah, do what @dmanns67 told you. That is all... :crackup:

For real though, you've got a lot of great tips to get you started. From my experience, once you get going, and your confidence starts growing, more ideas will pop in your head to make your project bigger and badder. Fight this temptation, it will drive you to drink and/or throw things. Keep things simple for your first retro. Do complicated stuff later. :twocents:
 
  • Like
Reactions: dmanns67

oster200

Original poster
Member
Oct 27, 2015
47
United States
Everything you linked in your post looks good. You can go with a 9006 Kensun relay harness to save a few bucks. Does not have to be Morimoto.
Okay I didnt know if it matter thanks, I like how the morimoto look tho lol.

I would highly recommend picking yourself up a new set of aftermarket headlights. One, this will allow you to bake the headlight open in the oven so you can remove the lens. You cannot bake OE headlights open due to being permasealed, you would have to cut them open. Two, it will give you time to work on the retro and not have down time on your TB. If you are spending money on a retro, you might as well start with brand new headlights IMO.
Thought about it, originally I wanted it as a safety net, as if I would ruin the headlight then I would still have one I could put in. Bad thing is I find like two of them for $80 im pretty sure these are super cheap not worth the money.

Thanks for the tips BTW.

I bookmarked this as a guide on how to take apart OEM headlights that blckshdw made. I know I will have questions on this just give me a moment to think :wink:

:coffee: lol yeah, do what @dmanns67 told you. That is all... :crackup:

For real though, you've got a lot of great tips to get you started. From my experience, once you get going, and your confidence starts growing, more ideas will pop in your head to make your project bigger and badder. Fight this temptation, it will drive you to drink and/or throw things. Keep things simple for your first retro. Do complicated stuff later. :twocents:

Yeah I sure hope so, turn 21 in less than a month and the only thing thats going to do for me is make it easier to drink lol. This is my first vehicle that I actually care about. My other ones where kind of just junky old things. Since it is the first vehicle I care about I'm really trying to learn more stuff about fixing them. And trust me I am not wishing for breakdowns because I'm just a college student with little money haha. I'm sure once I get the headlights out I will figure out how to dismantle them like in your guide. But as of now I don't see the difference between the bad and the good way you stated in the article. Looks like the bad way was taking off the black tabs that hold the lens and plastic. But I see you did that on both lens so is there a way to leave all that on but just "unclip" the lens?
 
Last edited by a moderator:

dmanns67

Member
Apr 3, 2013
32,979
Ohio
Okay I didnt know if it matter thanks, I like how the morimoto look tho lol.


Thought about it, originally I wanted it as a safety net, as if I would ruin the headlight then I would still have one I could put in. Bad thing is I find like two of them for $80 im pretty sure these are super cheap not worth the money.

Thanks for the tips BTW.

I bookmarked this as a guide on how to take apart OEM headlights that blckshdw made. I know I will have questions on this just give me a moment to think :wink:

No problem, we are here to help. Honestly, $80 is a good price for LS/SS headlights and that is about the average price for aftermarket ones that are OE style. It will also make separating the lens from the headlight about a 10 min job versus 60 min job. Carlton does have a great write-up that will help.

If you are like me, sometime life gets in the way and you dont have the time to finish the retro. Just like my fog lights I have been trying to retro for a year now :bonk:

Forgot to mention that a good tool to have when it comes to retros is a Dremel. Makes modifying or trimming much easier.
 

Blckshdw

Moderator
Nov 20, 2011
10,747
Tampa Bay Area, FL
But as of now I don't see the difference between the bad and the good way you stated in the article. Looks like the bad way was taking off the black tabs that hold the lens and plastic. But I see you did that on both lens so is there a way to leave all that on but just "unclip" the lens?

The way the assemblies are setup, the black base has a U shaped channel, and the clear lens has a lip that sits down inside the channel. On both sides of the lip with OEM headlights is a layer of Permaseal.

In my write up, the wrong way to approach cutting them is from the top/side/bottom, as your only exposing the outer layer of Permaseal, the inner one is still intact, and holding the lens in place. No Bueno :no:

The correct way is to cut along the back side of the assembly, at the 'bottom' of the U shaped channel where the edge of the clear lens' lip is. You don't have to cut very deep, 1/8" max, just enough to get through to the edge of the lip where you can wedge a flat blade between the lip and the inner layer of Permaseal.

The inside section where the crossbar goes is a pain in the ass. You have to cut the lens itself and it takes a while. The Dremeling will melt the plastic more than cut through it, so make many short cuts instead of trying to do it all at once.

If you are like me, sometime life gets in the way and you dont have the time to finish the retro. Just like my fog lights I have been trying to retro for a year now :bonk:

Truth! Aftermarket lights are the way to go. Will save you a lot more time getting them open, and if Murphy's law tends to make appearances in your life, you'll have to drive somewhere (probably at night) long before you get your retrofit done. :duh:

Forgot to mention that a good tool to have when it comes to retros is a Dremel. Makes modifying or trimming much easier.

Dremels are a must for trimming and shaping. If you happen to have a hot knife, or a soldering iron with a hot knife attachment, that could be used to open the OEM headlights as well. :twocents:
 

oster200

Original poster
Member
Oct 27, 2015
47
United States
Well I'm gone right now but once I get home I will look for some good quality aftermarket headlights. I think I will wait a couple months to do it. Save up some more money to do it the "easier" way. I know a recent thread on here was saying how LT headlights cost much more but when I was looking I found several that fit LT trim for $100. As I have 05 trailblazer LT. What should I use to reseal headlights?
 

HARDTRAILZ

Moderator
Nov 18, 2011
49,665
The 05 LT is same as LS.
 
  • Like
Reactions: Blckshdw

oster200

Original poster
Member
Oct 27, 2015
47
United States
This is covered in the write up. :yes:
Yup thanks, I was being stupid.

The 05 LT is same as LS.
Okay cool I found these on eBay they come with 10 year warranty. It doesn't really matter about warranty because once I do this there won't be one lol. I have heard about people saying that on some headlight the clear coat starts coming off and so I was wondering couldn't you just spray it with a clear coat If that would happen?

And now time to pick up some extra hours and wait to buy all this. Why is it that everything that is supposed to be easy at first turns into a whole project? Nothing can be quick and easy.
 

HARDTRAILZ

Moderator
Nov 18, 2011
49,665
What did you find on Ebay? You can get a set for about $70 shipped to play with
 

dmanns67

Member
Apr 3, 2013
32,979
Ohio
Either set you guys posted looks good. All of the headlights I seen that were lesser in price, the seller wanted a ridicolous shipping cost of $40.

I would not worry about a warranty. Like you mentioned, once you open the headlights and start modifying, that will void the warranty.

As far as clear coating goes, the UV from the sun will deteriorate the plastic lens of the headlight over time. I have seen people who sand/restore the headlight, then add clear coat, and a coat of wax for extra protection. Would not hurt anything to add a layer of clear coat to them lens if you like.

There are also companies out there that make clear urethane wraps for headlights that have built-in ultraviolet inhibitors which will help prevent the headlight lens from drying/hardening and discoloring. Its up to you which route to go. I personally have not tried either method.
 
  • Like
Reactions: Blckshdw

oster200

Original poster
Member
Oct 27, 2015
47
United States
Alright so I am all set and know what I'm doing just want to make some quick cash so I kind of even out after this purchase. I think instead of using the oven method to take it off could I use a heat gun?

As far as clear coating goes, the UV from the sun will deteriorate the plastic lens of the headlight over time. I have seen people who sand/restore the headlight, then add clear coat, and a coat of wax for extra protection. Would not hurt anything to add a layer of clear coat to them lens if you like.
I think I might try this, I looked it up and found a good amount of guides on how to do it. My only concern is do I do it on the brand new headlight assembly right a way or wait for it to get bad then do it? Would be easier to do it as its out of the vehicle.
 

dmanns67

Member
Apr 3, 2013
32,979
Ohio
Alright so I am all set and know what I'm doing just want to make some quick cash so I kind of even out after this purchase. I think instead of using the oven method to take it off could I use a heat gun?


I think I might try this, I looked it up and found a good amount of guides on how to do it. My only concern is do I do it on the brand new headlight assembly right a way or wait for it to get bad then do it? Would be easier to do it as its out of the vehicle.

Others have used a heat gun if you do not have access to an oven or the oven is not large enough. It will take longer and have to make sure you do not melt the plastic. As you are heating one area, the area you just heated is starting to cool off. It can be done, just take your time and have patience. Even in the oven, you are only at 225*F for around 10-15 min. So just run your heat gun on the lowest setting.

I personally did not worry about clear coating the headlight lens with brand new headlights, but if I ever had to restore the lens from UV damage, I would definitely use a clear coat or urethane wrap.

If you are going to clear coat the lens, I would do it while the lens is off of the headlight. It will make it much easier than trying to paint the lens while it is attached to the headlight or on the vehicle. When I removed my 6 year old headlights, they looked almost as good as the new headlights that I bought, so I never worried about covering the lens with anything.
 

oster200

Original poster
Member
Oct 27, 2015
47
United States
Others have used a heat gun if you do not have access to an oven or the oven is not large enough. It will take longer and have to make sure you do not melt the plastic. As you are heating one area, the area you just heated is starting to cool off. It can be done, just take your time and have patience. Even in the oven, you are only at 225*F for around 10-15 min. So just run your heat gun on the lowest setting.

I personally did not worry about clear coating the headlight lens with brand new headlights, but if I ever had to restore the lens from UV damage, I would definitely use a clear coat or urethane wrap.

If you are going to clear coat the lens, I would do it while the lens is off of the headlight. It will make it much easier than trying to paint the lens while it is attached to the headlight or on the vehicle. When I removed my 6 year old headlights, they looked almost as good as the new headlights that I bought, so I never worried about covering the lens with anything.

Alright I will see what I will do when the headlight assembly gets here.

What holds the projector in the reflector once you cut it? I was watching this video at around the 3:30 minute mark you can see it fits but what holds it? Do you use epoxy or drill holes... How are you supposed to make sure that it is even horizontally? As that depends on the rotation of the projector.
 

dmanns67

Member
Apr 3, 2013
32,979
Ohio
Alright I will see what I will do when the headlight assembly gets here.

What holds the projector in the reflector once you cut it? I was watching this video at around the 3:30 minute mark you can see it fits but what holds it? Do you use epoxy or drill holes... How are you supposed to make sure that it is even horizontally? As that depends on the rotation of the projector.

I am not quite sure what you are cutting? If anything, you might need to open up the inner diameter of the hole in the reflector for the headlight bulb so that the shaft on the projector will slid through.

In the video, TRS was retrofitting a full size projector in a smaller housing than whats on the TB. Some projectors are not made with the threaded shaft coming out of the back of the projector which will require the reflector bowl to be cut so that the projector recesses further back into the housing. Also, some projectors are longer than others or some headlight housings are smaller than others and you cannot just use the lock nut on the threaded shaft to secure the projector to the reflector bowl because there would not be enough clearance for the headlight lens to fit because the projector would be sticking out too far and needs to be recessed.

The MMH1 projector is designed to be like a plug and play type projector. Easy to install with minimal to no cutting at all. Other larger projectors or OEM projectors would require a lot of cutting and modification. BlckShdw is working on a retro with the Lexus LS430 projectors which are much larger and requires a lot of modification.

There are many ways to secure a projector. Anything from JB Weld, epoxy, high temp RTV, to custom brackets to bolt the projector to the reflector bowl. Like with the projectors in my fogs light, I used the holes in the projector meant for the shroud to bolt the projector to the housing.

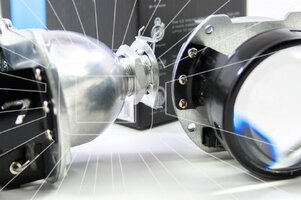
If you look in the picture below, you will see the threaded shaft coming out of the backside of the projector. There will be a thin rubber washer that comes in the hardware bag. Slip that washer over the threaded shaft on the projector. That washer will sit in between the reflector housing and the projector to adsorb vibrations. There will also be a lock nut and metal washer that comes with the hardware. Once the thread shaft of the projector has been installed through the hole in the reflector meant for the headlight bulb, you will install the washer then use the lock nut to tighten down. That lock nut is what holds the projector in place.
morimoto_mini_h1_7.0_bi-xenon_projectors_6_1.jpg

You do not want to tighten the lock nut down all the way until you are happy with the horizontal alignment of the cutoff. The nut is design so that the threads deform as you tightened it down so that the nut does not loosed over time. I used a bit of blue Loctite on mine as well.

For horizontal alignment, you will want to have the projectors installed into the headlights with the lock nut somewhat tight. Then install the headlights on the vehicle with the headlight lens still off. Install the HID in the projector and hook up the ballasts. Have your truck parked on flat/level ground at least 25ft away from a flat wall, then turn the headlights on. Then you can see how your horizontal alignment looks. If one or both projectors are off, you can turn the projector by hand until the cutoff line is level. Once you are happy with the cutoff of each projector, you can tighten down the lock nut while the headlights are on the vehicle. Make sure you are holding onto the projector while tightening down the lock nut to make sure the projector does not turn.

As far as I know, you will be the first person I am aware of the retro the MMH1 7.0 into TrailBlazer headlights. Others have done the 6.0s with no problems and minimal modifications.
 

oster200

Original poster
Member
Oct 27, 2015
47
United States
Well I just purchased my HID kit and new headlight housing last night! Ive been working more since summer hit, and haven't got a chance (well I had chances just not on my radar and laziness) to buy them so I finally got around to it last night. I ordered the Bi-Xenon: Morimoto Mini H1 Stage III with 35W 5500k HID and 70mm LED Halos. Now all I do is wait for them to get delivered.
 
  • Like
Reactions: Mounce and dmanns67

oster200

Original poster
Member
Oct 27, 2015
47
United States
Well I just wanted to let everyone know that I got my HID kit and my headlight housing in the mail yesterday. I think tomorrow I might try to open the headlight using the oven method. I think I will try 200* for 10 minutes first and if I need more time I will put them back in there.

So I just want to make sure before hand, I know that the driver side headlight is kind of pointed away from oncoming traffic should I be trying to put the projectors in pointing straight? or just leave them how it is (pointing away from oncoming traffic)? Since I'm getting the mini projectors I shouldn't have to do much trimming but I don't know if this will make my HID cutoff weird looking.
 

Blckshdw

Moderator
Nov 20, 2011
10,747
Tampa Bay Area, FL
The steps of your projector output should be the same distance apart as the projectors are on your truck, meaning they are aimed straight forward.

As long as you take the time to make sure the rotation of your projectors are level before sealing them back up, your cutoff shouldn't look weird.
 
  • Like
Reactions: dmanns67

oster200

Original poster
Member
Oct 27, 2015
47
United States
The steps of your projector output should be the same distance apart as the projectors are on your truck, meaning they are aimed straight forward.

As long as you take the time to make sure the rotation of your projectors are level before sealing them back up, your cutoff shouldn't look weird.
Okay I will do that and post a picture for everyone to tell me what I got to change or not change.

One problem I just pulled apart my driver side headlight and it went good, I was going to toss my passenger side in when I noticed the reflector is lose so I guess I have to return them....
 

oster200

Original poster
Member
Oct 27, 2015
47
United States
Loose how? Considering the work you're about to do to them, it may be an option to just fix them, or make them better even.

Edit: Plenty of output examples posted in this thread.

http://gmtnation.com/forums/threads/members-projector-retrofits.12778/

One of the supports on the back is snapped off and allows the bottom of the reflector to move forward and backwards. I thought about maybe just fixing it but since I bought them new might try and return them. Here are pictures of the corner all the way back and all the way forward.

Here are the two photos http://imgur.com/7KwuHv1 and http://imgur.com/s5zNbas
 

Blckshdw

Moderator
Nov 20, 2011
10,747
Tampa Bay Area, FL
Ahh, the dreaded stationary mount. That one broke on my first retrofit, causing my passenger side output to flutter. Very annoying. Some have fed a screw through the back of the headlight, through the broken stud, and into the back of the ball that sits in the joint. That solution was posted after I replaced my light at that time.

If you had the right equipment, you could try plastic welding it back on, but that's quite a bit more challenging.
 

oster200

Original poster
Member
Oct 27, 2015
47
United States
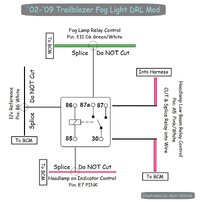
Well I got my new replacement headlight last week since that other one was broken but have been just taking my time with this. I dremeled everything that needed it so the projector would fit. Really the only thing I have left to do is kill the drl, get quad lights, and install the HID kit. Since I also have halos I was wondering about the wiring for that. I wanted it so the halos would be DRL. I have read through the fog light DRL mod and I should be able to follow it exactly except for 87a I would run a new wire that attaches to the halos instead of the fog lights? I have attached the picture from the thread.
 

Attachments

  • fog-drl-relay-jpg.74857.jpg
    fog-drl-relay-jpg.74857.jpg
    146 KB · Views: 6
Dec 13, 2013
1,490
Osceola,Ia
Well I got my new replacement headlight last week since that other one was broken but have been just taking my time with this. I dremeled everything that needed it so the projector would fit. Really the only thing I have left to do is kill the drl, get quad lights, and install the HID kit. Since I also have halos I was wondering about the wiring for that. I wanted it so the halos would be DRL. I have read through the fog light DRL mod and I should be able to follow it exactly except for 87a I would run a new wire that attaches to the halos instead of the fog lights? I have attached the picture from the thread.
Correct, except the wire from 87a Will go to the ground for the halos.. And then just run a fused 12v power to halos, and they will be the drl, and night time illumination when remote unlocking. You just won't be able to turn them on manually..
 
  • Like
Reactions: oster200

oster200

Original poster
Member
Oct 27, 2015
47
United States
So I know Im moving slow on this project, just doing it when I can, I guess. I was putting the projector and shroud in the housing to see how it would look. I already dremeled out the tabs on the reflector so now its sitting flush. Thing is, there is an enormous gap between the bottom of the shroud and the reflector as seen in the first attachment. I feel like it should sit closer to the reflector. And its not like I need to cut away more as I have enough shaft sticking out. Its also not hitting the lens when I put it on.

So the only way to fix this (if its a problem) is to cut more of the reflector. I was wanting to try and keep the projector being held on by the shaft so it would be easier to align.

EDIT: pictures are here http://imgur.com/a/YErhX
 

Blckshdw

Moderator
Nov 20, 2011
10,747
Tampa Bay Area, FL
The shroud is fine, that's how that particular model looks. I went with wider/taller shrouds that gave a much fuller look from straight on, but there's almost no depth, and I have gaps on the sides and top.

That seems to be the general trade off, shallow and wide shrouds, or narrow and deep coverage.
 

Forum Statistics

Threads
23,681
Posts
641,974
Members
19,138
Latest member
wentzben

Members Online