Baked on oil: plugs #5 and #6

EPfiffner

Original poster
Member
Jun 11, 2018
52
Canton, Ohio
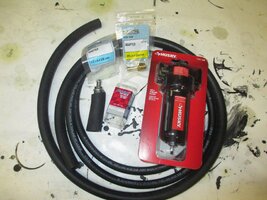
Homemade catch can / PCV retrofit:

I got a husky air compressor moisture separator, 3/8" NPT at home depot.
For fittings, I bought a 1/2" hose barb to 3 /8" npt for the inlet to the separator.
The outlet fitting is 3/8" hose barb to 3 /8" npt, this will go to the PCV valve.

At autozone, I returned the $200 fuel pressure test kit, and bought a gallon of Mobil 1, which I have been seeing a lot of lately...

I also bought:
3/8 fuel hose, 6'. This connects from the outlet fitting of the catch can to the PCV valve
1/2" emission hose, 6 '. This connects from the intake manifold vacuum nipple to the inlet fitting of the catch can.
6' of either hose is way more than needed.

I wanted a straight PCV valve (not 90 deg) so I thought of my '93 Beretta 3.1 V6. They had it in stock.

I had in my garage: 3/4" heater hose, about 3" long. This fits over the oem " dirty air" hose, and also over the base of the PCV valve.

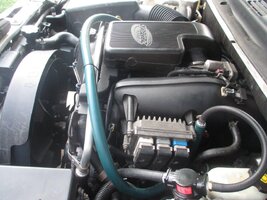
On the 4.2l, the dirty air emission hose is low on the intake manifold, it's a 90 deg 1/2" hose. The top connection is a slip fit, and it's manifold vacuum.

The bottom connection is clamped and I can't tell exactly where it goes, it appears to be back in to the manifold. This is the connection to the crankcase vapors.

What I did: disconnected this hose at the upper connection, left it clamped in place where it runs to the crankcase.
I slipped the heater hose over the oem crankcase vent hose, and put the PCV valve in the other end of the heater hose.
I then ran 3/8 hose from the PCV to the outlet of the catch can.

For the inlet side, I ran the 1/2" hose from the intake manifold vacuum nipple directly to the inlet side of the catch can.

The moisture separator is equipped with a spring loaded auto drain, which is a problem when you apply vacuum. The drain has a barbed nipple, so I just plugged it with a short piece of vacuum hose plugged it a screw for now.

I hurried to get everything sourced and installed early Saturday morning because I knew we were going on a 60mi drive. Upon returning home I checked and was surprised to find it was pretty much dry. I then realized I had the separator installed backwards, oops. I have since corrected, so we will see how it goes.

I have been losing a lot of sleep over this, and there's plenty more to come.
I've also noticed that any time I see ours, or any other TB on the road or in a parking lot, I give it a side-eyed glare.
 

Attachments

  • IMG_2039.jpg
    IMG_2039.jpg
    167.1 KB · Views: 20
  • IMG_2042.jpg
    IMG_2042.jpg
    180.3 KB · Views: 21
  • IMG_2043.jpg
    IMG_2043.jpg
    154.7 KB · Views: 21
Last edited by a moderator:

mrrsm

Lifetime VIP Donor
Supporting Donor
Member
Oct 22, 2015
7,737
Tampa Bay Area
I just finished reading your design of this "Kleverly Konceived Katch Kan" idea. I re-visited my Trailblazer Engine Heads in the Garage just now to look them over for the possible Vapor Path leading into the Intake Manifold Rubber Elbow Hose. I discovered that equidistant between the Six Intake Ports on the face of the Intake Port side of the head is a small rectangular hole with a radius of all four corners that lines up perfectly with the same shaped Rectangular Hole highlighted within the Red Circled Dorman Intake Manifold Image attached below as viewed from looking at it face on from the inside:

I used a Plastic Tie Wrap to probe that small opening in the Engine Head and found a diagonal hollowed out path inside of the Engine Head Casting that mates up with a hole through the head of a similar size and shape that passes through the S/S MLS Gasket where the Head mates to the Engine Block. That hole opens up into the margins of the Upper Engine Block. This circuitous route not only provides a pathway for the Lower Crankcase Blow-By Gasses to be drawn inside ...but the shape and the size of all of these small openings would definitely encourage a good “Venturi Effect” in drawing whatever Blow By Gas and Liquid Oil are nearby into its path at a fairly high velocity as the Intake Vacuum works to “soup straw” those vapors, etc… up inside the upper areas of the Intake Manifold.

Once they get within that Intake Chamber, they can be pulled down through each Intake Port of every cylinder during their respective vacuuming Intake Strokes. In this manner... the oil that gets inside of that chamber gets fairly equally distributed to all Cylinders... gumming up the works and burning the Oil with the EFI Sprays of Fuel,

I note for you that the Dorman flavor of this Intake has been modified in an odd way and hopefully other Members will explain whether or not that short Elbow Hose is even necessary ...given its New Design. It passes muster for checking whether or not it would work all the way back to the 2002 Year on these First Gen Atlas Engines on Amazon. Here is what that ‘rectangular port’ looks like as the Red Circled area shows...inside its own Gasket Sealed spot:


INTAKEMANIFOLDUNDERSIDE.jpg


INTAKEMANIFOLDOBLIQUEVIEW.jpg


The Dorman Updated Intake Manifold is available here:

https://www.amazon.com/dp/B005VTSZZM/?tag=gmtnation-20
 
  • Like
Reactions: EPfiffner

EPfiffner

Original poster
Member
Jun 11, 2018
52
Canton, Ohio
Pop and I made some revisions to the Kleverly Konceived Katch Kan setup. We plugged the crankcase side of the hose that goes to the bottom of the intake manifold.

Excuse the crude installation, this is experimental so the goal is to
A) not permanently mod anything
B) not spend any more than necessary

So he dug up this blue 3/4" hydraulic hose, and we pushed it over the VC end of the hose that would go to the air box resonator. I plugged the nipple on the resonator with a plastic cap.
The blue hose loops down and comes up vertically, the goal being to have the PCV valve mounted vertically.

So now we should be pulling the crankcase vapors from the valve cover, through the PCV, then the catch can, and in to the intake manifold vacuum port.

We did this last Monday so I don't have much data yet. I added a pint of oil yesterday after about 300 miles so it's improved I believe, I need to check my records to be certain.

It's hard to see in the photo but the catch can has only scavenged about a tablespoon of oil.

At this point the plan is to milk it along until late fall when a/c isn't as valuable since it doesn't work on any of our other vehicles except my way-cool Beretta.

As fall approaches I am going to make some repairs to my wife's old durango that this thing was supposed to replace, but we have kept it due to all this drama.

She can go back to driving the durango while this unit goes under the knife.
 

Attachments

  • IMG_2045.jpg
    IMG_2045.jpg
    175.4 KB · Views: 12
  • IMG_2044.jpg
    IMG_2044.jpg
    161.3 KB · Views: 12
  • IMG_2046.jpg
    IMG_2046.jpg
    170.5 KB · Views: 12
  • IMG_2047.jpg
    IMG_2047.jpg
    125.1 KB · Views: 12

mrrsm

Lifetime VIP Donor
Supporting Donor
Member
Oct 22, 2015
7,737
Tampa Bay Area
It would be interesting to have the means to measure either the Exit Vapor Pressure coming out of the VC to PCV leading into the Blue Hose... and/or the Vacuum Negative Pressure heading into the Vacuum Port on the Intake Manifold side, Between the two readings... you could figure out what their combined "draw" is that is tugging the Oil up from within the Engine and then getting it deposited into the KleverKatchKan.

I suppose you could use your original Known Loss Amount of Oil (in Ounces) over a given time frame and divide that by the Number of Miles Driven to get an Average Daily Oil Loss before you modded the engine... and then see if the KleverKatchKan manages to cut down on that overall Loss Per Day amount measured against the very same time frame. If it turns out to be a substantially less amount... then you'll know that the "Engine Blow-By Problem" is primarily feeding the Oil into the Vacuum Side of the IM; ergo...The Prime Culprit. It would also serve to know whether the small amount of Oil that is being captured inside of the KleverKatchKan right now ...smells heavily of Gasoline Vapors.
 
  • Like
Reactions: EPfiffner

EPfiffner

Original poster
Member
Jun 11, 2018
52
Canton, Ohio
Ah yes, the infamous "low oil pressure" DIC message.

My wife texted me this pic about 2 weeks ago. I freaked out and called her " stop!! Pull over!! "

She, and a helpful stranger at the gas station, checked the oil and added a quart, not enough to be an issue.

I stressed and lost sleep over it for a couple days, did some research here and some thinking.

Then last week we went on vacation, and I finally was able to sleep and forget about this blasted thing for a few days.

Its only occurring at idle after being on the highway, so I'll bet it's the clogged oil pickup like on Kevin Nadeau's video series.

As for @MRRSM 's ideas on the Katch Kan: I like your thought process, but admittedly I have slacked on the data collection as time has passed. The consumption is about the same, and the Katch Kan is trapping some oil, but only (as a guess) 1/4-1/2 cup since installation, and I've added around a gallon of oil since installation.

I may drain the oil and see if I can get a rounded probe in through the drain hole IF I can even see the oil pickup, but the way that the pickup is surrounded with a sheet metal shield, this would be a futile attempt.
 

Attachments

  • 3808-2.jpg
    3808-2.jpg
    98.4 KB · Views: 8

mrrsm

Lifetime VIP Donor
Supporting Donor
Member
Oct 22, 2015
7,737
Tampa Bay Area
This Dual Video Set from @MAY03LT covers the difference between what that Oil Pressure Sensor registers on the Dashboard vs. installing a TRUE Analog Oil Pressure Gauge as per the Second Video. Please... Watch these without the Wife-N- Kids being within earshot:


These links are useful and On Topic:

2014 GMTN Thread concerning the Question of Normal Oil Consumption:
https://gmtnation.com/forums/threads/4-2-oil-consumption.418/page-2

A Technical Description of the GM Atlas LL8 4.2L Internal Oiling Operations:
https://www.greatautohelp.com/operation/4200-oil-system.html
 

EPfiffner

Original poster
Member
Jun 11, 2018
52
Canton, Ohio
I'm still around, not letting this thread die yet.

The above suggestions got me thinking, so I pulled the connector on the OP switch and it looked oily. I'll need to find a socket to replace it. I should also verify with a mechanical gauge.

it also got me thinking maybe I can save this thing yet! Probably a 20% chance, but I'm taking it.

I ordered another quart of TEC and did cylinders 1-4. I pulled all the plugs and dumped a little in 5&6 just for the heck of it.

I did it on a hot engine and waited for it to bleed down the cylinder walls.

I checked after 4 hours and interestingly cylinder 1 was still holding liquid but the others had bled through.

I cranked it over a bit and added the rest of the TEC, so I used the whole quart.

I also cleaned out my catch can, nasty stuff in there. Id say it smelled like blowby, gas/oil/moisture mixture.

it had been 2600 miles since an oil change so I did that, black as night, nasty!

I took a piece of wire with a rounded edge and messed around trying to reach the oil pick up in case it was sludged up, that was shooting in the dark. I felt like I was touching the pick up, but who knows.

I'll see what the oil consumption is now and go from there.

also while I was under there, since I had been told the head/timing components had been replaced, I looked for "witness marks" on the bolts.

I can see where the balancer and front cover bolts have been out, and the bolts at the front of the oil pan that go up in to the timing cover have been out, but it sure doesn't look like the pan has been off completely.

it seems impossible that the front cover could be removed without removing the oil pan.

so I'm not sure what was done. I'm still prepping my garage etc for the engine removal.
 

Attachments

  • IMG_2057.jpg
    IMG_2057.jpg
    142.2 KB · Views: 7
  • IMG_2056.jpg
    IMG_2056.jpg
    138.6 KB · Views: 7
  • IMG_2059.jpg
    IMG_2059.jpg
    150.7 KB · Views: 10
  • IMG_2058.jpg
    IMG_2058.jpg
    121 KB · Views: 10

EPfiffner

Original poster
Member
Jun 11, 2018
52
Canton, Ohio
Wow it's been over a month since I posted an update.

Since the second TEC treatment, engine power/driveability has definitely improved. I thought it was just me being hopeful, but my wife agreed, she is my "non-biased third party". She said "whatever you did last time really helped" .

I now, after driving the truck since its been running a bit better, understand why this whole community exists. What a nice vehicle to drive, the I6 is smooth as glass and has surprising power, even in the "injured" state.

Last weekend I finally changed the OP switch. I used a 1-1/8 socket, 1/2 drive. It would have been much easier had I purchased the special socket, but I managed.

The switch was leaking oil in to the electrical connector so I sprayed it out well with TB cleaner and compressed air.

So far no "check gauges" low oil pressure messages. Time will tell because it was intermittent.

Oil consumption is still dire, I think I've dumped 1-1/2 qts in it in 700 miles, it almost seems worse. I had wiped all of the soot off of the tailpipe with lacquer thinner and it came back in short order.

Despite this, I think I will order more TEC and treat it again once it gets to around 2k-2500 on the oil that's in it. IMO it has done something since power has improved.
I'm sticking with the Mooseman's comment way back of "nothing to lose at this point".

Since the weather has cooled off my Katch Kan has been filling up more quickly with a nasty concoction of moisture and stinky blow by oil.

This weekend I'm hoping to do some rust prevention on the truck. I ordered a rustproofing gun and some stuff called NH Oil. I'll likely post about that in Appearance.

Even with its engine issues I'm going to keep the truck as nice as I can, dammit!
 

EPfiffner

Original poster
Member
Jun 11, 2018
52
Canton, Ohio
Well the wife reported that the "oil pressure low" message showed up after some highway driving, so that was disappointing.

It still was good to replace the switch/sender since oil seemed to be leaking through it in to the connector.

I came up with a theory: maybe it is oil viscosity/clogged oil filter issue. The oil only had about 1k on it but I changed it and the filter anyway. It was black as night.

I drove it around 60mi on the highway last night, and no OP low message.

I'm running cheap synthetic now (car quest) since my OCI's have been frequent.
 

mrrsm

Lifetime VIP Donor
Supporting Donor
Member
Oct 22, 2015
7,737
Tampa Bay Area
I was just thinking about what your "KleverKatchKan" captured as shown here in your own image... and wondering whether or not sending THAT as a Test Sample over to Blackstone Laboratories might discover something in its Chemistry and Contents that could be revealing from their analysis to tell you WHERE that Oil might be coming from ...or WHY:

BLACKSTONEOILSAMPLE.jpg

Here is a Link to their site if the idea seems worth exploring. If nothing else... if you decide to obtain and use one of their Oil Analysis Kits... you will arguably be sending them the First of any such samples ever captured in this exact manner on the GM LL8 Atlas Vortec 4200 Engine Platform:

https://www.blackstone-labs.com/tests/standard-analysis/
 

EPfiffner

Original poster
Member
Jun 11, 2018
52
Canton, Ohio
I was just thinking about what your "KleverKatchKan" captured as shown here in your own image... and wondering whether or not sending THAT as a Test Sample over to Blackstone Laboratories might discover something in its Chemistry and Contents that could be revealing from their analysis to tell you WHERE that Oil might be coming from ...or WHY:

View attachment 86421

Here is a Link to their site if the idea seems worth exploring. If nothing else... if you decide to obtain and use one of their Oil Analysis Kits... you will arguably be sending them the First of any such samples ever captured in this exact manner on the GM LL8 Atlas Vortec 4200 Engine Platform:

https://www.blackstone-labs.com/tests/standard-analysis/


Thanks for the link, I checked it out. Under sampling instructions it states to take the sample when the engine is warm so that contaminants and moisture are burned off, so I wouldn't be following their instructions since it is half full of moisture, lol

I'll consider it. I'm afraid it would just be more confirmation of what I already know though.
 

EPfiffner

Original poster
Member
Jun 11, 2018
52
Canton, Ohio
I'm going to apologize for keeping this thread going..

I'm still getting the "stop engine low oil pressure" . I haven't checked the pressure with a gauge, but I have no doubt that the engine is sludged up.

This weekend time permitting I'm going to drain the oil and dump a gal of kerosene/ATF/acetone mixture, through the dipstick, and let the pickup soak.

I'm going to do it on a warm engine. I'm going to take my air hammer and a piece of wood and vibrate the pan really well, creating an in-vehicle ultrasonic parts washer.

Crazy, right? Nothing to lose. While this is going on, I'm going to pull the plugs and soak the pistons with 50/50 ATF/Acetone. Cheaper than TEC and I've read it makes a killer penetrant.

The engine has been running well, still using oil. If I can get the oil pressure back, we are going to drive it and just deal with the consumption. If this kills the engine, well I really don't care at this point.
 
  • Like
Reactions: Beacon

mrrsm

Lifetime VIP Donor
Supporting Donor
Member
Oct 22, 2015
7,737
Tampa Bay Area
I thought that your biggest concern might have been the reaction between Acetone and PTFE (Poly-Tetra-Flouro-Ethylene) as it concerns the Teflon Engine Seals in the Front and Rear of the Motor, as well as the Valve Guide Seals... but my concerns were soon assuaged after reading this information:

https://www.calpaclab.com/teflon-ptfe-compatibility/

I would like to suggest two other things to do that might help out as well:

(1) Get a Small Hand Pump Garden Sprayer and find a solid Rubber Grommet that will fit tightly enough to allow you some freedom of movement in the Plastic Spray Tube...slipping that business end through the Grommet and then after removing the Drain Plug... introduce that nozzle up and underneath the Oil Pick Up Screen and then Spray The Hell Out Of the Screen area in a more direct manner. You will probably have to cut off the adjustable end of the Plastic Spray Nozzle to prevent it from getting jammed inside of the Lower Engine Block.

You will need to wear a Eye Protection along with a Full Face Shield and some Nitrile Gloves in order to protect your Face and Eyes and Hands from your "Toxic Cocktail". I'd bet a Brace of Gutenberg Bibles that this method would dissolve and clean all of that Varnish and Crap from that screen very well if the Spray nozzle is positioned just right. After you finish... all you would need to do is slowly retract the Plastic Nozzle and observe that dissolved mess drain down into the Pan.

(2) If you are STILL suffering from the PITA P0014 Code popping up... use this same technique by first removing the CPAS (Camshaft Position Actuator Solenoid)... and Guide that Nozzle or an adapted, clamped on Clear Hose ...in far enough to direct the Solvent Spray through the slots/holes that lead TOWARDS THE CAMSHAFT PHASER ... and Flush IT all out thoroughly as well.

It WILL become very necessary to fill the Crankcase with (6) Quarts of Cheap Organic 5W-30 Motor Oil and (1) Quart of Engine Flush or Transmission Fluid and use a Cheap Oil Filter and thoroughly Flush all of the Solvent and loosened Detritus. Allow the Engine to Idle for around 5-10 Minutes and then after draining out all the Crankcase of All That Mess left behind... re- fill it with (7) Quarts of Mobil1 and a Brand New Mobil1 Oil Filter before taking it for a Test Drive. Before you Start the Engine... Don't forget to R&R the Fuel Relay ...and Turn the Engine over enough to Purge the Air out of the Bone Dry Oil Filter.

I doubt that anyone will ever complain about a Member keeping a Working Thread alive who tries as hard as you have been to get to the bottom of a problem... So Good Luck ...and Happy Hunting! :>)
 
Last edited:
  • Like
Reactions: EPfiffner

EPfiffner

Original poster
Member
Jun 11, 2018
52
Canton, Ohio
Good times with the GMT this past weekend.

I did the toxic cocktail Saturday am on a warm engine. I did use my PPE, and I didn't blow myself up. I filled the crankcase through the dipstick, so as to avoid contaminating the rest of the engine.

I have to give credit, this method was suggested via YouTube user batsonelec C, I had posted on one of Kevin Nadeau's vids and received a response.

While the crankcase was soaking I pulled the plugs and treated the cylinders with 50/50 acetone ATF mixture in hopes of freeing up the oil rings (if that is even my issue).

I bumped the engine over and re-treated several times throughout the weekend.

Interestingly several cylinders hold the fluid indefinitely while the others do not. I believe the ones that hold liquid are the ones that were the worst on leakdown, but I need to check my records.

I had to suck them out with the shopvac before I could reassemble. Pic of the plugs attached, you can see 5 and 6 are still ashy.

I didn't see any chunks or anything when I drained the toxic cocktail.

I used a paint strainer and filled it up with the used oil (only about 1k on it) and 2 qts new ATF.

Idled it for 5-10 mins (opened the garage door up and it still filled the garage with a cloud of smoke!)

Drained and changed with new synthetic and filter.

Quick test drive and the oil pressure warning was back.

Christmas Eve I got up and drove to summit racing first thing. (I know you are jealous that I'm so close).

I bought a summit gauge kit and an Earl's M16 x 1.5 adapter for LS engines. $31 and some change out the door.

The Earl's adapter was only $7, it's aluminum. Nice piece, but it doesn't come with a sealing washer. I hogged out an aluminum drain plug washer I had in the garage and it worked fine.

I believe the Auto Meter one has a copper washer with it, so keep that in mind.

The gauge kit comes with ridiculously stiff nylon tube, but I managed. It only comes with enough to barely reach in to the truck. Right now I have the gauge zip tied to the passenger a/c vent.

The engine has over 80psi cold, and hot it carries 40-60 going down the road.

At hot idle though it was down about 8psi. I didn't heat it up enough to get the warning to come up, but I believe the switch is 6psi so it sounds like the switch/electronics are doing their job.

Interestingly though, per May03LT's video, the manual shows a spec of 13psi at 1500 rpm. I didn't actually test it, but I believe mine would meet this spec.
 

Attachments

  • IMG_20181223_100618781.jpg
    IMG_20181223_100618781.jpg
    289.1 KB · Views: 6
  • Like
Reactions: mrrsm

mrrsm

Lifetime VIP Donor
Supporting Donor
Member
Oct 22, 2015
7,737
Tampa Bay Area
This is just some Food for Thought... But... If you ever get the chance to Autopsy a Well Used Gerotor Oil Pump... some remarkable artifacts in well-worn engines might be seen as was the case described below:

(1) With the removal of the Gerotor Oil Pump from a 2004 GM 4.2L Engine with around 160,000 Miles of Wear and tear... and the disassembly of all the "innards"... the first discovery was that along the very bottom of the Pump to Timing Cover mate-up... one of the Small Torx Fasteners holding the clam-shelled unit together... was only in there "finger tight". If this loose fastener caused enough of a leak in between the surfaces... the Gerotor Oil Pump might lose Oil Pressure consistently when the Engine RPM settles down to a mere Idle.

(2) Once separated, with the Inner flat Gears' surfaces cleaned of Engine Oil and Marked with a Black Magic Marker... the smooth-rounded Gerotor shiny Lobes inside ...were all Pock-Marked with what must have been some kind of Quartz-Hard Grit that got sucked up with the Oil and routed in between them. Hence, those Hard Particles were pulverized under enough extreme pressures to cause minor indentations in those lobes. Without these surfaces being uniform... enough Motor Oil could leech backwards in between them during periods of Engine Idle to lower the Engine Oil Pressure... and then immmediately subside and be unnoticeable at much Higher Levels of RPM.

(3) After removing the Spring-Loaded By-Pass Valve... the same presence of scratch marks caused by being exposed to Grit were in evidence... and what felt like enough play that under the right circumstances... might have allowed the Cup Plunger to 'cant' sideways enough to get stuck occasionally within the tiny bore-port relief channel inside of the pump. If this were happening at higher RPM... once letting off of the Gas Pedal... the Plunger might remain stuck in the Open Position far enough to allow the Compressing Oil to accidentally by-pass back into the Crankcase at lower RPM.

(4) Once removed... the bottom of the Crankcase showed evidence of a remarkable amount of what felt like "Gritty Beach Sand" all pooled together into the bottom recesses of the pan... enough to make me wonder whether the stuff had gained entrance via the Filler Neck on dusty-windy days... or the Original Owner was careless for a time and Lost the Oil Filler Neck Cap. Another possibility might occur if the Dip Stick "O"Ring was lost or was or not sealing deep enough inside of the Tube enough to prevent Sand from getting down inside of the engine.

(5) If you study the Oil Flow Pattern governing the Oil Pick-Up and Filtration System... it Follows a route of moving as Unfiltered--Lightly Strained Oil into the Oil Pick-Up Tube... then into the Bottom of the Gerotor Pump on the Right Side of the Engine... getting pressure and movement from inside of the Gerotor Oil Pump and thence... moving upwards and into the Oil Filter before heading onward first into the Oil Mains Lateral Galleries to feed the Crankshaft Main Bearings.

The Oil also moves further upwards via two vertical Oil Galleries into the Passenger side of the Block with one feeding the CPAS Port and the other feeding the lateral Oil Galleries in both sides of the Engine Head leading directly into the Lifter-Rocker assemblies for both the Intake and Exhaust Valve Train ...lubricating the Lobes and articulating components of both the Intake and Exhaust Camshafts. So even with that simplistic flow... ALL of the Unfiltered Engine Oil DOES indeed have to pass through the Gerotor Oil Pump First... thereby exposing the Guts of the Pump to the possibility of suffering from Sand and Grit Damage over time.
 
Last edited:
  • Like
Reactions: Beacon and Redbeard

EPfiffner

Original poster
Member
Jun 11, 2018
52
Canton, Ohio
This is just some Food for Thought... But... If you ever get the chance to Autopsy a Well Used Gerotor Oil Pump... some remarkable artifacts in well-worn engines might be seen as was the case described below:

(1) With the removal of the Gerotor Oil Pump from a 2004 GM 4.2L Engine with around 160,000 Miles of Wear and tear... and the disassembly of all the "innards"... the first discovery was that along the very bottom of the Pump to Timing Cover mate-up... one of the Small Torx Fasteners holding the clam-shelled unit together... was only in there "finger tight". If this loose fastener caused enough of a leak in between the surfaces... the Gerotor Oil Pump might lose Oil Pressure consistently when the Engine RPM settles down to a mere Idle.

(2) Once separated, with the Inner flat Gears' surfaces cleaned of Engine Oil and Marked with a Black Magic Marker... the smooth-rounded Gerotor shiny Lobes inside ...were all Pock-Marked with what must have been some kind of Quartz-Hard Grit that got sucked up with the Oil and routed in between them. Hence, those Hard Particles were pulverized under enough extreme pressures to cause minor indentations in those lobes. Without these surfaces being uniform... enough Motor Oil could leech backwards in between them during periods of Engine Idle to lower the Engine Oil Pressure... and then immmediately subside and be unnoticeable at much Higher Levels of RPM.

(3) After removing the Spring-Loaded By-Pass Valve... the same presence of scratch marks caused by being exposed to Grit were in evidence... and what felt like enough play that under the right circumstances... might have allowed the Cup Plunger to 'cant' sideways enough to get stuck occasionally within the tiny bore-port relief channel inside of the pump. If this were happening at higher RPM... once letting off of the Gas Pedal... the Plunger might remain stuck in the Open Position far enough to allow the Compressing Oil to accidentally by-pass back into the Crankcase at lower RPM.

(4) Once removed... the bottom of the Crankcase showed evidence of a remarkable amount of what felt like "Gritty Beach Sand" all pooled together into the bottom recesses of the pan... enough to make me wonder whether the stuff had gained entrance via the Filler Neck on dusty-windy days... or the Original Owner was careless for a time and Lost the Oil Filler Neck Cap. Another possibility might occur if the Dip Stick "O"Ring was lost or was or not sealing deep enough inside of the Tube enough to prevent Sand from getting down inside of the engine.

(5) If you study the Oil Flow Pattern governing the Oil Pick-Up and Filtration System... it Follows a route of moving as Unfiltered--Lightly Strained Oil into the Oil Pick-Up Tube... then into the Bottom of the Gerotor Pump on the Right Side of the Engine... getting pressure and movement from inside of the Gerotor Oil Pump and thence... moving upwards and into the Oil Filter before heading onward first into the Oil Mains Lateral Galleries to feed the Crankshaft Main Bearings.

The Oil also moves further upwards via two vertical Oil Galleries into the Passenger side of the Block with one feeding the CPAS Port and the other feeding the lateral Oil Galleries in both sides of the Engine Head leading directly into the Lifter-Rocker assemblies for both the Intake and Exhaust Valve Train ...lubricating the Lobes and articulating components of both the Intake and Exhaust Camshafts. So even with that simplistic flow... ALL of the Unfiltered Engine Oil DOES indeed have to pass through the Gerotor Oil Pump First... thereby exposing the Guts of the Pump to the possibility of suffering from Sand and Grit Damage over time.

That's a great description of the oiling system. I guess even on a SBC or my 4.3 S10 Blazer the oil passing through the pump is unfiltered now that I think about it.

I'm sure my dumping of random chemicals in to the cylinders hasn't helped, lol. Actually it would be the stuff that the chemicals broke free passing through the pump.

Still, the truck runs better than it did when we got it 6 months ago so this saga has been somewhat successful.

At this point I'm going to maintain it and drive as-is.
We just hit 100k so I'm changing the trans fluid and filter today with dexron VI. I did the AutoTrac II last weekend during the toxic cocktail adventure.
 
  • Like
Reactions: Mooseman

EPfiffner

Original poster
Member
Jun 11, 2018
52
Canton, Ohio
Well I'm bringing this thread back from the dead, but until now there hadn't been much to report.

I'm glad I tried everything I could to resurrect this poor Atlas, but she ain't gettin' no better.

We are at 102k now, still runs very well considering. Still burning oil like crazy, and still zero oil pressure at warm idle.

The only thing that had changed is a P0420. Who would think that burning a quart every 500mi would kill a converter?

So it became decision time. Our home life changed a bit recently, my wife and I both work full time.

We decided to give the TB another lease on life.
We found a nice used engine with 116k. I feel like my man card should be pulled, but I'm having a shop do the work.

I like working on cars, but with no lift, it's just too much. Plus I have an in-process restoration going, and I would rather continue on that during my free time.

So it goes in Weds for the engine swap, and "while we're in there", p/s lines, cat converter, and full exhaust.

The shop let me get my own parts from RA, so I did Delco on the p/s lines, and Walker for the cat and exhaust.

Definitely a gamble with a JY engine. I would have liked to rebuild it as @m.mcmillen did, but with big time blowby AND no oil pressure, I think this is the best option for me.

I'm really excited to see how a healthy Atlas runs, we really like the truck, it's so smooth and powerful even with the broken engine.

$1200 labor, $600 from RA, and $850 for the engine: so way more money than I should put in to this thing, but hey? We are all nuts here or we wouldn't be on this forum, right?
 

gmcman

Member
Dec 12, 2011
4,656
I was away from the site for awhile and missed a lot of threads.

Even though the oil filter housing has a bypass valve, have you by chance been changing your oil filters frequently as they may be plugging up with all the cleaning?

I saw your large breather tube but didn't see how it was all tied together. The large port on the valve cover feeds filtered air to the crankcase from the air filter, then drawn out through the intake from the crankcase.

I had a catch can for awhile, and had an issue with the can but caused alot of issues.

With the engine running, plug the large port on the top of the valve cover for about 15 seconds. Release the plug, or whatever you used to block the flow, and see if there is a large vacuum pulling into the cover...will end with a whistle.

If you dont have any vacuum, then the restriction is likely at the port under the intake at the crankcase.

This needs to flow vacuum, and was the cause of my current issues with some carbon buildup or whatever got into my ring packs.

If you are cleaning the engine, I suggest frequent oil changes. Get some synthetic 5W-30 and keep changing when the oil starts to get dark, most importantly the oil filter.

Not sure if this will help, but these platform are mostly easy to work on and are great to drive.

After reading how many new vehicles need a scan tool just to change brake pads....I'm going to keep my Envoy as long as possible...lol.
 
  • Like
Reactions: mrrsm

gmcman

Member
Dec 12, 2011
4,656
I was also going to try the Husky catch can but didnt like the idea of that stone-style filter and looked like it could easily get clogged....not 100% on that but only after an observation.

I would suggest at this point in your journey, to temporarily go back to the stock PCV system....just the factory molded hose so you can vacate as much oil vapor as possible from the crankcase.

Also, get some new oil filters and see what happens to the oil pressure.

You may also have a restricted oil pick up tube screen.

If that were mine, IMO, the easiest and likely the only safe fix for this, others please chime in if not a good idea....is to drain the oil, pour a couple cans of Berrymans B12 into the dipstick tube and soak the screen for a few days. This will keep the B12 in the sump only...and for the love of pete...DON'T CRANK THE ENGINE with the B12 in there...disconnect the neg cable and leave a note on the steering wheel.

Pouring into the dipstick tube will keep it away from any seals. I would recommend this method if you keep having oil pressure issues and new filters won't fix it.

Edited to add: A small funnel with a fuel hose attached, and place the hose over the dipstick tube should allow for easy application of the B12.
 
Last edited:

gmcman

Member
Dec 12, 2011
4,656
Another thing you can try first, take an inspection camera up into the drain plug and try to get an image of the pick up screen.

I have one of these and it works quite well.


DEPSTECH 1200P Semi-rigid Wireless Endoscope, 2.0 MP HD WiFi Borescope Inspection Camera,16 inch Focal Distance & 2200mAh Battery Snake Camera for Android & IOS Smartphone Tablet - Black 33FT https://www.amazon.com/dp/B0785H3XR7/?tag=gmtnation-20
 

EPfiffner

Original poster
Member
Jun 11, 2018
52
Canton, Ohio
Another thing you can try first, take an inspection camera up into the drain plug and try to get an image of the pick up screen.

I have one of these and it works quite well.


DEPSTECH 1200P Semi-rigid Wireless Endoscope, 2.0 MP HD WiFi Borescope Inspection Camera,16 inch Focal Distance & 2200mAh Battery Snake Camera for Android & IOS Smartphone Tablet - Black 33FT https://www.amazon.com/dp/B0785H3XR7/?tag=gmtnation-20

Hey @gmcman, thanks for all of the ideas. I like that borescope, I need it!

I have tried your idea of soaking the pickup screen by filling through the dipstick tube.

Instead of using B12, I used a mixture of Diesel Fuel and ATF. (I read that B12 isn't what it used to be due to VOC requirements).

I rattled the oil pan periodically during the soak with an air hammer to shake things loose.

The problems with this engine are twofold: 1) oil pressure and 2) blowby/oil consumption

There's a lot to read in this thread, but IMO it has been isolated to bad rings. I did a leakdown test, several cylinders leaked down through the crankcase.

Someone suckered me on it used, the tailpipe is oily I just completely missed it I was so concerned with finding one with a clean body.

This is all good info though and if someone has a similar problem it's worth a shot!

I will return the crankcase ventilation to stock once the donor engine is installed.
 

gmcman

Member
Dec 12, 2011
4,656
I guess I was hanging on the hopes the rings might have been caked and not fully sealing, and that they could have been cleaned up enough to seal again.

That's quite a bit of oil on the plug so I don't think you're going in the wrong direction. However....I want to say that the pressure you used seems a bit low for the leak down test. I thought around 60 PSI was more widely accepted, and up to 80 is not uncommon.

Also, was your leak down test done at TDC? Reason I ask is if the piston is down in the bore, the tapered piston may leak more at BDC.

I'm very curious if you have vacuum at the large valve cover port....just final checks before the towel is thrown in.

Only tossing these out in case you may have overlooked anything.
 

EPfiffner

Original poster
Member
Jun 11, 2018
52
Canton, Ohio
I guess I was hanging on the hopes the rings might have been caked and not fully sealing, and that they could have been cleaned up enough to seal again.

That's quite a bit of oil on the plug so I don't think you're going in the wrong direction. However....I want to say that the pressure you used seems a bit low for the leak down test. I thought around 60 PSI was more widely accepted, and up to 80 is not uncommon.

Also, was your leak down test done at TDC? Reason I ask is if the piston is down in the bore, the tapered piston may leak more at BDC.

I'm very curious if you have vacuum at the large valve cover port....just final checks before the towel is thrown in.

Only tossing these out in case you may have overlooked anything.

That's all good stuff, man.
The nipple on the valve cover had good vacuum at the beginning of this saga. I had checked it early on, and then also as I added the catch can.

I haven't checked it lately, but symptoms have not gotten better or worse.
We've only put about 7k miles on it since we bought it.

As for the leakdown: I used a remote starter button, and with the hose for the leakdown tool screwed in to the plug hole, felt for compression with my finger as I bumped it over.
I then set a long screwdriver on the piston top and turned the crank by hand until it reached max travel.

I'm sure there's fancy tools etc to make it easier, but..

I think you are right about the 60psi. My problem with that is I don't know how you would keep the crank from turning! Even with 30psi it really fights against the ratchet.

I think if it were to have tested ok at 30psi and we still had symptoms, we would have investigated leakdown further.
I figured if it leaks down quickly at 30psi, it will at 60 as well (?)

I hate to throw in the towel too, but someone must have really trashed this poor thing for it to burn a quart every 350mi. And now remember, even if we were to cure the oil burning, we still have the zero oil pressure at hot idle.

I cleaned 'er up yesterday, looking pretty sharp I'd say!
IMG_20190519_061800990.jpg
 
  • Like
Reactions: mrrsm

EPfiffner

Original poster
Member
Jun 11, 2018
52
Canton, Ohio
Back from the shop finally!!
It took them a month, but the brand-new used engine is installed and well, from a quick listen.
They pulled the valve cover, checked it for sludge.
They put the starter on it and did a compression test on the stand.
They swapped exhaust manifolds because ours looked better, and they repaired three broken exhaust manifold bolts.
They replaced the pressure and return P/S lines with delco's I got from RA.
They installed a complete new walker exhaust, cat and everything, also from RA.

They put a new water pump and tstat/housing on also before they dropped it in.

I'm excited to drive it! The wife said it ran nice on the way home from the shop, she said it has quite a bit more power.

So $1190 labor and the parts he added, I gave him $1600 and told him to put the extra toward lunch for his techs.

Now we just need to prove that the title of this thread doesn't need to be "baked on oil..." Anymore!
 

Attachments

  • IMG_20190618_061341499.jpg
    IMG_20190618_061341499.jpg
    251.2 KB · Views: 9

EPfiffner

Original poster
Member
Jun 11, 2018
52
Canton, Ohio
Back to the shop again tonight for a power steering leak. This will be the 2nd time, so hopefully they can get it.

I had the driver's side wheel off, it looks like the return line where it goes in to the rack is a little bit crooked.

I had them install ac Delco lines with the OE design cup/hat seals, it looks like a real PITA so I'm glad I don't have to mess with it!

The junkyard engine runs really well. It's kind of noisy cold, piston slap or valvetrain, but it seems like that's kind of the norm for the Atlas from reading here.

We have only put probably 500 miles on it so far, but no oil adding needed yet. That's already an improvement!
 
  • Like
Reactions: mrrsm

NJTB

Member
Aug 27, 2012
612
Flemington, NJ
I'm really glad you got this sorted out. Followed this thread since you started posting, and FWIW, I felt your pain. Best of luck going forward.
 

EPfiffner

Original poster
Member
Jun 11, 2018
52
Canton, Ohio
I'm really glad you got this sorted out. Followed this thread since you started posting, and FWIW, I felt your pain. Best of luck going forward.

Thank you! So far so good, hopefully they got the rack seals right this time, I know those are a bear.
It sure is a nice truck, we were out around town yesterday with the ice cold a/c and the nice-sounding factory Bose rockin'.
 

Forum Statistics

Threads
23,332
Posts
638,008
Members
18,537
Latest member
moscoreli

Members Online