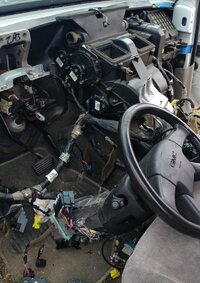
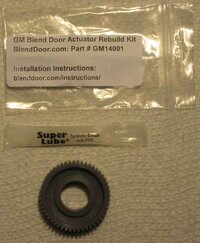
2002 Envoy Mode Door Actuator Replacement

garciarf

Member
Dec 3, 2011
17
Sparky said:
If you opened the actuator itself I have no idea how to realign it internally (or if that actually matters or not).

If you look at the actuator it can only go on the door one way. There is the splined part, true, but it has a flat-sided section that cannot go on the door any other way. Really can't mess that part up without forcing it really hard and breaking a bunch of plastic :tongue:

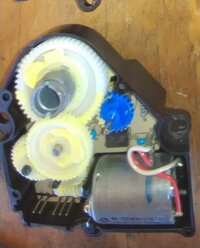
It does matter, since there is a potentiometer used to know the position of the actuator.

There's more info on that here, including some pretty pictures.

http://gmtnation.com/f23/successful-re-index-mode-actuator-cheap-actuator-fix-3492/
 

dcbenvoy

Member
Jan 28, 2012
51
Wow that is awesome. You guys sure like a challenge. Its a long cold winter and my garage is heated. I'm going to have to give it a try.

Thanks, I'll report back.
 

DILIGAS

Member
Mar 11, 2014
3
I just replaced three of the four actuators for HVAC mode blend actuator. I replaced left side (driver) Dorman 604-111, right side (passenger) Dorman 604-106. these two control the flaps for air distribution. Also, Doorman 604-115 Main this is the bugger up under the dash on drivers side that is hard to get to, hard to remove and the idiot that does all the clicking cause it has gummed up its gears. There is a fourth actuator just above this one that controls the fresh air, which I did not replace cause it was working fine. I could not have completed this job without this website which is my reason for writing cause there is a lot of fear and misunderstanding of terms being used. Basically, all the same and I wont go into process cause the ones on the first page pretty much nailed it!, except: I removed the dash completely, this I strongly advise as it takes just a bit over two hours and everything is plug and play.

I took pictures of each step of connections in the event my 66 year old brain forgot. You can get really good insights on process just like you did here by typing in the question. I also found a different thread where to remove the actuator you needed a $160 puller. that's B.S., go to home depot and purchase an anchor shackle 5/8 and go to their specialty drawers and get a socket type 8mm bolt 1.25X30 screw to replace the one in the shackle this has an allen wrench head which makes it easier to turn. Once you see the shackle you will realize it has to be spread apart to fit over the actuator and you have to cut off half the non-threaded part so that it will fit up against the cam on the inside.

Once you have it positioned just turn the bolt much like a gear puller and the sucker pops right off. This was easy for the left and right but the main actuator has no room which is reason for removing the dash, so much easier. This is like how you have to remove link in a chain nowadays since we do not have master links any more.

Now, how to turn the new actuator so that the line match up to old one. get a large beveled screwdriver and insert it in the cam so that it is wedged, use slight but constant turning pressure clockwise and slow, you should now hear the gears turning, go slow as you do not want to go past the mark. Install the actuator using old screws and 7/32 socket where you can get it to fit. On the main actuator this was difficult as there is just not enough room for the socket wrench. Get yourself a 7/32 open end wrench or 5.5 mm and good luck with that. I used pointed nose pliers as I used a tank of gas trying to find one. Again, follow directions on pulling the fuse, yep you have to go to the book that came with the car to find location.

Once all is installed, I connected the temp control module back up, replaced the fuse, reconnected the electrical to the shift lever, if you don't you will not be able to turn car off. I then turned the ignition switch to on so that the temp control module came on and ran thru all modes for air, heat, and air conditioning to insure all was well before I put it all back together.

I am retired and have three vehicles so pressure of completing the job to go to work was not an issue. just think, all this fun cause we had to replace our battery. Hope this helps as this site was best I found for us who believe the GMC dealerships are worse than our politicians.
 

The_Roadie

Lifetime VIP Donor
Member
Nov 19, 2011
9,957
Portland, OR
DILIGAS said:
...Hope this helps as this site was best I found for us ...
Welcome! Best FIRST POST EVER!!! :thumbsup:
 

mrjean

Member
Jul 15, 2012
110
DILIGAS said:
I just replaced three of the four actuators for HVAC mode blend actuator. I replaced left side (driver) Dorman 604-111, right side (passenger) Dorman 604-106. these two control the flaps for air distribution. Also, Doorman 604-115 Main this is the bugger up under the dash on drivers side that is hard to get to, hard to remove and the idiot that does all the clicking cause it has gummed up its gears. There is a fourth actuator just above this one that controls the fresh air, which I did not replace cause it was working fine. I could not have completed this job without this website which is my reason for writing cause there is a lot of fear and misunderstanding of terms being used. Basically, all the same and I wont go into process cause the ones on the first page pretty much nailed it!, except: I removed the dash completely, this I strongly advise as it takes just a bit over two hours and everything is plug and play.

I took pictures of each step of connections in the event my 66 year old brain forgot. You can get really good insights on process just like you did here by typing in the question. I also found a different thread where to remove the actuator you needed a $160 puller. that's B.S., go to home depot and purchase an anchor shackle 5/8 and go to their specialty drawers and get a socket type 8mm bolt 1.25X30 screw to replace the one in the shackle this has an allen wrench head which makes it easier to turn. Once you see the shackle you will realize it has to be spread apart to fit over the actuator and you have to cut off half the non-threaded part so that it will fit up against the cam on the inside.

Once you have it positioned just turn the bolt much like a gear puller and the sucker pops right off. This was easy for the left and right but the main actuator has no room which is reason for removing the dash, so much easier. This is like how you have to remove link in a chain nowadays since we do not have master links any more.

Now, how to turn the new actuator so that the line match up to old one. get a large beveled screwdriver and insert it in the cam so that it is wedged, use slight but constant turning pressure clockwise and slow, you should now hear the gears turning, go slow as you do not want to go past the mark. Install the actuator using old screws and 7/32 socket where you can get it to fit. On the main actuator this was difficult as there is just not enough room for the socket wrench. Get yourself a 7/32 open end wrench or 5.5 mm and good luck with that. I used pointed nose pliers as I used a tank of gas trying to find one. Again, follow directions on pulling the fuse, yep you have to go to the book that came with the car to find location.

Once all is installed, I connected the temp control module back up, replaced the fuse, reconnected the electrical to the shift lever, if you don't you will not be able to turn car off. I then turned the ignition switch to on so that the temp control module came on and ran thru all modes for air, heat, and air conditioning to insure all was well before I put it all back together.

I am retired and have three vehicles so pressure of completing the job to go to work was not an issue. just think, all this fun cause we had to replace our battery. Hope this helps as this site was best I found for us who believe the GMC dealerships are worse than our politicians.

wow, this is fantastic to hear. i have dreaded replacing mine. i know for a fact i need to change my mode and defrost actuators but have not done them yet. i have a 2002 trailblazer xlt. i have no idea how to tackle this. i am a picture guy and wont do it without it. which number actuators did you grab?
 

mrjean

Member
Jul 15, 2012
110
not sure if its because i have an 2002 but my mode and defrost actuator were on the opposite side. the side my driver side door is on. and the dumb shaft where the mode actuator goes on broke off.
 

DILIGAS

Member
Mar 11, 2014
3
Yes there are three actuators on the driver side. 1. left side for the temperature control for driver. 2. just above and behind #1 is the air distribution for both sides foot, both and face. 3. located up and behind #2 and this controls the defrost. If you broke off the cam for the flap door it will have to be replaced. If you did not take the time to remove the dash, then you need to do this as you can see the flap door and actuator in operation. You should also remove the vent direction at the top and access will be a breeze to the flap door. If you have a pick a part wrecking yard that would be the cheapest. Hope this helps.
 

DILIGAS

Member
Mar 11, 2014
3
That I do not know as I have not had reason to research. I would contact GM parts for name and possibly picture which would identify name and GM part number. They are really good about sending fax or e-mail at no charge. As when dealing with GM they want you to buy the car for the $3 replacement part. Sorry I could not help.
 

mparker

Member
Sep 24, 2018
8
Royse City, TX
old thread I know but I have to ask. Why are there different part numbers for the 5 actuators? They all look exactly identical in design and internal parts. Zero difference. Just wondering because I have a broken gear in my Vent/Floor actuator (the one that requires removal of the entire dashboard to get to) and I have a spare Heat Actuator and they look identical. Is there difference in the Onboard Chip programming for the actuator?
 

Mooseman

Moderator
Dec 4, 2011
26,027
Ottawa, ON
I think it's an orientation on each side and the sweep it does. I know for sure the recirculation actuator is totally different in that it has no position sensor because it just opens and closes, no in between.
 

John in RI

Member
Oct 17, 2018
10
Greene, RI
Ya' there are a few different part numbers used in each truck and there is more than 1 part number that will work for each 'type' of actuator. PN might be year or model specific,.. not sure. My 04 ( manual HVAC ) and 05 ( auto HVAC) both used the same PN's for all actuators. Well,.... for each of the 4 of them I replaced on the 05 a couple weeks ago. The recirculate actuator is the only actuator with 3 pins on the connector port; all other actuators have 5 pins.

* DEFROST and DRIVER TEMP use the same PN actuator.

Actuator #'s
Driver Temp = 52402611
Defrost = 52402611
Vent/Floor = 52402610
Pass Temp = 52402612
Recirculate = 52402613

TBHVAC1.JPG


This pic shows a replacement actuator that I installed in my 04 way-back-when,... don't know what parts truck I pulled it from in the junkyard back then, but that part number worked fine for the pass temp too.

TBHVAC2.JPG


The Recirculate actuator is ridiculously hard to access; complete removal of the dash housing ( & than some ) seems to be the only option.

TBHVAC3.JPG


TBHVAC4.JPG


:cool:
 
  • Like
Reactions: mparker

John in RI

Member
Oct 17, 2018
10
Greene, RI
Just wondering because I have a broken gear in my Vent/Floor actuator (the one that requires removal of the entire dashboard to get to)

When I replaced my VENT/FLOOR I didn't have to remove the whole dash - that's only required for the recirculate actuator. ( I took the pics above from a wrecked truck as I 'gutted' the interior. ) I do recall that different dash brackets were used on different trucks,... might have been due to adjustable pedals, manual vs automatic HVAC, year to year changes, or some other difference. I've seen some people remove very few parts to replace the actuators on the drivers side, but I personally trimmed a few pieces from the drivers side dash housing and removed the pedal, air duct and metal dash bracket because I was working with a large pile of actuators at the time and more space = quicker testing time for all of those things. Trimming the dash housing made it easier to remove the metal dash bracket........ and gave me a LOT of room to work.

FYI: When you pull the VENT/FLOOR actuator off the HVAC box Lever, the internal flap will rotate to the FLOOR position. It should move very easily thru it's full range, if not,... you might have a blockage inside the HVAC box. IMO it's best to install the white plastic actuator arm on the HVAC box lever FIRST,... then install the actuator onto the white plastic actuator arm and then turn the actuator into proper position for mounting. At first I tried to position the actuator with arm onto the HVAC box's lever, but I found it difficult to get them positioned correctly without the actuator arm falling off the lever.

:cool:
 
  • Like
Reactions: mparker

Mooseman

Moderator
Dec 4, 2011
26,027
Ottawa, ON

mparker

Member
Sep 24, 2018
8
Royse City, TX
Well I have already removed the entire dashboard and the internal steel structure, steering wheel, etc etc. Have plenty of room to move around in there now. LOL Took me about 5 hours to figure it out. This is my first TrailVoy so I'm learning as I go. Picked her up for $500 as a project car.
I will be visiting the junk yard some time over the next week to search for good Main Gears for these Actuators. That appears to be the primary part that fails in these things. If I have success I will essentially rebuild and test them with new gears. I may get a wild hair (since I have it all ripped apart) and test different actuators in different locations to see if they are cross compatible. Sure would be easier if they were all the same and just got calibrated in their new location. Figure I might as well test it and let the group know. Give me about a week to post the results. After that it's hunting season. :smile:
 

mparker

Member
Sep 24, 2018
8
Royse City, TX
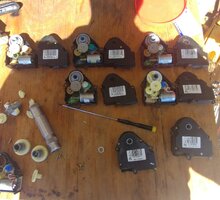
Thanks for that! I too came to the same determination before I saw your post. I removed 5 from the junk yard, opened them up and carefully centered the main gear by removing the connecting gear to see how they all lined up and it's exactly as your picture.20181023_133058 (2).jpg20181023_133136 (2).jpg

I am still testing Actuators in different locations. So far I am still having issues with the controls working properly and controlling the vents properly. I put an "R" Actuator in the "HL" position and used my buddies Snap-On scanner and recalibrated the system. It actually worked. The R actuator is normally placed on the Passenger side and controls the passenger side Heat. I put it in the HL position which controls the Front Vent/Floor mode. It calibrated and worked for a few minutes. Then I shut the car off and turned it back on and none of the actuators worked properly. I thought maybe it's the actual Manual Control module. I tried two different ones with similar results. Plus my Recirculation Actuator isn't working at all. So I put an R actuator there, it calibrated using only 3 of the 5 pins (that original actuator is the 3 pin model) to my surprise the R actuator calibrated in recirculation position and everything worked for a minute or two then all stopped responding. So I am still troubleshooting why the system will work after first calibration but fails after subsequent calibrations. Very odd behavior still troubleshooting.
NOTE: Back A/C Actuators are all disconnected. I am only testing the front actuators with the dash removed. Wondering if the entire system (front and rear) has to be hooked up to calibrate properly or having only the front system connected is enough. I may have another electrical issue somewhere. It's possible I am confusing the system since not every little plug and sensor is plugged back in. Not sure how picky these systems are yet.

So far it looks like the actuators are labeled as follows
S = Defrost
HL or HT = Vent/Floor Mode
Green R = Right/Passenger Temp
Black R or S = Left/Drivers Temp
Z = Recirculation (3 pin)

Not sure if these letters correspond with all models/years just what I am seeing in the 02, 03 and 04 models so far. Those happen to be the years I pulled them out of. Envoy and Trailblazer.

EDIT: I do realize that they also may be position sensitive and that the Actuators may not actually work in different locations. This may be why I am getting odd behavior after calibration. I am going to put them all in the proper position and test again. Just providing input and testing that may or may not help others.
 
Last edited:
  • Like
Reactions: Mooseman

Sparky

Member
Dec 4, 2011
12,927
My thought is there has to be differences, because from a manufacturing standpoint if they could use the exact same part for all locations it would be the most cost effective to do so. (Although, at the same time, how hard would it be to design it so you COULD use the same actuators...)
 

mparker

Member
Sep 24, 2018
8
Royse City, TX
Well Sparky you are correct! But I still had to try for my only personal satisfaction. I got all the right ones in the right place, calibrated the system. Verified every variation worked on the HVAC. Then i decided to switch them all around. Zip, Nada, No Joy! Calibrated the system using the snap on scanner and used the fuse pull method. They definitely are not swappable. There has to be some base level programming in the small onboard chips. So even though the guts looks exactly the same they are programmed for certain positions. I am certain if i had searched the forums some other member likely posted similar tests. I just had to know for myself and wanted to share my results.
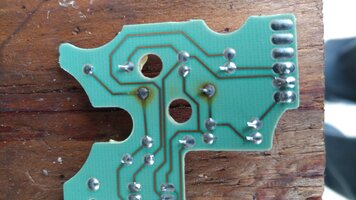
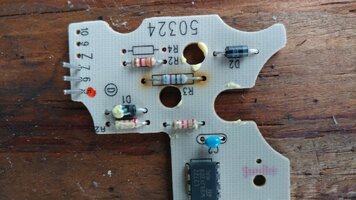
I was able to repair the recirculation actuator though. It was not working so i took it apart. Low and Behold R3 solder joints failed. So I broke out the trusty soldering iron and flipped the board over and rsoldered it. Bam, working great. Now maybe I can put the beast back together before hunting/rifle season starts.20181025_112053.jpg

20181025_112101.jpg
20181025_132901_HDR (2).jpg
 
Last edited:

John in RI

Member
Oct 17, 2018
10
Greene, RI
I had a pretty good laugh to/with myself when I saw your pic of the actuators all opened up on your table...... :laugh: Here's my bench a few weeks ago....

TBActuators1.jpg


TBActuators2.jpg


I was determined to get my HVAC system working again before the fall ended and winter kicks in. Worked thru 4-5 sets of these things and got 3-4 HVAC controllers tested while I was in there. Now that the entire dash is working and all the back-lighting functional,... maybe I can FINALLY re-install my dash bezel again !


:cool:
 

mrrsm

Lifetime VIP Donor
Supporting Donor
Member
Oct 22, 2015
8,202
Tampa Bay Area
THIS is a very supportive "How To R&R the 2002 Trailblazer Front Under Dash Hot-Cold Blend Door Actuator" with some NICE coverage by the VOP (Video Original Poster) of his use of a Milwaukee "Fuel" M12 Battery Powered 3/8" Drive Right-Angle Ratchet (I prefer using the 1/4" Drive Version of this Milwaukee "Fuel" M12 Battery Powered Tool):


2002 Trailblazer Rear HVAC Fascia and Panel R&R:


2002 Trailblazer Rear HVAC Blend Door Actuator(s) R&R:


ACDelco BDA Internal Broken Plastic Gear R&R:

 
Last edited:

mrrsm

Lifetime VIP Donor
Supporting Donor
Member
Oct 22, 2015
8,202
Tampa Bay Area
Last edited:

Forum Statistics

Threads
23,681
Posts
641,986
Members
19,140
Latest member
greyviper225

Members Online